By Dustin Simpson
When it comes to resealing your RV’s slide-outs, you’re on the right track. The good news is that you can use any appropriate brand of sealant, regardless of what the manufacturer might suggest. The key is making sure you’re using a high-quality sealant that’s designed for RVs and compatible with your slide-out materials.
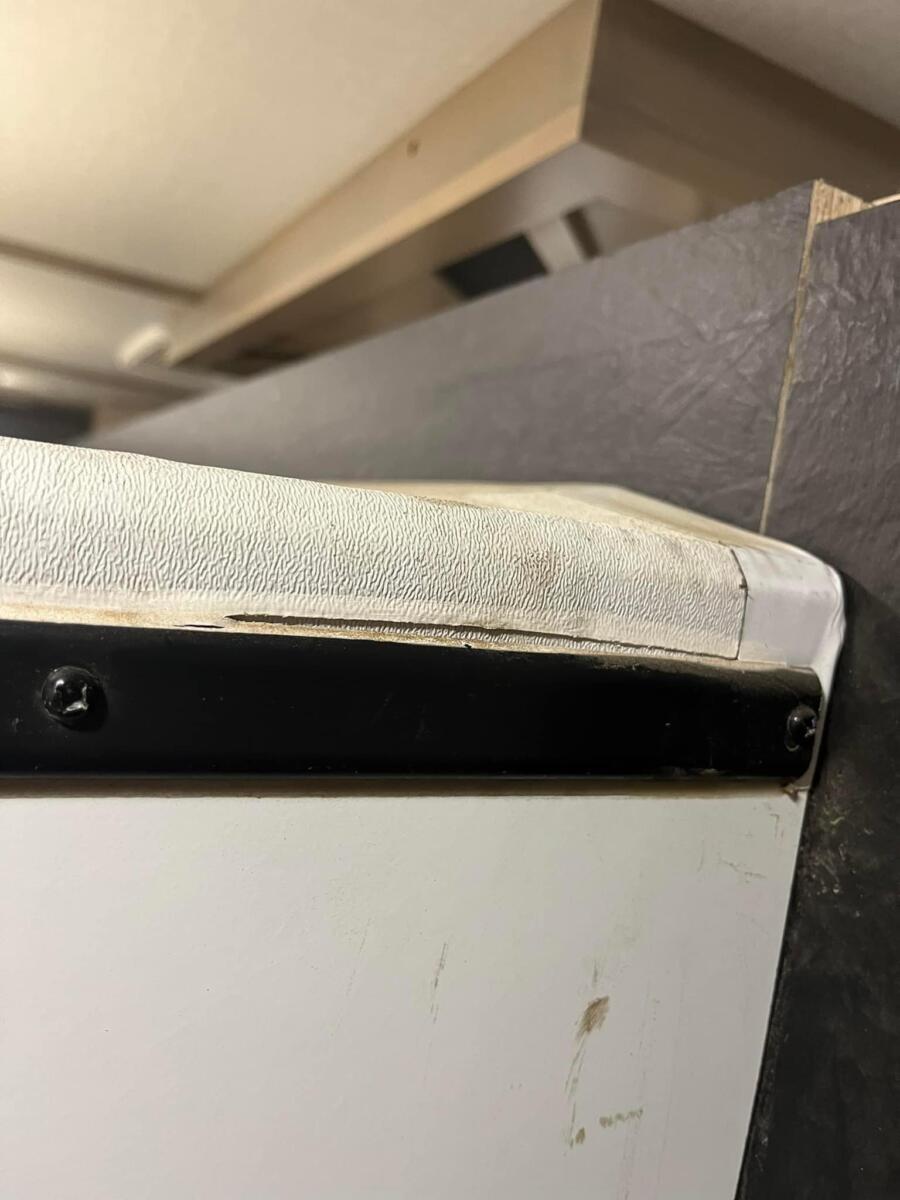
Sealant separation on the exterior side out roof line at beltline molding.
Here’s a step-by-step guide to resealing your slide-out:
1. Gather your supplies
Sealant: A self-leveling RV sealant like Dicor or Alpha Systems works great. Both are popular choices and will get the job done.
Caulking gun: You’ll need this caulking gun to apply the sealant. Tip: Cut the tip very small to apply. A trick I do is pinch the tip to help apply flat between the roof and molding edge.
Utility knife: To remove the old sealant.
Cleaning supplies: Isopropyl alcohol, a rag, and a scraper to clean the surface before applying the new sealant.
Masking tape: Optional, but it helps to create clean lines.
2. Remove the old sealant
Carefully use your utility knife or a scraper to remove the old, cracked, or peeling sealant. Take your time to avoid damaging the surface underneath.
Clean the area thoroughly with isopropyl alcohol to remove any dirt, grime, or leftover residue. A clean surface is crucial for the new sealant to adhere properly.
5. Tighten or replace screws
Make sure to lightly tighten the screws before you reseal and replace any that are damaged. Here are the black replacement screws, and here are the white screws.
4. Apply masking tape (optional)
If you want to keep the lines clean and avoid any excess sealant, apply masking tape along the edges where you’ll be applying the sealant.
5. Apply the new sealant
Load your sealant into the caulking gun and apply a smooth, even bead along the edges of the slide-out. Start at one end and work your way to the other, keeping a steady hand.
6. Smooth the sealant
Use a caulking tool or your finger (wearing a glove) to smooth out the sealant and ensure it fills all gaps. This step helps to create a watertight seal.
7. Remove masking tape (if used):
Carefully remove the masking tape before the sealant dries to avoid pulling up the new sealant with it.
8. Let it cure
Allow the sealant to cure according to the manufacturer’s instructions. This usually takes about 24 hours, but it’s best to check the product label.
9. Inspect your work
Once the sealant has fully cured, inspect your work to make sure there are no missed spots or bubbles.
By following these steps to reseal your RV’s slide-out, you can ensure that your slide-out is properly sealed and protected from the elements, regardless of the brand of sealant you choose. Just remember to do this regularly to keep your RV in top shape!
Hope this helps you reseal your RV’s slide-outs. Happy RVing!
I was recently deeply honored when a friend within the RV industry reached out and asked if I would review the company’s revised website. This surprised me because I thought that the company already had one of the best RV industry websites in the business, so the fact that they were redoing the whole thing was significant.
As someone who does a lot of RV reviews, I spend a lot of time looking at RV company websites. Often, it’s just to see if I can find a specification, but I’m also curious what standard features are included on RVs and other details.
If you don’t know, I used to do this same type of work in the automobile industry. I wrote car reviews for newspapers and my own website. Car company websites, even 15 years ago, were solid representations of their brands’ products and provided a lot of detail. Of course, some were better than others, but even the worst ones were still good.
Then again, car companies have a lot of money. But they also have limitless supplies of great photos for the media, plus b-roll if you’re doing video. The resources are seemingly endless.
When you’re in charge of a business, one of the things you want to control is the messaging around that business. To me, it’s a basic tenet of running any business.
I’m not sure what the heck is going on in Indiana, but almost every RV company’s website is terrible. And you could argue that part of the frustration that so many prospects and buyers have with the RV industry is just the misinformation that’s out there. So you’d think that RV companies would want to control the messaging.
Well, actually, some do. But only a very few.
What would a great RV company website look like?
Every RV company’s website lists its models and most of the specifications of those models. That’s sort of the ground floor, and it is information that is useful.
Within the specifications are the dry weight and dimensions of their rigs, too. Again, helpful and arguably necessary information.
But that’s also where things stop, and that’s unfortunate.
What’s going on? In thinking of Paul Harvey, where’s the rest of the story?
Another thing I’ve noticed is that some websites do work relatively well only on specific computer platforms or browsers. For example, a website I was looking at for a review I am writing works really well on Google Chrome, but I found that out when a lot of the features of that site didn’t work at all on Apple’s Safari browser. Same computer.
As someone who has created a bunch of websites for a bunch of small businesses, one of the basic things you do is get as many different platforms of computer, phone, tablet, and all of that as you possibly can and see if there’s something that doesn’t work somewhere. Or, if something looks bad on certain platforms. For example, a great website on a desktop computer may be almost unreadable on a smartphone.
But, guess where a lot of people are looking at the internet?
I have also heard from a few RV companies that they provide all the information I’m looking for in their print brochures, and that’s where they prioritize information distribution. I knew it was the ‘20s, but I didn’t think it was the 1920s.
Even more opportunity
Some of the other questions I see people seeking answers for are about replacement parts and sealants. There isn’t a day that goes by that I don’t see several people ask what the best type of sealant is for their RV’s roof or where to find a replacement part for something that simply wore out or broke.
Literally every day, I see people asking what’s the best lubrication for their slide mechanism or how to treat their slide seals.
I know the standard answer to this is “go to the selling dealership.” But a lot of those dealerships just don’t have a reference guide for selling parts for RVs that are even a few years old. I know when I was managing warranties and such, people would want to get a replacement bit, and there was frequently little that I could do to help them.
You may share this illustration, uncropped, on your website, blog or social media with our compliments. The musings from Tanner Woods’ creative mind appear every Sunday in this newsletter. Laughter is good.
So what would I put on the perfect RV website?
I would start with extensive images and specific details about anything that might matter.
For example, Brinkley RV makes a huge deal about the AlphaPly roofing system on their products, calling them near-maintenance-free. But I know of another brand of RV that uses the same roofing system and doesn’t say a word about it on their website. In fact, the way I found out about this was by talking up Brinkley’s roof among some friends, and one of those friends worked for the brand that also uses the AlphaPly system and pointed it out.
And it’s a great roofing system! Sell to your advantages. And I bet the RV salespeople would use this to their advantage, too.
I would also have a good number of photographs of each model in my catalog and, ideally, even a walk-through video with details and information. For example, take a look at Alliance RV’s website and notice that they have a video walk-through of almost all their products.
As for maintenance of slide rooms, it would be easy enough to take Lippert’s informative videos and just put them in a blog post about maintaining the RV. Lippert does a good job with videos about their systems, but not many people seem to use them compared to how many people ask about maintaining these systems on the ol’ interwebs.
Interstate commerce laws
Something I don’t know anything about, but that’s never stopped me from blathering on about it, is interstate commerce laws. But I wonder if there are any restrictions against an RV company selling replacement parts on its website? Or at least making a parts resource catalog available that their dealers could take advantage of when ordering replacement parts.
When I was doing warranty work at a dealership a while back, one of the RV companies had a tool where you could click on a region of an RV and then drill down and find parts for that RV based on the serial number. This made ordering replacement parts ridiculously easy, and I wondered why this wasn’t available to owners.
You don’t necessarily have to have prices—perhaps let someone find the parts they need and then work with a local dealership to order those parts.
There is so much opportunity in providing real information to customers. That would create a strong relationship with those customers—at least in my opinion.
Yes, a very few companies actually do this, but I’ve found that the vast majority don’t. And with today’s technology and fewer committees, it would be pretty easy to create a resource that would make customers and prospects really appreciate your brand.
At least, that’s how I see it. Er, um, that’s the rest of the story.
A piece of Elvis Presley history hit the interstate with no air filter, no prior fuel stop, and 1,659 miles ahead. Jimmy’s World had only driven the RV made from Elvis Presley’s jet a few short times, so this trip looked like one giant test drive with Graceland as the destination.
The trip was hot, funny, stressful, and strangely successful. The Elvis Jet made it to Memphis, got asked to leave Graceland again, and still kept rolling toward Oshkosh.
Join the trip in the video at the end of this post.
The first highway run started with nerves
Before the first real highway push, the crew found a trashed air filter buried under parts, then realized it was Sunday, and most stores were closed. The plan became simple: Get it onto I-4, reach a truck stop 10 miles away, add fuel for the first time, and hope nothing leaked.
Grizzly packed like a man expecting the end of the world, with a sleeping bag and his beloved “wooby,” while Jimmy admitted he was nervous. The RV had only gone about 8 miles at 40 mph before this, and it had touched 65 mph once for about three seconds. Then came “clear prop,” warning lights on the dash, and the first merge into traffic. Cars immediately honked, slowed down, and filmed it like a parade float with wings.
Fuel, fans, and the first wave of problems
The first fuel stop was a win. The Elvis Jet took 62 gallons, the custom filler neck did not dump fuel on the ground, and the receipt landed at $88.34 after a fan and snacks (that’s changed now). The fan helped with the heat, although it also sat in a spot that did not help visibility much.
Soon after, the trip turned into an electrical hunt. Flashers, turn signals, a high beam, brake lights, and later, a flickering headlight switch all caused trouble. Rain showed up, but the wipers needed airplane power, so Rain-X had to do the job.
At another stop, the crew checked mileage and got 11.3 mpg over 382 miles, better than expected for something that looked like a private jet and drove like a bus.
Nashville grades exposed what this thing really was
By day three, the route to Nashville meant hills, heat, and one missing piece the team wanted badly, the exhaust brake switch. They could not find it after the earlier teardown, so the plan became manual downshifts, light brake use, and a lot of hope.
A scale ticket gave one of the best clues about why the jet felt odd at speed. It weighed 22,000 pounds, with 9,000 on the front axle and 13,000 on the drive axle. That matched the old motorhome’s empty weight almost perfectly. On a 5 percent downhill grade, the crew managed speed with gears instead of panic, and a trooper in the rain still did not pull them over.
Graceland finally happened, then ended fast
The Elvis Jet made it into Graceland’s parking area, paid the oversized fee, and got a warm reaction at first. Staff liked that people could walk up to this jet, touch it, and look inside, unlike the covered aircraft nearby. Then one older man told them to move it, so visit number two ended much like visit number one.
After Memphis, the RV life part got louder. Fresh water vanished, gray water readings made no sense, a sink backed up, lights went out, and one fuse had melted completely. The good news was that several of the worst issues came down to blown fuses, so brake lights, turn signals, and hazards came back.
Jimmy also said the employee who welcomed them at Graceland lost her job, and he tried to help her find work. The trip still rolled through a Bass Pro car show and all the way to Oshkosh, without a single traffic stop.
The road trip worked because it stayed weird
This run was never clean or smooth. It was hot, loud, under-tested, and full of roadside fixes, yet the Elvis Jet still made the trip it set out to make.
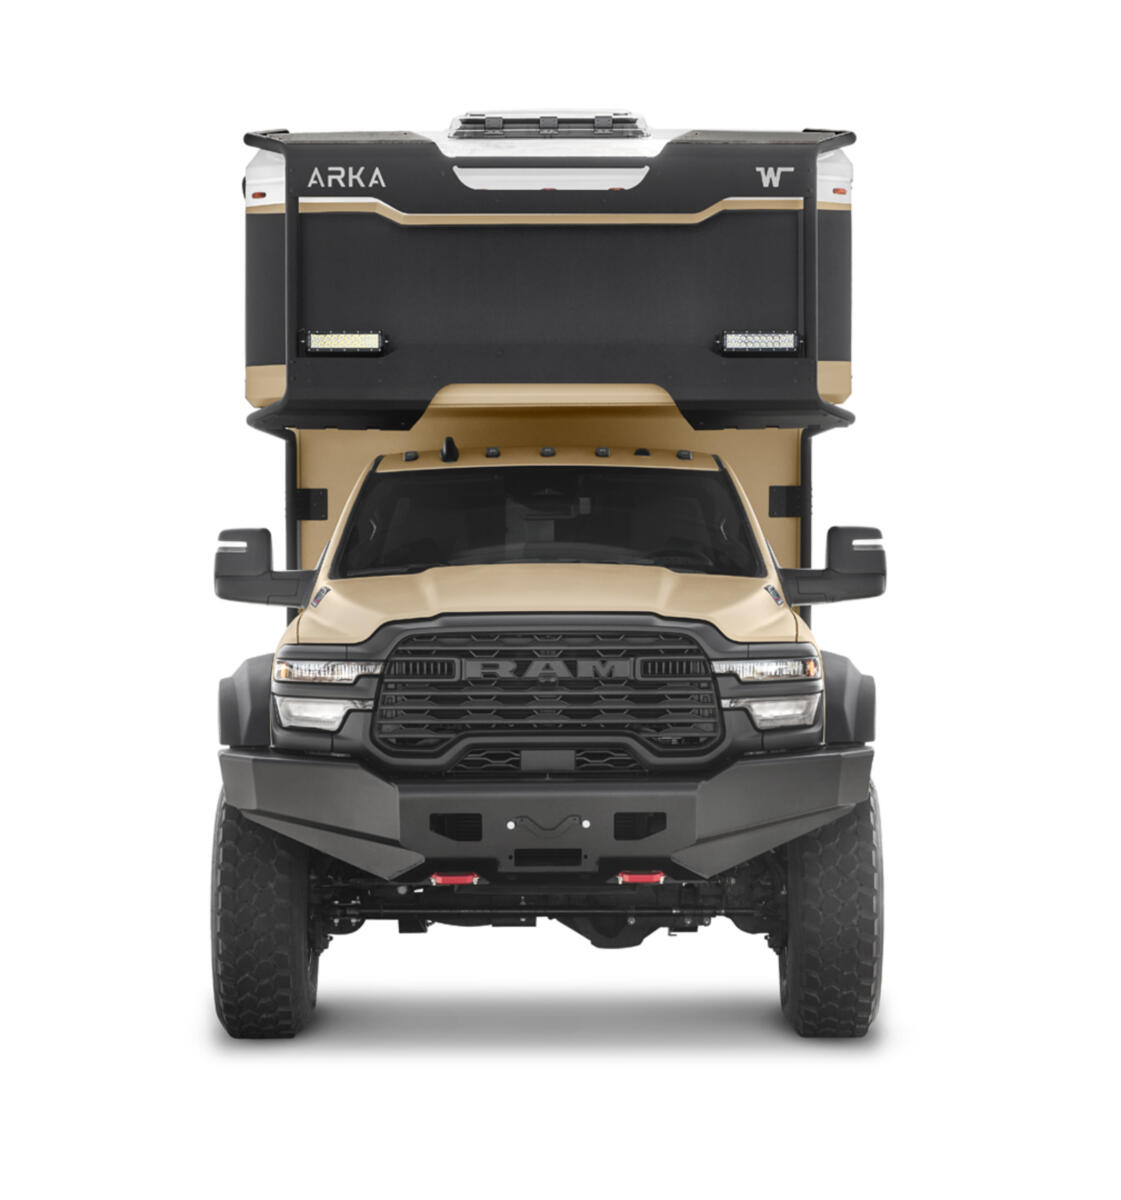
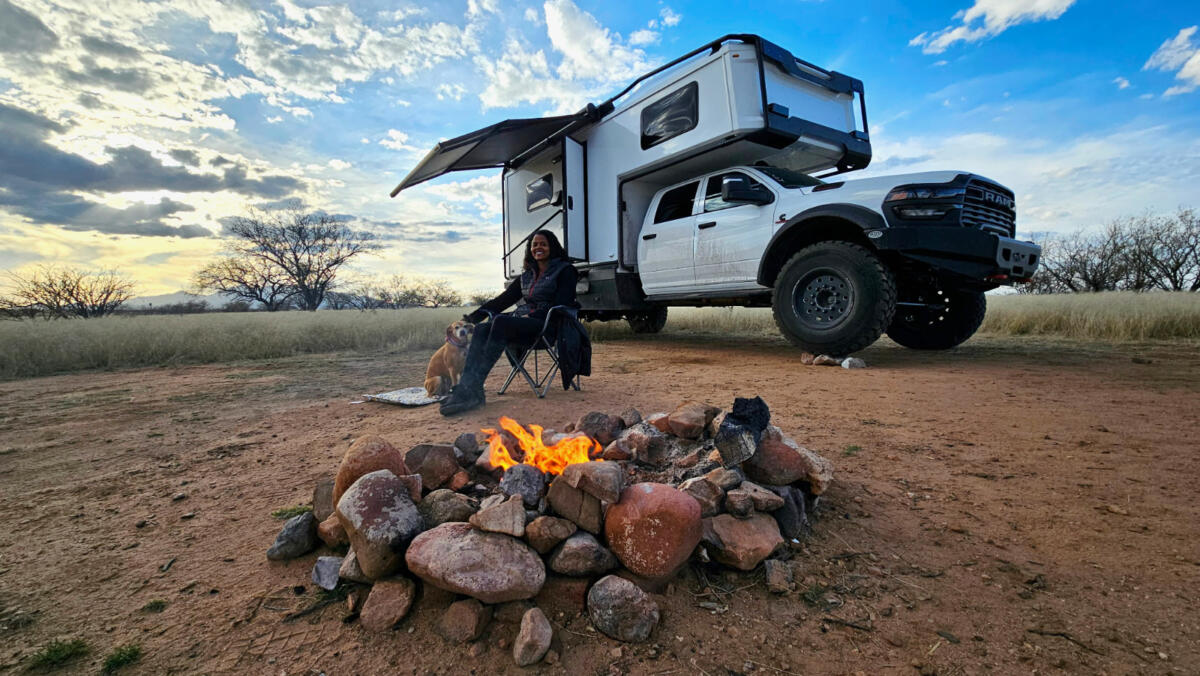
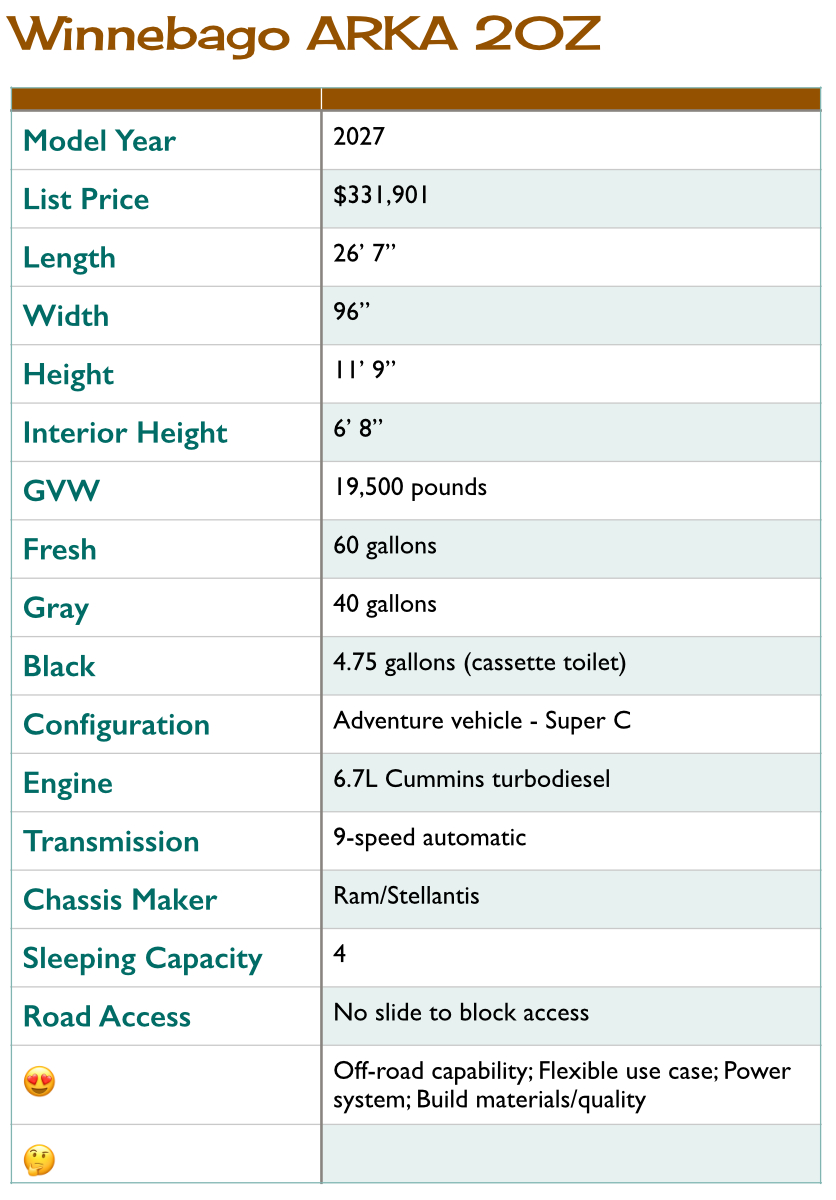
Today’s RV review is of the new-for-2027 Winnebago ARKA 20Z, an off-road-capable, adventure-ready overlanding RV that is based on the Ram 5500 chassis, which has been modified for extreme capability. There are a number of this type of overlanding rigs out there, typically from smaller companies. But this one breaks a lot of new ground and really has hit the mark quite well.
How the Winnebago ARKA™ 20Z is built
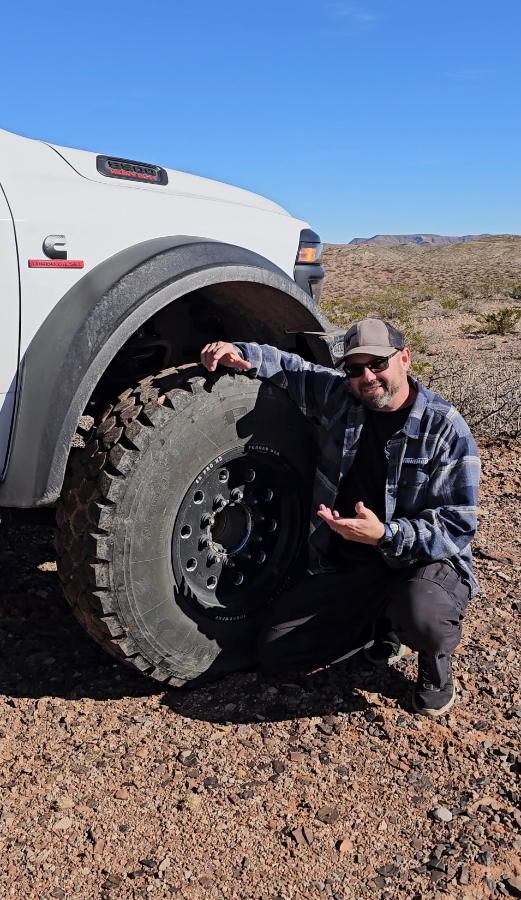
From the stock Ram 5500 four-wheel-drive, Winnebago has upgraded the suspension, tires, bumpers, and more. The chassis has been upgraded with BuckStop™ components, including suspension and bumper that can be set to easily accept a winch. This rides on 41” off-road tires that both accentuate the rugged appearance of the rig and also provide additional capability off-road.
It might seem odd how much distance there is between the cab and the RV box, but this was intentional to allow the vehicle to flex in extreme off-road conditions.
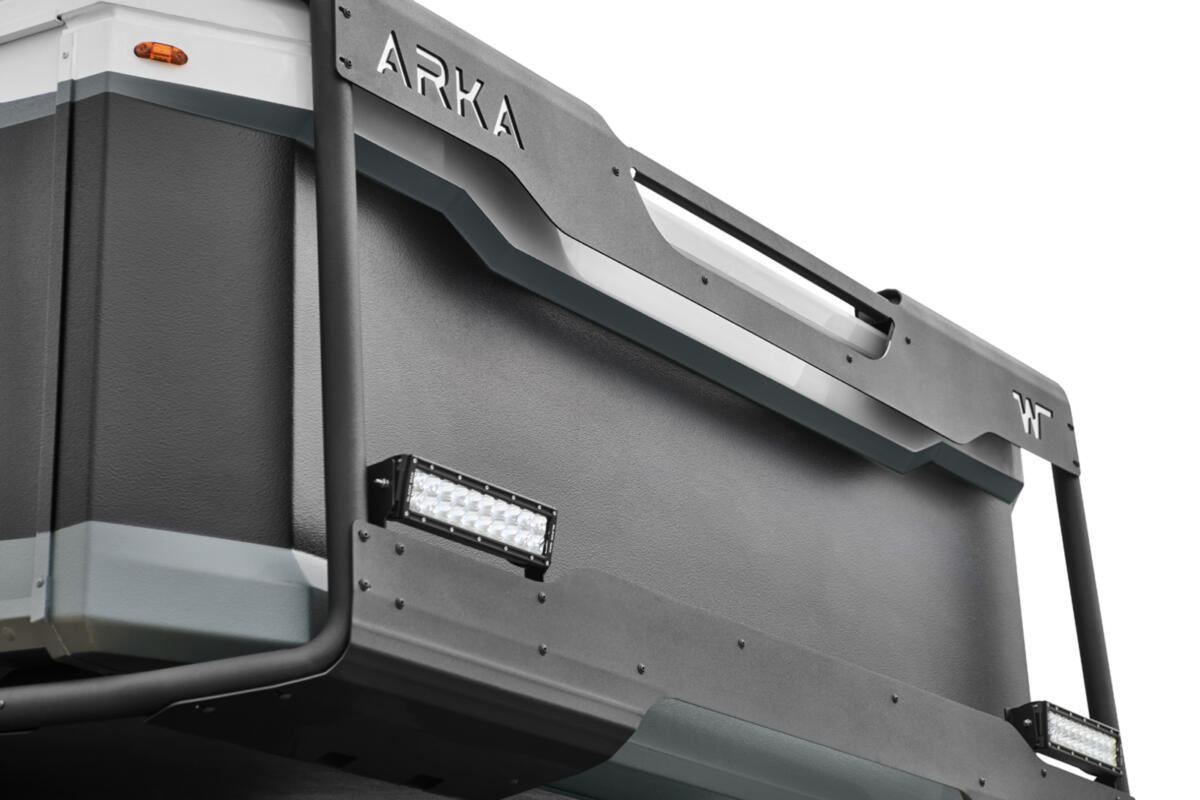
The RV portion of this rig has a metal brush guard around it for added protection. There are some pretty intense lights on the exterior, too.
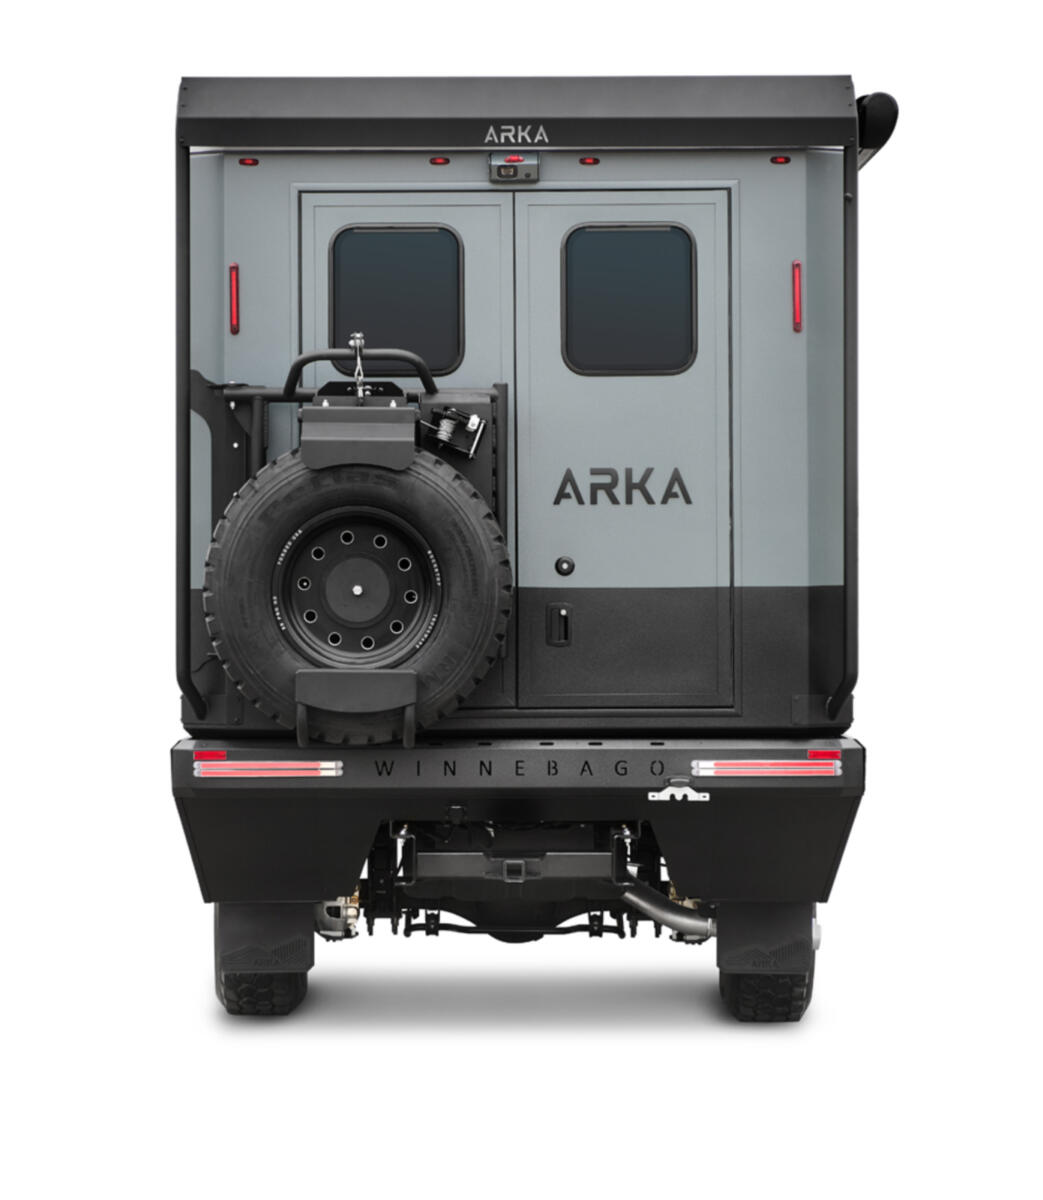
On the lower portion of the rig are aluminum gearboxes. Out back is a full-sized spare tire, and there’s even a winch to lift it onto the carrier—a very nice touch. These big donuts are weighty.
I really like that this uses a SmartPlug® power system. All the exterior cabinet doors are very thick. This is well-suited for colder climates.
In fact, I got to speak with Kenny Phillips, who is a Winnebago Brand Ambassador and the co-host of the Beyond the Wheel podcast, about his experience testing a prototype of this RV back in January.
His impression was that this rig is extremely well-suited to off-road adventures. He and his wife, Sabrina, took a prototype into the snow and found it to be exceptionally capable to the point that he remarked, “You could almost use the ARKA to help recover lesser vehicles.”
The roof-build on this RV is a vacuum-bonded fiberglass structure with raised sections where there was going to be a hole (such as a vent cap, etc.) so that water is better able to run off.
Winnebago ARKA - 2027
1 of 18
An on-board air compressor has an outlet on either side of the Winnebago ARKA
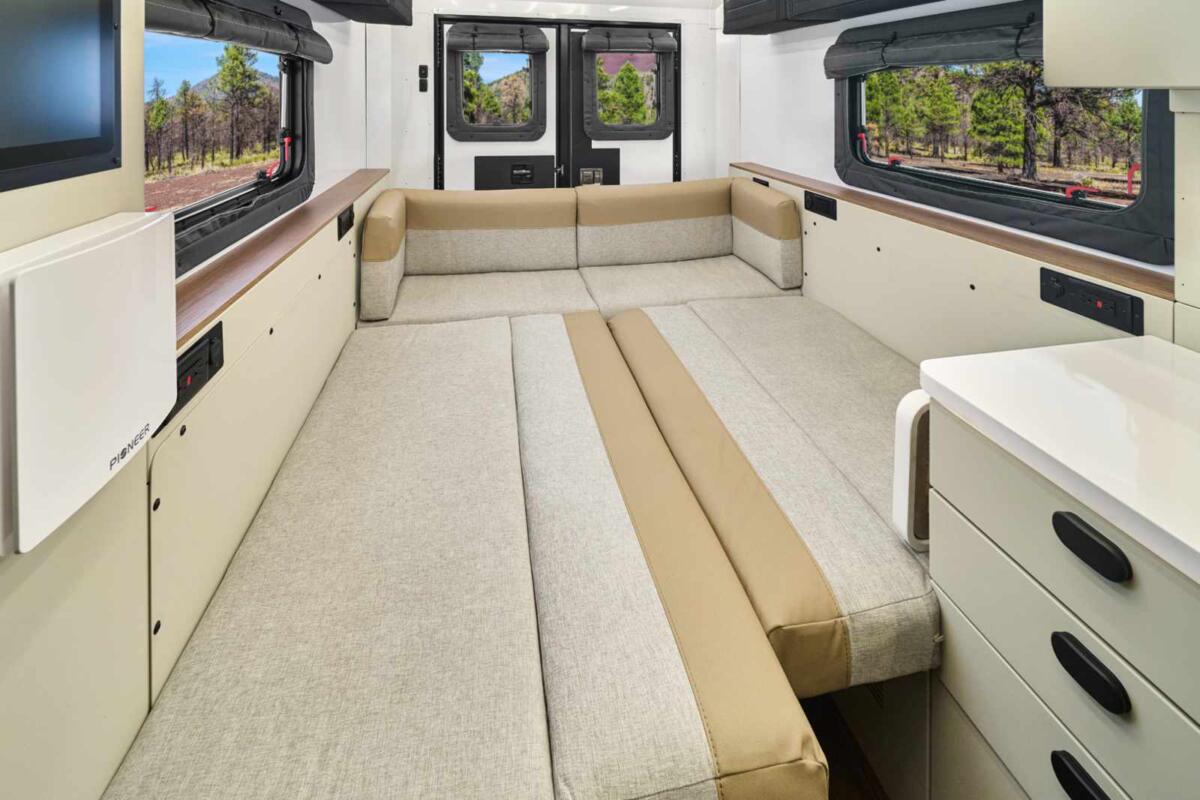
The rear dinette with cushioned placed to create a bed for two
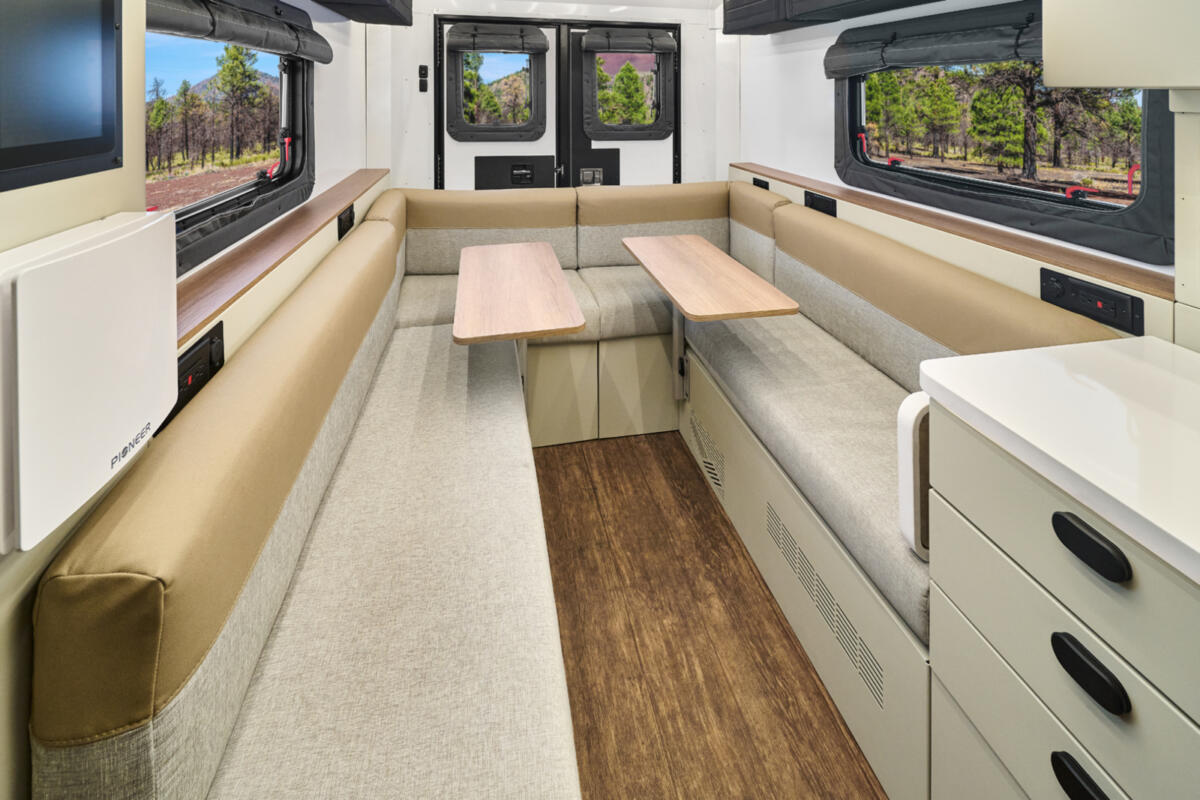
A U-shaped dinette can be reconfigured to optimize cargo and has Lagun-style tables
A digital control system can be operated via Bluetooth device
A metal frame is used to mount lights and solar panels
A minimum of holes on the roof is facilitated by mounting the solar panels on the side rails
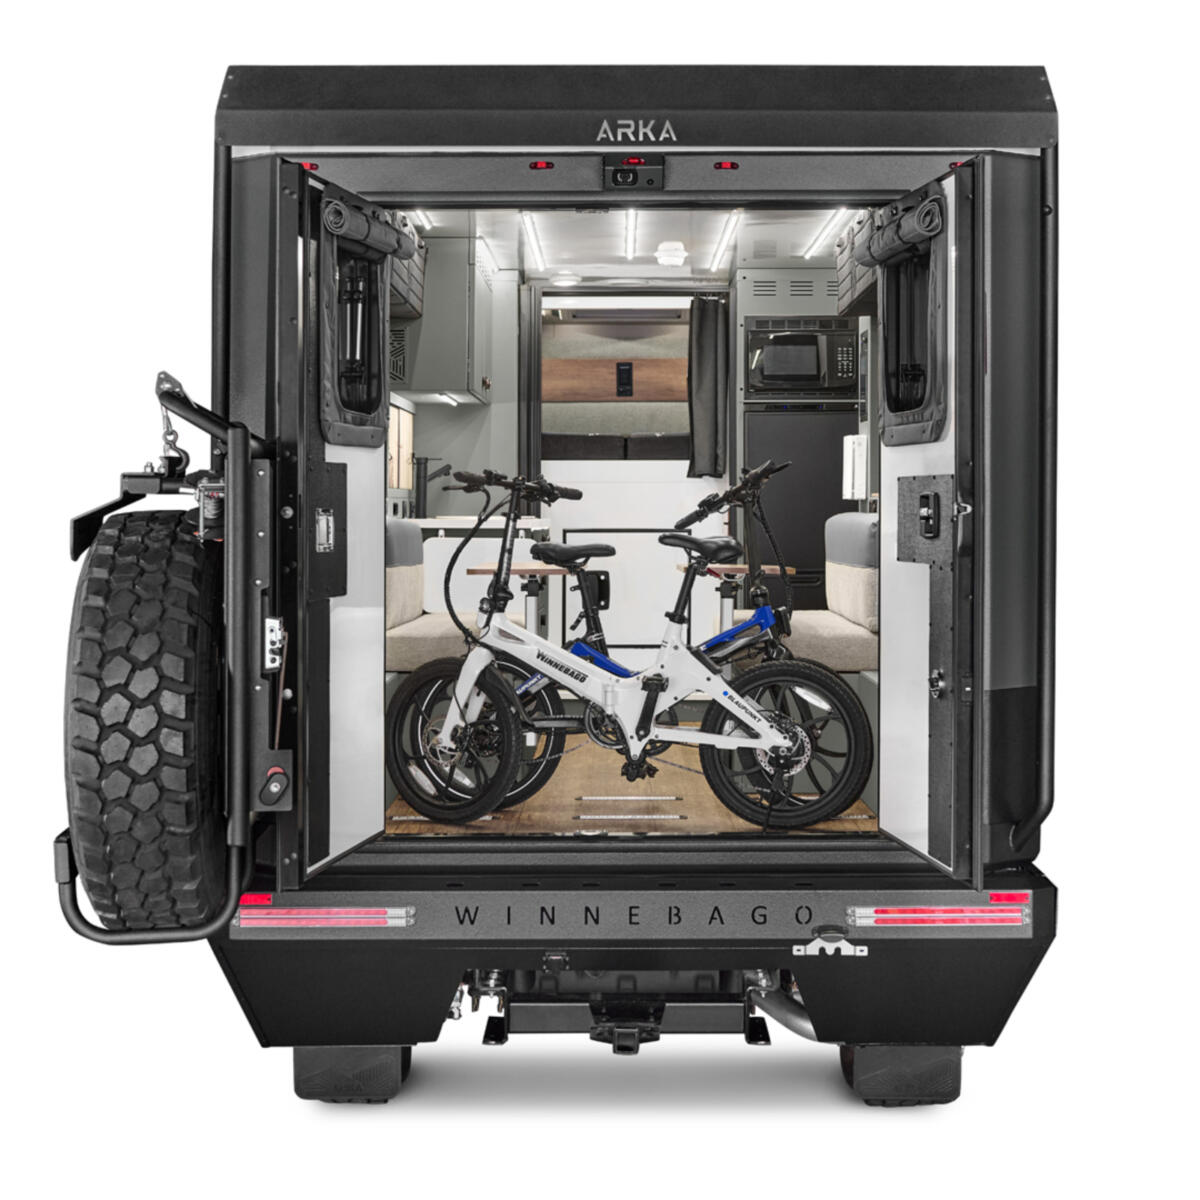
Dual panel doors at the rear of the ARKA along with a tire mount that incorporates a power lift
Soft overhead cabinets are removable and plenty of windows offer an open feel
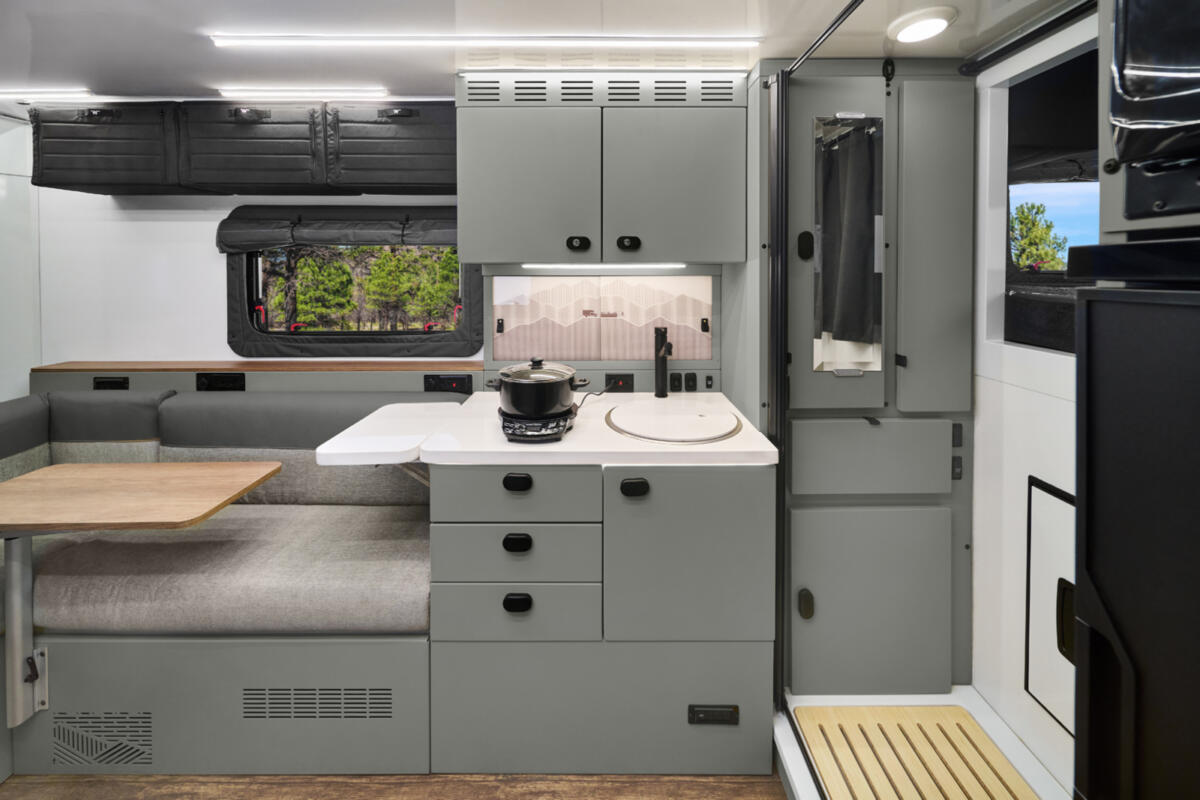
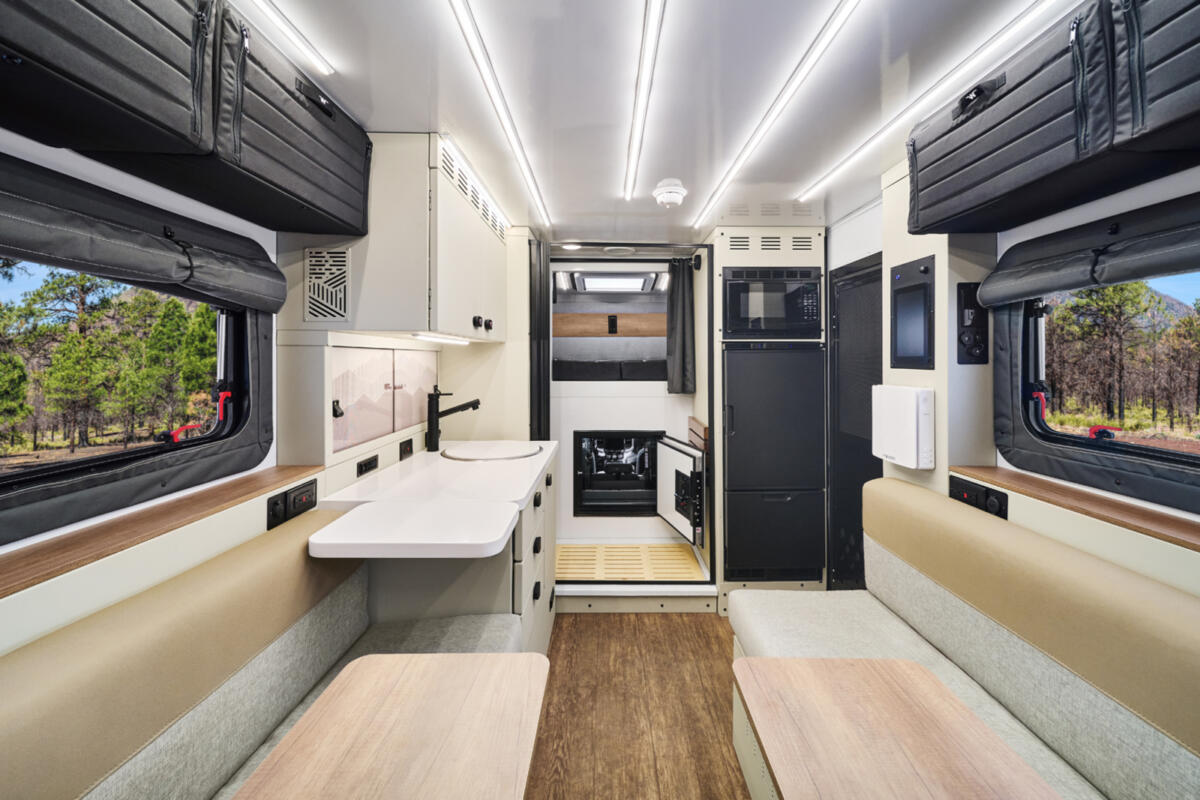
The galley in the Winnebago ARKA 20Z
The galley of the 2027 Winnebago ARKA with metal cabinets that feature positive latches
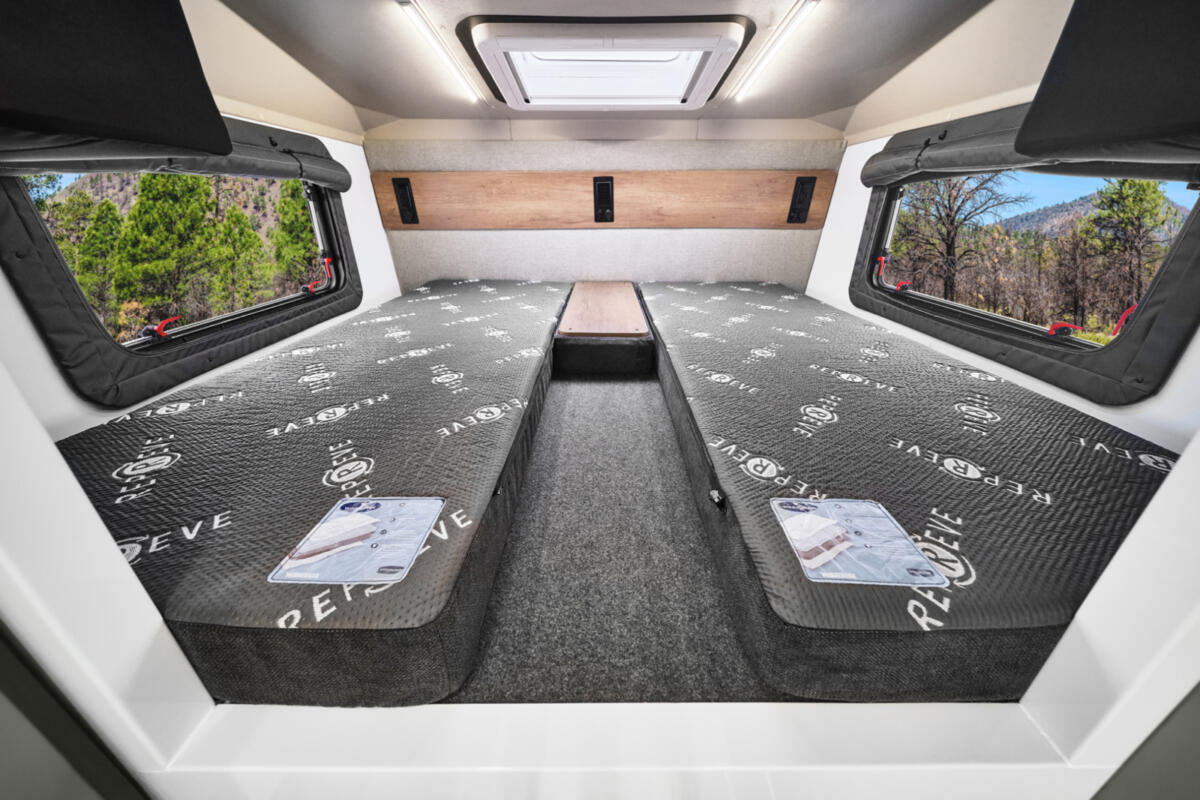
The cabover space features two mattresses and free-standing nightstands
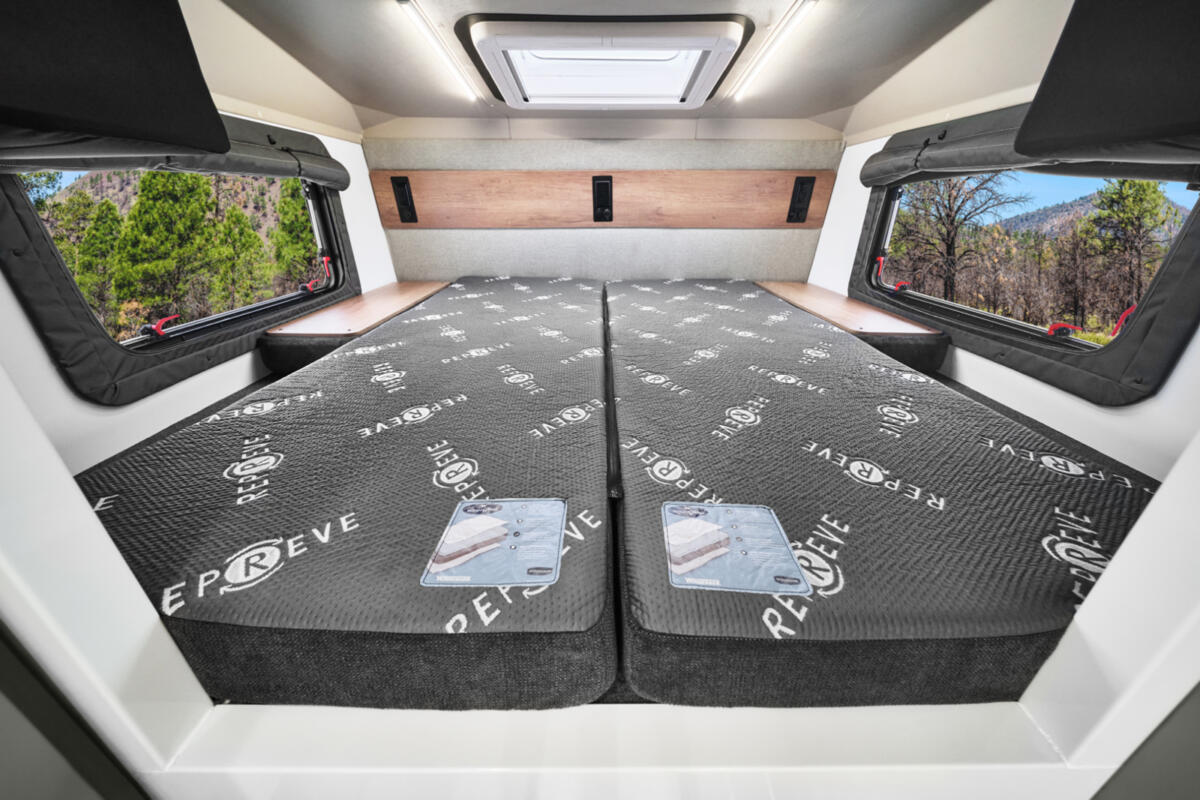
The over-cab space with the mattresses configured as a single queen bed
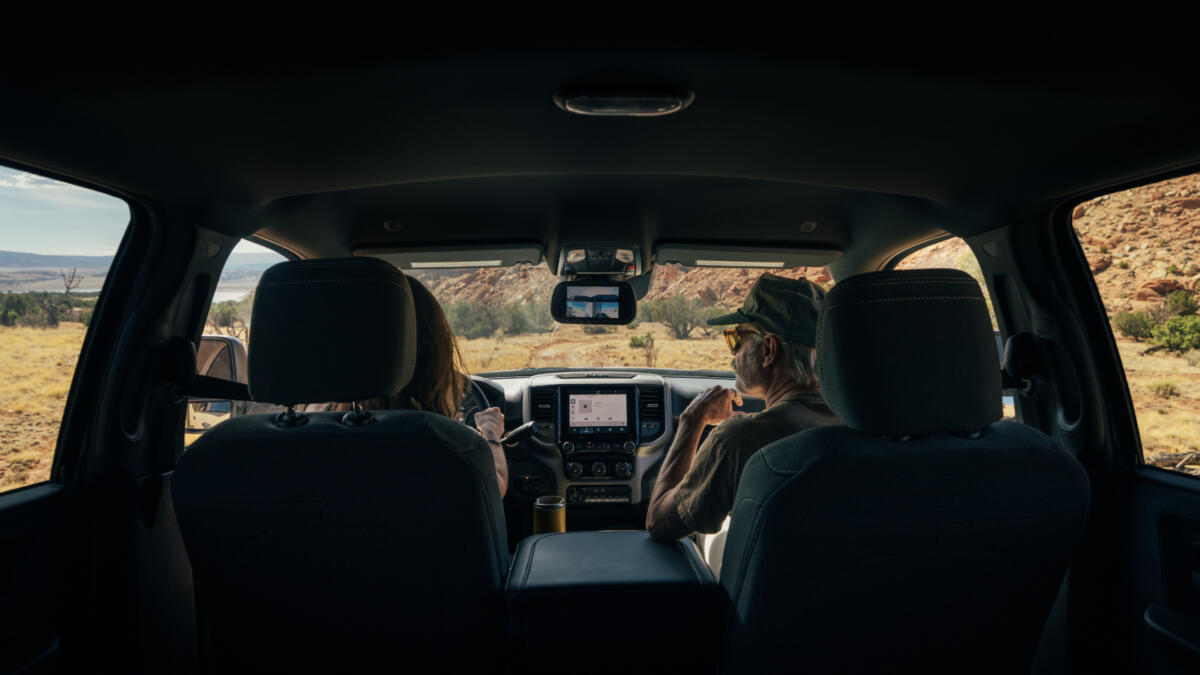
The cab of the Winnebago ARKA features an always-on rear view camera system
Kenny Phillips with a prototype of the Winnebago ARKA
Sabrina Phillips enjoys a remote spot with the Winnebago ARKA prototype
Living in the Winnebago ARKA
The floor plan of this RV is almost like a large camper van; there are double doors in the back, along with an included ladder to get in, if need be. There’s a reconfigurable rear seating area that can go from U-shaped seating to dual benches and, of course, it can fold down to gain additional sleeping space.
Phillips indicated that, when he was testing the prototype, it was able to swallow his e-bike, tools, and recovery gear and still leave the seating area intact. But you can also configure the space to accommodate a large kayak or the like. There are built-in L-tracks in the floor to tie things down.
The cabinetry is all aluminum with compression latches that won’t pop open during transit. But the aluminum cabinetry is also likely to have no issues withstanding the kind of off-road shenanigans owners will put this through.
I love the fact that the storage above the dinette/seating area is a soft, almost luggage-style container that can be removed if one wants to. The window coverings are roll-up zippered panels, which really help with the ability to withstand weather temperature extremes.
The lounge in the back features two Lagun tables.
Something that sounds terrific is the heated floor in this RV. “I thought this was going to be a gimmick, but it turned out that we really liked this feature,” said Phillips. “The heat it provides was so even and pleasant.”
Unusual bathroom in the Winnebago ARKA
The bathroom in this RV is really different in that it’s set between the cab-over bunk and the main living space. The whole room is a shower when that’s what you want, and there’s a medicine cabinet.
The toilet is a cartridge model, but the unusual thing about the way it’s built is that it can swing into a cabinet. Therefore, even though this is technically a wet bath, it doesn’t feel like a wet bath and really almost performs like a dry bath. It’s well-designed.
There’s also a provision for hanging wet clothes and such in this space. And there’s a waterproof, magnetic curtain between the bedroom and this shower. I also like that there’s a seat in here that doubles as the step up into the bedroom.
Bedroom in the Winnebago ARKA
The main sleeping space is over the cab. This, too, has been done very well. There are essentially two mattresses here, so you can configure the space to have two individual beds or push them together and have a single large sleeping space.
There are also reversible nightstands that can be placed on the outside of the bed as nightstands or flipped over and used to add even more sleeping space and make the surface of a king-sized bed.
Interestingly, Kenny Phillips said that the mattresses are made in-house by Winnebago and are very comfortable. “These aren’t the typical RV throwaway mattress, at all.”
There’s also a skylight with a cover, and that skylight can be opened. Again, the window coverings are the thermal material with zippers to be able to control temperatures more easily.
Boondocking and off-grid camping
This is truly meant to be a boondocking rig. It comes with 800 watts of solar, with an additional 400 watts available as an option.
One of the most unusual and useful features built into this RV is a Pioneer® air exchanger that does a number of things. Most importantly, it is a dehumidifier that removes a lot of humidity from the cabin. The process is very efficient and can substitute for using the A/C in some conditions. In addition, it can help the A/C work more efficiently.
While Kenny Phillips was able to use the RV during winter and didn’t take full advantage of this feature, he did say that it seemed to improve air quality even in drier places.
The walls are two-inch-thick insulated walls. The structural aluminum isn’t the full width of the interior space, so that eliminates the heat loss of aluminum studs on the outside surface. If you’ve ever seen laminated RVs in the winter, it’s really easy to spot where the aluminum studs come into contact with the exterior, as aluminum is a terrible insulator.
The standard power system in this RV is a 48-volt system and uses a 165Ah Lithionics battery pack. The system is recharged through the standard 800 watts of solar and can also be charged using the 6500-watt alternator. In other words, there’s no specific generator aboard, nor do you need one with this many ways to recharge the battery.
You can also add a second Lithionics battery and 400 additional watts of solar.
My thoughts on the Winnebago ARKA™
Quite honestly, I think Winnebago totally nailed it with this design. I’ve seen a lot of this type of vehicle, and the compromises are usually pretty evident. It seems that Winnebago has really worked around a lot of those compromises in this RV and created something that is flexible and durable and hits the mark.
Something else they’ve done is provide metal panels behind the interior walls so that you can add things like MOLLE (modular lightweight load-carrying equipment) panels or other things to better configure the RV to your style of adventure.
In speaking with Kenny Phillips, he said that his wife, Sabrina, was particularly happy with the quality of the ride and comfort in the Ram pickup cab, so it would seem that Winnebago has struck a good balance between capability and comfort.
On the subject of capability, this is also designed to tow up to 15,000 pounds, so you’re in Super C territory here.
The air conditioner standard on this RV is the SDG split system A/C that runs on the native 48-volt power. I would imagine this is very similar to the unit used in the Grand Design Lineage Class B RVs, and it’s a great system.
These aren’t going to be cheap. However, compared to similar vehicles, I don’t think the price is out of line. I’ve seen some of these approaching and even exceeding half a million bucks, but the MSRP of this unit is $331,901.
A potential “drawback” of owning an ARKA
One of the biggest problems owners might have is one that Kenny and his wife experienced. “When we would walk out into the parking lot, there was a crowd around this RV, and people would be asking all kinds of questions.
At last year’s RV open house, my wife and I saw the Dynamax Isata 5 Explorer Edition, and we were pretty impressed with that. However, quite honestly, the ARKA would be the rig I would choose just because of the ruggedness as well as the clever ways they’ve done things, including that dehumidifier and the heated floors.
The Winnebago ARKA debuted this weekend at Overland Expo West. If you’re there, seek it out. I think the company has done an exceptional job with it.
An honest look at RVs from RV industry insider Tony Barthel, where you learn the good, the bad, and the intriguing about RVs, including travel trailers, fifth wheels, Class A, Class C, and Class B RVs, as well as some interesting class-breaking RVs. You can find more reviews online at StressLessCamping.com.
P.S. No, you’re not going crazy. Russ and Tiña De Maris wrote about this RV earlier this week. But Tony has a different take.
Las Cruces, a true desert destination, is nestled in southern New Mexico’s scenic Mesilla Valley.
This Chihuahuan Desert city of about 117,000 is situated between the Rio Grande and the majestic Organ Mountains. What makes Las Cruces a great destination for RVers? Read on to find out.
Getting there
Las Cruces sits in southern New Mexico at the crossroads of I-10 and I-25. You can follow the interstate network into town from almost any direction. It is also less than an hour from El Paso and only about 45 minutes to White Sands National Park.
Downtown Las Cruces
For RVers, one of the best parts of Las Cruces is how walkable it is to enjoy. The Downtown Las Cruces Partnership boasts that the downtown area is a safe, vibrant, and diverse community. You can take the Mesquite Historic District walking tour to see for yourself. This tour is a mile loop with seven stops.
In the same compact area, Plaza de Las Cruces serves as a gathering space for concerts, festivals, markets, and cultural celebrations. You won’t want to miss the award-winning Las Cruces Farmers & Crafts Market that stretches seven blocks and draws nearly 300 rotating vendors.
Las Cruces is also the home of New Mexico State University. As with many university towns, NMSU features special events, sports contests, and galleries that may interest RVers.
Park base
White Sands National Park. Photo credit: Emily Woodbury
Las Cruces also works well as a base for seeing national parks. White Sands National Park’s visitor center is located about an hour away. It’s important to remember that services between Las Cruces and White Sands are limited, so plan ahead. Carlsbad Caverns National Park is farther out, about 197 miles from Las Cruces.
Only about ten minutes from Las Cruces is Old Mesilla. Mesilla Plaza is a well-preserved historic town and has been named a National Historic Monument. Within the thick-walled adobe buildings, visitors will find wonderful galleries, restaurants, museums, and gift shops. You can shop inside the Billy the Kid gift shop, where Billy the Kid was tried and sentenced to hang.
Editor’s note from Emily: Have a drink at the Golden Eagle Restaurant (and see if you can spot a ghost) and dinner at La Posta De Mesilla, an old stagecoach station-turned restaurant.
RVers enjoy leisurely walking through this area, which holds so much history.
Places to stay
Leasburg Dam State Park is a popular state park near Las Cruces. Positioned along the Rio Grande, Leasburg is just 15 miles from town. It offers RVers 12 water and 30-amp electric and four water and 50-amp electric sites, plus an RV dump station on premises. Visitors will also find campground restrooms and showers. For RVers who want a quieter spot with fishing, birdwatching, hiking, and easy city access, it is a smart choice.
Hacienda RV Resort is an in-town option. This campground sits off I-10 at exit 140 and has 113 big-rig-friendly sites. Hacienda features full hookups with 30/50-amp service, paved roads, free high-speed Wi-Fi, a hot tub, a dog park, and sites up to 110 feet long. That makes it a strong pick for longer rigs, remote workers, and anyone who wants a more resort-style stay while still being close to Old Mesilla and the rest of southern New Mexico.
Sunny Acres RV Park is another convenient base, especially if you like being able to walk for a meal or a few errands. The park is for those 55+, has large sites, full hookups with 30/50-amp service, cable TV, Wi-Fi, laundry, private restrooms and showers. RVers will appreciate the easy access to I-10, I-25, and US-70. Guests are within walking distance of restaurants, groceries, a bus stop, antique shopping, and more.
You should go!
Las Cruces, New Mexico, is an RV-friendly hub. It offers walking/hiking/biking trails, a vibrant art scene, and wonderfully authentic food. Plan a trip today!
Folks recently gathered around the campfire to console Mark. Unfortunately, he was ticketed for not using his turn signal.
Mark felt unfairly targeted. Read on to learn why.
Turn-only lane
“There I was,” Mark explained, “in the right-turn-only lane. What did the officer think I planned to do? My big rig should have been a great, big, obvious clue since it was fully inside the turning lane. But I got a ticket! I think some officers enjoy ticketing out-of-towners. It’s so aggravating.”
Marty wanted to know, “So, why were you ticketed?”
“I didn’t use my turn signal. That’s why.” Mark explained. “Even though I was clearly in the turn-only lane. The law says to use turn signals when required. Doesn’t being in the turn-only lane negate the need to signal?”
Safe and legal
Even when a lane is clearly marked as turn-only, signaling is still the safest habit and, in most places, the legal expectation.
For example, California’s driver handbook says to always signal when you turn, even when no other vehicles are around. They also advise signaling 100 feet before the turn.
Washington state’s Supreme Court has ruled that a signal is required even when a driver is already in a dedicated turn lane. In the summary of their decision, the judges said:
We are asked to decide whether the phrase “when required” compels drivers to use their signal every time they turn or change lanes on a roadway. We hold that it does. The plain language (ROW 46.61.305) requires drivers to ensure turns and lane changes are done safely and with an appropriate turn signal. The phrase “when required” relates to the manner in which the required signal is made—continuously during not less than the last 100 feet traveled.
Why it matters
Turn signals matter, even in turn-only lanes. A turn-only lane shows where you are headed, but it does not always show exactly when you are about to move, slow, stop, or commit to the turn. The California DMV says turn signals are one of the main ways drivers communicate intent, and it also reminds drivers to check blind spots before turning.
Legalese
The legal gray area concerning signal lights usually comes from wording differences between states. Some laws focus on signaling before a turn or lane change, while others add timing language, such as signaling continuously for the last 100 feet before the turn.
Washington state’s high court read its statute as requiring the signal on roadways even when the vehicle is already in a dedicated turn lane. They concurred that signaling helps alert drivers and pedestrians who may not realize what the vehicle will do next.
Cheap insurance
From a safety standpoint, the turn signal is cheap insurance. The Federal Highway Administration (FHWA) says dedicated left- and right-turn lanes improve safety because they let turning vehicles slow down and get out of the through traffic stream before making the turn.
FHWA also reports crash reductions for these lanes, including 28–48% fewer left-turn crashes and 14–26% fewer right-turn crashes. Adding a turn signal gives that already safer setup one more layer of warning.
Lesson learned
For RVers, the practical rule is simple: Signal early, hold your lane, and make your move obvious. That gives cars behind you time to react, especially in busy city traffic where a driver may not immediately notice that your lane is turn-only. It also helps when you are driving a longer rig, because the people around you need more time to understand your path and adjust their spacing.
A good campground-to-highway habit is to treat every turn the same way: Signal first, then brake, then turn. If your RV or tow vehicle is in a lane marked left-turn-only or right-turn-only, the signal is still the smarter move even if the lane markings already hint at your destination. Signaling reduces confusion, keeps traffic flowing, and makes your intentions clear to anyone who did not notice the pavement arrows or overhead signs.
Do you signal when in a turn-only traffic lane? Tell us in the comments below.
A quick glance at this travel trailer’s floor plan tells me it features a rear kitchen, a nice bathroom, and a private bedroom. With those three key areas checked off, it’s time for a closer look.
Behind the walls
Winnebago builds the Access™ 25RK on an NXG-engineered frame. It features durable sidewall metal, a one-piece TPO roof membrane, and a fully enclosed underbelly with radiant foil insulation. There’s also heated pass-through storage and a power tongue jack.
This tandem-axle trailer has two 4,400-pound axles, which helps explain why it feels like a step up from smaller, lightweight campers. The main living area is arranged around a single slide-out that helps expand the interior for an open feel.
Key specs
Exterior length: 29’4″
Exterior height: 11’2″
Exterior width: 8′
Awning length: 16′
Interior height: 6’8″
Freshwater tank capacity: 60 gallons
Black tank capacity: 49 gallons
Gray tank capacity: 98 gallons
LP capacity: 40 pounds
GVWR: 8,800 pounds
Dry weight: 6,520 pounds
Furnace: 30,000 BTU
Dry hitch weight: 670 pounds
Hitch height: 22 inches
Price: $39,130
Interior and living space
Entering from the rear side door puts you in the Access 25RK kitchen. Cabinets are a blend of light and dark finishes—a pleasing combination. The area immediately appears bright, modern, and roomy.
The lighter wall color, along with mid-tone floors and upholstery, helps the RV feel fresh and comfy. The central traffic path is easy to move through, and the floor plan does a nice job of separating cooking, lounging, and sleeping areas without making the trailer feel chopped up.
Kitchen
The rear kitchen is compact but thoughtfully arranged. There are plenty of drawers and cupboards for basic kitchen necessities. Winnebago equips the Access 25RK with an undermount stainless-steel sink, a residential-style faucet, a 1.1 cu. ft. microwave, and a 10 cu. ft. 12-volt refrigerator. You’ll also see a recessed 3-burner cooktop with backlit knobs.
I was happy to note that designers fit a pantry into this kitchen. I only wish pull-out drawers had been added for better accessibility.
Right inside the door, you’ll discover a handy shoe cubby integrated into the back of the dinette. I love this dedicated space to control shoe clutter.
Living room
The living area is simple, but it works well. The slide out holds theater seating, with a fold-down middle console with cupholders. A smart TV is mounted on the opposite wall for comfortable viewing.
The booth dinette sits opposite the theater seating, as do two additional storage cabinets. This arrangement is good for meals, card games, or simply relaxing after a day outside.
Bath
The bath is a practical mid-size and covers the basics well. There is adequate space for access to the commode, with a storage cabinet and towel rack, as well.
The 2026 Winnebago Access 25RK lists a 30″ x 36″ shower with a 14″ x 22″ skylight. It’s not luxuriously huge, but definitely doable. You’ll also see a roof vent, a dedicated medicine cabinet, and under-sink storage.
Bedroom
The front bedroom gives the Access 25RK a more residential feel than many trailers this size. First of all, there’s an actual door for separation and privacy. The bedroom offers a queen bed, underbed storage, and a wardrobe for hanging clothes (or stacking storage solutions, if you prefer.)
You’ll also discover dual nightstands with charging ports, and above the bed is a shelf for additional storage, if needed.
Overall take
The 2026 Winnebago Access 25RK is a smart pick for RVers who want a rear-kitchen trailer with good storage, an open common area, and a private bedroom. I think the Access 25RK is a very nice balance of comfort, towability, and value. Winnebago also backs up the layout with useful basics like the tankless water heater on the 25RK, the 6’8″ interior height, and the wide-body 8-foot construction.
Watch a video walkthrough below from Clear Creek RVs. Could this be the RV for you? Tell us in the comments.
A quick look at almost any RV owner blog, and you will find someone saying that they drive at “xx” mph because that is the “Speed Rating” on the tire sidewall. This is definitely not a good idea and, in my opinion, is definitely unsafe.”
“Speed Symbol” on tire sidewall
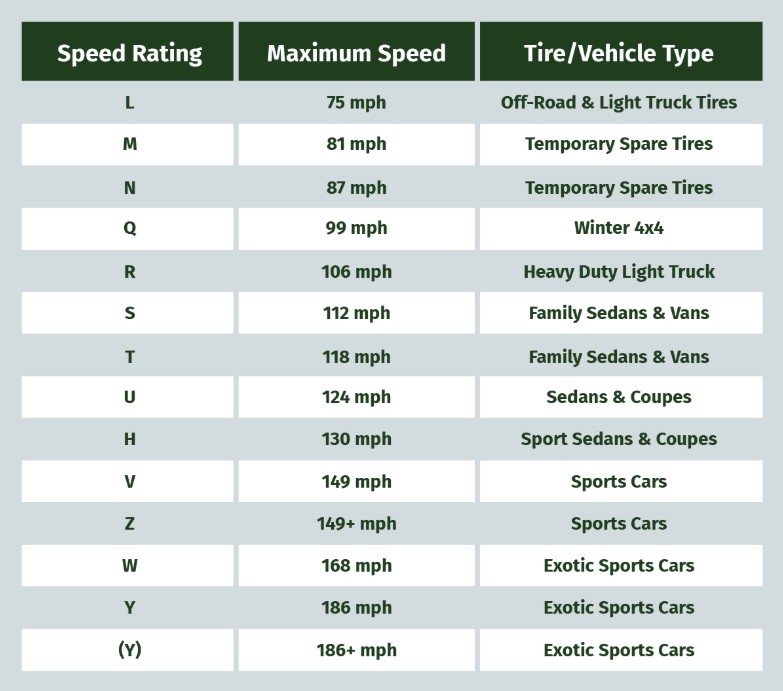
Some, but not all, tires come with a “Speed Symbol” on the sidewall of their tires. This is usually found on many “P” or passenger-type tires. There are standards in Europe for the Max design operational speed.
Here is a basic chart covering tire speed in Europe:
Europe tire speed rating (click to enlarge)
NOTE that the various European speed numbers are “maximum” speeds and not “average” speeds. These ratings come from European standards, not U.S. DOT standards.
In the U.S., the Tire and Rim Association (TRA), Department of Transportation (DOT), and Society of Automotive Engineers (SAE, now SAE International) have specified tests for brand-new tires, such as:
A Load Range “C” tire would have a 2-hour “break-in” at 75 mph, then run 1/2 hour at 34 psi at 80 mph, then 1/2 hour at 85 mph, which is the test end. If there are no external indications of structural failure, the tire is considered to have “passed” the “high speed” test. That test tire is then scrapped and is not to be used in any additional testing.
It appears that the European “Speed Rating” letter is being interpreted as the acceptable continuous operational speed. This is NOT a proper interpretation of the various standards.
The Tire Industry Association (TIA) says this about the “Speed Symbol: “The Speed Symbol, or V in this example, indicates the maximum speed for the tire, but it is more like a performance rating that reflects the handling characteristics after it is installed on the vehicle.”
Here is avideo on reading the tire sidewall information.
Bottom line:
RVs basically use three types of tires:
Class A uses Heavy-Duty Truck-type tires.
Class C will normally use LT-type tires, many of which carry a “Speed Rating” number.
ST-type tires were developed and approved based on a 65 mph speed test. I would consider 65 to be the MAX speed rating for up to 30 minutes, then the tire “life” may have been “consumed.”
I almost always limit my speed in my RV or when towing my 26′ trailer to 60-65, so I can’t suggest any faster for you as being acceptable for tire life.
So, the answer to the question in the title of this post, “Can you really drive 112 mph?” is “Definitely Not.”
Hydration is essential, especially for RVers who spend time outdoors, drive long distances, or camp in warm climates.
Remaining hydrated is why many RVers use reusable water bottles. The bottles are convenient, significantly reduce waste, and can keep your beverages colder/hotter longer.
A typical day in a bottle’s life
For many RVers, the day starts with filling up a reusable water bottle. The bottle is then placed inside the truck’s (or RV or car) cup holder, where it’s easily accessible. Frequent sips are enjoyed throughout the travel day.
Once at the campground, the water bottle is all but forgotten while the campers set up and settle in.
Trouble begins
The forgotten water bottle often remains inside the truck for a day, two, or sometimes longer. During that time, the truck’s interior warms in the heat. Any microbes inside the bottle can begin to grow.
Warm, damp spaces are exactly the kind of environment where mold and microbes can take hold. Reusable bottles can also develop hidden buildup in narrow parts like straws and lids. This is especially true when the parts are opaque or stainless steel, making the mold growth nearly impossible to see.
Health risks
Drinking from a moldy bottle, straw, or nozzle is problematic because mold exposure can be harmful. The CDC says mold can cause a stuffy nose, sore throat, coughing or wheezing, burning eyes, or skin rash.
People with asthma, mold allergies, or weakened immune systems can have even stronger reactions. The Mayo Cliniclikewise notes that mold allergy can lead to coughing, itchy eyes, and breathing trouble, especially when asthma is part of the picture.
There is also the simple hygiene issue. Straws and bottle mouths can hold saliva, residue from drinks, and moisture in tight spaces that are hard to scrub clean. Research on everyday, reusable bottles has found that they can harbor microbial populations, and broader biofilm research shows that these slimy communities can act as reservoirs for microbes rather than just a bit of harmless grime. In other words, a straw that looks only a little dirty may still be carrying much more than you can see.
Clean it up!
A quick rinse is not enough. For reusable water bottles, the Cleveland Clinic recommends washing with warm water and soap, using a bottle brush to reach the narrow parts, and paying close attention to the cap, mouthpiece, and any crevices where mold can hide. Letting every part dry completelybefore reassembly matters just as much as the washing itself.
If a straw or lid has visible mold, a bad smell, or a persistent film that keeps coming back, replacement may be your best option.
Tools that help
For RVers who depend on refillable bottles, a little prevention goes a long way. Pack along a straw brush like this one and a lid bottle cleaner like this (pictured above). Both tools take up very little storage space and can make a difficult job so much easier.
For RV life, the best habit is to treat the bottle like a daily-use dish, not a travel accessory that can sit around indefinitely. Empty the bottle, wash it, and dry it before it gets tossed back into a warm truck cab or a closed-up rig. You don’t want to give mold a foothold.
Remember that your future travels depend on you staying healthy.
We spend a lot of time talking about RV problems, repairs, frustrations, and the things we wish manufacturers would do differently. But this time, we want to flip that around.
What do you genuinely like about your RV?
Maybe it’s the perfect floorplan. Maybe it’s the giant windows, the outdoor kitchen, the roomy shower, or the fact that your smaller rig fits just about anywhere. Maybe your favorite part is something simple—like the cozy dinette, a big pantry, or the way your comfy mattress feels after a long travel day.
We’d love for you to fill out the form below and tell us what makes your RV feel just right for you. What features do you appreciate most? What size works best for your travel style? Which rooms or layouts make life on the road easier, more comfortable, or more fun?
This time, we’re focusing only on the positives. (We’ll save the complaints and wish lists for another day!) Please fill out the form below, and feel free to upload a photo, too. Thanks! We’ll run some of your responses in upcoming newsletters.
An Indiana highway crash is serving as a harsh reminder about RV trailer safety after a disconnected trailer struck and flipped a camper on U.S. 41, near Evansville, sending two people to the hospital. Authorities are still investigating exactly what happened. But incidents like this highlight a reality many RVers already know: A trailer disconnect at highway speed can become violent in seconds.
For many RV owners, the unsettling part is how ordinary these situations can begin. Often, the rig looked perfectly fine pulling out of the driveway or campground. The problem may not show up until a bump, sway event, hard brake application, or highway-speed vibration exposes a weak point in the towing setup.
Why trailer disconnects can become so dangerous
When a trailer separates from the tow vehicle, several things can happen almost instantly and none are good.
The trailer tongue can slam into the pavement. The trailer may begin fishtailing violently. Safety chains can either help stabilize the trailer or fail if they were improperly connected. In some cases, the trailer crosses lanes or strikes nearby vehicles before the driver even has time to react.
With travel trailers, the danger increases because of their size and high center of gravity. Once the trailer begins whipping sideways, rollover forces build quickly.
That appears to be part of what happened in the Indiana crash. Photos from the scene showed the RV, a towable, overturned beside the highway after being struck by the disconnected utility trailer.
The hitch mistake many owners never realize they made
One of the most common towing failures involves the coupler not fully seating onto the hitch ball.
Sometimes the latch appears closed when it really is not locked completely into place. Other times the wrong ball size is being used, or the coupler itself has worn enough to create excessive play.
Experienced RVers often develop a routine specifically to avoid this.
Many perform what is commonly called a “pull test.” After hitching up, they raise the tongue jack slightly off the ground and gently apply the trailer brakes by manually engaging the brake controller while easing the tow vehicle forward just enough to confirm the coupler is securely locked onto the ball.
It takes only a few seconds, but it can reveal a problem before the trailer reaches highway speed.
Safety chains are not just backup hardware
Many RV owners think of safety chains as little more than a legal requirement. In reality, they may become the last line of defense between a controllable emergency and a catastrophic crash.
Properly crossed safety chains should pass underneath the trailer tongue in an “X” pattern before attaching to the tow vehicle. That crossing creates a cradle designed to help catch and support the tongue if the coupler disconnects. Without that support, the tongue can slam directly into the pavement, potentially triggering violent whipping or even pole-vault-style flipping forces at highway speed.
“A trailer disconnect at highway speed can become violent in seconds.”
Chain length matters, too. Chains that are too long can allow the tongue to hit the road. Chains that are too short may bind during turns.
And the breakaway cable matters just as much. That cable is designed to activate the trailer brakes if the trailer completely separates from the hitch. But safety experts warn that many owners attach the cable to the same removable chain loops or hitch hardware involved in the towing connection itself. If that hardware fails or tears loose during a disconnect, the breakaway system may never activate. Instead, the cable should be attached to a solid, independent point on the tow vehicle or hitch assembly that would remain attached even if the coupler and chains fail.
Why loading and sway still matter
Not every trailer separation begins with the hitch itself.
Improper tongue weight, overloaded rear cargo areas, soft suspension components, or underinflated tires can create severe sway conditions that place enormous stress on the hitch system.
A trailer that repeatedly jerks and oscillates at highway speed can eventually expose weaknesses in worn hardware or marginal connections.
That is one reason experienced towers often recommend rechecking the hitch after the first few miles of travel, especially after the RV has been sitting in storage for weeks or months.
Metal settles. Loads shift. Hardware loosens. Tires warm up.
A setup that looked perfect at the campsite may not stay that way after 20 miles of rough pavement.
The five-minute walk-around many RVers swear by
Many longtime RVers eventually develop a personal pre-departure routine. The exact checklist varies, but most include the same basic ideas:
Check that the coupler latch is fully locked. Confirm the hitch pin and retaining clip are installed. Verify the chains are crossed and not dragging. Test trailer lights and brake operation. Inspect tires visually. Make sure storage doors, steps, stabilizers, and antennas are secured.
It sounds simple because it is simple.
But many towing incidents begin with small oversights made during rushed departures, distractions, bad weather, or simple fatigue after a long stay.
The Indiana crash is still under investigation. But for RV owners watching from afar, it serves as another reminder that towing safety is rarely about one dramatic mistake. More often, it is the small things overlooked before the trip even begins.
America’s Original RV Newsletter. Since 2001 Issue 1261 If you find this newsletter helpful, please consider supporting our work with a donation of your choice. Thank you!
Today’s thought
“It’s in those quiet little towns, at the edge of the world, that you will find the salt of the earth people who make you feel right at home.” ―Aaron Lauritsen, 100 Days Drive: The Great North American Road Trip
Need an excuse to celebrate? Today is Armed Forces Day, National Barbeque Day, and National Love A Tree Day!
On this day in history: 1888 – Nikola Tesla delivers a lecture describing the equipment which will allow efficient generation and use of alternating currents to transmit electric power over long distances.
Featured news
What BLM reversal of major public lands policy could mean for RVers
A new fight over Bureau of Land Management policy could eventually affect RVers who rely on public land for camping and boondocking. The Interior Department has rescinded a Biden-era rule that elevated conservation as an official use of federal lands, with supporters calling it a return to “multiple use” management and critics warning of weaker protections for fragile areas. Learn more.
State park campground expands, becomes largest in America
For years, RVers have complained that many state park campgrounds were built for another era—with tight sites, limited hookups, and roads that feel too small for today’s larger fifth wheels and motorhomes. Now, one Alabama state park is moving sharply in the opposite direction and is now the largest in America.
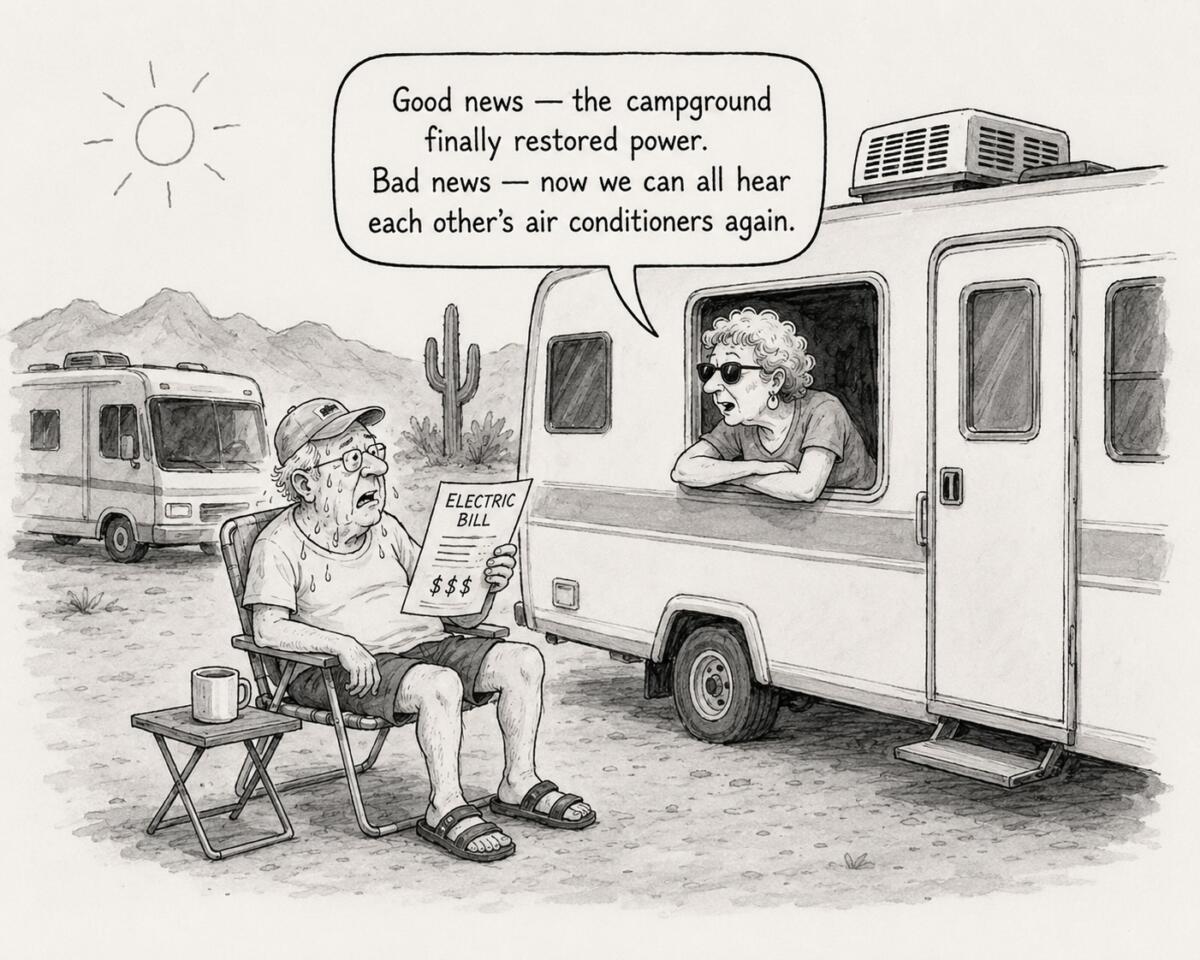
Can an RV park legally shut off your power during extreme heat? Arizona case raises questions
An Arizona RV park is at the center of a growing dispute after residents reportedly lost electricity during triple-digit heat amid an ongoing conflict involving park management and tenants. State officials later stepped in and ordered power restored at the Quartzsite park, raising concerns for long-term RV residents heading into another brutal Southwest summer.
RVers hear “technician shortage,” but RV repair company says the problem runs deeper
RV repair delays have become so common that many owners now expect them. But one independent mobile RV technician says the problem goes far beyond a shortage of techs, pointing instead to warranty approvals, parts delays, manufacturer paperwork, and increasingly complicated RV systems slowing repairs across the industry. Continue reading.
After short dip, gas prices on the rise again
After five straight days of declines earlier this week, the national average price of a gallon of gasoline was once again on its way back up as of Thursday, a couple cents lower than last week. With crude oil prices hovering in the $100/barrel range, pump prices remain elevated. Here are the numbers.
AccuWeather predicts summer weather could bring dangers
AccuWeather forecasters warn that the summer of 2026 could bring a wide range of dangerous weather extremes across much of the United States, including prolonged heat waves, drought, severe thunderstorms, flash flooding and major wildfires. Learn more.
Arizona RV park fire destroyed multiple homes in minutes. Snowbirds especially vulnerable
A fast-moving brush fire near Wickenburg, Arizona, destroyed multiple RVs and forced evacuations Monday, leaving some residents with almost nothing. Local reports said at least eight RVs were lost, highlighting the unique danger RV park fires pose for snowbirds and full-timers across the Southwest.
Tornado rescue story highlights hidden risks for RV pets
A tornado kitten rescue in Mississippi is drawing attention to what can happen to pets after RV park disasters. Rescuers searching through the wreckage of a tornado-damaged trailer park recently heard something unexpected coming from the debris: faint meows. For many RVers, this story may hit a little differently.
Beyond the headlines with Tony Barthel
The problem with luan; bears, coyotes, orangutans; and a really cool new A/C
This week’s RV news recap covers everything from terrifying bear encounters near Yellowstone and Glacier to a mystery coyote that somehow swam its way onto Alcatraz. Plus, environmental activists are targeting major RV manufacturers over rainforest wood sourcing. And there’s exciting news about a new ultra-efficient RV air conditioner that could change summer camping. Read Tony’s weekly news analysis here.
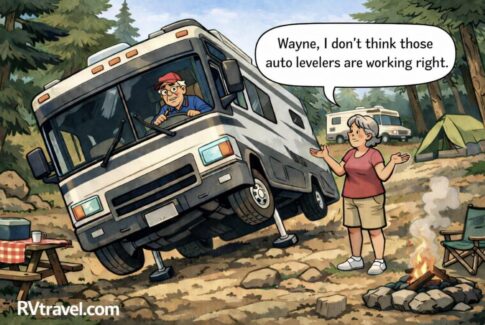
Campground rule #1: The quieter the campground claims to be, the louder the leaf blower at 7:12 a.m.
Tiny, portable air purifier is RV-sized
If your RV ever smells a little too much like last night’s dinner or the campground fire pit, this compact air purifier is a quiet hero. It uses a true HEPA filter to trap dust, pollen, smoke, pet dander, and odors; runs whisper-quiet in sleep mode; and is small enough for an RV, car, or bedside table. It’s a must-have for summer air. Check it out.
RV review The best 2026 travel trailers under 5,000 lbs.
Finding a small camper that still feels useful is harder than it should be. Here, Josh the RV Nerd at Bish’s RV pulled together a list of 2026 single-axle trailers that stay under 5,000 pounds dry, and the mix is broader than most shoppers expect. Some are simple weekend sleepers. Others add slides, bunks, solar, heated underbellies, off-road gear, or smarter storage. This list gives lots of options to consider. (Cheri lists them all in the article, too, if you don’t want to or don’t like watching videos.)
Tanner Toons with Tanner Woods
You may share this Tanner Toon, unaltered, on your website, blog or social media with our compliments. The musings from Tanner Woods’ creative mind appear in this newsletter every Saturday and Sunday and in many RV Daily Tips newsletters through the week. Sign up for our RV Daily Tips Newsletter so you don’t miss a single Tanner Toon.
News briefs
Despite rising travel costs and economic uncertainty, RV travel remains strong this summer, with 37 million Americans expected to take RV trips, according to a new RV Industry Association survey. Travelers are increasingly choosing road trips, closer-to-home destinations and flexible vacations, while national parks, beaches and campgrounds remain top picks.
OutReserve has launched a new ChatGPT app that lets travelers search for campgrounds, RV parks, cabins and other outdoor stays directly within ChatGPT while planning trips. The company says the tool is designed to simplify outdoor travel planning by helping travelers compare destinations, amenities, and availability in one place.
AAA projects 45 million Americans will travel at least 50 miles from home for the Memorial Day holiday, Thursday through Monday, up slightly from last year.
Camp Fimfo Texas Hill Country in New Braunfels, Texas, has been named the nation’s top RV campground in USA TODAY’s 2026 10Best Readers’ Choice Awards. The resort-style campground along the Guadalupe River earned the No. 1 spot after a four-week public voting period.
GOOD DEED DEPARTMENT! A North Texas glamping resort sheltered six families after an EF-2 tornado destroyed their homes April 25 northwest of Dallas. Camp Quitcherbichin provided six cabins for the displaced families.
Yosemite National Park is preparing to welcome visitors for the peak summer season with expanded access across the park, including the reopening of popular trails, climbing areas and full campground availability. All Yosemite front-country campgrounds will be open this summer and available for reservation via Recreation.gov. More info here.
This summer, visitors to Yellowstone National Park are being urged to plan ahead—both to stay safe and to help protect one of America’s most iconic wild landscapes. By following these top 10 things to know before you go, you can make the most of your visit while helping ensure Yellowstone remains healthy, wild, and awe-inspiring for generations to come.
Tennessee has officially dedicated Cardwell Mountain State Archaeological Park as its newest state park. The 534-acre site in Warren County preserves thousands of years of history and sits above Cumberland Caverns, one of the nation’s largest cave systems.
A wild burro rescued from a septic tank at an Arizona RV park may sound like one of those strange “only in the desert” stories. But wildlife officials say the incident points to a growing reality across parts of the Southwest: More wild burros are wandering into RV parks, neighborhoods, and developed snowbird areas as human activity spreads deeper into desert habitat. Here’s the full story.
The northern lights could be visible farther south than usual this weekend as fast-moving solar wind from an Earth-facing coronal hole triggers geomagnetic storms. In the U.S., the aurora borealis may be visible in northern states including Idaho, North Dakota, Wisconsin, Michigan, New York and Maine.
Arizona’s Organ Pipe Cactus National Monument is now a Dark Sky Park. The certification from the National Park Service and DarkSky International recognizes the exceptional quality of the park’s night skies and provides added opportunities to enhance visitor experiences through astronomy-based interpretive programming.
The National Park Service is once again reminding visitors to take extra precautions in bear country following recent bear incidents in several national parks.
Idaho has opened the new Twin Peaks Ranch State Park near Salmon after acquiring a 670-acre former guest ranch property. The park includes cabins, a lodge, restaurant, and equestrian facilities, with a public grand opening planned for June 27.
Escapees RV Club says its upcoming Escapade event in Maine will feature six days of live entertainment, games and themed activities, with ticket prices set to increase May 17.
Beginning July 1, California police will be able to ticket driverless vehicles for traffic violations. The law allows officers to issue notices of noncompliance to operators such as Waymo and Tesla when self-driving vehicles speed, run red lights, make illegal turns, or block emergency scenes.
Great Smoky Mountains National Park has temporarily closed parts of several trails due to aggressive bear activity, including Ramsey Cascades Trail and the Mollies Ridge shelter along the Appalachian Trail. Park officials are urging visitors to stay alert, warning that bear activity can occur anywhere in the park.
RVers’ favorite eatery Cracker Barrel is bringing back its Campfire Meals for a limited-time summer return. They feature foil-wrapped Campfire Chicken and Campfire Beef, seasoned with signature campfire spices.
THE MORE YOU KNOW… The World’s Largest Tire near Detroit stands 80 feet tall, weighs 12 tons, and once worked as a real Ferris wheel at the 1964–65 New York World’s Fair. Nearly two million people rode inside it before the giant Uniroyal tire was moved beside I-94 near the Detroit airport. At one point, the company even stuck an 11-foot-long “world’s largest nail” into it as part of a tire promotion. Because apparently regular advertising wasn’t weird enough.
Protect your battery terminals
Battery terminals and cable ends should be cleaned using a mixture of baking soda and distilled water with a wire brush. A commercial battery cleaner, such as CRC Battery Cleaner with Acid Indicator, can also be used. This changes color from yellow to pink when acid is present outside the cells, helping identify problem areas. You can find it on Amazon here or learn more about protecting your battery terminals here.
RV and RV-related recalls
Chrysler is recalling certain 2023-2026 Ram 2500 pickup trucks. A software error in the powertrain control module may improperly allow the vehicle speed to exceed the tire speed rating. That can reduce tire integrity, which can result in compromised vehicle control and crash. Learn more.
Forest River is recalling certain 2026 Prime Time Crusader travel trailers. The wastewater holding tank ventilation pipe may end inside the trailer, allowing sewer gas to enter the cabin. Recall number: 49-2057. Info: 574-825-4995.
Reader poll How likely is it that you will buy an electric car/truck in the next year?
Despite it being called a “bean,” coffee is actually a fruit. The “beans” grow on a bush and are found in the center of a berry, known as a coffee cherry.
? MYSTERY PRODUCT OF THE DAY ? ‘Tis the season for this! If you haven’t made the switch from ____ to ____ yet, you’re going to soon. We’re just about a month away from summer, and this will help you get the cool party started!
Laugh of the week
Top scams RVers should watch for right now
As more RVers hit the road for early summer trips, scammers are getting more creative—and more convincing. Here are three scams spreading right now:
Fake traffic and toll violation texts: Drivers across multiple states are getting texts claiming they owe a small unpaid toll or traffic fee, often with a QR code to “pay immediately.” Officials say these are scams designed to steal payment and personal information.
QR code scams (“quishing”) at travel stops: Fake QR codes placed on signs, fuel pumps, campground notices, or parking kiosks can redirect you to phishing sites or malware downloads. Security experts say these scams are rising fast this spring.
Fake RV rental and sale listings: Scammers continue posting too-good-to-be-true RV deals on Facebook Marketplace and Craigslist, often pressuring buyers to send a quick deposit before “someone else grabs it.” Once the money is sent, the listing disappears.
Miss The Perfect Scam podcast? Find the latest (and all) episodes here.
Today in history
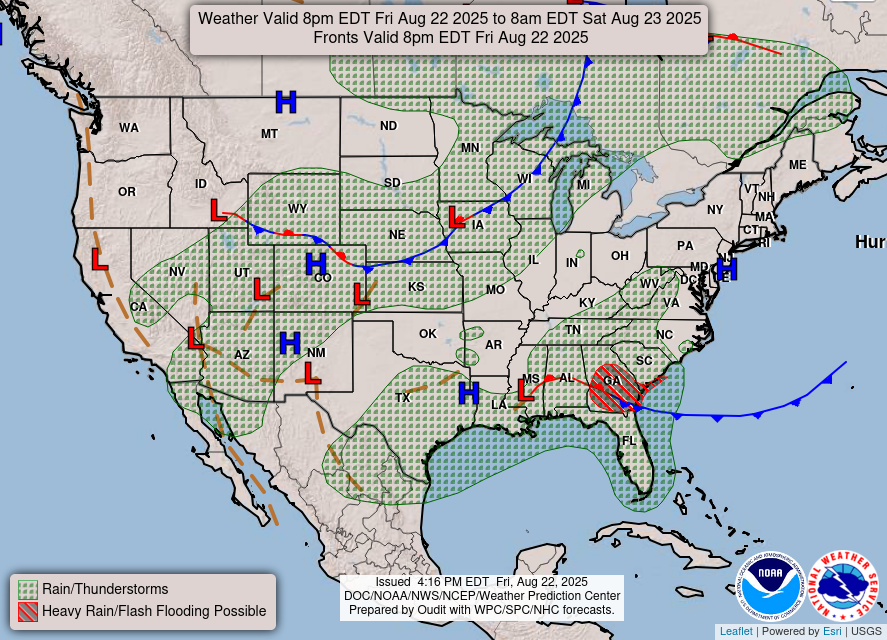
Today’s weather forecast across the nation THIS MAP UPDATES TWICE A DAY
We use cookies to ensure that we give you the best experience on our website. By continuing to use our site, you consent to accepting cookies. We NEVER have or will sell reader's data. For more info, please see our privacy policy page.


 Properly crossed safety chains should pass underneath the trailer tongue in an “X” pattern before attaching to the tow vehicle. That crossing creates a cradle designed to help catch and support the tongue if the coupler disconnects. Without that support, the tongue can slam directly into the pavement, potentially triggering violent whipping or even pole-vault-style flipping forces at highway speed.