
Dear Dave,
The battery on my travel trailer drains down within a few weeks when in storage and not plugged in. It is a pain to disconnect the cable to the battery as the box lid is strapped down and I never seem to have the right size wrench. How hard is it to install a battery disconnect switch? —TT Owner
Dear TT Owner,
Most smaller, inexpensive trailers do not have a battery disconnect switch standard. This is a common problem with units that are stored without the ability to plug the shoreline cord in and keep the batteries charged.
Flooded lead acid (FLA) and absorbed glass mat (AGM) batteries will naturally drain down even without a draw on them, although it typically is a month or longer. The issue with most RVs is the LP leak detector, which can drain a battery down in just a few weeks.
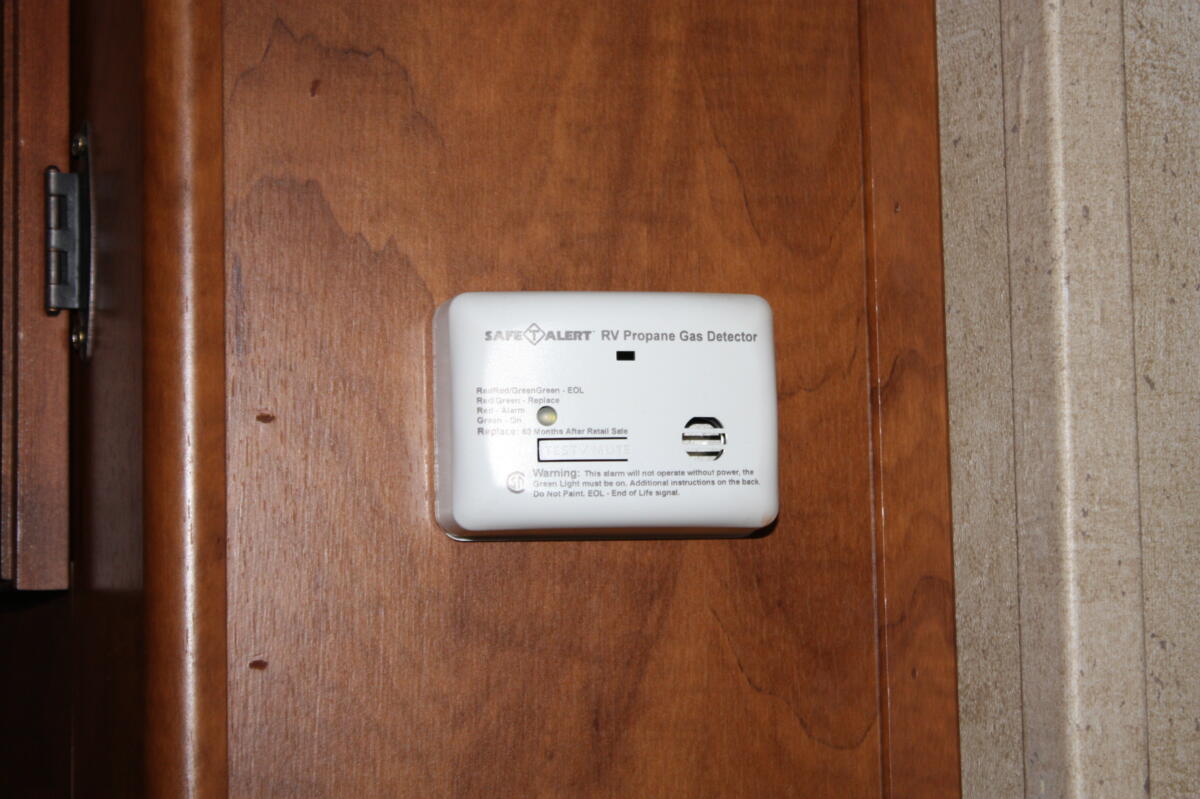
Another issue is most LP leak detectors have a direct path to the 12-volt power, and the standard battery disconnect switches shut everything off except the leak detector. Most of the standard battery disconnect switches are solenoids hidden somewhere close to the battery with a switch typically installed in the entrance door side panel.
Types of battery disconnect switches
There are several different types of aftermarket battery disconnect switches that are fairly easy to install. Some owners like the knife blade style, as they can actually see the open circuit. You can find these on Amazon here.

I prefer a more protected disconnect product that has a plastic housing and an On/Off dial, like this product on Amazon here.

Here is an older version we purchased for demonstration purposes a few years ago and just recently installed on the Forest River Salem trailer.
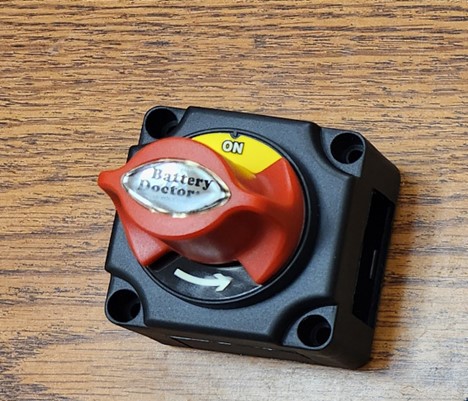
This has knock out tabs on all four sides to customize the install to your application. I felt it was much more protected from the elements. Plus, I would not be placing my hand on a bare metal bar like the knife blade, even though it might be safe.
Location for the switch
The battery on our trailer is located on the front tongue, behind the LP cylinders. Since our trailer has a Blue Ox weight distribution hitch, we needed to find a location for the switch that would not be in the way of the side bar. Locating it on the side of the tongue would most likely be in the way of the bar. Putting it on the front face of the trailer was not a good idea as the ribbed metal outer sheet was very thin, so I doubt it would stay there very long.

Because this unit has a weight distribution hitch on the side, the best location seemed to be on top of the frame. However, the width of the frame was too narrow to install screws or bolts, so we had to improvise. The mounting holes are very small and most U-bolt configurations only go down to 3/8”, which was too big to fit through the holes. I did find a 10-24 all-thread rod would fit. They come in just about any length, so that was the start of the journey.

Installation of the battery disconnect switch
My local home improvement store (Menards) had 10-24 all-thread rods in a 12” length for $0.89 before the 11% rebate. Cap nuts at the top were $1.28; two braces were $0.78 each; and the 10-24 nuts were $1.28, as I had to purchase a packet of bolts and nuts. So, now I have a packet of 3” bolts that do not have nuts. I could have gone to my local Ace Hardware store and bought individual components, but they did not have the small all-thread rods.

I disconnected the positive cable at the battery and connected it to the post of the battery disconnect. I then used a larger-gauge battery cable that I had in stock to connect to the battery. It had mechanically crimped ends and just seemed to be a better connection. I am surprised that the original smaller-gauge wire is sufficient; however, I am surprised by many things in the RV industry.
I could not find a U-bolt small enough or long enough to cover the tongue, so I used a 10-24 all-thread rod and flat brace. With a cap nut on the top, it worked great to straddle the metal tongue.
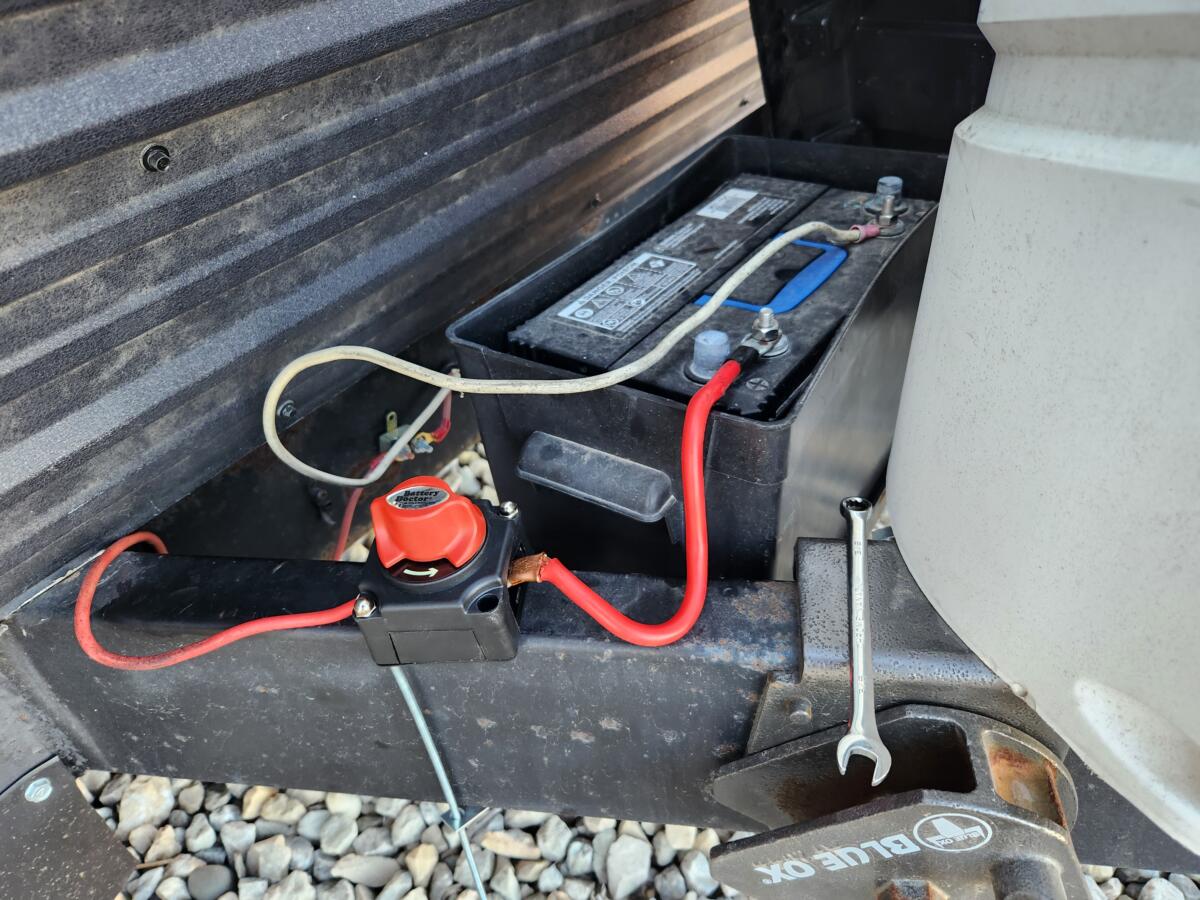

I wrapped black electrical tape around it to seal the openings on each side. The only thing left is to cut off the excess thread at the bottom.

You might also enjoy this from Dave
When storing 5th wheel, what is the best battery maintainer and how do I connect it?
Hi Dave,
This will be my first time to keep the 5th wheel in storage. I have two questions, below. Mainly I am looking for a recommendation on a battery tender [maintainer]. I have two 12V batteries hooked up, as shown in the attached photo.
Q1: What battery tender do you recommend I purchase for my setup? It looks like the first battery is the one connected to the 5th wheel power. Second battery is tied to the first battery.
Q2: Is there a certain way I need to connect the tender to these batteries? I have seen conflicting info on Google. Some say connect only to one battery, some say connect to the negative on one and the positive on the other. —Cody, 2022 Rockwood Ultra Lite 5th Wheel 2893BS (Forest River)
DAVE HAS ANSWERED MORE THAN 1,000 readers’ maintenance and repair questions. Read a directory here. There is so much to learn!
RVDT2742
I’ve put a battery shut off switch mounted to the plastic battery box with bolt heads inside of the box, and the switch knob could be removed and I set the knob inside of the door, just as a precaution against anyone else messing with it.
I installed a nearly identical dial type disconnect on our trailer, likewise on the tongue frame. However, most of the battery disconnects, including mine, are designed to connect to the negative (ground) side of the battery rather than the positive side.
I got lucky. The included mounting screws fit snugly to either side of the frame and I avoided the under frame bracket. I used Gorilla Mounting Tape to vertically secure the switch to the frame and the screws prevent any horizontal movement. The Gorilla product has a higher working temperature range than 3M’s competing product. That turned out to be important in Texas.
Jim, mechanical disconnect switches aren’t really “designed” for a specific polarity.
The reason why most suggest the switch be installed on the negative side of the battery is safety. If you accidentally touch a ground while tightening the nuts, you can arc weld your wrench if the nut is connected to the positive side of the battery. Likewise, if the switch is installed on the negative cable and shorts to ground for any reason, sparks won’t fly, it just won’t disable power flow.
I always recommend putting it n the negative cable because it truly is safer.
Not trying to start a flame war. Many 12v FLA & AGM batteries have different positive (larger) and negative (smaller) post/stud sizes. While I am sure there are exceptions, in my experience,. many 12v battery disconnect switches that attach directly to the battery are sized for the negative terminal. Probably has something to do with that safety aspect you mention.
No flame interpreted my friend. You are correct, battery posts and their respective clamps are typically of dissimilar sizes to deter accidental reverse polarity.
My commentary was based on remote battery disconnects that are not directly mounted off a battery post but rather like the rotary switch that Dave was using. My apologies for not being more specific.
Safe travels!
On Dave’s installation, I’d leave about a 1/2″ all-thread below those small hex nuts and install a nylok nut to ensure those little hex nuts stay put and don’t work loose. #10 hex nuts don’t have a lot of holding power and it’s clear by the bent cross piece they have been torqued.
But then, I wear a belt with suspenders! 😆
Nice article. I used a marine grade master shut off and mounted it on the frame, in reach, behind the battery box. I chose to use the ground wire.
The reason the trailer’s existing battery cable seems undersized is because the automotive battery cables we are used to have to be thick to handle the high amperage draw of a starter.
Trailers, and the coach of an RV, have nothing that draws that much current. Therefore there is no need or advantage to having such thick, heavy, and more expensive cables.