Home Blog Page 2201

Tips for the snowbirding boondocker

0

By Bob Difley

Snowbird season is on us. If you are planning to spend a few months boondocking in the deserts, you may find the following tips helpful as well as a partial check list before you set out, or to make adjustments if you’re already doin’.

• Consider installing solar panels. Most of the desert is wide open to the sky and you get a full day’s worth of charging — even though the days are shorter. Even a single panel will provide enough electricity to run some of your systems, decreasing the amount of generator run time.

• Also consider a catalytic heater, which runs on propane — and since it has no fan, it draws no electricity. Your built-in forced air heater will quickly drain your batteries on those crispy desert nights.

• Make up a desert day pack for hiking, biking or just sightseeing, consisting of sunscreen, a floppy brimmed sun hat, sunglasses, refillable water bottle, energy bars, a stuff bag nylon windbreaker, and a small first aid kit.

• Stock your bookshelf with a selection of field guide books: deserts (such as Audubon’s Deserts), southwestern wildflowers, western or local regional bird book, desert wildlife (though the Audubon book has a wildlife, bird and wildflower section), desert plants, and a regional or state tour book like Lonely Planet or Moon Travel guides. Mike and Terri Church’s“Southwest Camping Destinations” lists all the campgrounds and related information for the Southwest. Edward Abbey’s “Desert Solitaire” is a good read also.

• Jerry jugs or inflatable water bladder for extra drinking water.

• If you plan on staying into April or beyond, when it heats up again, buy windshield and side window sun screens to keep the inside of your RV cooler.

• Sturdy-sided walking shoes or hiking boots to protect your ankles from cactus thorns and rattlesnake strikes. (I’m kidding about the snakes — they hibernate all winter, as do scorpions and Gila monsters.)

• Leave your ear plugs at home or you won’t hear the quiet — or the coyote serenade. And turn off your porch light if you want to see the spectacular Milky Way, as clear and sparkling as you ever imagined when seen through the clear, humidity-free desert air.

photo: R&T De Maris

Tune up your RV fridge for better food care


By Greg Illes

The Norcold and Dometic RV refrigerators are ubiquitous, and RVers who live away from AC power a lot of the time really have few other options. By and large they do the job, given their less-efficient (than house-style compressor types) gas-absorption technology.

However, there are several problems that can exist even in the best of RVs. Addressing these issues can help these little units live up to their (limited) potential.

INSTALLATION — The manufacturers are very particular about clearances in the dark area behind the fridge proper. These clearances are essential for proper airflow over the coils and fins of the thermal structure back there. Unfortunately, many manufacturers either don’t try very hard or their production quality is inconsistent. The end result (as I found in my RV) is that the clearance specifications are badly violated. It’s not difficult for a reasonably handy person to pull the fridge out, take some careful measurements and fabricate some trim to establish proper clearances. This way, the airflow can work as the designers intended.

FAN (cooling unit) — For standard fridges with roof vents, there are usually no fans installed. For my side-vent fridge (it’s in a slideout), there was one factory fan. The fan is thermally switched — to put more air through the enclosure if the top coil gets too hot. On warm days, my fan used to stay on for hours and hours, using up battery juice — and the fridge would still be several degrees too warm. The solution was to add one more fan. Now, the extra air flow really cools things down. The fans now stay on for typically less than one hour; and even though the current draw is twice as much, the result is better refrigeration and lower current consumption. Even if you don’t have a stock fan, adding one in could give your fridge an extra advantage. It’s fairly simple to do by tapping into the 12V circuit and using a standard thermal switch.

FAN (fridge compartment) — It’s well known that air inside the fridge is not at a uniform temperature from side-to-side or top-to-bottom. Several aftermarket battery-powered fans are made for “stirring” the inside air, and they all work so-so. Reviews generally speak about unreliability and quick battery exhaustion. Since the concept is sound, adding a permanent 12V fan is a set-it-and-forget-it solution. Caveats: You will have to drill and seal some small holes in your fridge, in a safe place. You should select a fan with fairly low current draw because it will be on whenever your fridge is turned on. I picked a fan from Digikey that draws only 1/8 of an amp, which equates to 1.5% of my battery capacity per day. (Less than one cell phone charger.)

Tackling any, or all, of these tuneups can make your fridge seem almost as good as a household compressor-style unit — so be handy, have fun, and keep your foods and drinks fresh and cool.

image: Pixabay (public domain)

Greg Illes is a retired systems engineer who loves thinking up RV upgrades and modifications. When he’s not working on his motorhome, he’s traveling in it. You can follow his blog at www.divver-city.com/blog.

Coffee-can your sewer odor away

By Russ and Tiña De Maris

If your RV is connected to a sewer drain most of the time, you probably keep your gray water valve open. This can lead to a smelly little problem: Sewer gases arise from the sewer hose into your gray tank, and slowly migrate up the through the tank and out the roof vent. At times those same evil essences can somehow reinfiltrate your RV with a negative impact on your olfactory organs.

Worse still, if there are any “vague” connections in your gray water venting system, those nasty little essences can also make their creepy way out, carrying not just the odor of gray water (as bad as that is!) but with a direct connection to the city sewer (or local septic system), that really horrific scent of black water can invade your premises.

What to do? Enter the Folgers P-trap solution. If you leave your sewer hose connected and the dump valve open, stick a P-trap between the sewer and you. Simply obtain a coffee can (or a large rock) and make a bend in your sewer hose. Gray water will advance over the bend, but the water trapped in the hose on the “rig side” of the coffee can will prevent the odoriferous fumes from crossing over.

Mind you, when you dump your black water you’ll want to temporarily remove the coffee can to allow a free-flow of black water, et al, to make the trip down the sewer unimpeded. One more thing: If your travels take you to the cold country, don’t use this lash-up in below-freezing weather — you’ll get more than just stink back!

Keep your toilet flowing when the freeze sets in

0

By Russ and Tiña De Maris

With cold weather “now in progress,” one RVer asks: How can I keep my tanks and water lines from freezing up in cold weather? It’s a good question, and one we learned about early in our RVing days when we woke up one frosty morning to find our water line looked like an icicle.

frozen pipe signWhen it comes to freezing up your RV, the first rule is: Don’t let it happen. Freezing water in a line is expanding water, and it will likely cause damage. Let’s look outside first. When nighttime lows drop below the freeze point, most RVers abandon any idea of hooking up a hose to their “city water” inlet. Fill the rig’s fresh water holding tank and let your RV’s water pump keep water at the ready. Of course, it’s critical that you keep the RV warm — keep the heat on to keep the rig’s water lines from freezing up.

If you’ll be in camp for awhile and have electrical hookups, some RVers have kept their water hose ice-free by carefully applying “heat tape” to the hose. Heat tape is typically sold in hardware stores to be wrapped around pipes at home to keep them from freezing. When using it on a hose, the trick that’s said to work is not to wrap the hose with the heat tape but, rather, run the heat tape parallel with the hose and tape it on. We’ve never tried it, but some say it works. And it may, provided it doesn’t get too, too cold.

Next, there’s the matter of the sewer hose. Again, if you’re in a park with sewer hookups, we typically recommend leaving the black water valve closed and allowing gray water to flow freely into the sewer. Not good advice in cold weather. Keep both valves closed, and dump only when your tanks fill up. If you’re in serious cold country and your tank valves are not in a heated basement compartment you may find them “frozen shut.” We’ve dealt with this by carefully pouring hot water over the valves to unstick them.

What about holding tanks? Again, if your rig is “winter ready” the tanks are probably safely tucked away inside a heated compartment. Only our truck camper has ever had this option, and we’ve always had to deal with exposed tanks. In our experience, if the weather warms up above freezing by day, we’ve always been good. But if you’re dealing with protracted below-freezing days and nights, you’ll need to do more. If you’re stuck in a cold-weather area, skirting around the rig may help keep some of the cold out. Hay bales are easy, but they mold and attract vermin. Using “real” skirting may be your only option.

Even with skirting, if there’s a danger of a holding tank freeze-up, your last viable option is a holding tank heater. Think of it as an electric blanket for your tank. It sticks on the bottom of the tank and uses electricity to warm the tanks above the freeze point. One manufacturer has a “dual power” system that uses shore power when in camp, and 12-volt power when the rig is under way. At about $100 per blanket (meaning two for the typical RV), it’s not an inexpensive solution.

If cold weather is severe, be concerned about keeping your inside pipes warm, too. Typically basement storage compartments are heated with your rig’s LP furnace. If you try and conserve LP by turning it off and heating with a space heater, you’ve blown keeping the storage compartments warm. We’ve found in really cold weather that it’s best to open the cabinet doors to areas where water pipes run to ensure warm air gets to the precious plumbing.

As a general rule, it’s never a great idea to keep your RV in the open winter air for the season. Look into RV self-storage units in your area.

Use a TPMS for easy tire pressure monitoring

0

By Greg Illes
A while back I drove a boat-on-trailer 100 miles at night to the Sacramento River Delta area. We camped overnight to get an early start the next day on the water. Imagine my surprise when I awoke the next morning to find one trailer tire completely shredded on a badly battered rim. The tire had gone flat behind my tow vehicle and I never felt it or noticed it. In early 2013, the same thing happened to a friend with a cargo trailer (see photo).

tpms-736My brother-in-law won’t invest in a TPMS (tire pressure monitoring system). He pays his house insurance, he pays his auto and RV insurance, he even pays for “umbrella” insurance — but he won’t pay for equipment for watching his tire pressures. Why? Because he’s never had a problem. He checks his RV and toad tires before a trip, and occasionally while en route. The fact that any tire can pick up a nail going out the driveway doesn’t bother him — but it does bother me. If it bothers you, a TPMS is an excellent choice.

If you decide to invest in a TPMS, you’ll spend $300 or so and hopefully you will never make “real” use of it. Which is to say, you’ll see the display, observe that your tires are at desired pressure and temperature range(s), and roll on down the highway with beatific peace-of-mind. However, if the TPMS ever encounters an opportunity to “earn its keep,” you will be saved a miserable tire-destroying roadside flat, or worse, a blowout experience.

If you are able to be informed as to when any tire pressure is decaying, you can proactively exit the roadway and undertake a remedial exercise (find the problem and fix it). However, if the first thing you know about a tire problem is that it’s flat/blown-out and thumping the heck out of your RV, you are likely to be dealing with a more insidious issue, including major damage to your coach body and chassis.

Now, let’s add to this equation the presence of a towed vehicle (trailer or toad), which has its own set of tires and pressures. The toad is way back behind the RV and any tire failure there is virtually undetectable by the RV driver (you know how I know this). A typical RV-and-toad, on-highway combination has 10 tires that can misbehave. Other than the front tires on the RV, the rest of the tires have failure modes that are generally undetectable by the driver of the RV.

Yes, a TPMS will occasionally issue a false alarm. For me, this hasn’t been a big deal, and in fact it familiarizes me with what to do in the real event. It also makes real the possibility of a tire failure and the need to monitor pressures.

There are a variety of TPMS systems available, including sponsors of this website. You can choose the physical style and user interface which you find most suitable.

Greg Illes is a retired systems engineer who loves thinking up RV upgrades and modifications. When he’s not working on his motorhome, he’s traveling in it. You can follow his blog at www.divver-city.com/blog.

Make your under-cabinet electric outlet really work for you

By Jim Twamley

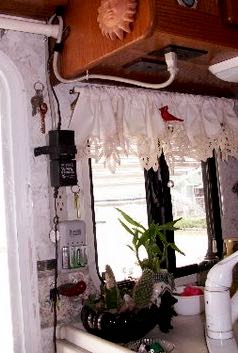
Power outlets under cabinets may be OK for a few appliances, like a mixer or a coffee pot (if the cord is long enough), but a little thing called gravity makes them totally useless for things like transformers, battery chargers and items with short cords. Here is one possible solution.

Notice that a standard surge protector power strip was secured to the wall. The power strip cord was also secured to the wall and under the cabinet with screw-in wire holders. This makes a neat application utilizing the otherwise useless under-cabinet outlet.

Also notice that Velcro strips are used to hold the top transformer in place on the surge protector power strip.

Test your shore power outlet for safety

By Russ and Tiña De Maris

One quick way to ruin an RV trip is a heavy electrical shock. Shore power systems in campgrounds can be dangerous if not maintained or if miswired. Protecting yourself isn’t difficult or expensive.

On arriving at a campground, don’t just assume the power supply is safe. First, make sure the breaker is turned off to the power outlet, then plug in the RV power cord. If you have an exterior power outlet on your rig, plug in an electrical circuit analyzer that indicates circuit problems. If you don’t have an outside outlet, plug the analyzer into an outlet inside and have a helper look at it.

Now turn on the breaker to your RV circuit. If the circuit analyzer indicates all is well, well and good. If not, DON’T touch the side of your coach or attempt to go inside. Switch off the breaker immediately, especially if you should get an indication that the hot and ground wires are reversed. If they are, you have a potentially dangerous situation. Don’t touch the electrical box or the side of your rig. Unplug the shore power cord without touching anything else.

If the tester indicates a reversed hot and neutral wire you are physically safe, but you could see damage to sensitive electronics. If your analyzer shows an “open ground” situation, there is still a level of danger to your physical safety if an electrical short took place.

In any case, if your tester shows a problem, disconnect and ask for a new site.

Editor’s note: Electrical circuit analyzers are available at Amazon.

RVing? Camping? What’s the difference?

0

By Chuck Woodbury
I believe I am finally able to define the lifestyle called RVing, which some people criticize because it’s not really “camping.” What they don’t understand is that RVing and camping are not the same, although sometimes they overlap.

rv-cw-736Only one segment of RVers are exclusively “campers” — those who “camp” for a week or two a year. These people generally camp in the summer, often on family vacations. They typically spend their days sightseeing or hiking and their evenings by the campfire. Their RVs, if they have one, are pretty basic and are often rented.

After Labor Day and before Memorial Day, the RVers you see on the road are more often “travelers” than “campers,” using their RVs for both transportation and lodging. Their rigs are larger and better equipped than the vacation campers — sort of “homes away from home.”

Sometimes, however, these well-equipped RVers end up in the same national park or national forest campgrounds as more traditional campers and this is where their lifestyles get misinterpreted.

These avid RVers, in their bigger rigs, are simply living in a portable way. They are essentially living in self-contained, mobile condos rather than in fixed-based houses.

Many of these RVers have simplified their lives. I’m especially referring to the hundreds of thousands of retirees who have sold their homes and moved into a trailer or motorhome. At some point, they had to get rid of a lifetime of possessions. They retained what they considered important — fishing rods, a sewing machine, favorite books, a TV, pictures of the kids and grandkids, and nowadays, a computer.

These full-timers and serious part-timers would never be traveling America in the first place if RVs didn’t exist. They would not set off in their cars month after month, staying in a different Holiday Inn each night. To do so would be too much trouble and even exhausting. They might fly off to Europe on occasion, but by and large, they would spend their lives at home.

After climbing on Wyoming’s Independence Rock for more than an hour and doing battle with a blustery wind, it was a wonderful feeling to return to my comfy porta-house. When I closed the door behind me, I felt truly at home, even though my street address is a thousand miles away.

I understand the concept of the portable house. It’s not the same as camping.

photo: R&T De Maris

Should I upgrade my RV to match the features of more expensive models?

By Steve Savage, Mobility RV Service

The other day someone asked me how to go about finding the same high-end features found in a more expensive RV, in a less expensive RV. I guess this boils down to, “I want to have the same features found in a Cadillac, only I want them in my Chevrolet.” The short answer to this question should be obvious. You can’t — and here’s why.

In the majority of cases, the difference between the less expensive and the more expensive RV is far more than the “sum of the options” list. Normally, increased cost brings with it better construction, a bigger power train, larger wheels and tires, and so forth.

It’s a big mistake to tell yourself a $40,000 fifth wheel package has as much quality construction as a $120,000 fifth wheel. To put it bluntly, it doesn’t, and the extra cost goes well beyond window dressing like additional flat screen TVs — and while they may increase livability, they add nothing to quality.

This same line of thinking carries over to folks who think that by upgrading a Yugo, they will end up with a BMW. Attempting something similar in an RV generally results in a poorly integrated system or out-of-place features. While the next owner may appreciate the addition of granite counter tops in a mid-line motorhome, there is not a chance the current owner will gain back even a fraction of the cost when selling — regardless of what they may have told their spouse.

The best way I can summarize this ramble is this way: Buy what you want, or buy less expensive and live with it until you can afford what you want. Never try to convince yourself that, with effort, you can make a silk purse out of a sow’s ear. It’s a costly mistake I see all-too-many owners make.

Learning from the “other guy”

By Russ and Tiña De Maris

While there’s plenty to be learned from industry experts, as RVers we often learn a lot from fellow RVers. There’s nothing like hearing the next-door RVer confess to learning through that old “school of hard knocks.” Here’s one shared by Jim Hazard, one of the RVtravel.com reading faithful.

After installing a new in-line water filter in his motorhome, Jim began noticing some rather odd water system problems. After having slipped the new filter in the housing and buttoning it up, Jim flipped the pump switch and noticed the pump ran on and on. The pump was pushing a decade in age, and had suffered through some plenty cold water, so Jim’s first “diagnosis” was a possible fatality in the water mover.

After a new pump arrived and was installed, it tested just fine. But not long after, while doing some latrine duty, Jim noticed that the water that should have flowed into his toilet bowl wouldn’t. He could get a bit of water out of his hot water faucets but nothing on the cold water side. This symptom presented itself whether the source of water was from the motorhome’s fresh water tank (utilizing the pump) or from the city water side, where the water pump would have had nothing to do with flow problems.

Jim consulted with both professionals and volunteers on RV Internet forums, and while all practically stood on their heads trying to figure out the issue, no one could come up with a concrete answer. Most figured there must be some sort of hung-up check valve in the plumbing system. At his wit’s end, Jim bumped into another RVer and in swapping stories, got the advice: “Check your water filter.” A quick look at the filter showed that Jim, when installing an unfamiliar brand of filter, had put the thing in the housing upside down. Pulling out the filter and swapping it end-for-end immediately resolved the problem.

Incidentally, after Jim “cured” the stubborn problem, he found a recently posted reply to the problem that he’d posted on an RV forum. Another forum member had a similar problem and, sure enough, advised checking filter orientation. For those die-hard NPR “Car Talk” fans, it sounds like the RV equivalent of “Stump the Chumps.” Never underestimate the diagnostic powers of your fellow RVers. And thanks to Jim for ‘fessing up on his no-pressure ordeal.

Late night campground arrival courtesy

0

By Bob Difley

When pulling into a campground during quiet hours, it seems that some forget they may be the only ones awake. A few tips to follow to be considerate to the sleepers:

• Turn your lights off. Park in your site as quietly as possible.

• Leave the tweaking and setting up of your camp gear until the next day.

• Keep conversations to a minimum — both in number and noise level — and don’t shout parking instructions.

• Avoid slamming doors and any other unnecessary noises. It may not bother you — since you’re awake — but it will your neighbors.

• Turn off your engine after you are parked.

Did your efforts work? If you get a lot of dirty looks the next day, you don’t get a gold star!

Another wrinkle on RV departure checklists

By Russ and Tiña De Maris
We’ve reminded readers several times of the importance of not forgetting important items when pulling up the stakes at your campground. We speak from personal experience, once heading down the road with our rig festooned with dragging power cord and water hose. Much has been said (and printed) about checklists, but not everyone wants to deal with “another piece of paper” in their lives.

Leave it to our readers to come up with new ideas to share. On this topic, Ghent Wilson shares his own method of running a checkout checklist — only Ghent’s isn’t on paper — he keeps his as a mental checklist. Again, speaking from experience, I have to hand it to Ghent. His “bean” obviously works a lot better for him than ours do!

“I have developed a quick, double-check of myself … I count. For each side, top and interior I have assigned a number value to the checklist.

“For instance, I have a ‘check items count’ on my trailer hookup:
1. Both load distribution bar pins installed = 1
2. Both safety chains connected = 1
3. Break-away safety cable connected = 1
4. Power cable connected to tow = 1
5. Hitch safety lock, locked= 1
6. Tongue leveler raised and blocks stored = 1
7. Hitch pin secure = 1
8. Brake, running and turn signals operating = 1
9. Gas valves off = 1

Total checks for hookup = 9

For the utility side:
1. Water hose stored = 1
2. Power cable stored = 1
3. Hatches secured = 1
4. Tires/chocks/leveling blocks checked/stored = 1
5. Slide properly secured = 1
6. Sewer/grey water closed, capped and hose secured = 1
7. Windows closed = 1

Total checks for utility side = 7

“I have the item count memorized for every side, interior and the top and count them as I do my final check. Therefore, I greatly reduce the chance of missing anything significant. Not a true checklist, but it works for us.”

Thanks, Ghent, for the mentally stimulating alternative to the paper checklist!