
By Jim Twamley
 Just how effective are those RV wind deflectors you see on trucks pulling 5th wheels and travel trailers? Though somewhat technical (what you’d expect from a Professor of RVing), this information could save you some serious cash.
Trucks pulling trailers lose a majority of their energy at highway speeds through aerodynamic drag. Using computational fluid dynamics, scientists study airflow as it interacts with test models in a wind tunnel. These studies have determined that in order for an RV wind deflector to work efficiently it must be within a few feet of the trailer due to the fact air flow created by the deflector closes in within a few feet unless it’s conducted by another surface. Cab extension gap seals and side fairings will help to make this possible. (From the article “On the Aerodynamics of Tractor-Trailers,” by M. Hammache and F. Browand.)
According to these scholars, the best place for an air deflector is actually on the trailer itself because that’s where the majority of the drag occurs. When you place a rounded “nose cone” on the trailer, you eliminate the gap of a cab wind deflector and the aerodynamic drag is significantly reduced. So, if you’re looking to save a bunch of money by installing one of these over-the-cab deflectors, make sure it’s as close to the trailer as possible and also install gap seals. If you don’t do this you’re throwing money to the wind.
In fact, if the gap is too large, it will end up reducing your fuel economy because you’re actually increasing the drag. The bottom line is that trailers like the Titanium brand, made with an aerodynamic nose, are more fuel-efficient than any aftermarket cab-mounted wind deflector. The more aerodynamic the trailer, the better the fuel economy. —Preventing the money from blowing out of your wallet —Jim Twamley, Professor of RVing
##RVDT1335
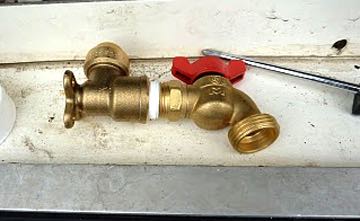 For the hot water drain I selected a 1/2-inch “SharkBite” fitting with a 1/2-inch male threaded standard garden hose valve. The “SharkBite” fittings are great because you just push them on and they form a tight seal with absolutely no leaks. They can also be easily removed by compressing the release collar. This particular fitting has a braced back for securing it into the wall.
 On the fresh water tank drain I used a standard 1/2-inch barbed hose connector with a 1/2-inch threaded male end attached to a standard garden hose valve. This is held in place by a hose clamp. You probably already figured out why I’m using a standard garden hose valve, and you would be correct. When I drain my fresh water tank I want to be able to attach a standard garden hose and water the trees or run it down the sewer instead of making a small lake under the coach.
 That’s not entirely accurate anymore as the average age of an RVer has dipped below 50. Still, there are a lot of older RVers on the road, many over 70. So how well does the safety record of these older drivers compare those of younger ones? Darn good according to the Insurance Institute for Highway Safety.
 I advise staying away from any RV that falls into the entry level, i.e., the cheap price range. The only way the manufacturers market entry-level products is by “decontenting”* the product or by pushing it down the line. I have seen some of these wherein appliances were not even wired before leaving the factory. I would also advise against buying from any manufacturer that has not been in business for at least five years. Everyone needs a track record.


 The typical RV refrigerator is smaller than the one in your home and many RVers tend to overstuff it, making it difficult for air to circulate and maintain an evenly-distributed temperature. This can also cause some meat and dairy items to smell a bit after just a couple of days.
 The answer is “not much!” There is very little maintenance required on a well designed solar electric battery charging system. Solar panels have no moving parts to wear out, no fuel to consume and no filters to replace. All you have to do is clean them occasionally with a non-abrasive cleaner and check the mounts and fasteners to make sure they are tight. Vibration, expansion and contraction from temperature changes have a way of loosening up hardware.
 Every so often, depending on how much you have driven your RV or car, or before you embark upon a long road trip, check your tires for wear and damage problems. One easy way to check for wear is by using the penny test. All you have to do is grab your spare change and follow three easy steps.
 In the classic monster movies, the mad scientist zaps his new “creation” with a huge blast of electricity — and it all goes bad from there. As RVers, the wrong kind of voltage can raise all kinds of problems for us; and it’s not just any voltage to worry about, but low voltage.
 HOW CAN YOU PROTECT YOURSELF? Buy, install and use a power line monitor. You can use yours as an added safety benefit against bad electrical wiring at the RV hookup. One inside the rig watches the monitor as another plugs in the power at the pedestal. The inside person verifies that the power monitor shows “good” wiring — no reverse polarity, no “no ground” situations — any of which can lead to safety issues. Other RVers take the safety a step farther: Using the appropriate adapter, they plug their monitor directly into the power outlet on the campground pedestal, getting a “read” on the power even before plugging their RV in. The latter is a smarter approach.
 If you’ll be camping in a park with “city water,” that is, water from a faucet, there are some good accessories to keep in your RV storage compartment. These can make your visit easier —even safer — for your rig. They’re inexpensive and you’ll bless yourself for having them when you need them.
 A water pressure regulator (left) can also save you lots of headaches. Typically RVers complain that the pressure they encounter in a campground or RV park is too low, but it only takes one case of over-pressurization to blow a fitting in your rig to really make your blood boil. A simple RV water pressure regulator can prevent over-pressure from doing real damage. Where do you put it? We’ve seen plenty of RVers who hook the things between the water hose and the city water inlet on the rig. But why not protect the water hose too? Hook it on the campground faucet, then to the hose, and all your bases are covered. Yes, there is a slight fall-off of water volume when you use this rig, but the peace of mind is usually worth it. Is it worth the extra money to buy the fancy “adjustable” water pressure regulators? Not from what we’ve heard — some say they simply don’t work as advertised.
