Home Blog Page 2205

Make your under-cabinet electric outlet really work for you

By Jim Twamley

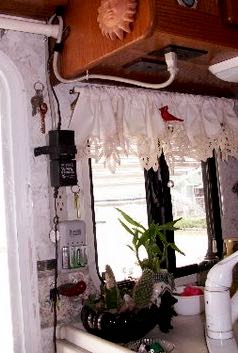
Power outlets under cabinets may be OK for a few appliances, like a mixer or a coffee pot (if the cord is long enough), but a little thing called gravity makes them totally useless for things like transformers, battery chargers and items with short cords. Here is one possible solution.

Notice that a standard surge protector power strip was secured to the wall. The power strip cord was also secured to the wall and under the cabinet with screw-in wire holders. This makes a neat application utilizing the otherwise useless under-cabinet outlet.

Also notice that Velcro strips are used to hold the top transformer in place on the surge protector power strip.

Test your shore power outlet for safety

By Russ and Tiña De Maris

One quick way to ruin an RV trip is a heavy electrical shock. Shore power systems in campgrounds can be dangerous if not maintained or if miswired. Protecting yourself isn’t difficult or expensive.

On arriving at a campground, don’t just assume the power supply is safe. First, make sure the breaker is turned off to the power outlet, then plug in the RV power cord. If you have an exterior power outlet on your rig, plug in an electrical circuit analyzer that indicates circuit problems. If you don’t have an outside outlet, plug the analyzer into an outlet inside and have a helper look at it.

Now turn on the breaker to your RV circuit. If the circuit analyzer indicates all is well, well and good. If not, DON’T touch the side of your coach or attempt to go inside. Switch off the breaker immediately, especially if you should get an indication that the hot and ground wires are reversed. If they are, you have a potentially dangerous situation. Don’t touch the electrical box or the side of your rig. Unplug the shore power cord without touching anything else.

If the tester indicates a reversed hot and neutral wire you are physically safe, but you could see damage to sensitive electronics. If your analyzer shows an “open ground” situation, there is still a level of danger to your physical safety if an electrical short took place.

In any case, if your tester shows a problem, disconnect and ask for a new site.

Editor’s note: Electrical circuit analyzers are available at Amazon.

RVing? Camping? What’s the difference?

0

By Chuck Woodbury
I believe I am finally able to define the lifestyle called RVing, which some people criticize because it’s not really “camping.” What they don’t understand is that RVing and camping are not the same, although sometimes they overlap.

rv-cw-736Only one segment of RVers are exclusively “campers” — those who “camp” for a week or two a year. These people generally camp in the summer, often on family vacations. They typically spend their days sightseeing or hiking and their evenings by the campfire. Their RVs, if they have one, are pretty basic and are often rented.

After Labor Day and before Memorial Day, the RVers you see on the road are more often “travelers” than “campers,” using their RVs for both transportation and lodging. Their rigs are larger and better equipped than the vacation campers — sort of “homes away from home.”

Sometimes, however, these well-equipped RVers end up in the same national park or national forest campgrounds as more traditional campers and this is where their lifestyles get misinterpreted.

These avid RVers, in their bigger rigs, are simply living in a portable way. They are essentially living in self-contained, mobile condos rather than in fixed-based houses.

Many of these RVers have simplified their lives. I’m especially referring to the hundreds of thousands of retirees who have sold their homes and moved into a trailer or motorhome. At some point, they had to get rid of a lifetime of possessions. They retained what they considered important — fishing rods, a sewing machine, favorite books, a TV, pictures of the kids and grandkids, and nowadays, a computer.

These full-timers and serious part-timers would never be traveling America in the first place if RVs didn’t exist. They would not set off in their cars month after month, staying in a different Holiday Inn each night. To do so would be too much trouble and even exhausting. They might fly off to Europe on occasion, but by and large, they would spend their lives at home.

After climbing on Wyoming’s Independence Rock for more than an hour and doing battle with a blustery wind, it was a wonderful feeling to return to my comfy porta-house. When I closed the door behind me, I felt truly at home, even though my street address is a thousand miles away.

I understand the concept of the portable house. It’s not the same as camping.

photo: R&T De Maris

Should I upgrade my RV to match the features of more expensive models?

By Steve Savage, Mobility RV Service

The other day someone asked me how to go about finding the same high-end features found in a more expensive RV, in a less expensive RV. I guess this boils down to, “I want to have the same features found in a Cadillac, only I want them in my Chevrolet.” The short answer to this question should be obvious. You can’t — and here’s why.

In the majority of cases, the difference between the less expensive and the more expensive RV is far more than the “sum of the options” list. Normally, increased cost brings with it better construction, a bigger power train, larger wheels and tires, and so forth.

It’s a big mistake to tell yourself a $40,000 fifth wheel package has as much quality construction as a $120,000 fifth wheel. To put it bluntly, it doesn’t, and the extra cost goes well beyond window dressing like additional flat screen TVs — and while they may increase livability, they add nothing to quality.

This same line of thinking carries over to folks who think that by upgrading a Yugo, they will end up with a BMW. Attempting something similar in an RV generally results in a poorly integrated system or out-of-place features. While the next owner may appreciate the addition of granite counter tops in a mid-line motorhome, there is not a chance the current owner will gain back even a fraction of the cost when selling — regardless of what they may have told their spouse.

The best way I can summarize this ramble is this way: Buy what you want, or buy less expensive and live with it until you can afford what you want. Never try to convince yourself that, with effort, you can make a silk purse out of a sow’s ear. It’s a costly mistake I see all-too-many owners make.

Learning from the “other guy”

By Russ and Tiña De Maris

While there’s plenty to be learned from industry experts, as RVers we often learn a lot from fellow RVers. There’s nothing like hearing the next-door RVer confess to learning through that old “school of hard knocks.” Here’s one shared by Jim Hazard, one of the RVtravel.com reading faithful.

After installing a new in-line water filter in his motorhome, Jim began noticing some rather odd water system problems. After having slipped the new filter in the housing and buttoning it up, Jim flipped the pump switch and noticed the pump ran on and on. The pump was pushing a decade in age, and had suffered through some plenty cold water, so Jim’s first “diagnosis” was a possible fatality in the water mover.

After a new pump arrived and was installed, it tested just fine. But not long after, while doing some latrine duty, Jim noticed that the water that should have flowed into his toilet bowl wouldn’t. He could get a bit of water out of his hot water faucets but nothing on the cold water side. This symptom presented itself whether the source of water was from the motorhome’s fresh water tank (utilizing the pump) or from the city water side, where the water pump would have had nothing to do with flow problems.

Jim consulted with both professionals and volunteers on RV Internet forums, and while all practically stood on their heads trying to figure out the issue, no one could come up with a concrete answer. Most figured there must be some sort of hung-up check valve in the plumbing system. At his wit’s end, Jim bumped into another RVer and in swapping stories, got the advice: “Check your water filter.” A quick look at the filter showed that Jim, when installing an unfamiliar brand of filter, had put the thing in the housing upside down. Pulling out the filter and swapping it end-for-end immediately resolved the problem.

Incidentally, after Jim “cured” the stubborn problem, he found a recently posted reply to the problem that he’d posted on an RV forum. Another forum member had a similar problem and, sure enough, advised checking filter orientation. For those die-hard NPR “Car Talk” fans, it sounds like the RV equivalent of “Stump the Chumps.” Never underestimate the diagnostic powers of your fellow RVers. And thanks to Jim for ‘fessing up on his no-pressure ordeal.

Late night campground arrival courtesy

0

By Bob Difley

When pulling into a campground during quiet hours, it seems that some forget they may be the only ones awake. A few tips to follow to be considerate to the sleepers:

• Turn your lights off. Park in your site as quietly as possible.

• Leave the tweaking and setting up of your camp gear until the next day.

• Keep conversations to a minimum — both in number and noise level — and don’t shout parking instructions.

• Avoid slamming doors and any other unnecessary noises. It may not bother you — since you’re awake — but it will your neighbors.

• Turn off your engine after you are parked.

Did your efforts work? If you get a lot of dirty looks the next day, you don’t get a gold star!

Another wrinkle on RV departure checklists

By Russ and Tiña De Maris
We’ve reminded readers several times of the importance of not forgetting important items when pulling up the stakes at your campground. We speak from personal experience, once heading down the road with our rig festooned with dragging power cord and water hose. Much has been said (and printed) about checklists, but not everyone wants to deal with “another piece of paper” in their lives.

Leave it to our readers to come up with new ideas to share. On this topic, Ghent Wilson shares his own method of running a checkout checklist — only Ghent’s isn’t on paper — he keeps his as a mental checklist. Again, speaking from experience, I have to hand it to Ghent. His “bean” obviously works a lot better for him than ours do!

“I have developed a quick, double-check of myself … I count. For each side, top and interior I have assigned a number value to the checklist.

“For instance, I have a ‘check items count’ on my trailer hookup:
1. Both load distribution bar pins installed = 1
2. Both safety chains connected = 1
3. Break-away safety cable connected = 1
4. Power cable connected to tow = 1
5. Hitch safety lock, locked= 1
6. Tongue leveler raised and blocks stored = 1
7. Hitch pin secure = 1
8. Brake, running and turn signals operating = 1
9. Gas valves off = 1

Total checks for hookup = 9

For the utility side:
1. Water hose stored = 1
2. Power cable stored = 1
3. Hatches secured = 1
4. Tires/chocks/leveling blocks checked/stored = 1
5. Slide properly secured = 1
6. Sewer/grey water closed, capped and hose secured = 1
7. Windows closed = 1

Total checks for utility side = 7

“I have the item count memorized for every side, interior and the top and count them as I do my final check. Therefore, I greatly reduce the chance of missing anything significant. Not a true checklist, but it works for us.”

Thanks, Ghent, for the mentally stimulating alternative to the paper checklist!

One-of-a-kind motorhome on display in Polson, Montana

mo-home-1-736You won’t see another motorhome like this one, which I found at the wonderful Miracle of America Museum in Polson, Montana. The plan is to eventually restore it. For now it just sits.

It was built by Marshal Sanders of Highland, Michigan in the late 1960s out of a bunch of other vehicles. It’s powered by a 1966 Olds Tornado engine with front wheel drive. The front of the motorhome is from a GMC truck. The grill and front bumper is from a Pontiac. In back, the taillights are from a 1959 Ford.

mo-home1-736Marshal had a big problem when he first drove the motorhome: when he turned the steering wheel left, the RV went right. Not good. But it was not a problem that couldn’t be solved, which Marshal did with a bellcrank.

GMC had the same problem when it was developing its motorhomes. To figure out what to do, GMC representatives visited Marshal to see his solution. They liked it so much they copied it for their own RVs.

Dim interior lights: Battery problem or power converter?

5

By Steve Savage, Mobility RV Service

Here’s a common question that’s worth sharing.

From a reader: Recently my lights in my fifth wheel have started getting dim and sometimes flickering. How can I determine whether my problem is a four-year-old battery or the charger or the converter? I have disconnected my negative battery post while plugged into campground service.

When I disconnected the negative (battery cable) and checked my lights, they were very bright for about two minutes and then went dim. Then I turned on another light switch and they went bright again for a few minutes. How can I check the battery charger? I have a meter to check it, but I don’t know the procedure to check it.

My response: Very simple! Connect your battery and test the voltage with your meter. If you don’t see over 13 volts, your converter is dying. Any time a power converter is plugged in and working, you will always “see” more than 13 volts. The power converter is also the only thing that can make your 12-volt lights flicker, provided your AC power is good. That is to say, as long as you have good power at your receptacles and at your microwave, your power converter is the only possible villain.

It is not unusual that power converters become erratic before they fail completely. The battery is not relevant with an operational converter because it can easily carry the lighting load. You could have a completely dead battery and still have good lights.

You can temporarily work around this by putting a regular battery charger on your batteries, but you need a new power converter. I am not clear why you are using the terms “charger” and “converter.” You have a power converter that converts 120 volts AC to 12 volts DC, and that charges the battery. It also supplies 12-volt power to your lights, etc. The remainder of the panel is called the distribution panel. You either have a distribution panel with the converter built in, or you have a distribution panel with the converter mounted separately and tied to the panel with a red (+) and a white (-) wire.

Receiver hitch recycling

0

By Jim Twamley
Recycling is good for the planet and for the pocketbook. The price of aluminum keeps going up ($1 a pound in Phoenix in February 2015) and many folks cash in on the soda can redemption deposit by turning in uncrushed cans. But sometimes (and in some states) it’s just easier to crush your cans and turn them in by bulk weight.

I ran across a guy using a can crusher in his receiver hitch and tossing the cans in a bag hanging on the ladder of his class C motorhome. As a money-making hobby he takes a walk, collects cans, and the nickels and dimes add up. When he gets back to his motorhome he runs the cans through the receiver hitch can crusher.

Just don’t get your fingers caught in it!

Tailgate open or closed? Which is more fuel efficient?

0

By Russ and Tiña De Maris

It’s an age-old campfire discussion among RVers and pickup owners. Everybody wants to save money on gas — do you drive with the pickup truck tailgate open or closed? Up or down?

Driving with the tailgate closed would seem counterintuitive. After all, won’t the wind get “caught” by the tailgate and simply tend to slow you down a bit? Why not leave it open and let it flow freely? A story carried by Autoblog.com attempts to settle the issue. The results — if they cut across all lines of pickup truck design, tell you the answer. But it’s a big “if.”

Autoblog approached Ford Motors for the definitive test. Ford provided a 2015 F-150 — you know, the new “aluminum” aerodynamic pickup. The machine gains its notoriety for good fuel economy because of all that aluminum — it’s a great deal lighter than a similar “steel-sided” truck. But all that lightweight construction is easily wiped if aerodynamics are ignored. Tailgate open or tailgate closed — which is it?

Well, Ford has a secret built into their tailgate — a tailgate lip that acts as a spoiler. A wind tunnel demonstration Ford put on for Autoblog shows that keeping the tailgate up (closed) makes for less drag. Here’s why: The wind blasting over the top of the pickup cab needs a place to “touch down” and be redirected away from the truck. If the gate is left open, it doesn’t know where to go and, hence, tends to bunch up in the bed of the truck. Ford engineers say the same is basically true for all pickups — not just theirs.

One thing Ford says can improve aerodynamics even more — a tonneau cover will allow for even smoother wind movement, thus, increased fuel economy. Look at the autoblog.com post for more details. There are tons of tonneau covers available at Amazon.

Does your refrigerator have indigestion? Burp that baby!

By Steve Savage, Mobility RV Service

There was a time when “burping” an RV refrigerator was a standard service technique. Burping has gradually fallen by the wayside, so only old-timers remember when it was commonplace.

Up until somewhere in the early 1990s refrigerator cooling coils — those coils you can see when you remove the exterior cover on the back of your refrigerator — used to block easily. Refrigerator manufacturers eventually modified the design and the problem is less frequent. It still pops up from time to time, and sometimes you can get lucky and save over a $1,000 on a new refrigerator using the burp method.

Coils most often become blocked when an RV refrigerator is left turned on while the RV is parked on a steep slope. When in that position for a prolonged period (hours), the rust preventive that circulates in the coils, along with the water, ammonia and hydrogen, form crystals. These crystals travel up and down the tubing until they block the smaller tubes and the refrigerator then stops working.

How do you know if your cooling coil is blocked? In a blocked coil, the burner tube will be very hot but the coils on the left side of the refrigerator (in the back) will not be warm at all. This will manifest itself after the refrigerator has been run overnight. Anytime you smell ammonia or see yellow or a yellow liquid on the bottom of the burner tube, you have a definite “leaker.” Your cooling coil has gone to heaven and must be replaced.

If the coils are hot on both sides of the back or you hear a gurgling sound and the refrigerator is not cooling, it most likely is a leaker. The coolant charge is likely gone, meaning you’re in for either a new refrigerator or cooling coil. If the refrigerator is very old, given the cost of new factory coil I would opt for a whole new refrigerator. I also only “recoil” with original factory coils, given the problems we and fellow techs have experienced with reliability from other sources.

If your refrigerator is not cooling and you find it is only hot on one side in the back, burping is worth a try. It does take a considerable amount of labor and time.

• Familiarize yourself with how to remove your refrigerator from the cabinet where it is installed.

• Allow the refrigerator to cool down, if you have been operating it, and remove the refrigerator. Place it on the floor of your RV. We use a heavy carpet remnant so as not to mar the floor. It will be heavy and awkward, but two strong men can do it without too much trouble. Mind you, we don’t even attempt this with one of the big four-door models.

• With the refrigerator completely disconnected, tip it gently onto its side in such a way that the side that was not heating up is down. The side with the burner tube will orient up. Leave it overnight and the fluids inside will redistribute. Historically, folks said to turn it completely upside down, but we have had equally good luck laying it on its side.

• Next day, stand it back up, plug it in using an extension cord, and extend the 12-volt leads so you have power to the control panel (eyebrow board) at the front of the refrigerator. Turn the refrigerator on.

• Allow two hours to pass, and if you are lucky you will find the coil that was not getting warm before is now becoming warm. You should have a cold freezer and the lower compartment will begin to cool. It takes almost a day for it to completely cool down. If this is taking place, the refrigerator coil is no longer blocked and you can reinstall it and leave it on.

The downside to this procedure is there is no guarantee the coil will not become blocked again in the future. Despite this dark cloud, successfully burped refrigerators often go on to have many more years of productive life. The upside is, if it works, you have just saved yourself well over $1,200 in replacement costs or the expense of a new coil and the labor to install it, so we try this procedure first.

Why don’t dealerships do this? Many techs are young and do not know this was routine in years past. Additionally, it is not possible to issue a guarantee with this type of service, so the owner has to understand it may not work. Of course, if it doesn’t, the refrigerator is already out and ready to be serviced or replaced, so the labor involved is not a total loss.