Home Blog Page 2152

RV sewage dumping: Gloves or bare hands?

By Russ and Tiña De Maris

One of the first things a new RVer learns is how to dump the holding tanks. That’s a subject that’s been discussed at great length, but here’s a related question: Do you wear gloves when dumping tanks or do you ‘bare hand’ it?

dirty handsMany RVers don’t wear gloves because, they say, it’s just too much bother and they can’t see much advantage to it. The reasoning usually runs, “The stuff stays in the hose, so what’s the big deal?” In a perfect world it’s a good line of reasoning. But since we’re not living in a perfect world, the ‘stuff’ doesn’t always cooperate and stay in the hose. Pinhole leaks can occur and a misaligned bayonet fitting can pop off, unloading an unholy amount of stuff. File that under, “Been there, done that.”

“So you get a little doo-doo on your hands, just wash it off,” is the next comment. Good idea, a thorough washing with warm water and soap for at least 20 seconds. Meantime, make sure none of it gets off elsewhere and ends up in your mouth or nose. And hope in the meantime that you have no minor breaks in your skin. What can happen with a bit of misplaced sewage bacteria? Here’s the short list:

  • Gastroenteritis, characterized by cramping stomach pains, diarrhea and vomiting;
  • Hepatitis, characterized by inflammation of the liver, and jaundice;
  • Infection of skin or eyes.

Not sure of any RVer who’d like to have a bout of any of those manifestations. In our rig a pair of heavy neoprene gloves is the order of the day when handling tank dumping duty. Washing up even when using the gloves is a good idea, and an outside “shower” unit that many RVs are equipped with is just great for it.

Why not throw-away gloves? They typically tear easily and if one of the support wires in your sewage hose gets loose (not an uncommon event) it’ll easily rupture your “safety” net.

#nrv

Tips for cold weather RVing

0

By Russ and Tiña De Maris

Even with springtime near, cabin fever may have a hold on you. Can you RV even when the weather outside is below the freeze mark? Here are some quick tips to make a cold weather RV excursion workable.

cold weather rvCamping in snow? You’ll need to keep your vents clear–not just your heater and water heater, but your refrigerator vent (up roof top) free from snow.

Down below, if your holding tanks aren’t in heated compartments, add a little RV antifreeze to keep from freeze ups.

A fresh-water hose hooked up can easily freeze. Best to fill your fresh water tank, then use “tank” water for RV use. Be sure to completely drain your fresh water hose after filling up.

Inspect your outside compartment doors to ensure they’re weather-tight. If a compartment door lock freezes, pre-heat the key with a match or lighter before inserting in the lock.

Keep lower cabinets inside the rig open to ensure pipes running through them don’t freeze up.

Plan on using electric space heat? Don’t run more than one heater on any given RV circuit, and make sure the service the rig is plugged into is adequate. If heating with non-vented LP or kerosene heaters, make sure you have plenty of fresh air ventilation.

Choose campsites carefully. Sheltering trees at the north will help, but make sure there are no dead trees or dead limbs hanging above your rig.

Lots of snow and there a while? Pile up snow around the base of the RV to form an ersatz “skirt” to keep the wind from blowing cold under the rig.

A container of DRY sand is helpful. Things get too slick for traction, toss a little sand under the drive wheels. Wet sand will freeze up and leave you with a useless block.

Boondocking? Be sure to file a “flight plan” with a friend, indicating where you’ll be camping and when you’ll return. Tell them you’ll check in on return, so if you don’t they can call out the troops.

Brrr! Photo: AliciaV on flickr.com

#nrv

Tips about tires when taking RV out of storage

Here are some dos and don’ts related tires when taking your RV out of storage.

Screen Shot 2016-04-28 at 10.09.35 AM
Mild soap and water is the best way to clean your RV tires.

DO check your tires’ current inflation levels. Tires can lose up to two pounds of air pressure a month just sitting around. Unless you’ve compensated with more inflation when you put your unit in storage, the tires are likely a bit underinflated now.

DO drive your RV around a bit to even out flat spots. After some months of sitting unmoved in the same spot, and possibly with a load of “stuff” still inside, your tires will likely develop “flat spots” where they have been pressing into whatever surface they’re on. So when you first take your RV out of storage for a drive you may find your ride a little bumpy for the first dozen miles or so, until the rolling heat evens them out.

DON’T keep driving if you keep feeling the bumps. If you continue to experience a bumpy ride after 12-15 miles, you might want a service center to check your tires in case there is a serious problem. I always say, better safe than sorry.

DO clean your tires with soap and water. I’m sure one thing you’ll be doing to prepare for RVing season is cleaning the exterior; including making those tires look brand new. The safest and cheapest way to clean your tires is with mild soap and water. Stay away from the hard stuff!.

Screen Shot 2016-04-28 at 10.09.48 AM
Last four digits tell you when your tire was manufactured. In this case, the 29th week of 2010.

DON’T use petroleum-based cleaners or special dressings on your tires (the hard stuff). YOU could be making your tires vulnerable to damage from ozone and UV rays if you are using petroleum- or alcohol-based cleaning agents, silicone oils or tire dressings, all of which can dissolve the same protective tire coatings used to block ozone and UV rays. So your good-intentioned cleaning can be causing more harm than good!

DO find out how old your tires are. To determine the age of your tires, one good thing is that your tires will always tell you exactly how old they are, unlike some of my friends. Your tire’s birthday is stamped right on the sidewall. Look for the last group of four numbers after the “DOT” mark embossed on the side of the tire. The first two numbers in this cluster indicate the week in the year in which the tire was manufactured, with that year noted by the second pair of numbers. So say the last four numbers are 2910. That means the tire was “born” in the 29th week of 2010. And yes, if you’re buying a used RV, ALWAYS ASK about the tires’ DOB.

This article was supplied by Dicor.

Is an RV cover a good investment?

1

As winter slowly ebbs away, spring approaches. We all know what follows – Hurray! Summer! No matter the season, each of the four represents a bit of a danger to the exterior of your RV. Winter, with its rain, snow and ice. Spring, with plenty of tree sap and bird poop. Summer and attacking UV radiation. Even placid fall can drop plenty of dead leaves and make a mess of your rig. Should you invest in an RV cover?

rv-cov-740RV cover manufacturers have as much pizzazz for selling their products as snake oil merchants. ‘Look! Consider these covers as you would a 24-hour security guard against damaging UV-radiation, dust and dirt, the horror of bird droppings, and to keep a stored rig cooler. Since they’re a lot less expensive than a storage building big enough to accommodate an RV, price often is a big draw for those who chose to pack their RV away in a giant size storage bag.’

How can you sort it all out? It is true that a good RV cover will keep wind-blown dust from chewing on your finish, and some covers will keep rain out while still allowing moisture from the inside to make its way out. If you’re in an area affected by UV radiation, not having the sun beating down on your rig constantly will do much to keep your finish looking nice for longer.

On the other hand, there are RVers who have bought and used RV covers who now wish they never had. A common complaint among users is the difficulty involved in putting a cover on. Typically you’ll need to climb up on the roof to put the cover on. Getting on an RV roof without damaging the rig — or yourself – can be difficult, but the problem is compounded when the cover is over the roof, and the installer has to carefully waltz around over the cover to adjust it. Not being able to see what you’re stepping on can lead to broken roof vents, even broken legs.

Some users report having to put blocking under the cover to keep water from puddling on the cover. While that may not be a problem for some, if you want to take the rig out of storage during a freeze, you may find the cover has frozen onto the roof. To remove it without damaging it, you’ll then need to figure out how to get hot water up to the roof to thaw the frozen cover loose. And it’s a given that if you want to remove an RV cover that’s wet, it will be a major hassle, as any RV cover is heavy, but a wet one multiplies the weight greatly.

Some complain that with the cover in place, the inside of the RV is like a dark cave. With the cover in place, you won’t be able to pop open roof vents to relieve inside humidity, and rig sweating can be an issue. Others say some covers don’t breath well, creating a great environment for mold and mildew to develop. Others warn that rig attachments like antennas or mounting brackets can poke holes in expensive covers.

So what’s to be done? If you want to go for an RV cover, most recommend doing the added cost of a cover custom designed for your rig. In that way you can be assured that the cover will not block access to your door, so you’ll be able to get into the rig without pulling the cover loose. Make sure you tighten the cover carefully, and make checks over the storage area: If a cover gets loose in the wind it will easily chaff the finish, and can even rub the paint off.

Alternatives to RV covers range from relatively inexpensive–be sure to give your rig a good bath and wax job before winter to help prevent finish damage–to the more spendy alternatives: Construct a “pole barn” style RV cover that prevents rain and snow from dumping down on the rig, while less expensive than a walled structure. Others bite the bullet and pay for inside storage from a suitable storage facility.

Desolenator enables water independence: Just add sun

By Bob Difley

Desolenator water purification system

The first paragraph you read on Desolenator’s  website states: “Desolenator is a clean technology venture that has developed and patented what’s on track to becoming the most affordable and environmentally friendly method of water purification on the market.”

That’s a pretty strong statement from an idea incubator in the United Kingdom on the concept of drinkable water that humans have been struggling to solve since they first walked upright – and is still the number one requirement for life on the planet (or in boondocking campsites).

There are various methods of creating pure, drinkable water, but all are expensive and often not very environmentally friendly. But now this team of developers say they can produce the lowest cost per liter of water compared to any other available system with their mobile desalinator that runs purely on energy from the sun. And other than being able to provide clean water for billions of people around the world without pure water, this simple system is also an appealing solution for RVers who like to camp off the grid.

deso_parts 
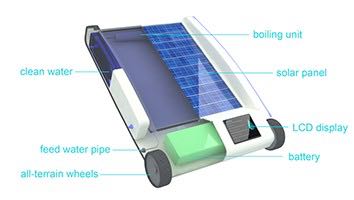
The team currently has a working prototype that can produce nearly 4 gallons of pure water per day and hopes to finance the next stage of the project with an Indiegogo fundraiser. You can read more on the Desolenator website

You can find Bob Difley’s RVing ebooks on Amazon Kindle.

##bd04-16; #rvt740

Concerns of soon-to-be new RVers

7

Dear RV Shrink:
rvshrinkWe are close to making a buying decision on a new motorhome. We have studied them to death. It’s a very expensive step, and I want to make sure we do it right the first time. I have read your comments about making sure the thing fits our needs, and that we both agree on the floor plan and options. Before we make the jump, can you give us anymore input?

We are extremely nervous. Any help would be greatly appreciated. —Anxious buyer in Boston

Dear Anxious:
Besides the usual concerns about finding the right unit for the way you want to travel I suggest spending some time studying the manufacturer and the dealer. These will be people you will be entering into a relationship with. There are things you want to discover ahead of time such as how you will be treated after the sale, quality reputation, service record, organization, and parts availability.

By talking to as many other RV owners as possible you learn quickly if the dealer follows through on new owner concerns, if the factory stands behind their product and how timely they are in correcting issues you might have.

Most new units are going to have some issues, so you want to be sure whoever you end up working with is going to have your best interests in mind. Having service work done at the factory, parts availability and customer service will become very important in the future. You might want to call your potential manufacturer’s service contact before making a buying decision and see how you are treated with a few questions.

I think once you have done your homework and feel comfortable about craftsmanship and business reputation, pulling the trigger will be much easier and less stressful. —Keep Smilin’, RV Shrink

The RV Shrink is not really a psychologist (or professional RV technician). But he does know a lot.

#RVT740

Slideout supports: Love ’em or leave ’em?

3

There can be no doubt that slideout rooms are the difference between night and day. That little bit of extra floor space can make up for a whole-lot of “too much togetherness.” Now the question: Should you use aftermarket slide out support stands?

Variously called “slide out stabilizers” or “slide out supports,” these little jack stands are designed to slip under a slideout frame and crank up to give added support. One major retailer says they, “Protect your slideout extension tubes from bending, causing difficult slideout operation.” Sounds pretty serious — a bent frame could be bad news when it’s time to weigh anchor and hit the road. But hang on a minute — if they’re so critical, why don’t RV manufacturers provide them with new rigs, or at least make them a piece of optional equipment?

Not everyone with a slideout “buys into” the stabilizer story. One RV technician says his understanding is that if an RV under warranty comes in with a damaged slide that could be attributed to a stabilizer, all bets are off for getting warranty service. It begs the question: If your slideout needs stabilization to prevent damage, why aren’t there scores of unhappy campers limping across the country on their way to service bays, slide out rooms flapping in the breeze?

Some of those who fore swear slide out stabilizers point to a potential problem: What if your rig were to “settle” while the stabilizers did not: They suggest the pressures placed on the slide out frame could be enough to damage it, leaving the RVer in a world of hurt.

On the other hand, friends of ours just don’t feel comfortable “hanging out in space” without the additional support under their slide out. Of course, we also have a friend who won’t venture up into the “gooseneck” portion of her fifth wheel until her husband installs a king pin stabilizer. Says she knows it’s crazy, but she just imagines the whole works tipping down on the king pin when she shifts her weight forward. Does impose an interesting mental picture . . . okay, we’ll turn it over to you. Have you had experience with a slideout frame bending — with or without a stabilizer?

Level your RV with the slide-out deployed?

1

He wants to level the rig first, then deploy the slide-out. She wants to level after the slide is out, because it seems like the rig “leans” a little bit after the slide goes out. What’s the answer?

Screen Shot 2016-04-26 at 7.22.49 PMThe safest (and most warranty-wise) answer: Do what your rig’s manual tells you to do. Here’s a lift from a Keystone manual: “The recreational vehicle must be level to avoid binding the slide-rooms. Remember, stabilizing jacks are not capable of supporting the weight of you vehicle! They are intended only to stabilize the unit maintaining a level condition. Non-leveled conditions cause sticking situations providing damaging strains on the slide-out mechanism.”

This advice is pretty much standard among the majority of the RVing crowd. If the rig is twisted, even a bit, it can put a real cramp on the slide-out mechanism. Pinching your slide-out can make for a most uncomfortable situation–particularly if you can’t ‘reel the unit back in’ when it’s time to hit the road.

OK, so much for the simple answer. Now things can get a bit more complicated than “what the book says.” What about that “leaning RV.” What can you do about that situation? If your rig leans after you deploy the slide-out, the most likely issue was not having your unit properly settled in the first place. Were the levelers on firm ground, or did they perhaps “sink” a bit into soft ground? Here’s a case for leveler or “jack boots” that give a larger surface area to those little feet.

If you’re leaning over, take a good look at your site, and peek around underneath the rig. If the leaning is such that the rig isn’t comfortable, or enough that it could cause damage to your refrigerator there may be no help for it but to pull up stakes and move the rig a bit, settling in on ‘terra’ that’s a bit more ‘firma.’

Video: Working at Amazon during the holidays

By RV Travel Staff

camperforce-740Every holiday season, Amazon.com hires thousands of employees at its warehouses to help with the huge increase in its business. In this one hour and twenty minute webinar from Workamper News, you’ll learn everything you need to know about Amazon’s CamperForce program.

If it’s right you, it’s a great opportunity to earn enough extra income to help support your RV lifestyle. Many couples sign on and double up on the income. Some couples earn enough to support their RV travels for all or much of the year.

Amazon CamperForce is looking for several hundred Workampers from October to December 2016 at its fulfillment centers in Campbellsville, KY, Murfreesboro, TN, and Haslet, TX. According to Amazon, employees work “in a fast paced and friendly work environment.” Jobs include warehouse tasks including receiving, stowing and shipping.

https://youtu.be/KtqsApW33q0

The good ol’ days? How about the good ol’ stinky days!

By Chuck Woodbury

It’s easier, as one gets older, to reminisce fondly about “the good old days.” The problem is, the good old days weren’t always so good.

Despite all the horrible news we read today, the fact is that most of us enjoy charmed lives. Oh, it’s easy to whine about what’s not right. That’s why it’s good to think about those less fortunate than us to gain perspective. Consider the proverb: “I had no shoes and complained … until I met a man who had no feet!”

horse-739
Horse-drawn streetcar in New York City at about the turn of the 20th century.

But we can also look at our history to see how good we have it. For example, consider how people in cities lived in those “good ol’ days.”

I sometimes complain about the ever-present sound of automobiles and their noisy engines. I have caught myself thinking, “Oh, wouldn’t it have been nice before cars and all their noise when the sound was the hoofbeats of horses pulling carriages?” Yeah, sounds good. But as radio commentator Paul Harvey might have said, there’s a “rest of the story.”

Those horses were animals. They burned food, not gas. Their emissions did not rise into the air like gas fumes. They dropped to the ground. Horse poop! Everywhere! In 1894, the Times of London projected that by 1950 every street in New York City would be buried nine feet deep in horse manure.

In 1880, New York and Brooklyn had a combined horse population of between 150,000 and 175,000 (long before the horse population reached its peak). Each horse pooped between 15 and 30 pounds of manure a day on streets and in stables — a whopping three to four million pounds of the stuff. Piles of manure in vacant lots in New York and other cities would commonly reach 40 to 60 feet high. People known as “Crossing sweepers” stood on street corners; for a fee they would clear a path through the mire for pedestrians.

Each horse also produced about a quart of urine daily — about 40,000 gallons altogether.

When it rained, the horse manure turned into muck. People sloshed through it. They dragged it into their homes on their boots. Then summer came and the mess baked, hardened and was pounded by traffic into a fine dust which covered everything. We complain today about a little dust on our coffee table. Just be glad it’s not horse poop dust.

THE RESULT IN NEW YORK and other cities was an ugly, stinky mess! Combine the horse poop and pee with tossed out stinky garbage and the contents of people’s potties dumped from windows onto streets (before the days of running water and toilets) and you had a situation that none of us would dare go near today.

And what did all that disgusting slop attract? Flies! It wasn’t until around 1900 that window screens were readily available. So those flies could buzz right into the open windows of homes and apartments, where they could bite and spread disease. Yet people had no choice but to keep their windows open. They’d die from heat stroke if not. Air conditioning? Yeah, right — half a century into the future! In the winter, Mama cooked on a coal-burning stove. The fumes added to the already foul air.

The good old days?

Today, our cities are clean. Streets are paved. Horses are in the country. Our windows have screens. When it gets hot, we turn on the air conditioning. Life is good. Life smells good.

Those of us who are fortunate enough to afford RVs and travel with them are among the luckiest people today, and in fact in the history of the world. We breathe clean air in wide-open spaces, we camp in quiet places away from cars and pollution and we have more freedom than Marco Polo. The “best” good old days for most of us, I suggest, are now.

Screen shot of the forest

screen-shot-739

By Chuck Woodbury

Screen shots, to most of us, are images we capture of our whatever is on our computer screen. This is a different screen shot. I took it with my iPhone out the screened window of my motorhome at my campsite in North Cascades National Park.

I didn’t like this photo at first. But then as I was scrolling through photos today I came across again. Now, I like it.

That’s all.


Sleep-deprived RVer needs help selecting new mattress

Here is a question Chris Dougherty, Certified RV Technician, received from a reader while he was serving as RVtravel.com’s technical editor.

Dear Chris,
A quick question, I hope, about replacing the full size queen mattress in our motorhome. It is at present a one sided mattress and is very worn. After replacing the mattress in our Arctic Fox with a foam one and the resulting mold problems, I am loathe to even try replacing this one but the time has come! Any suggestions? Would a regular house mattress be okay? -Aileen

Dear Aileen,
I have great news for you! You don’t need an RV mattress, as long as you can get the same size at a mattress store. For instance, if you had a mattress that was cut across the corner for a corner bed, then you’d have to get a similar RV mattress to fit the same as the old one.

I have replaced the mattress in every RV I’ve had. Currently I have a Serta pillow-top in our fifth-wheel, and will move that to our next rig.

Measure the existing mattress length, width and height and use that as a guide. If you want a larger mattress, that may be okay, just try to fit the dimensions in your RV and makes sure the clearances are adequate. A pillow-top mattress is quite a bit higher, so make sure you’ll still have head clearance and access to the bedside tables. etc. If it’s longer, make sure you can still walk around it, and that it is supported adequately underneath.