
By Russ and Tiña De Maris
Many RVers are pretty aware of safety. They check tire pressure. Make sure the running lights are operational. Try to “keep the weight down” so as not to overload their rig or tow vehicle. But sometimes, things happen that you probably hadn’t stopped to think about. An RV hitch failure can ruin your whole day. Take Larry’s experience.
An unforgettable trip—thanks to an RV hitch failure
Larry told us his story nearly a decade ago, but it’s one of those timeless tales worthy of a revisit. Larry Lang had hitched up his Forest River travel trailer for what was to be an unforgettable trip. Just how unforgettable, he couldn’t have imagined.
Behind the wheel of his SUV, Larry and the trailer were just outside Grass Valley, California, when the unexpected—and unwanted—happened. The trailer hitch broke. As a safety-conscious RVer, Larry had properly hitched up the rig’s safety chains, crossed over as they should be.
If you’re not familiar with the concept, the safety chain from the passenger side of the trailer connects to the driver side of the tow vehicle, and vice versa. That way, if a hitch connection fails, those chains “cradle” the falling trailer, hopefully keeping it from hitting the ground.
 But catching a falling trailer is one thing. Controlling a mess like that is a different matter. The resulting sway became an out-of-control situation. As Larry, his wife, and the family dog came up on a steep slope, the only thing that likely saved them from serious injury or worse was a K-rail on the edge of the roadway. That was AFTER the malfunctioning combination had already crossed a lane of oncoming traffic, which miraculously kept out of the way.
Hitch company’s gracious offer refused
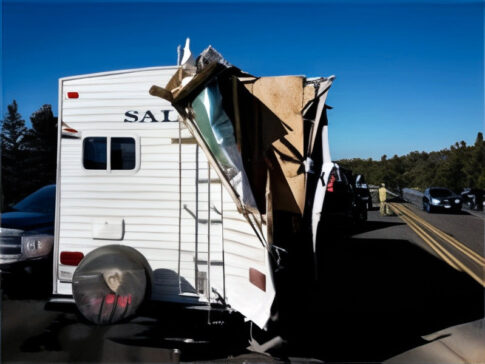 After officials cleaned up the mess of what remained of the SUV and travel trailer, Larry’s insurance company swung into action. While he didn’t specify just how much the settlement amounted to, he did say it was in multiples of thousands. Along the way, however, the hitch manufacturer, Camco, got into the act.
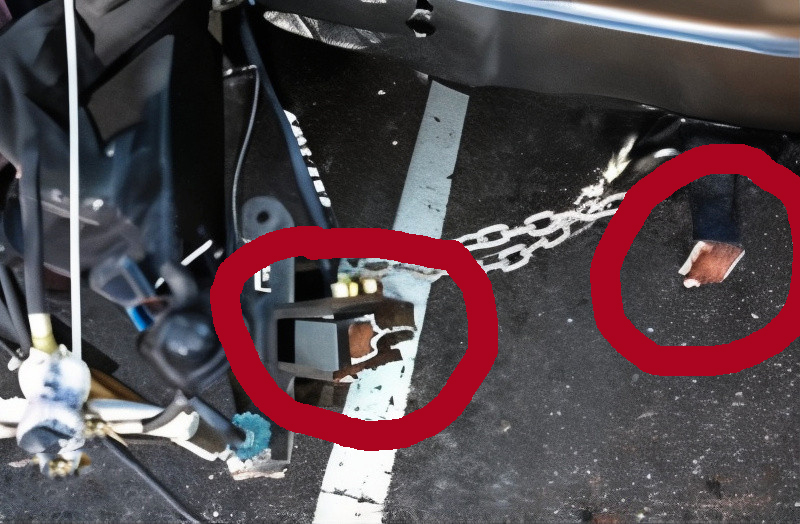
Larry said he contacted Camco out of concern that maybe, just maybe, his wasn’t the only Camco hitch that might be defective. Camco told Larry they would pay him some compensation for the problem, provided he’d sign off on a release that would discharge the manufacturer from any future claims.
After thinking about Camco’s “generous” $1,700 offer, he declined. Larry worried that signing off on that deal might endanger his insurance company in some way, so he felt it better to take a pass. Additionally, the so-called settlement wouldn’t have even covered the cost of Larry’s deductibles on his trailer and tow vehicle.
Larry’s hindsight
But the whole RV hitch failure situation was more than just unnerving. “I’ve been thinking that if I had closely inspected the hitch during installation,” he wrote, “I might have seen a potential weakness in the welded joint.” On the other hand, “The weld failure might have been occurring over a period of time without my knowledge.”
Since Larry told us about his experience, we had our own hitch issue. The night before we were to head out on a 1,500-mile journey, a friend pointed out that it looked like our trailer was a little “down in the mouth.” Indeed, a closer look showed that a weld around our truck’s hitch receiver was “going fast.” We probably wouldn’t have gotten far before disaster hit us.
Add weld inspections to your maintenance checklist
How many of us think to inspect welds that our lives might easily depend on? Perhaps we wouldn’t need to inspect welds as often as we check tire pressure. But it’s probably a good idea to add weld inspections to your semi-annual inspection list. Certainly check welds around hitches, hitch receivers, and even suspension parts—all these could cause life-threatening situations if a weld went awry and wasn’t fixed.
More frequently, those who tow should think about adding these checks when hitching up:
Visual inspection
• Coupler housing: Look for signs of metal fatigue, cracks, corrosion, and rust.
• Receiver: Check for cracks, broken welds, bent metal, loose or rusty mounting bolts, or splitting at the corners of the receiver box.
• Ball mount: Ensure all moving parts (if there are any) are lubricated and moving freely. Ensure the hitch pin or hitch lock is inserted properly, and that the retainer pin is secure.
• Tow ball: Make sure the ball is securely mounted and in good condition.
• Safety chains: Verify they’re in good working order, attached correctly, and secured to the vehicle. Don’t twist safety chains to shorten them—that actually reduces the amount of weight they can carry. If they’re too long, you’ll need to make an adjustment. One way is to cut the chain to the correct length. Or you could install a chain coupler to take up the slack—but make sure the coupler is rated the same strength (or greater) than the chain itself. Don’t listen to the advice of “Just use a wire tie to take up the slack”!
Secured and engaged
• Receiver and draw bar: Ensure they are functional and the hitch is securely fastened to the vehicle.
• Coupler engagement: Confirm the coupler is properly engaged with the tow ball and the locking mechanism is engaged.
• Safety pin: Make sure the safety pin is in place and properly threaded.
We’re so glad Larry and his family made it out of their predicament in one piece. It was a tough experience, but maybe we can benefit from it.
Photos courtesy of Larry Lang. Images were enhanced through AI to allow for enlargement without sacrificing clarity.
RELATED
- Paint your RV hitch for easy hitch-ups
- How to maintain a trailer hitch, ball, and trailer coupler
- Travel trailer users: Recall of 145,000 hitch receiver locks may involve you
- How to eliminate hitch clunk
- Alternatives to hitch ball grease
RVDT2891
It looks like Larry was driving too fast.
I agree. In fact, I think he lost control and the damage to the hitch was a consequence of jackknifing, not the cause.
Looking at the fracture face of the hitch and the singular instantaneous zone, it gives the appearance of failing from a single, significant and swift event. The shear lip suggests side loads that exceeded the yield strength of the metal. Said differently, he literally tore his hitch in half.
Crossing chains is a good idea and the proper way to do it.
BUT, a lot of trailer manufacturers are using a single point chain
attachment. No way to properly cross the chains.
Mine’s that way.
Our 21′ TT is single point on the chains. I use our tongue jack as a divider and cross the chains in front of the retracted leg. I suppose under the right (wrong!) circumstances I could damage the tongue jack. Replacing it is still less than my deductible for the rest of the potential damage.
No “break away” braking? (I don’t know because I have a diesel pusher)