Home Blog Page 2170

Portable grill takes practically no storage space

0

By Eric Brotman
RVtravel.com

I’ve had portable grills in the past, ones that used small propane canisters to supply fuel for the fire. Canisters have a good safety record, but I always felt a little uneasy around them. If they became hot in storage, if they were flawed in their manufacture, if a child found one and played with it improperly — the worries were there.

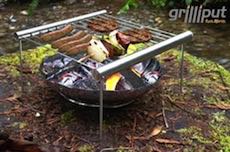
Then I found the Grilliput, an ultra-small grill named after an island where tiny people live in Jonathan Swift’s famous novel, “Gulliver’s Travels.” It’s made of stainless steel parts designed in Germany. Unassembled, the device fits into a cylinder resembling a flute. It weighs just 20 ounces and sets up in three or four minutes.

Heat for the grill is provided by an accessory called the FireBowl. It looks exactly like a stainless steel kitchen steamer, only without holes in its metal leaves, and will hold kindling or charcoal briquettes. Just get the wood or charcoal going and place the Grilliput over the bowl. The FireBowl weighs 12 ounces, making the entire grill set weigh 2 pounds.

The Grilliput conveniently grills food for two people. Its grilling surface, at 10” by 9”, will handle a couple of good-sized steaks, or several smaller cuts of meat, chicken or fish. Meals for more than two people are possible if the grill is filled with hot dogs or kebobs.

The clever design appeals to people of all ages and makes for good conversation around your RV, especially when showing the Grilliput to new friends and neighbors for the first time. The Grilliput sells for about $25 at Amazon.com.

Upgrade to a luxurious spa-grade RV showerhead

0

A good shower can make your day. But a poor shower fixture can be frustrating, ineffective, waste water (important when boondocking), and leave you feeling less than invigorated. The Body Spa RV Shower Kit can change your shower experience to the highlight of your day.

The Body Spa shower upgrade kit with Oxygenics amplifying technology, designed for high performance in RVs, delivers a powerful spray regardless of water pressure, rinses thoroughly in less time, and uses up to 30 percent less water.

It saves water, energy, and money while oxygen infusion revitalizes skin and hair. The SmartPause shut-off valve conserves water while you lather up and non-stick internal parts prevent mineral build-up. The shower head installs in only minutes. It comes with 60″ hose, wall mount wand holder and plumber’s tape.

Maintenance Free
The BodySpa never requires maintenance or upkeep.

Limited Lifetime Warranty
The showerhead is guaranteed for life never to clog because the internal components are constructed using Delrin, which prevents mineral deposits, lime and scale buildup.

Cost Effective
Because the showerheads last forever, require no maintenance, and are designed to conserve 30-70 percent of water and energy used by traditional shower heads, the shower head is a good option for the RV owner that wants a cost effective solution.

Self Pressurizing
The patented technology uses a self pressurizing design to increase spray velocity to produce a stimulating experience even with low water pressure.

Customize the Flow
The SmartPause valve allows you to pause water flow to a trickle with the push of a button. Helping you save water while lathering up and rinsing off.

Health Benefits
The Oxygenics technology increases oxygen content in the water by up to 10 times! The oxygen helps to purify the water by creating negatively charged ions that counter damaging free radicals. The result? Rejuvenated, younger looking skin (according to the company).

You can find the Body Spa RV Shower Kit at Amazon.com for about $32 (as of April, 2016).

Add extra room to your shower with ‘Extend-A-Shower’

0

Let’s face it. Most RVs do not have as much space as we’d like. However, we make trade-offs since who wants to maneuver a 70-foot motorhome around just to get more room?

Confined RV spaces that particularly come to mind include the bathroom, and especially the shower, where we often don’t have enough room to even turn around without bumping into something with our funny bone.

Stromberg Carlson, though, has created the Extend-A-Shower which is a lot more than an opltical illusion of more space — it actually does create more space in your shower so you don’t need to run to the campground showers anymore.

You can enjoy the comfort and privacy of your RV’s shower when Extend-A-Shower is installed. And when it is not in use, it folds quickly and easily out of the way with no tools required.

Extend-A-Shower comes in various sizes to fit showers from 35 to 60 inches wide and are available at the StrombergCarlson website ranging from about $45 to $70 or at Amazon.com.

Charge your cell phone with a campfire

By Chuck Woodbury
RVtravel.com

I suspect that headline grabbed you. It sounds ridiculous! But it’s true. It’s about a device called the Power Pot, which for gadget freaks like me is just about the coolest camping accessory to appear in a long time.

The Power Pot uses hot water to generate power — essentially acting as a mini thermoelectric generator. This means it converts heat directly into power to charge USB handheld devices. The Power Pot is simple: just add water and then place over a heat source, like a campfire as noted in the headline. Plug it into the flame-resistant charging cable and watch it charge as fast as with a wall outlet. It takes a mere 10 to 60 seconds to start charging an electronic device after placing the pot on its heat source.

The Power Pot works great with many other heat sources besides campfires. Use a backpacking stove, wood stove, propane/butane heater, natural gas home range, your fireplace — even a hot spring! Got Sterno? That works. If your power’s out at home or in your RV, light a stovetop burner, fill the Power Pot with water, and then plug in your cell phone or other device. On days when the sun doesn’t shine (or at night) or when a windmill doesn’t spin, you can still generate power.

And while you’re boiling that water for power, drop in some carrots or peas.

Granted, an RVer will likely not have many occasions to use a Power Pot, but the fact is, this is one very cool gadget that could conceivably come in handy one day. And it does more than just charge your iPhone. Use it to charge most other smartphones, GPS devices, GoPros, digital cameras, lights, headlamps, radios and ham radios, water purifiers, etc.

The device weighs only 12 ounces, has an indefinite shelf life, no moving parts, and it’s water and fire resistant. And it comes with a lifetime warranty.

If you’re looking for an incredibly cool gift for a geeky RVer friend or family member, this is it. Heck, get one for yourself. Put it on your campfire at the RV park. When someone comes by and asks “What ya’ cookin’?” you can say, “I’m not cookin’; I’m chargin’!”

The Power Pot sells for $149 at Amazon.com. Learn more at the Power Pot website.

Portable LED lantern separates into four individual lanterns

By Chuck Woodbury
RVtravel.com

Coleman has a hit in its Quad LED Lantern. Not only does it perform well as a powerful lantern, but it is easily separated into smaller, portable lights that can be carried wherever necessary.

Watch the video below for a demonstration

It’s great for RVing families and other group campers who need both an individual lantern as well as portable lights for walks to restrooms or other places in the night.

The Quad is equipped with four removable LED panels that hold 24 LED lights total. Users can remove any of the four panels and use them independently or they can keep all four attached to the lantern and produce 190 total lumens of light. As a result, the Quad is the perfect light for group camping trips and any other occasion where folks might splinter off into smaller groups during the night.

Each of the panels is a fully functioning light, with six 5mm white LEDs, a rechargeable NiMH battery, an independent on/off switch, and a top handle for carrying or hanging. The NiMH battery — which recharges when stored in the lantern base — provides up to 90 minutes of light on its own. The lantern base, meanwhile, requires eight D-cell batteries, which provide an approximate run time of 75 hours for the entire lantern. Other features include a main on/off switch located on top of the lantern, a light range of 26 feet, and a limited five-year warranty.

The lantern sells for about $50 on Amazon.com and is also available at most big box stores like Wal-Mart and Target.

Choose your camera(s) carefully and make great memories

By Greg Illes

There are literally thousands of different kinds of cameras, any of which can make digital snapshots to last a lifetime. But, depending on your skills and preferences, there are probably only a few that are just right for you.

To help you think about your preferences and your choices, I’m going to share with you my personal camera “kit” — the devices that I’ve chosen to meet my particular needs. Sure, your needs are likely different, but perhaps a glimpse into my requirements and rationales will help you in your own quest for the perfect camera (assortment). So, here, after years of purchases and replacements, is my current kit:

Cell phone — This ubiquitous device is an obvious choice for me, for the simple reason that it is always with me. My smartphone has reasonably good resolution and great color scale and white balance. But sadly, its zoom is deplorable (digital only), it’s incredibly awkward to use, and the screen is all but invisible in daylight. So, on balance, it’s very handy but very limited.

Digital SLR — Okay, here’s a REAL camera, with interchangeable lenses, huge versatility, instantaneous focus and storage for fast-action shooting, great telephoto choices for nature work, tons of programmable modes for different photo techniques, and so on. A photographer’s camera. It’s also expensive, bulky, heavy, needs spare batteries and chargers, and generally a royal pain to lug around. In fact, the typical full-size DSLR was so obnoxious to me that I instead picked a compact version, the Nikon V2. This nearly point-and-shoot-sized camera is half the size and weight, but still with most of the capabilities of the bigger DSLRs. But it’s still too big to always have with me.

Waterproof point-and-shoot — Neither my cell phone nor my DSLR were capable of withstanding even a mild dunking without severe damage. For kayaking or other water-threatened activities, I needed something more durable. I tried a waterproof container for the DSLR and a different one for the cell phone, but they were disasters, making the once-useful cameras nearly unusable. The Fuji XP65 turned out to be an ideal midrange choice. Submersible and durable, with a medium “real” zoom range (optical not digital), it can undergo my wettest adventures and come up smiling. I’ve even used it to take a few pix half-submerged for above-and-below water snapshots. The Fuji also does double-duty as a better camera than my cell phone when I just don’t want to carry the DSLR. It easily fits in a cargo pocket or backpack with little fuss, so I don’t have to put up with a strap and a camera banging around my waist.

There are some other camera types I’ve toyed with the idea of owning. The GoPro is one, with its specialized wide-angle video camera capability. But my needs for “video snapshots” are minimal. I actually don’t see myself driving my RV down the road with a helmet-mounted camera any time soon.

I hope these ideas and motivations help you with finding your own best-match camera (or cameras). Photos are a big part of travel recollections, and it’s quite pleasing to own good tools with which to make good memories.

Greg Illes is a retired systems engineer who loves thinking up RV upgrades and modifications. When he’s not working on his motorhome, he’s traveling in it. You can follow his blog at www.divver-city.com/blog.

Losing (RV) weight begins in the galley

By RVtravel.com staff

There is a direct connection between reducing the weight inside your RV and increasing the mileage for every gallon of expensive gas you purchase. Gas may be “cheap” now — but hang on, it can change overnight. Storage space is limited but you can make the best use of the space you have by thinking outside the box or can.

When you shop for groceries and sundries for your home, you can take advantage of sales on bulk items without worrying about the weight and space to store them. In an RV, however, weight decreases mileage and storage is limited.

Think light: Round cans create unusable space and add weight.

Think dehydrated: Can you purchase the same item, such as soup, vegetables or fruit in dehydrated form?

Think square: Most of us have a drawer or shelf full of assorted plastic containers. Swap round containers for square with your neighbors or go to the dollar store. They’re inexpensive and you can purchase several sizes for under $10.

Think bags instead of boxes: Cereal is light but bulky. Pour the cereal into a plastic gallon freezer bag (more expensive but stronger with less chance of tearing). Remove the air, seal the bag and it can be stacked just about anywhere.

Think envelopes: Gravy, spaghetti sauce, taco seasoning, etc., can be found in packets. Fill any gaps on your shelves with these small, thin items instead of cans or jars.

Think configuration: Most toilet paper four-packs are stacked two-on-two. Open the package and fill spaces on your shelf with individual rolls. You can do the same with paper towels. Both will help eliminate items rattling on the shelves.

Think size: After you have arranged your shelves and drawers to your satisfaction, you can only replace an item with one of equal size.

Think time: Remember to mark the date and cycle food to the front so items with a short shelf life can be used before expiration.

A little time spent planning now can save weight, space, time and money very soon.

Water heater woes and the dreaded dripping pressure relief valve

0

By Chris Noble

If you have a water heater in your RV then you have a device called a pressure and temperature relief valve (P&T for short). The P&T is located on the outside of the water heater and it provides a most important service: to keep you safe. Don’t believe me? Watch a YouTube video on exploding water heaters and you will be convinced.

With that being said, the P&T valve can also annoy the heck out of you if it drips every time you fire up the water heater. I’ve heard that it’s “normal” for a P&T valve to drip on Atwood water heaters, but I can tell you that water dripping anywhere is not normal. If it is only dripping, then it is relatively safe — but certainly not normal.

So, what can you do about it? One of three things: You could ignore it and let it drip (not the best thing to do). You could replace the P&T valve (not overly difficult or too expensive). Or you could try to repair it and save a few dollars and be rewarded with not throwing away a perfectly usable valve.

In your water heater there is usually a small pocket of air in the top of the tank which compresses as the water heats up and expands. This is perfectly normal and desirable. The Atwood service manuals address the dripping P&T valve by stating that sometimes that air bubble gets filled with water, so there is no room for the water to expand and the P&T valve does its job and lets a little water out to relieve the pressure. The service manual goes on to say that it is not a defective valve— you can turn off the water heater, allow the water to cool, then open the P&T valve (with the water off). That will sometimes resolve the dripping valve by putting that air pocket back into the top of the tank. No need for a replacement of the P&T valve.

Fair enough, but sometimes it worksand sometimes it doesn’t. Oftentimes it doesn’t work because there is either a small bit of sediment or, depending on where you get your water, lime or calcium buildup that clogs the valve when it opens to let out that excess pressure. So what if putting the “air back in” doesn’t work and your valve continues to drip? Replace it? Not so fast. Here is a handy tip to try first.

First, make sure that your water tank and its contents are cool! You don’t want to get scalded. Next, turn off the water supply and remove the drain plug (might as well flush the tank while you’re at it). Now, remove the P&T valve from the tank — it simply unscrews just like the drain plug. If the innards are not overly corroded or damaged in any way, take the dripping valve and pull the small lever out so that the valve is fully open and place it into a container (I use a gallon-size zip-lock bag) with enough white vinegar to completely cover it and leave it to soak for about 24 hours. Occasionally (mostly because I am a curious type), I remove it from the vinegar and actuate the lever just to make sure that the sediment is breaking up.

The next day you just may be amazed at how much gunk comes out of that thing. Now, clean the threads on the water heater, wrap some Teflon tape on the threads of the P&T valve and reinstall it. Put your drain plug back in, fill the tank with water and fire it up. If it still drips, then replace it. But chances are you are back to dry and saved yourself some bucks and didn’t throw away a perfectly good valve.

Oh, and just an FYI: If you do replace the valve it is a Cash Acme NCLX with 1/2″ threads, so shop around as they can be had for about $15.  Hope this helps.

Editor: Several water heater pressure relief valves are available at Amazon.

photo: Chris Noble

Do-it-yourself generator maintenance saves money, frustration

0

By Jim Twamley

RV generators are great because they allow you to run all your electrical stuff without being hooked up to shore power. It’s not uncommon for us to pull off on a lonely roadside, fire up the generator and use the microwave to make lunch. On excessively hot travel days we use the generator to run both our air conditioners to keep the coach cool. Generators have become standard equipment on motorhomes and on many fifth wheels and travel trailers as well.

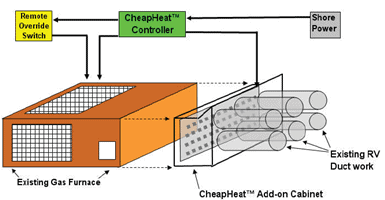
RV generators provide 120 volts of alternating current (AC power) and are powered by gasoline, propane or diesel. Since generators are crucial to the RV lifestyle, it is important to maintain them properly. Maintenance procedures and intervals vary depending on manufacturer and model, so I recommend you consult your generator manual for guidance on the proper maintenance schedule.

Basic generator maintenance requires the following items be done:

• Change the oil and oil filter every 100 hours or once a year whichever comes first.
• Change the fuel filter when required.
• Clean or change the air filter every 50 hours of use or more frequently if operated in dusty conditions.
• Check belts for cracks or fraying, bolts for tightness and fuel lines for leaks.
• Check the antifreeze level on generators that are water cooled.
• Record the hours so you know when to preform the next maintenance.

Keeping up with regular maintanenance means your generator will be a lot happier, and much less prone to breaking down when you most need it.

If you’re not willing to do two things, don’t buy an RV

By Steve Savage, Mobility RV Service

How do buyers decide which RV to buy? They focus on interior design and floor plans. Manufacturers know this and go to great lengths in “staging” their various models for photographs used in advertising. Potential owners likewise pick their favorites based on what they see inside and, to a lesser extent, the outside of the RVs they consider.

What’s the matter with that strategy? It’s a terrible way to choose! When you focus on colors and floor plans, you are looking only where manufacturers expect you to look. You are making a decision based on the least important parts of RV construction. If you want to learn about the RV you are considering you have to do two things: First, you have to get up on the roof. Second, you have to go underneath the RV you are considering. Why look there? Simple — those are not places manufacturers expect you to look.

On the roof, you are looking for fit and finish, intact caulking, especially where the front and rear caps join the roof. If it is a rubber roof, is it lying flat and not lifted up? Take note of how the roof rolls down to meet the side, as often you’ll find the rubber is not tight or caulked well. If it’s fiberglass, look in the same places but pay particular attention to how the roof rolls over to the sides. Often it’s left unsupported and is subject to cracking. You can tell how well it is supported simply by pressing down gently with your hand and feeling how easily it gives.

To go underneath, take along a plastic tarp to lie on. First, just settle in and look around. Is anything hanging down? Are screws turned all the way in? The human eye is amazingly sensitive to things that are not straight or even, and poor quality control detection often does not require intimate knowledge of RV construction. If it looks wrong, it probably is! If you are under a motorhome, look for drips — indicating a fluid leak. Look behind the rear wheels for indications of a bearing seal leak, in which case you will see black grease swirled around the back of the wheel.

If you want to go a step further, slide out the cabinet drawers and look at the cabinet construction. Look how the draw slides are mounted. Take note of how things are fastened together. Ask yourself how hard it would be to work on things if service became necessary. You don’t have to know how to work on it — simply note whether or not you can see it.

Remember, manufacturers are prone to cut corners anywhere they think you’ll not be paying attention. If you’re unwilling or lack sufficient knowledge to do these things, take a technician along with you. The amount you spend to obtain professional advice will be small in comparison to what you will spend if you miss something significant.

photo: keirstenmarie on flickr.com

Save propane with CheapHeat electric heating system

The standard way for recreational vehicles of all types to heat their interiors has been by bottled propane (LPG). Now the CheapHeat™ system gives you a choice to change the central heating system between gas and electric with the simple flip of a switch.

When you choose to run on electric heat, rather than gas heat, your coach will be heated by the electricity provided by the RV Park for which you are already paying.


The CheapHeat™ system was designed to provide a maximum amount of configurations with a minimum amount of equipment. Because of the advanced design, the CheapHeat™ CH-50 controller integrates seamlessly with the existing gas furnace printed circuit controller and thermostat. Once installed, the only additional control the customer will have, is a switch that gives them the ability to select whether they want to heat their RV with gas or electric.With the CheapHeat™ add-on system it’s not uncommon for even “fulltimers” to go for greatly expanded periods without having to refill their propane tanks since propane will only be used for the stove or–in some cases–the hot water.

Learn more about the CheapHeat add-on system on the CheapHeat website.

Build your own levelers

By Peter Calabrese

Two years ago I was reintroduced to RVing. I was a full-timer of sorts back in 1978-1981, having lived in one in a mobile home park. At that time I did not tow the travel trailer — I had it as a permanent residence. This time, I am towing it around the mid-Atlantic region.

Needless to say, leveling the trailer was new to me. I’m a do-it-yourselfer— not so much for money savings as for a creative release. I had some 2″ x 8″ treated lumber for outside projects laying around in the garage, so I went to work creating. I measured the inside clearance of the tire/wheel area on the ground and sawed two lengths with a hand circular saw so they slide in between the tires. I set the saw at the most angled position to get a ramp on both ends. I then measured the tire surface that actually made contact with the ground and cut another piece of the 2″ x 8″ with the same angled ends, making sure to leave about 3 inches on both sides.

Next was how to make a slip connection to stack the pieces. I found some 1/2″ x  2 1/2″ carriage bolts I had in my old project pile of scraps with rounded heads so as to not have sharp edges that could damage the tires. I drilled a slightly smaller hole than the bolt size through both pieces at the same time. To guarantee alignment, I “C” clamped them together for drilling. I also made sure to do this in an extremely obvious different pattern for both sets, so as to not spend time trying to figure which top went with which bottom and in which direction. I then force-screwed the carriage bolts into the top blocks so they stayed in place, then drilled open the holes in the bottom block so it dropped in and out with ease.

I now have a leveling block set that I use as follows:
•  One bottom block under a tire gives 3/4″ lift.
•  One bottom block under both tires gives 1-1/2″ lift.
•  One bottom block under one tire and a double block under the other tire gives 2-1/4″ lift.
•  Two double blocks gives 3″ of lift.

Also, one set fits between the tires and one on the rear or front of the tire to pull the trailer into position.

This worked well in grass, but in some campsite ground conditions, mostly paved and stone, these blocks slid while trying to run the trailer up on the blocks. I stopped at a tractor trailer repair shop and asked if they had a used throwaway tire inner tube (automobile tubes would also work). They gave me one at no charge. I cut two pieces out of the tube larger than the bottom block and stapled them to the bottom blocks. These blocks do not slip under any surface condition, and the trailer just pulls right up on top.

I recently saw a class C motorhome try to pull up on plastic levelers on a paved parking lot and they kept sliding out on them. They tried to hold the plastic blocks in place with their foot while someone else pulled forward — this did not work (Editor’s note: and it’s incredibly dangerous!). After about a half hour they gave up and parked un-leveled. I am going to cut the rest of the inner tube to carry along to give to other campers when I run into people with the same struggle.