Home Blog Page 2171

Happy Camper: The wine for RVers!

0

By Eric Brotman
RVtravel.com

What’s in a name? Jeffrey Dye, owner of Happy Camper Wines, hopes his screw-top bottles with labels showing a sleek, silver trailer in the great outdoors will help RVers make happy new memories and bring back old ones.

“Some of my fondest memories as a child are of going up to the Sierra Nevada mountains in an RV from our family home in Fresno,” he said. In 2006, Dye hitched those memories to his 30 years of experience in the wine industry. He started producing chardonnay, cabernet sauvignon and merlot wines under a brand name that celebrates the RV lifestyle.

Happy Camper isn’t a name most people would expect to see on a wine from Napa or Bordeaux, especially with its suggested retail price of $9.99 ($7.99 if ordered on the Happy Camper website). But wine snobs who assume the bottles are filled with a bland novelty at best — or an offensive rotgut at worst — would be dead wrong. When judged in blind tastings with other wines in the same price range, Happy Camper has brought home the gold more than once. The Los Angeles International Wine & Spirits Competition awarded Happy Camper’s 2010 Merlot the top prize for wines costing less than $10. The same vintage has been highly rated by Wine Enthusiast Magazine. Dye recommends it with grilled pork tenderloin, smoked salmon, pastas and pizzas. “The night is filled with stars,” he writes. “Our Merlot is one of them!”

Dye has no sales reps, preferring to operate as a one-man show. Sometimes he spreads the word about Happy Camper by going on the road. He’s conducted tastings for KOA and has given free samples to owners of various campgrounds and RV parks. He receives compliments for his wines “all the time.” RVers ask him for posters and tell him his wines are a hit, especially when served to other RVers. “One couple that contacted me was planning a cross-country honeymoon in their RV,” he said. “They wanted to serve Happy Camper wines at their wedding.”

Happy Camper wines can be ordered online at the company website, where there is also a state-by-state list of wholesalers and retailers.

The value of RV roof coatings

0

By Dicor Corporation

Protecting your RV roof with a coating specially designed for the type of roof material you have is one of the best investments you can make in extending and refreshing the look of your RV roof.

Your RV roof is exposed to many elements, including sun, rain, hail, snow and wind-blown debris, along with atmospheric conditions that can range from freezing to dry desert heat to humid swamplands. Whatever conditions your roof is exposed to, the right coating system will help give your roof a brighter, cleaner look over a longer period of time and enhance the value of your RV investment.

For EPDM roofs, a roof coating can help make it easier to maintain a great-looking roof. It does this by adding another critical layer of protection while reinforcing seals against leaks and making it harder for discoloring dirt and mold to stick around.

For fiberglass roofs, a proper coating provides another barrier to the sun and weather, elements that can, over time, produce discoloring and spider cracks (or crazing). Dicor Products’ coating also produces a brilliant white finish that aids in reflecting sunlight to reduce heat absorption.

For metal roofs, products like Dicor Products’ Elastomeric Metal RV Roof Coating also provide a brilliant white finish to aid heat reflection, while reducing environmental and weathering effects on the finish. Used in conjunction with Dicor’s Rust Inhibitive Primer, the potential for corrosion is also reduced.

The bottom line: if you want to restore your roof to make it look like new again, or if you simply want to maintain and extend your roof’s good looks and investment value well into the future, you should look into a roof coating system designed for your particular kind of roof. However, to achieve maximum value from these coatings, the application process is critical. In a future installment, we’ll cover the application process.

Mosquitoes — deal with them (even if you can’t beat them)

By Greg Illes

The first thing you’ll always hear about mosquitoes is DEET, the active ingredient in the most-effective (to date) repellent. “Get some DEET and go soak in it,” or something like that, is common advice. Our attitude about DEET is thoughtfully considered: it’s a toxin, you can’t drink it, so why put it on your skin? Now, that may be too extreme an attitude for a lot of folks, and if it is, more power to them, because DEET really does help keep the bloodsuckers at bay. That said, we avoid it.

But even DEET proponents will agree that it smells, makes you feel sticky and dirty, and is non-effective after washing or showering. Nobody seems to like to sleep with it on, which is arguably when you need the best protection, to get a good night’s rest.

For those who would like to minimize mosquito predation with other methods, we offer the following suggestions:

Other repellents — Several different skin applications are available, both commercially and as home-brew recipes. We’ve had excellent results with Pest-Off body oil from Plantlife (it has a huge ingredients list, all natural plant oils). There are many other rub-on or spray-on products. There are also air-treatment deterrents. We’ve had only modest results with citronella candles, smoke coils, and/or battery-powered smoke-producers, because the slightest breeze makes them ineffective except directly downwind. But they can be useful when it’s calm, which is also when the bugs are the most pernicious.

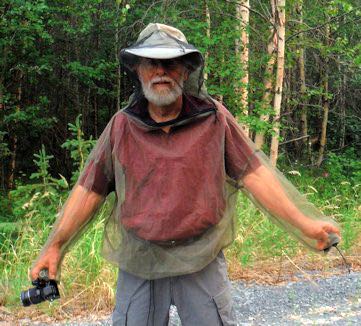
Personal netting products — A head net and a jacket, or jacket-headnet combo, should be considered mandatory attire in mosquito country. If it’s hot and you need to wear shorts, add mosquito-net pants to the list. This is a nearly sure-fire method to keep from getting bitten, with no repellent at all. I say “nearly” because the nasties will actually bite right through the netting if you let it sit against your skin. BTW — they will also bite through socks and T-shirts, so wear loose-fitting clothing to avoid this.

RV “sealing” — Mosquitoes find you by the carbon dioxide (CO2) you exhale. They will find the CO2 at any screen or vent, or any gap, crack or hole. If they can get in, they will, and they’ll follow the scent right to your ear lobe. Do a serious inventory of your RV’s doors, windows and vents, and screen or plug any mini-ports you find. Check under the bed and behind drawers, too. We did ours, and it’s been bug-free ever since (once we swat the ones let in with the door open/close).

Outdoor screens — If it’s okay to stay in one spot and gaze out at bug-infested, but otherwise beautiful, scenery, then a camp screen-room might be useful. These come in various sizes, are lightweight and easy to put up, and can afford the opportunity to be bug-protected while reading, cooking or just relaxing. We saw one huge screen room where the campers had an extension cord and their TV set up inside.

Active attack — You can use pesticides or bug bombs if you like. Here again, it’s a toxin and you don’t want it in your body. Furthermore, if you bug-bomb the RV or screen room, it only lasts until the next time you use the door, and then more bugs come in. We don’t use this method, but you can try it if it seems useful. One active attack method we do use, in fact with great delight and a vengeful grin, is the high-voltage swatter. We got one of these recently and have found it to be amazingly effective at snatching the little devils right out of midair and instantly killing them. You can find these at sporting goods and hardware stores for $5 or so. And you don’t have to feel guilty if you think it’s fun. [Editor: bug swatter zappers are available at Amazon.)

These anti-bug remedies have been quite useful for us, especially in northern Canada where the mosquitoes can get to plague proportions. The jackets especially have allowed us to transform misery into contentment.

photo: Karin Illes

Greg Illes is a retired systems engineer who loves thinking up RV upgrades and modifications. When he’s not working on his motorhome, he’s traveling in it. You can follow his blog at www.divver-city.com/blog.

Catalytic heaters warm your RV without draining batteries

If you’ve become frustrated with the inefficiency of your RV’s forced air furnace, especially when dry-camping and it kills your batteries in record time, you might want to consider adding a catalytic heater.

Using no electricity, and therefore not depleting your batteries, the catalytic heat, operates on propane only, has high to low settings, and costs only pennies an hour to operate.

Olympian’s Wave™ heaters operate on low pressure LP gas, and can be wall mounted or used as portables and are equipped with a 100% safety shut-off valve to prevent accidental non-ignition fuel discharge.

The built-in automatic Piezo electric spark starter will last for 20,000 starts. No electrical drain or battery connection.

Features & Specifications

Operates at all altitudes

  • No flame
  • No flue or chimney
  • Safe & dependable
  • Installs in minutes
  • Penetrating soft infared catalytic heat
  • Adjustable from 1600 to 3000 BTUs
  • Dimensions: 11-3/4″ H x 10-1/4″ W x 3-1/2″ D

You can find the Olympian Wave catalytic heaters at Amazon.com.

Changing travel plans “on the fly”

0

By Bob Difley

When traveling it’s all too easy to find yourself focusing more on the destination than the trip. Think of all the great attractions you pass when you have the blinders on, barreling down the interstate. Slow down, check out your surroundings as you go, look for signs to local attractions, stay free from tight travel agendas, and it’s all right to suddenly change your mind and go somewhere that you hadn’t planned to.

Many of these attractions, whether scenic, historic or of unique interest, are free, and as so, do not have big advertising budgets like large commercial attractions do. So you have to either look for them or find out about them in another way. By finding these free and low-cost attractions you can save a considerable amount of your entertainment budget.

Another good way is to ask at visitor centers, welcome centers, federal agency offices (BLM, National Park Service, Forest Service, etc.), park entry stations or campground hosts, do Internet searches for attractions in your area, etc.

You could otherwise miss a stunning scenic view, spectacular hike to a waterfall, wildlife viewing areas, or other sites worth seeing — as well as missing out on free entertainment. And often, when you are visiting smaller attractions or local museums — where they are glad to see all visitors — they will let you stay overnight in their parking lot, saving campground fees. Just ask first.

You can find Bob Difley’s RVing e-books on Amazon Kindle.

photo: Russ and Tiña De Maris

Portable waste tank: A must for boondockers

If you are a winter snowbird and boondocker and don’t already have a towable waste tank you are missing one of boondocking’s most useful accessories. It’s not a pleasant chore — and also time-consuming — to pack up and move your whole rig to the dump station when you can simply dump your waste tanks into a portable tank-on-wheels and tow the tank to the dump station instead.

This  32 gallon 4-Wheeler Tote-Along tank is equipped with two 10 in. rear wheels and double swivel front wheels for towing or pulling on level ground.

A ring at the end of the handle allows using any vehicle with a hitch ball to tow the tank to a dump station where you can position and empty the tank with its built-in 3-inch sewer valve.

The tank is constructed of blow-molded polyethylene and comes with 3-inch bayonet-mount inlet and outlet and 3/4-inch male garden hose connection for cleaning. It also includes a bobber guage, all hook-up/dump fittings, and tow handle.

Features:
  • Two Bayonet hose adapters
  • 5 foot  piece of 3 inch sewer hose
  • 3″ and 3/4″ Caps
  • Full tank indicator
  • Heavy Duty Tow Handle

You can find this tank and other brands and sizes at Amazon.com.

Grab handle makes RV screen door reach a lot closer

By Jim Twamley

Unless you have telescoping arms, if you’re like most RVers you may struggle to reach out and grab that RV screen door to close it. Kelly Melfi from Frankfort, Ill., is quite an innovator and he’s a lot like the rest of us. Grabbing the screen door was a hassle. But as an innovator, Kelly couldn’t just let it go.

With Kelly’s idea you can easily reach your screen door from inside your coach. He simply used a 1/2-inch piece of PVC and two “elbow” connectors as the handle. He cleverly attached the handle diagonally across the slider bars with sheet metal screws through the center of the elbows. This allows the handle slide cover to freely slide back and forth on its tracks.

Editor’s note: If you don’t want to build it yourself, here’s a screen door cross bar from Amazon.

Apps help you find public lands

By Dave Helgeson

The U.S. federal government controls nearly 650 million acres of land owned by you and me, the taxpayers of this great nation. That number is nearly 30 percent of the entire United States. For years those of us that love to recreate and camp (disperse camp — aka boondock) on public land had to rely on paper maps to know where the federal land was located. It was even more difficult to know which government agency controlled the land and where the actual boundaries were located.

Among the Internet, mobile apps and on-board GPS, locating public lands, the agency that has jurisdiction and the boundaries is no longer the arduous task it once was. Here are two indispensable sources for finding public lands, the administering agency and knowing when you are within their boundaries:

Publiclands.org allows you to search the 11 western states for both federal and state lands on which to recreate. You can zoom in or out, and pan to see the boundaries, while color overlays indicate controlling agencies. With a little cross-referencing via online topographic maps or Google Earth you can obtain the needed coordinates to successfully navigate to your chosen location. (Editor: Publiclands.org is a website from the Public Lands Interpretive Association (PLIA), a 501(c)(3) not-for profit educational organization.)

Similarly, by downloading the U.S. Public Lands app on your GPS-enabled mobile device not only can you view federal land, but you will know your relative position to the boundaries via an onscreen beacon. This allows you to follow a road onto federal land while seeing your real-time position onscreen. Now you will know exactly when you have crossed onto public lands.

Between the two resources listed above you can confidently and successfully navigate onto public lands without the guesswork of past methods.

map: publiclands.org

We know what the Lone Ranger did with his trash – How about yours?

By Russ and Tiña De Maris

It’s a problem that doesn’t get much play —but what do you do with the trash? Many “boondocking” locations just don’t have a handy dumpster or trash can for you to toss your junk, so what can you do with the refuse of living?

Limiting the amount of “stuff” is a big start. Where we can, we recycle. In states where a deposit is charged for aluminum cans or other containers, there has to be a way to “redeem” it. Checking the local telephone book yellow pages under “recycling” will often yield a place where you can sell back those commodities. We were really thrilled once in Oregon to find a “recycle” machine outside of a grocery store where we could drop in aluminum cans, then get a “chit” back we could exchange for cash inside.

Many boondockers save waste paper and use it to start campfires or, where it’s safe, simply burn the waste paper. If you’re out in the boonies for an extended period, holding onto food waste can pose a problem — you don’t want to attract trash feeders and you don’t want it stacking up inside the rig. Some clever boon’ers carefully bag up the small food waste and stuff it in their freezer until they head back to civilization.

On the road, what’s to do? By keeping the waste stream small, you have less to dispose of. When we travel we generally have less than a “Walmart bag” of trash a day, so when we skate in to fuel up the rig, we simply pop the bag in the trash barrel at the fuel island — we’ve never been troubled about it. If you get in deep with a large amount of something, well, check and find out where the local transfer station or dump is. I know, it’s a bit weird to roll into the dump in Slo Joe the Motor-Home — but, hey, you do what you need to do.

And if you missed out as to where the Lone Ranger took his trash, you can click here to download the theme song. Then simply transpose in, “To da dump, To da dump, To da dump, dump, dump….” OK, so we weren’t born yesterday — more like a lot of yesterdays ago.

photo: public domain

Think you need to replace your AC fan motor? Maybe not

By Steve Savage, Mobility RV Service

It’s warm out and air conditioners are humming — or should be. Then comes the request for service. A common one concerns air delivery, or more specifically, “My air conditioner is not blowing as hard as it should,” or “My air conditioner fan will not start.” Before getting in line for service, let’s talk about possible problems.

Let’s take the “fan motor won’t start at all” first.Air conditioners sit for months without running and one of the things that often happens during that time is the motor shaft rusts and sticks in the bushing. Before ordering a new motor, try freeing the motor shaft by turning it by hand. In severe cases you may need pliers. Do this while the unit is off (OK, sometimes I do it with the fan switched on, but that is me). What you will often discover is once the shaft is freed up and the motor starts to run, the problem goes away.

I do this dozens of times each year on dealer lots. If you call me on the phone (customers only, not Internet readers), I will discuss this possibility with you before I fire up the truck and charge a bushel of money for a very simple and brief fix. I have run into this so often, I have made a bent hook out of a piece of aluminum trim and don’t even have to unscrew the cover in order to get it spinning. In my experience, the problem is more common with Dometic Duo Therms rather than Colemans, but they all do it some.

Next up is “air delivery at the vents is too weak.” Again, this is not a motor replacement issue, at least in my experience. More likely than not, your coil is “iced.” When humidity is high, running the fan on high is often the cure to put more heat across the evaporator coil. That’s the coil you can see from inside the camper, and if you drop the filter cover and look up, you often can see the ice. If running the fan on high does not cure the problem, your freeze control that is sticking in the coil and is designed to shut off the compressor when the coil starts to freeze may have been left out or has fallen out of the coil.

Sometimes the freeze control does fail. The good news is, it is not an expensive part and takes only a few minutes to take out the old one and plug in the new one. Duo Therms are a normally open circuit and Coleman’s are normally closed, so they are not interchangeable and can be tested for continuity to ensure one is not replaced unnecessarily. I replace less than one a year, so failure is uncommon.

Do fan motors fail? Sure, but not often. If you know how to use a multimeter to test an electric motor, you already know how to check them. In my opinion, Coleman’s are the easiest to replace, Duo Therms are not bad, and I hate replacing Penguin motors. As always, be sure to diagnose before ordering a motor!

Roof coating time? Prep work is a key

0

By Dicor Corporation

Just like painting, much of the work in coating an RV roof is in the preparation. Roof coating is a multistep process, beginning with lap sealant replacement or touch-up performed one to two weeks ahead of the actual coating. This will allow the sealant to be well-cured before the coating covers it, helping the sealant and coating to bond with maximum effectiveness. In the same vein, peel and stick patches are best applied one or two days before coating.

Clean first

Next comes cleaning. A very clean surface is key to making any coating stick well. First, sweep any loose dirt, debris, sticks, stones or leaves from the roof. Then use the appropriate Dicor Products cleaner/activator for your kind of roof and for the coating system you are using.

The type of roof you have will determine the type of coating system you will be applying to the roof surface. Each roofing material has its own individual characteristics that require a certain type of coating system. Because of this, Dicor Products offers three coating systems, one for EPDM and TPO, a specially formulated roof coating system for fiberglass, and a metal roof coating system.

Tip: Mask-off sidewalls

For the cleaning and coating procedure, always mask off the sidewalls and caps of the RV with a good quality tape, such as FrogTape®. The cleaning/activator agent is designed to loosen dirt from the roof material. The chemicals in the cleaning and coating materials are made for the particular roof material they are acting on, not for your sidewalls and end-caps. Masking off the sidewalls and front and rear end-caps takes a little more prep time, but then you don’t have to keep constantly rinsing the walls and end-caps (unless you like the exercise). This prevents the dirt, debris and cleaning agent from having an opportunity to affix themselves to the sidewalls and end-caps. It also prevents any accidental contact with the coating and these surfaces. It’s easier and safer all the way around.

Even bigger tip: Read the instructions!

Before starting anything (listen up, guys), read the instructions! Different cleaning and coating formulas are made for different roof materials. We have been mostly talking about EPDM and TPO roofing here, but there are materials, processes and products designed for fiberglass and metal roofing as well. Such instructions can help you make best use of your time and your product.

As for your tools, we find a medium nap roller is the best way to apply the coating material.

Use the right lubricants to keep your RV working right and quietly

By Greg Illes

It’s truly surprising how many different ways modern technology has provided to lubricate moving parts. When I was a kid, the choices were likely between “axle grease,” motor oil, 3-in-1 and Liquid Wrench. Nowadays, we have a plethora of synthetics, Teflon-bases, penetrants, dry-lubes, and food-grade (you can swallow it) lubricants.

Let’s start with the basics — your RV engine and chassis. Of course you need to follow manufacturers’ recommendations, but remember that the older your unit, the more likely that improved lubricants have come out since the manufacturer wrote up those notes. Do your research — the new synthetics generally provide better lubrication and longer mechanical life. This goes for everywhere in your RV: engine oil, chassis grease, axle lube, transmission oil, even power steering fluid.

Next, the regular maintenance stuff. Here, the biggest boon to the RVer is likely to be the dry lubricants made by folks like WD-40, Liquid Wrench, 3M, CRC and others. These products have a dry, non-greasy lube like PTFE or moly-disulfide, suspended in a penetrating evaporative fluid. It runs into sticky joints, dries up, and then leaves a slippery deposit behind that will not attract dust and dirt. For my RV, this stuff worked wonders after literally years of trouble with my outside cargo door latches. Many slideout lubes operate similarly, as do key-lock lubricants.

And then there are the old standards, the stuff you always reach for when things squeak or get sticky. The ubiquitous WD-40 is an excellent penetrant, not to mention its hundreds of other reported uses (way too long a list for this article). However, WD-40 “ablates” — that is, it doesn’t stay around for very long, so a non-ablating lubricant must be used for longer-lasting results. I like Tri-Flow for its penetrating/lubricating capabilities. Some food-grade silicon lube is good for O-rings or threads on food and water containers or plumbing (these come in tube and spray). Some light oil is always useful, in a small-droplet applicator for those tiny spots that need just a little dab. I like the small Tri-Flow, and I also like Phil Wood Tenacious Oil. This last is a viscous, clingy lube available from bike shops or Amazon, and it doesn’t “run away” when you apply it to a joint. It’s kind of a cross between oil and grease.

There are literally hundreds of choices in today’s marketplace — far too many to keep in stock in our RV’s limited space. For your chassis, try to pick name-brand lubes that you can buy on the road, so you don’t have to stock them. For regular maintenance, pick a few useful lubes and keep them handy. Your rig will run longer and happier, not to mention squeak-free.

Editor’s note: There are many lubricants to choose from, at great prices, at Amazon.

photo: wikipedia / public domain

Greg Illes is a retired systems engineer who loves thinking up RV upgrades and modifications. When he’s not working on his motorhome, he’s traveling in it. You can follow his blog at www.divver-city.com/blog.