Home Blog Page 2175

Add automatic lighting to your storage compartments

By Greg Illes

How many times have you fumbled in the dark, trying to find the semi-hidden switch to your storage compartment light? And how many times have you forgotten the dang thing and left it on to suck down your batteries?

Yeah, me too. Way too many times. But don’t dismay—there’s a really cool and easy way to eliminate the problem once and for all.

Get yourself a momentary door switch, the kind that is used in refrigerators, freezers, etc. These are inexpensive and easy to find in various configurations. Pick one that will work with your door setup. The easiest method is usually to mount a small piece of sheet metal in the corner of the doorway, and mount the switch through a hole there. The sheet metal can be glued or pop-riveted in place.

The switch needs to be a momentary normally closed type. In this configuration, the switch will OPEN when the door shuts on it. In its relaxed state, normally-closed, it will complete the circuit. Wire this switch in series with either the hot or the ground lighting wire — doesn’t matter which one. [If you aren’t really comfortable with RV electricals, you should get someone wiring-savvy to do the hookup for you.]

Once you have the momentary switch hooked into your lighting circuit, you can leave the light turned on all the time. It will only get powered when you open the door and the switch push-button pops out. Close the door, the switch gets depressed, and presto! — the light goes off.

Want to have the light off while the door is open? There are some switches that have a pull-to-activate feature. But if you can’t find one, just use the regular light switch and turn it off.

photo: Jacob Henri 6 / wikipedia

Greg Illes is a retired systems engineer who loves thinking up RV upgrades and modifications. When he’s not working on his motorhome, he’s traveling in it. You can follow his blog at www.divver-city.com/blog.

Tools for RVers: IMPELtronics flashlight

By Chris Dougherty
Certified RV technician

Having a good flashlight in an RV is important, and even a couple of flashlights that serve different purposes is a good idea. Sometimes a flashlight can serve more than one purpose, as is the case with the IMPELtronics magnetic flashlight.

Ideal for your RV toolbox, this 4-LED flashlight has magnets on each end: the one on the body can hold the flashlight to a steel surface and pick up objects that weigh as much as 8 pounds, and the other can help pick up a metallic item you can’t reach or see by another method. What separates this unit from others is that the entire LED head extends 22 inches and flexes 360 degrees to put the light and its magnet where you need it.

The 4-LED head puts out a decent if not earth-shattering amount of light, and is compact and utilizes four LR44 button batteries to power it. The exterior of the light is made completely of aluminum, and is available in a variety of colors. It costs $20.99 and can be ordered directly from the manufacturer, IMPELtronics.


RV Gadget: keyless lock system by Lippert Components

Many of us have become accustomed to remote control and keyless locks on our cars, but aside from high-end motorhomes that option hasn’t been available for RVs. Recently, Lippert Components introduced the RV Lock keyless lock system for travel trailers and fifth wheels that allows for an easy upgrade to keyless and keypad entry.

The battery-powered lock system is a simple replacement for existing keyed locksets. Simply remove the old lock and the new unit fits into the same hole using the included hardware. There is a small wire attachment inside the lock, and the rest is simple hardware. Programming the lock is straightforward, according to the company, which only requires a paper clip to activate the learning button.

The white or black RV Lock comes with the replacement lockset, one key fob and the numeric keypad. Additional wireless key fobs are also available for car-like ease of locking and unlocking the trailer.

The RV Lock and keypad retails for $239.00 and the key fobs are $39.99 each and are available from your favorite RV retailer. More information can be found at Lippert’s website. —Chris Dougherty

Will you spend a day getting your RV ready for the season?

By Chris Dougherty
Certified RV Technician

Being a “tech guy” in RV land can be both a punishment and a reward. People always have questions (which I welcome, by the way) about their RVs, and they range from the newest technologies to all kinds of how-to questions. Most of the time I can give a helpful answer, which is rewarding. Sometimes, however, I get the completely frustrated RV disaster comment or question for which there is no easy answer (e.g., my roof fell in).

Granted, sometimes the problems that arise with our RVs are unavoidable, but many of them are avoidable. As RVers we have chosen to have an active rather than passive role in our recreation. The same goes for boaters, vacation homeowners or car collectors. There is a certain amount of work involved with a reward at the end in the form of the knowledge that you’ve done the job well and that your investment is better off because of it.

On the flip side, passive vacationers book a cruise or a resort vacation, which is fine for those who like them but they are missing much of the return to our roots — experiences that make RVing so enjoyable, in my humble opinion.

So, part of being an active RVer is maintaining your equipment, and many problems RVers face on a trip could have been avoided if: (1) they had checked over the unit prior to their trip, and (2) proper maintenance had been completed. I guess I’m kind of the hindsight guy in that I’ve seen a lot of this stuff and I can tell you about it ahead of time.

When you’re on your trip, spending your precious time and money, is not the best time to find out that you can’t light the water heater or the slide won’t work. The same goes if you put your foot through the floor and realize that the roof has been leaking and the roof, wall and floor are completely rotted out. Oops … a vacation not to remember.

You don’t have to spend a lot of time maintaining your RV. In fact, there are plenty of RV service providers out there who will do all your regular maintenance for you. But if you can do it, taking on some of these duties will save you some money, teach you about the craft you have bought and, as Spock says, help you become one with your RV!

So plan a day at the beginning of the season to get your RV ready for use. Clean the entire unit and do all the maintenance, starting with the roof and working your way down. Do your own PDI (pre-delivery inspection), if you will. Test all the systems, lights, plumbing, etc. Make sure everything is in tip-top shape, like your commanding officer was coming to do an inspection. Fix whatever needs fixing. From paint to light bulbs, this is the time to get ‘er done. In most cases, you can do it all in a day or less. Then, when it’s time to hit the road, you already know everything should be working and, just as importantly, you remember how everything works!

Sounds like a good time for a campfire, BBQ and a beverage to me!

#fb05-01-16

Tools for RVers: Essential equipment, a set of pliers

By Chris Dougherty
Certified RV technician

An essential part of the RV toolbox is a good set of pliers. Now, you can get a complete set (the ones in the photo are from Amazon.com), which is economical and functional, or you can pick individually. I like a set like this, as I can think of a time where I have used each one.

The channel locks are ideal for any plumbing connection or nut/bolt that you need a little more leverage on. Needle nose are great for the wiring jobs. Electricians’ pliers and wire snips are essential for doing electrical work. Lastly, general purpose pliers help when securing fasteners.

Go your awning carpet one better

0

By Russ and Tiña De Maris

No matter where we travel, for some reason as RVers we want to somewhat “civilize” the world. At night we like to sit by the campfire (or out West, you sit by the fire pit without a fire!) and we’ll often bring along a camp lantern to provide a little more light than the moon and the stars provide. And just in case the moon and stars are too bright, we’ll roll out the awning and sit under it and keep shaded from whatever might come our way.

If you’ve got an RV awning, there’s just no sense in “letting it go” like that on ground level. No, somebody has to rustle around in the storage compartment and pop out a green “grass” carpet or some other sort of woven rug to put down under the awning. We confess, we do the same thing.

But here’s one for your “bring civilization” filethat might go a step better than your typical under-the-awning-grass-carpet trick. Instead of “fly away in the wind” carpeting, or “Drat! The stuff is too wet from the rainstorm to put away in the storage area,” here’s what one of our faithful readers suggests. Carol Boteler writes, “I bought several sets of plastic open-work patio tiles for setting on the ground around my trailer door.”

We took a look around the Internet, and sure enough, these versa-“tiles” may be just what the RVer ordered to make life in a dusty (wet) (gravelly) (grassy) environment more “civilized.” At nearly a foot square each, a set of six of these can make a nice “landing” area in front of your RV steps. Buy another set or two (six each), and you can “pave” under your awning in time for cocktail hour in no time flat. If they’re rained on, it’s a simple matter of picking them up, shaking them off, and stowing them away — they won’t mold or mildew because they’re made out of polypropylene — a lightweight, resilient material. You can find them on Amazon.

But wait! There’s more! No, we won’t send you a second set for just the added cost of shipping and handling, but we will provide you with yet another use for these little squares. Do you march off to the campground shower, shuddering at what sort of fungi and microbes might be lurking in the shower stall, just waiting for you? Take along a couple of these clever snap-together tiles and slap ’em down in the shower stall. When you’re done showering, move them out to where you’ll stand to complete your final grooming attempts.

You’ll find these using the search term, “interlocking patio tile flooring.”

photo: amazon.com

Why use an RVDA/RVIA certified RV technician for repair work

By Chris Dougherty
Certified RV technician

In 1984 the RV industry, led by our friend Gary Bunzer, the RV Doctor, developed some of the first formal testing methods for RV technicians. The idea, according to Gary, was to have a baseline to determine how much a technician knew, a platform to determine how new technicians were to be trained, and a basis for developing a training curriculum. The Recreation Vehicle Industry Association (RVIA) along with the Recreation Vehicle Dealers Association (RVDA) took that idea further and created a formal certification program for the RV industry. It’s still a work in progress and always will be. As technology and our industry changes, the information technicians must know will also change.

Recently, I was honored to have been invited to serve on the RVIA committee to completely revamp the RV Service Technician (RVST) Standard to which RV technician training in the coming years will be based, including textbooks and test questions. The group, which met in Dallas, included 16 RV experts and professionals from all different segments of the industry — from RV manufacturers and suppliers to dealers, educators and independent technicians. For four days we went through the 125-page document line by line. It was a challenging task, but well worth it.

The people there were among the most progressive people in the industry. They were not compensated for their attendance, by the way — it’s a volunteer position.

The economic downturn hurt the program, and many certified techs had to leave the industry. In addition, many shops could not afford to maintain the training or certification.

As the economy improved, RV industry training has also improved. Many certified techs are coming back, but still many are not. Many businesses and individuals just don’t see the benefit of having trained and certified techs work in their shops.

A certified technician is an assurance that he or she has demonstrated a certain skill level of their craft and can perform to that level. This is a plus for the dealership, knowing that time won’t be wasted on the shop floor figuring everything out, and that jobs will more likely be done correctly the first time, with fewer customer returns and more satisfied customers. For the RVer, the certified tech is the best friend he or she can have to make sure that their RV is cared for in the best way possible, and that a job will likely be done the right the first time.

There isn’t currently a list of certified techs and shops available, so you need to call your shop and engage them in the conversation.

I encourage every RVer who reads this to seek out and use certified RV technicians. I encourage every dealer and service center principal reading this to get all your techs trained and certified. And I encourage every tech reading this to honor their craft and their profession and get certified.

I am a huge proponent, supporter, participant and booster of the certified RV technician program. You should be, too.

#rvt743

A Nut Job can make detailing your RV’s wheels easier

By Chris Dougherty
Certified RV technician

We recently received a box from “Crusher” with some samples of his new product he calls the “Nut Job.” Right then and there I knew I would never forget this one. This is a product and company name designed to elicit puns.

The Nut Job, made by HaHa, LLC, of Bluff City, Tenn., is a detailing tool for cars and RVs — or their wheels, to be more exact. The device is designed to make cleaning deluxe wheels with chrome lug nut covers a breeze, and it does, according to the product’s inventor Randy “Crusher” Lewis.

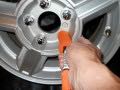
There are two different sizes of Nut Job. The big Nut Job is for Class A motorhomes and big trucks, and the small Nut Job is for cars and trailers. To clean the lug nuts, simply place the open end over the lug nut and spin to clean. The unit utilizes removable and machine washable socks as a cleaning medium, and the device and sock will expand to cover various-sized lug nuts.

In addition to cleaning nuts, the Nut Job’s other end can be used to get into tight spaces around the spokes in some wheels. Take that sock off and there’s a screwdriver to pry off a hubcap or lug nut cover. That end can also be inserted into a drill to use the Nut Job as a (slow) spin cleaner to clean those difficult spots in the spokes of the wheel, according to the company.

The Nut Job is sold factory direct and can be found at the company’s website. The big Nut Job retails for $18, and the small Nut Job for $15. Replacement socks are only $3. The website has lots of information, images and videos of the product, and the founder and inventor of the Nut Job, “Crusher” Lewis, can be contacted directly via email at crushspeed(at)hotmail.com.

I want to go to Mars

By Chuck Woodbury
editor, RVtravel.com

I dream of going to Mars. When I see a photo (or illustration as below) about life on Mars I get mad that I was born too soon to be able to ever go there. It’s so easy and so fast these days to go anywhere on our own planet Earth if you have the money to get there. But Mars … that is still unknown and mysterious. There is so much to see. Yes, maybe it’s all the same — dirt, rocks and air you cannot breath (humans can remedy that if you give them enough time).

To me, the thrill of going to Mars would be to go where no man had gone before (thanks, Star Trek!). I think it would be scary to look up at the sky and see no trace of Earth, except a little pinpoint of light. Still, I would go if someone gave me the opportunity.

A couple of hundred years ago there were still places on Earth that had not been visited by modern men. I envy Lewis and Clark: they set off to explore the American West when it was still a mysterious and unknown place.

Here are a few images of Mars that I find interesting:

In this artist’s rendering, an astronaut on Mars is working in a lab where vegetables can be grown hydroponically. These crops will provide him and his fellow crew members with food. I guess you might feel cooped up after awhile in a place like this, but still, I would like to be part of the crew. It would be so exhilarating to learn to live totally on your own. Illustration credit: NASA

Evidence of the layered geological history of Mars is laid bare in this postcard from NASA’s Curiosity rover. The image shows the base of Mount Sharp, a Mars rover’s eventual science destination. The pointy mound in the center of the image is about 1,000 feet across and 300 feet high. Photo credit: NASA

I wrote in my essay that there are places on Earth that look like Mars. The image above shows a dry stream bed on an alluvial fan in the Atacama Desert of Chile. It reveals the typical patchy, heterogeneous mixture of grain sizes deposited together. On Mars, Curiosity has seen two rock outcrops close to its Bradbury Landing site that also record a mixture of sand and pebbles transported by water that were most likely deposited along an ancient streambed. Photo credit: UC Berkeley

Mars or Earth?
Below are two photos. I took one of them in Iceland. The other is of Mars, taken by NASA. Can you tell which is which? Pretty tough. The answer is below.

Mars-4-737• • •

In case you didn’t know, people DO live on Mars.
This Martian family is proof! As you can tell from their postcard, they read the RVtravel.com newsletter every Saturday.

mars735

ANSWER:
The bottom photo is Mars.

Caulk tools: A must for RVers

By Chris Dougherty
Certified RV technician

Okay, I know I harp on leaks a lot, but these tools are essential to help keep your RV leak free.

Liquid RV sealants: From EPDM seam sealer to silicone to body sealers — all come in 10-ounce caulk tubes; so if you’re going to maintain your RV yourself, you need these.

Caulk gun: You don’t really need a “Cadillac” caulk gun if you’re not using it all the time — you can get a consumer-grade gun — plastic and no frills. They range up to $25, and there are even pneumatic ones for the air tool lovers out there. One with a piercing tool and tip cutter is convenient.

Little red nozzle caps: These little red caps are great for preserving open tubes of caulk and glue.

Newborn Caulk Buddy: Great little item for tooling a silicone caulk seam. Buy it separately or with their gun as a kit.

General Electric Co. M9001 Caulk Smoother: This stuff is slick. I first saw it in use at one of the RV plants, and it’s for use with silicone only. Once you place your bead on the clean surface, spray this on the entire seam and then use your caulk buddy or other tool (or finger) to finish or tool the seam. No smears and it looks fantastic.

Non-marring scraper: These plastic scrapers, available at Harbor Freight, are great for scraping old sealant and other things from surfaces you don’t want to damage.

Utility knife and long-tip awl: If your gun doesn’t have a piercing and cutting tool, you’ll need these. They also make a specific caulk gun cutting and piercing tool — I’ve never owned one, though.

In addition, paper towels or shop rags are important, and some people prefer to use latex gloves to protect their hands. For the common roof sealants, excess can be removed carefully with mineral spirits.

#rvt739

How to protect your RV’s electrical system

By Chris Dougherty
Certified RV technician

A reader wrote in recently who had heard about RVs getting fried by bad wiring in campgrounds, and asked if I would recommend purchasing a surge protector for an RV to help prevent this.

I highly recommend surge protectors. I have worked on numerous RVs over the years that suffered electrical problems caused by outside sources. It’s more common than you might think.

To be fair to RV parks and campgrounds, many of them have upgraded their electrical systems in the last 15 years. But when I first started doing this professionally, hot summer weekends often led to air conditioner start kits having to be replaced because of brownouts. On hot summer weekends in RV parks, many if not all the RVs are running their air conditioners plus other appliances. This is a considerable amp draw on the system and if it’s not designed for it, the voltage can drop off — which wreaks havoc with electrical devices and motors.

The most problems I’ve seen are from lightning strikes in or near an RV park. Some of the damage I repaired could have been prevented with a surge protector, some not. One coach I recall had the lightning surge come through the cable connection, which took out all the systems and appliances in the coach. Coming through the cable connection, the surge jumped to the 12-V DC system through the antenna booster, and the 120-V AC system through the TV and the converter.

RV surge protectors seem like an extravagance — until you need them. There are a number of various models on the market from companies like Progressive Industries and Technology Research. There are entry-level units with basic mis-wired pedestal indication and with protection to 2,100 joules and spikes to 6,500 amps — to units that protect over and under voltage, open neutrals, reverse polarity, ground current protection and higher surge suppression protection.

You can install a permanently wired unit with a remote display, or you can use a weather-resistant plug-in model with a locking hasp, which is easier to move from one RV to the next.

These units are on sale at Amazon.com and your favorite RV retailer; they start at $68 and go up to about $350.

Braving the RV shower

0

By Russ and Tina De Maris

Accustomed to “endless” water supplies at home, some new RVers are a bit taken aback when taking showers on the road. The typical RV water heater has a six gallon capacity – far, far less than a sticks-and-bricks home version. What’s to be done?

shower scared
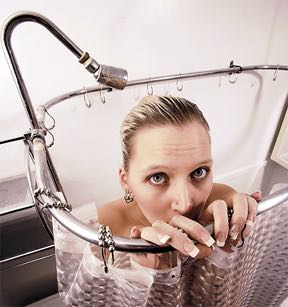
The luxury of long showers may be a thing of the past when you hop in your RV. But there are things that can be done. First, the limits of how long a shower can be are not just in the size of the water heater, but also the size of your grey water holding tank. When staying in an RV park site equipped with a sewer hookup, holding tank capacity isn’t a concern.

To “beef up” the hot water supply, some RVers have installed a larger (10-gallon) water heater, assuming you have the space available in your RV water heater cubbyhole. Many have asked about “instant” water heaters – after all, many residential homes have them. A few high-end coaches have a line called Aqua Hot, but they aren’t common in the average RV. There are after-market instant heaters, but they tend to be extremely expensive, and just haven’t received much acclaim by RVers.
Some RV water heaters have a “mixing valve” feature that allow the heater to effectively deliver more hot water than a standard unit. How this works is that the heater itself super heats the water in the tank, then mixes ambient temperature water with the super-hot water to deliver water at a safe temperature. In essence, a six gallon water heater effectively delivers nine gallons of hot water. Many RVers have reported lukewarm results: it seems the mixer valves are prone to problems and in the end, you often get less-than the correct temperature water.

Some RVers swear they get oceans of hot water by adding an electric heating element to their gas-fired RV water heater, then running both gas and electric at the same time. This is a definite no, no, according to heater manufacturers.

Where does this leave you? If you really have to have a long shower, you’re stuck staying at an RV park and using the “community” shower. You could pull into a truck stop and pay for a shower – these are probably preferable to many RV park showers as they’re individually cleaned before each use, and a towel comes with your purchase.

In the end, most RVers learn the way of conservation, the old “Navy Shower.” Step in the shower, set your water temperature, rinse off, then switch the flow off with the little button on the shower head. Soap up with the water flow stopped, then rinse off again. With time, most of us adapt to the conservative approach.

#nrv