Home Blog Page 2190

Stop fiddling with that *$#&! propane retaining bar!

By Jim Twamley


If you are like me, you fuss with that pesky propane retaining bar, squirreling it around until you can get at your tanks. When you come back with the bottle refilled, it’s just another hassle trying to hold onto the bottle and rack up the retaining bar to get the cylinder back in place. Enter Frank Bailey.

Frank has been a full-time RVer for over six years. He retired from a tractor manufacturing firm where he worked in the engineering lab, so you won’t be surprised that he has developed some innovations to make his RV lifestyle a bit easier.

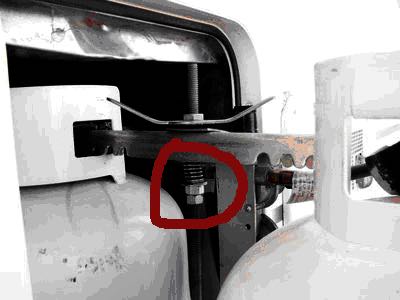
Frank, like most of us, was frustrated with the propane tank retaining bar assembly because it is awkward to handle. He decided to make life easier by placing a tension spring under the retaining bar. He used about a 1½- to 2-inch spring (not so stiff as to make the wing nut hard to twist) and mounted it on top of a large washer held in place with the locking nuts. This holds the retention bar up against the wing nut while you easily remove the tank for service. On the return trip, you’ll find it a breeze to get things back in place.

Thanks to Frank for his great idea!

Save on three of RVers’ biggest expenses

0

By Bob Difley

Three of the biggest expenses for fulltime or near-fulltime RVers are fuel, campgrounds and eating out. But one of the great advantages of RVing is that you can easily change any one or all three of these expense categories to adjust to the changing economy or the fluctuation of your personal finances.

To save on the fuel expense, drive fewer miles between campgrounds, stay longer at each destination, drive 55 mph, avoid jackrabbit starts and quick stops, and keep your tires properly inflated. Go online to find the cheapest gas stations in the areas you travel. Join the Pilot Flying J RV club to get discounts on every fill up.

Save on campground expenses by staying at public campgrounds, like in the national forests, that don’t have hook-ups or better yet, by boondocking several days a month on free public lands. Stay longer at campgrounds and RV resorts where you can get a cheaper weekly rate. When on the road, spend the night free at Walmart and Cracker Barrel restaurants. Check campground fees in a campground guide or online before choosing where you will spend the night.

You are likely pressed for time like when carrying a full work schedule and therefore have time to cook. Your RV’s galley, no matter what size, is fully capable of making tasty and nutritious meals. By shopping at local farmers markets and farm stands you can enjoy the freshest and healthiest foods. Make cooking a creative event rather than something to get out of the way quickly. You will amaze yourself with how relaxing creative cooking can be — and how much money you will save over eating in restaurants.

“To sleep, perchance to dream …” — but not on the highway

0


By Greg Illes (with apologies to Billy Shakespeare)

Healthy sleep is one of the most talked-about subjects in many walks of medicine, and with good reason. Good sleep makes for a good life. Sleep — really solid, deep sleep — is the time when the body and mind heal up from the day’s rigors. Sleep time is about the only time in our lives when we are truly masters of our souls.

But for some, good sleep can be elusive. If you have a real sleep disorder, you are probably already dealing with it. But if, like many of us, you just occasionally have a tough time getting a good night’s sleep, then there are some basic guidelines to be aware of.

Of special concern for RVers is not only the quality of life, but the ability to perform well when you are managing a 10-ton rig going down the highway at 65 miles per hour. Poor sleep makes for poor concentration, slow decision-making and inevitably poor driving. So in addition to just plain feeling better each day, good sleep makes us and those around us safer on the road as well.

One of the most blatant obstacles to good sleep, especially in the RV life, is night lighting. How many times have you parked in such a well-lit RV park, rest stop or public campground (pick one or many) that your bedroom was lit up all night like a rock star’s stage? This happens way too often. In fact, even the strong light from a full moon can significantly alter the quality of sleep.

A simple solution for light pollution is the sleeping mask. These are available for a few bucks at travel shops, Amazon, and other retailers. It’s amazing how soothing the darkness feels after strapping one of these things on.

Other nighttime irritations, particularly noisy ones, can also subtract from good sleep. Anything from campground neighbors to the local train tracks can cause more disturbance than you want to deal with. Remedies for this type of interference range from earplugs to background (or “white”) noise generators, to actually moving your campsite.

In summary, be conscious of your sleep quality and manage it well. You (and your loved ones) will profit from the attention.

Greg Illes is a retired systems engineer who loves thinking up RV upgrades and modifications. When he’s not working on his motorhome, he’s traveling in it. You can follow his blog at www.divver-city.com/blog.

Keep those electrical adapters in easy reach

0

By George Bliss 

No doubt most of us carry more “stuff” than we need. When we need one item from our storage areas it can turn into a varied search and the occasional suspicion that your spouse has moved it.

One item that is in constant demand is an electrical adapter to hook into shore power. Depending on where you are, a different adapter may be needed from night to night. To easily locate the adapter needed, I found that mounting readily available broom handle holders to the inside surface of a basement door works great.

If you’re concerned about putting too many holes in the door, you can mount the holders to a separate piece of wood or a piece of thick plastic like a large cutting board and attach it to the door at the four corners. Either way, make sure the screws you use are not longer than the thickness of the door — you don’t want them coming out the other side. As well, a screw with a coarse thread should hold better. When mounting the holders (see photo) they should be just far enough apart to accommodate the shortest adapter.

A hot idea for gauging LP in your cylinders

0

By George Bliss


Propane tanks are pretty much maintenance free.  Running with two 20-, 30- or 40-poundtanks and an automatic change-over valve, it takes only an occasional check to be sure you don’t run out of propane in your RV.

Every once in awhile you’ll want to know how much propane is left in a tank. You won’t want to run out and have your furnace quit on a chilly night or be halfway through barbecuing that roast with guests coming.

The most accurate way to measure your remaining propane is to weigh the tank. On the outside of the collar that protects the valve you’ll see various letters and numbers. Locate the letters “TW” stamped into the collar and note the numbers that follow. “TW” stands for Tare Weight which is the weight of your tank empty. Subtract the Tare Weight from the actual weight of your tank (bathroom scales work fine for this) and you’ll get the weight of the propane remaining in the tank. Generally, a 20-pound tank holds 20 pounds of propane, a 30-pound tank holds 30 pounds, and so on. If the Tare Weight of your 30-pound tank is 27 lbs, and your scale shows 40 pounds, then 40 minus 27 is 13 pounds. Thirteen pounds of propane in a 30-pound tank (13 divided by 30) equals 43 percent full by weight, so it’s almost half full.

There is an easier way if your tanks are mounted in a holder, as all RV tanks are, or if you don’t have a weigh scale handy. You don’t need to remove the tank(s), you don’t need to know the Tare Weight, and you don’t need to know propane weighs about 4.2 pounds per U.S. gallon. Take your kettle, fill with water and bring to a boil. Once boiling, pour the hot water in one place over the tank — where the tank collar meets the tank. After the kettle is empty, place your hand at the bottom of the tank where the hot water ran down the tank. If there’s any propane in the tank it will absorb the heat from the water and the tank will be cold. From that start point, run your hand upwards along the hot water path. When you reach the point where the steel of the tank gets hot, you’ve reached the level of the propane in the tank. You now know if you’re good to go or if you need to top-off or completely refill your propane tank.

Keep your RV cool while dry camping

0

By Russ and Tiña De Maris
Summertime, and the livin’ may be easy. But if you’re dry camping, it isn’t always easy to stay cool. We can no longer claim to be “boondocking purists,” in the sense that now (cough, cough) we own and carry a portable generator on our travels.

Still, it’s not always necessary to fire up the “Yamaha Chorus” to run the air conditioner when Sol climbs high in the sky. A few tips may make it possible for you to keep the a/c off and still stay comfortable.

Shade is the dry camper’s best friend. Using shade has to be balanced against keeping sun on the solar panels, and too many encroaching trees can spoil air currents if you run a wind turbine. But making your own shade through the use of awnings and RV orientation won’t mess up either solar panels or wind chargers.

By presenting the least amount of rig sidewall to the sun, Sol has less chance to overheat your rig. Pointing the nose or the tail of your RV to the south can provide the least heat-seeking profile. Rolling out the awning helps, and we’ve found that hanging a shade cloth from the awning roller (with the use of S hooks) brings even more heat relief.

How reflective is your RV roof? Most rigs come with EPDM rubber topside — but too often that can become darkened (and more heat-absorbing) with age. Keep your roof clean.

Inside the rig, block out therms with the use insulated aluminum foil cut to fit your windows. Sold by the foot at some hardware stores, the stuff cuts with scissors and is easy to work with. We use an indelible marker to note which window which heat shield belongs to, and they store easily under the bed or often behind a couch.

Refrigerated a/c units aren’t the only mechanical ways of keeping the heat down. Low-voltage evaporative coolers designed for RVs work great when in hot, dry areas. They use little power and pump chilled, moist air into the rig. Just be sure to open a window at a point distant from the cooler so the humidified air can exit your rig.

A powered roof vent can really help to keep your cool. Hot inside? Power it up to pull the air out of the RV. Cool morning? Switch the rotation and pull the cooler outside air into the rig.

Charge all your portable devices with a few simple accessories


By Greg Illes

Cell phones are only one of the many devices we routinely have to charge up. From PDAs to iPods to tablets — it seems like there’s always something needing a charge.

When at home, or in the RV and hooked up, AC is readily available and we just plug ’em in, no sweat. But on the road, boondocking or camped with no hookups, it’s a different story. Nobody wants to run the generator just to charge a cell phone.

Fortunately, there are 12V socket-based chargers which will charge your device from your batteries. Unfortunately, most RVs have few 12V accessory sockets (we older folks call them “lighter sockets”), making it impossible to charge multiple devices simultaneously. Furthermore, if your device is discharged and you want to continue using it on a charger, you are restricted to the location in your RV where that lonely socket is available. Perhaps worst of all, many RV 12V sockets are powered from the chassis battery, not the coach battery. This means that charge current is draining your starting battery — not a good idea.

Good news for all — it’s easy to add extra 12V sockets. You can use socket extenders or add entirely new ones. Running a new 12V fused line from your batteries will support new sockets — but by tapping into an existing RV circuit you can save some time. Yes, there is a valid concern about overloading an existing circuit, and the total load must always be carefully considered. In my RV, I addressed this by changing over to 100-percent LED lighting (a valuable conversion in itself). After doing this, my lighting circuits were so lightly loaded that they could safely power 12V sockets.

IF YOU ARE HANDY and can use a voltmeter, it’s simple to find and tap into a circuit or even to add a new line. If you don’t feel comfortable with this, don’t take chances — ask your RV service shop about performing this task. It should not involve more than one or two hours’ labor.

The marketplace offers a truly amazing array of 12V socket products, from chargers to socket multipliers to inverters (which will give you a small amount of 110V AC for low-power needs). These range from $10-$40, and can be found in auto parts stores, Amazon, and many retailers. I’ve found it’s best to shop online, at least initially, and check the reviews carefully. There is a lot of “junk” out there and it will cause trouble and inconvenience for the unwary.

Sample products in the photo include a dual USB charger, combination extender-chargers, and cup holder extender-charger.

Power-miser thoughts: Most devices will draw little or no power once fully charged; however, all inverters and some chargers will use some power even when no device is plugged in. If you don’t want even a trickle of power going out, unplug everything when not in use.

Greg Illes is a retired systems engineer who loves thinking up RV upgrades and modifications. When he’s not working on his motorhome, he’s traveling in it. You can follow his blog at www.divver-city.com/blog.

Can flea collars keep pests out of your RV?

By Cheryl Probst

The next time you’re buying a flea collar for your dog or cat, throw one in for your RV. It could save you from having to spend money on repairs to your rig’s propane system.

Wasps like the smell and sweet taste of propane, and will turn the pilot light areas in the refrigeration and water heater compartments into their next home. If too many wasps move in, their condo will clog up the pilot light area and the system won’t work. When the propane is turned on, it could result in not only frying the wasps but also the RV wiring, meaning a potentially expensive service call to the repair shop.

This is where the flea collar comes in. Cut it in half and lay each half on the bottom of one of the compartments. Wasps don’t like the smell of flea collars and will congregate elsewhere. Replace the flea collar whenever you get a new one for your pet. Turning off the propane when the RV is in storage will also lessen the likelihood those pesky critters will invade these compartments.

Other solutions, such as commercial wasp traps to keep wasps out are available. If wasps have already invaded these compartments, one-shot solutions to get rid of them include dousing them with a cup of soapy dish detergent in water. Wasps reportedly like the smell of beer better than they do propane, so place a half-full can of beer in the compartment. The wasps will crawl into the can to get at the beer and drown.

#rvt-739

Take a really nice shower AND save water

0


By Greg Illes

Before we even took a test drive in our first RV, we knew about “the shower rules” — basically, fast and furious, and be sure to turn it off while you’re soaping up. When I was young, we called this the “GI shower” because military guys with limited water supplies would make use of the same technique.

So we were prepared — sort of. What we were not prepared for was the pitiful, miserly piddle of water that came from the standard RV shower head. For awhile, we figured that low flow meant low satisfaction — oh, well. But after a few campfire gripe sessions about this miserable trickle, some friends told us about a new product that made the same amount of water feel like a lot more. It was the Oxygenics Body Spa RV Shower Head, and it was (and is) sold by Camping World, Amazon, and other retailers. I was a typical skeptical Engineer, but the 4-star and 5-star reviews convinced me to try it out.

This turned out to be one of those night-and-day experiences. The Oxygenics head made our RV showers significantly more enjoyable. I remember thinking, “Gee, a real shower.” No, it can’t duplicate the three-gallon-per-minute flood we get at home, but at around 1.5 GPM in my RV, it makes my water last a good long time. The spray is wide, uniform and forceful enough that you don’t get the feeling that you have to be right under the shower head to be sure the water hits you. There is a lot of online info about how it’s don in the various user forums.

The unit costs less than $40 complete with matching hose. It comes with a built-in on/off valve, and installation is a screw-on snap for most RV installations (it has a standard half-inch NPT pipe fitting with rubber seal that will attach to most shower valves).

Alternative fix to broken Norcold fridge hinge saves money

By Dick Wright

Norcold refrigerator doors are notorious for the bottom hinge breaking because they are plastic. While you could replace the piece on the bottom, it’s not available for Norcold. Their solution? Sell you a new door.

There really is no bonding agent that will hold the hinge for the long haul. Searching the Internet provides a permanent fix. It was an obscure posting and I have not been able to find it again, but I did copy images of the fix for my own reference. I can’t take personal credit for it — but for Norcold owners it’s a godsend, as it can save them hundreds of dollars.

The first large photo shows a normal hinge pin for a Norcold door. Remove the door by unscrewing the pin in the top hinge.

What I did first was glue the broken piece into place with superglue. I then drilled a hole on each side of the hinge piece and reinforced it with small screws that went through both pieces.

The last picture shows a piece of aluminum strap 1/8-inch thick the length of the door. You can purchase this at Home Depot or Lowes. Round the two outside corners. Drill and countersink holes every six inches. Drill the bottom of the door for each hole and temporarily attach with the first and last screw. Drill out the hinge pin hole being very careful to match up the new hole in the aluminum with the hole in the broken piece. Remove the aluminum strap and paint it black and allow it to dry thoroughly. Then replace all the screws and reset the door on the hinge pins. You now have a permanent fix and a hinge that is much stronger than the original.

Enjoy your portable generator — safely

0

By Russ and Tiña De Maris


Having a portable electric generator with you on a backwoods trip can be a lifesaver. Sudden heat waves can be defused with the ability to run your air conditioner. Whipping up a quick meal with the microwave oven sounds good, too.

But with the convenience of portable power, don’t forget the need for caution. Portable generators aren’t without risk. Here are a few things to keep in mind:

Carbon monoxide (CO): A single portable generator produces as much carbon monoxide as hundreds of autos. Take in CO and you can be dead in a few minutes, so make sure you keep the generator well away from your rig and keep it well clear of doors, windows and vents. Make sure your RV’s CO alarm is operational, in “date” (they have a working life — check for a label on or in the unit), and has fresh batteries.

Electrical hazards: Keep your generator dry — don’t try and operate it out in the open in the rain. Don’t touch a running generator when your hands are wet. Check your power cord carefully for damage, and make sure all the connectors on the cord set are intact.

Fire hazards: Don’t try to refuel a gasoline generator while operating. Shut it down, let it cool off, then refuel. Be careful how you store the fuel — not inside your rig, of course, and make sure it’s a container specifically designed for gas storage. I know, those nasty “CARB” gas cans are a pain in the neck, but it’s better than getting blown up by “any old thing that will hold liquid.”

Use an engine monitor to drive safer and cheaper


By Greg Illes

In 1996, the U.S. auto manufacturers began adhering to (another) new standard. This time it was the Onboard Diagnostic Port, or OBD interface to the engine electronics. This port (since evolved to OBD-2) allowed access to a host of engine parameters, from water temperature to fuel flow and other critical operating numbers. The OBD also reads the CEL (check engine light) fault codes that help mechanics diagnose engine troubles.

These units are sometimes referred to as “engine monitors,” and they do exactly that, with programmable displays for parameters of concern. One such product is the Scangauge, available in a variety of models and capabilities for about $130. But why would anyone want to look at OBD information as long as their engine was in good health? There are a few good reasons.

FUEL CONSUMPTION
Perhaps the most useful information available from OBD is fuel mileage. The Scangauge unit provides both instantaneous and average mile-per-gallon numbers, so you can immediately see the effect of your driving techniques on fuel economy. Rather than waiting for a tank refill to get an idea of your average consumption, you can watch the numbers rise or plummet as you negotiate hills and headwinds. It’s also possible to watch the gauge and seek out which throttle and gearing combinations provide the best fuel economy.

NON-GAUGED INFORMATION
Today’s “idiot light” panels often won’t tell you about an engine parameter until it is out-of-bounds. Furthermore, some truly important information, for example transmission oil temperature, is not gauged or error-lit in most vehicles. The engine monitor can provide information which could only be had by installing an entire separate dash gauge.

TRENDS and PRECISION
With numerical information on water temperature, transmission temperature or what-have-you, it’s possible to see a negative trend and take appropriate action before you’re stranded. You can also see “197F” instead of the too-simplistic L — H indicator.

Installation is simplicity itself. All information and power come from the OBD port. Plug in the unit, find a place to mount it with its Velcro stickies, and that’s it.

The bottom line is that an engine monitor will let you get the best mileage from your rig and will enable you to see and manage the health of your engine operations. Why would you NOT want to do this?

Greg Illes is a retired systems engineer who loves thinking up RV upgrades and modifications. When he’s not working on his motorhome, he’s traveling in it. You can follow his blog at www.divver-city.com/blog.