Home Blog Page 2191

Stretch your battery endurance with LED lighting


By Greg Illes

Back in the late ’90s, small, unknown companies were about to make electronic history. New developments heralded a sea of change in the LED lighting market and the world of lighting overall. In succeeding years, bright LED lights have worked their way into every realm of artificial light, from flashlights to traffic signals and even outdoor video displays.

It is only natural for RV technology to benefit from this new capability, with a huge array of light fixtures and light bulbs available for RV LED lighting. Why all the fuss and excitement? Two really simple reasons:

First, LED lights use very little energy to produce light as compared to other light sources such as incandescent. For a given amount of light, an incandescent bulb might use 1.5A from your battery. For the same light, a fluorescent will draw 0.5A, and an LED will draw only 0.15A (one tenth)!

This can have remarkable impact on battery endurance. In practical terms, lights that would drain your battery in a day or two can be run for a week or more.

The second reason to use LED lighting is that these bulbs will far outlast incandescent or fluorescent bulbs, with lifespans normally 10 times fluorescents and around 50 times incandescents. For most practical purposes, in RV use they are lifetime bulbs which helps to offset their initial cost.

THE CHANGEOVER
Converting to LED can be as simple as changing light bulbs or as complicated as changing or adding entire light fixtures. For this discussion, we’ll focus on the bulb change.
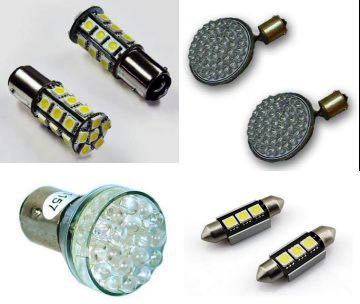
SHAPES
Bulbs come in three general shapes — flood, projector and right angle. They also come with different bases, with the 1141/1157 (bayonet) being one of the more common. You’ll need to purchase whichever format is right for your fixtures.

INTENSITY
Bulbs are available in a fairly wide range of intensity, which is measured in “lumens.” A 10-lumen light is suitable for a dim night-light, while 100-200 lumens will work for room lighting.

COLOR “TEMPERATURE”
Bulbs called “white” can vary from warm (yellowish) light to cool (bluish) light. This characteristic will be typically rated in degrees kelvin, such as 5500. Whichever shade you prefer, keep the color consistent throughout any common area or the light will look strange and distracting.

These bulbs are available everywhere these days (RV retailers, Amazon, auto stores) but at wide price variances, so it pays to shop around. Since the bulbs are expensive, you may want to only partially retrofit the most-used fixtures.

Greg Illes is a retired systems engineer who loves thinking up RV upgrades and modifications. When he’s not working on his motorhome, he’s traveling in it. You can follow his blog at www.divver-city.com/blog.

Golf cart batteries your solution?

0

By Russ and Tiña De Maris


Many RVers swear by the use of golf cart batteries over conventional RV deep cycle batteries. There are some good things to be said for the golf cart batteries — for one thing,they have thicker internal plates which usually makes for a longer-lasting battery bank. Since they’re designed to push around heavy golf carts (and heavy golfers), they usually have a much higher amp-hour capacity.

Still, keep in mind a golf cart battery is a six-volt battery. To replace the typical RV storage battery, you’ll need two of them — twice the footprint — to make one usable battery. The two batteries will need to be hooked up in series, that is, the negative terminal of one of them must be hooked to the positive terminal of its partner. Then the free terminals of the batteries — a positive and a negative — will be hooked to your RV battery leads.

Be sure to get MATCHING golf cart batteries — best new whenever possible. And remember, when you go to calculate your amp-hour capacity in this installation, the two batteries in series DO NOT add amp-hour capacity. Two matching golf cart batteries each with an 85 amp-hour capacity wired in series is still JUST an 85 amp-hour battery. And yes, you can parallel wire banks of series-wired six-volt batteries to increase your amp-hour capacity.

Power inverters — take shore power with you

By Russ and Tiña De Maris


In our traveling tool box, battery-powered portable tools have a favored place — what would you do without that drill? But when the time comes to recharge that drill, where are you going to find power in the boonies? If you have a generator, yes, you could fire it up for a few hours to recharge your favorite Makita, but that’s a lot of waste and noise. Here’s where an inverter can help.

An inverter converts 12-volt RV battery power into “shore power,” that many other shore power-loving devices can work with. We’ll keep this entry simple and expand into more detail in the future. For small power applications, say your blender and battery charger applications for portable power tools, a small, “plug it in the cigarette lighter” inverter is ideal.

Where do you find such a beast? RVers spend a lot of time on the road and there’s always a truck stop close at hand. “Trucker stores” have plenty of inverters for sale and the price is usually fairly competitive. You can also find scads of them on eBay or on Amazon.com, many for less than $25.

How much inverter do you need? Read the manufacturer’s plate on the device you want to power up. Usually battery-operated tools need very little juice to operate. Since inverters are rated in “watts” for power output, match or exceed the number of watts required by the device. Mind you, when you get into larger loads, your cigarette lighter socket won’t be able to put out enough juice to keep up with the inverter — and a blown fuse or even worse could result. NEVER exceed the rating of your “power plug.” Yes, you can hard-wire an inverter to your system for increased capacity, but that’s a subject we’ll take up later.

Always turn off your inverter when not in use — even when not actively “inverting” power, they do use a small amount of “standby current.”

USB flash drives bring music to your RV or tow vehicle

By Russ and Tiña De Maris


Car and RV stereo systems are turning to newer digital methods of playing music. While CDs aren’t yet a thing of the past, you may find a USB flash drive connection on your stereo system. How can you bring “your” music to that flash drive port? It’s easy if you have music on your computer already.

1. Plug a USB flash drive into any open USB port on your laptop or desktop computer. Some flash drives have a light that will flash, indicating the drive has been found by your computer.

2. Search your computer for the music files you want to take with you. Windows users, click on the Windows icon down in the lower left corner of your screen and “search” by song title, artist or music format (MP3, AAC, etc.).  Apple users, use the Apple button with the F key to look for music.

3. Right-click on the file you want to copy over to your flash drive. Click “Copy” then open and navigate your way to the “removable disk” window. That window will have opened when you plugged the flash drive into your USB port. Click “Paste” and you’ll copy the music file to the USB drive. Repeat as you like.

Applers, use the Apple cut shortcut by clicking the Apple button and “C” key; Apple copy shortcut using the Apple button and the “V” key.

The most common acceptable music formats for mobile sound systems are MP3 and WMV files — check your owner’s manual for what formats your unit will accept.

Now you can plug your flash drive into your car or RV stereo and use the appropriate control to bring your music to your ears.

One more hint: If you’ve got MP3 songs and want them in a specific order, create a “playlist” or .m3u file, too.

photo: pioneer electronics

Better pot and pan storage

By Jim Twamley


Imagine having an earthquake at your house for eight straight hours every few weeks. You would eventually learn to make adjustments after the earthquake. Well, that is exactly what happens in your RV every time you travel.

If it isn’t tied down it will fall, roll around and make a mess. This twisting and turning, the churning and shaking, all cause wear and tear on things that are secured in drawers like your pots and pans. If you store metal on metal it will cause abrasion and do things like wear off that nice T-fal non-stick coating on your expensive pans.

So, RVers have learned to pack these things to minimize the damage. Many RVers use the no-slide “Grip-It” shelf and drawer liner (note the liner in the photos). Not only is it good as a non-slip lining, but it is also a good separator for glassware. It is soft and spongy so it nicely absorbs the rattle of travel.

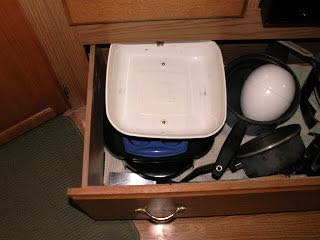
Some RVers use bubble wrap or dish towels to accomplish this. I wore off the non-stick coating on my last electric skillet by putting the lid upside down in it so the drawer would close. Now I put a rubber muffin pan in the skillet before I put the lid in place and it protects the non-stick lining of the skillet from abrasion.

Five safety trip tips for RVers

0

Courtesy Amica Insurance


If you’re taking a vacation in your RV this year, you won’t be alone. More than 20 million Americans are expected to head out in their rigs, and that can cause auto insurance companies to take notice. Amica Insurance sends these tips along to RVers in hopes that they may help you have a safe trip:

  • Always check your blind spots, which are bigger and more prevalent on RVs. Using mirrors increases your safety but they don’t always show everything on the road, so always be aware of what’s around you.
  • Leave extra room for braking, as RVs are heavier than typical cars and require more time to stop.
  • Make sure all tires are in good condition and properly inflated. Avoiding excess loading and driving at a safe speed will cut down on tire issues.
  • Weight distribution is crucial when traveling in an RV, so be sure to securely pack away heavy items. Items that come loose can cause problems with handling and braking.
  • Always wear a seat belt, whether you’re driving the RV or just a passenger. Anyone not wearing a seat belt may be injured in the event of a sudden stop or accident.

Diesel pusher or puller — what’s the difference?

0

By Russ and Tiña De Maris


A reader asks us, “What’s the difference between a diesel pusher and a motorhome with the diesel engine up front?” Here are some thoughts from RVers on the subject — and you may have a few of your own to share:

push pullNoise: Many RVers say that a FRED (FRont End Diesel) motorhome is a lot more prone to be noisy while motoring down the road. One even suggested that if you want a FRED, consider installing an intercom system, like you might have in a helicopter.

Additionally, most diesel “pushers,” where the power plant is in the rear of the rig, put their air conditioner generators up front. If you need to operate your AC at night, with a rear bedroom, sleep is much easier with that generator up front. On the other hand, FRED units tend to place the generator at the rear of the motorhome, hence close to the bedroom.

Power train efficiency: With a shorter distance to the drive axles from the engine, “pushers” are assumed to have less power loss. However, in smaller rigs, particularly Class C motorhomes, you’ll likely see much better fuel economy than a large Class A “pusher,” even with the engine up front.

Bottom line: Test drive any rig you may be considering, particularly a FRED-style motorhome. Is noise a factor for you? If your lifestyle allows, the better fuel economy of a Class C FRED may be just what you need.

Try water-cruising by kayak

0


By Greg Illes

Everybody has seen the wild-ride, white-water kayaking adventure films, breathtaking and scary with what these world-class athletes put themselves through. But there is a totally different world of kayaking, as I discovered with my wife a couple of years ago.

We had always looked at all the waterways that we passed by and thought somewhat wistfully, “Wouldn’t it be nice to wander over to the far side of that peaceful little lake,” or something to that effect. After a half-day guided kayak tour in a local slough, we began looking into inflatable kayaks. Inflatables have both advantages and disadvantages over the hard-shell, do-or-die kayaks that you see the death-wish guys flinging down waterfalls.

Inflatables can, of course, be easily stored in an RV cargo locker. They also float high in the water and provide much greater stability and visibility. They are much less competitive than hard-shells, and a bit more susceptible to wind. Since my wife and I are in our late sixties, competition is not foremost in our minds — we crave a relaxing, peaceful “stroll,” so to speak, but on the water.

We ended up purchasing a Sea Eagle two-seater tandem kayak, and we couldn’t be more pleased. This handy boat inflates and is ready to go in about 5-10 minutes, and is both lightweight and rugged. It’s suitable for smooth to choppy water, and for anything rougher than that we don’t want to be out there, anyway.

Hiding away in our rear storage bay, the little boat weighs 35 pounds and is virtually invisible until we want to use it. This is a real blessing in our travels. In the last year, we’ve paddled easily out on a Pacific Ocean bay, a secluded western river and the famous Lake Powell, to name but a few. Our exploration of the remote winding fjords of Lake Powell, where our outstretched arms could reach both canyon walls, was a sublime experience.

Inflatable kayaks are available from many vendors, in price ranges from a few hundred to over a thousand dollars. Try Googling for “inflatable kayak,” and be sure to check out this website for reviews of inflatable kayaks.

Happy paddling!

Greg Illes is a retired systems engineer who loves thinking up RV upgrades and modifications. When he’s not working on his motorhome, he’s traveling in it. You can follow his blog at www.divver-city.com/blog.

Is your RV “too old” for the park?

1

By Russ and Tiña De Maris


An  RVer with a 1989 motorhome tried making a reservation in an RV park. When the reservation clerk learned the age of the unit, the RVer was told: “Sorry, but your rig is too old. Your electrical system just isn’t compatible with our service and it would likely catch fire.” He was told the park only allowed RVs that were no older than ten years.

The RVer was left a bit shaken: Do older RVs burn up because of newer electrical services? The answer to that question is, No. Properly wired and maintained RVs, regardless of age, don’t “catch fire” by being plugged into a “modern” electrical service. The smoke here was from the RV park puffing up an improbable excuse to refuse an “older” RV.

Sad to say, there are plenty of RV parks who practice — as many RVers see it — age discrimination. Many “upscale” RV properties practice the so-called “ten-year rule.” Basically, if the rig is more than ten years old, it’s simply not welcome at the park. What’s the “reasoning” behind this practice?

“You have to do it,” said Reza Paydar, president and CEO of La Jolla, Calif.-based SunLand RV Resorts, which owns and operates seven RV resorts throughout Southern California. “If you allow these older vehicles to come into your park, it’s like having a neighbor with a rundown house, and it impacts the desirability of the sites nearby.” Paydar was quoted in a story in RV Business Magazine.

Others use more subtle means to keep out “undesirable” rigs. Here’s a quote lifted from a forum for RV park owners. “We also do not post our monthly rates. Our rates run anywhere from $200 to $550 per month for the same type of spot. Usually if you say a high price to the undesirable customers, they will turn it down and move on.

“If they call rather than drive in, I say tell me a little about your rig … how many people? Pets? So I can see if we have an appropriate space for you … Are you working in the area or vacationing?, etc. You can get a pretty good idea if they will fit into your park that way. Then you can quote the price.”

Not all parks with the “ten-year rule” enforce the rule. Some park managers will make exceptions if the rig has been well-maintained. This ires some RVers who feel “rules are rules,” and should be enforced across-the-board. Others find the situation amusing and suggest those with older rigs simply lie about the age of their unit, or pass on by.

Got an older rig and worried you may not be able to find a place to stay? Remember, not every RV park has such a rule, and if your rig is well cared for you may be able to stay there anyway. We’ve never heard of a public campground with an “aesthetics” standard — so generally speaking, you’ll probably always be able to find a place for you and your rig, regardless of age.

Using a wheel bearing lube system? Maybe not a good idea

By Russ and Tiña De Maris
We’ve written more than one time about the wisdom of pulling your trailer wheels apart every year or two and taking the time to inspect and repack the axle bearings. Each time we do, we hear from somebody who says, in effect, “Why waste the time? Just put on a lube system that allows you to pump fresh grease into the system. No need to fool with jacking up the rig and tearing down the hubs.”

Well, if a picture paints a thousand words, let this one say it all.

We still argue against the smarts of using a “Bearing Buddy” or “Easy Lube” system; we’re still not convinced that the system is all that great, in that, if you pump in a different kind of grease than is already in the system, you may easily have fatal compatibility issues. But even without that point, the picture illustrates the wisdom of periodic inspections of the inside of those hubs.

Here’s the back story: One of our readers, Butch Williams, does a fair amount of RV maintenance on a professional level. One of Butch’s customers uses a lube system on his 2004 fifth wheel. He was preparing for an extended RV trip and dropped by Butch’s business to inquire about maybe having the wheels inspected. Butch strongly urged the man to do it, and squirming a little, the man decided to go for the inspection.

When Butch yanked the wheels to expose the inner workings of the brake system, here’s what he says: “The bearings looked fine, BUT the brake shoes were coming apart – un-bonding. Notice the lining, separating from the shoes.” Three out of the four wheels showed this same problem. Butch’s conclusion is frightening: “Had this not been caught and repaired, most likely, the linings would have come totally detached and jammed between the other shoe lining, and could have locked up the wheel.” Talk about bringing your RV trip to a screeching halt.

Yeah, lube systems may be a lot easier, and far less time consuming than a manual bearing lube job – but if the system lulls you to sleep about other things hiding under that brake drum, you could be a lot worse for wear.

photo: Butch Williams

##RVT811;##RDT1363

De-fog your headlights with bug spray? Maybe not!

By Russ and Tiña De Maris

We get a lot of interesting suggestions from readers. One of them offered up hope for defogging headlights. We’ve personally used clearing kits purchased at the auto parts stores – the kind where you use an electric drill to buff out the headlights. Those work great – if you don’t mind spending $20 or more, only to turn around and find your headlights fogged up again in a few months. So when we got the latest suggestion, we were intrigued.

headlight-737The suggestion was to spray your plastic headlights with inspect spray containing a high concentrations of Deet. Yeah, a shot of Deet, followed by a wipe down with a rag or paper towel, and Hey, Presto! your headlights are cleared up again. Is it really so?

Yes and no. The “Deetreatment” does tend to clear the foggy headlights. How does it work? Apparently the chemicals in the bug spray actually melt the plastic in the headlights. Well and good, but here’s the drawback: Not only does the fog return, at the same time, you run a serious risk of damaging your rig. If the bug spray leaks down onto your rig’s paint job, it will chew up the clear coat, the top finish that keeps the paint bright and shiny. In a similar vein, the bug spray may well damage the seals that keep water from getting in your headlight units.

But here’s another way to clear up your foggy headlights, inexpensively: Toothpaste. Yep, chopper cleaner, particularly that which has abrasives (like baking soda) will remove the yellowing. It’s inexpensive, and probably lasts as long as spraying them with bug spray, but without the danger involved.

So, get yourself a tube of toothpaste, squirt a goodly amount on your fingers, and smear the stuff around the headlight. Now, use a tooth brush to scrub, scrub, scrub the entire headlight down. If there doesn’t seem to be enough grit in your paste, then you can add a bit of your own baking soda to the mix. Spray the mess of the headlight with water, and if they look good, great! Or, if you want them clearer, try another coat of paste and another round of brushing. No, you don’t have to worry about “Up and down” motions only – circular might even be better.

Once the headlights are clean to your satisfaction, or as clean as you can get them, apply a dab of car wax and buff it well with a clean, soft rag. When dry, remove the excess with a shot of water and a clean rag rubdown. This well help seal the headlights, and perhaps, make them a bit more resistant to the power of UV radiation.

Yes, you will find you’ll eventually have to repeat the performance, but when you do, you can whistle your way through the old tune, “You wonder where the yellow went, when you brush your teeth with Pepsodent.”


How to fix a broken RV window

Dear RV Doctor:
gary-736My living room window was broken when our deck table fell through it during a storm. Do you have to take the whole window out to fix it? It was the bottom window portion that broke. —Gail, Sebring, FL

Dear Gail:
Unfortunately, in most cases, yes, the complete window assembly will have to be removed, then disassembled in order to replace the broken glass in that lower section. But, it certainly isn’t a huge deal to remove and reinstall the window, but it will take two or three people depending on the size of the window.

Typically, the window sandwiches the wall between the outer frame and a piece of garnish trim around the perimeter, located inside the RV. In the photo, you can see the trim piece and the mounting screws. Begin by removing all the screws from around the garnish trim piece and place the trim aside. Next, carefully insert a wide blade putty knife under the exterior flange of the window to break the seal of the existing sealant. Have someone support the window from the outside as you gently push from the inside. At this point, all that is holding the window in place is the sealant around the perimeter of the exterior. Work the wide putty knife around the frame as you carefully push the window out of the opening through the sidewall.

Once removed, clean off all the remnants of butyl caulk or sealant from around the window flange and what may be left around the opening in the sidewall. Always use fresh new sealant when reinstalling the window. Once the window is out and cleaned off, it can be disassembled.

Depending on the brand of the window, somewhere around the perimeter of the frame, you should find a joining strip where the two ends of the formed frame come together. It is probably secured with rivets or screws. Either way, it will have to be taken apart in order to remove the rest of the broken glass. Or better yet, take the entire window assembly, in one piece, to the glass shop and have them do the disassembling and reassembling of the window itself. They’ll be able to seal the window properly within its frame also. You’ll only have to seal against leaks as you reinstall the window back into the RV. I recommend Eternabond double-stick tape when reinstalling the window into the motorhome. The Eternabond tape will help hold the window in place as you reinstall it, as well as seal it, but you should still have someone helping as you put it back in place.

From the outside, be sure there are no gaps anywhere around the perimeter of the window after all the screws through the garnish have been reinstalled. It may be necessary to install new screws, one size larger, if any appear to strip as you tighten them. Next, inspect the entire outside perimeter of the window. If any gaps exist between the window and the sidewall, water will have an entrance; and that is the biggest threat to guard against. In some cases, a double layer of sealing tape is required to ensure no gaps remain. If necessary, use a thin bead of silicone sealant along the top edge of the window just to be sure.

The bottom line is that you, most assuredly, do not want any water intrusion. It is also recommended to install new vinyl-backed foam tape on the inside flange of the garnish trim. It should also fully compress when you tighten the mounting screws, thereby effectuating a tight vapor seal. And that should do it! Keep in mind, if this appears too daunting for you, any number of local RV shops would be more than happy to perform the removal and reinstallation of the window for you.

Read more from Gary Bunzer at RVdoctor.com.

#rvd737; ##rvt743