Home Blog Page 2190

Taking it apart? Tips for putting it back together — correctly!

By Steve Savage
RV Mobility Services


For all you do-it-yourselfers out there, here’s something important to remember: Not even those of us who work on RVs for a living know how everything we work on is assembled. It’s a sure bet you don’t either. Most of the calls I’ve received recently have been the result of someone correctly diagnosing what was wrong, but after repairs were made the unit failed to work. Why? On reassembly it wasn’t put back together correctly.

I carry a digital camera right along with my other tools and I never hesitate to snap pictures when I’m working on something I haven’t seen before. I also shoot pictures when I have to remove a part and order a replacement, and may not get back to the job for several days.

Plenty of things in an RV can be assembled incorrectly and yet everything will still fit — screw holes line up correctly, and so forth. It takes me much longer to repair something that’s been taken apart by someone else, and it’s harder to be on the lookout for things I would never expect to find. Remember, too: Make some repairs on your RV incorrectly and it can be dangerous.

Here are some simple steps to follow on your next RV repair project: Pay attention when you take something apart. Take pictures of the item intact and as you disassemble it. Download the service manual for the correct procedure. Doing these things will save you time and money and keep you safe, as well.

Check your water tank venting and save water


By Greg Illes

It’s surprising at times how much impact a simple oversight can be. In our Itasca motorhome, the fresh water tank had a factory-installed venting tube. This is a necessary feature so that the tank can “breathe” with capacity and altitude changes. However, the way the designers chose to install this vent was not ideal.

The vent was routed immediately out of the tank and down below the RV floor. Consequently, normal driving would slosh our fresh water out of the vent. On one occasion, we arrived after a long winding road at our destination with nearly 30 percent of our water already spilled overboard!

This venting style is not uncommon, especially if you have dual-fill capability (gravity tube and city-water connections). So it’s a really good idea to check the design of your venting system and make corrections if necessary.

If your venting system is designed with an uphill vent like the top image in the diagram, you’re probably in good shape to keep all of your water in the tank. But if you have venting which goes immediately downhill, your fresh water will spill out on turns, slopes, and the typical jostling which accompanies motoring down the road.

If your venting system is a wasteful one, the fix is fairly easy. You can interrupt your vent line and make it much more difficult for the water to exit. CAUTION: Don’t think about simply capping it off — that would result in tank collapse or rupture. Always make modifications with equal-diameter tubing. And always be sure any changes you make leave the vent clear and unobstructed.

The two basic fixes are to either rerun the vent uphill (for example, to where the gravity fill entrance is), or to make a racetrack of tubing around the top of the tank before exiting downwards. Either method will prevent or drastically reduce water spillage. A variation would be to run tubing upward a couple of feet and then back down again (no, this will not cause a siphoning action).

Every installation is different, so it takes some study of your available space and maybe some experimentation. But if you’re losing precious water, it’s definitely worth the trouble and a few bucks’ worth of tubing.

Greg Illes is a retired systems engineer who loves thinking up RV upgrades and modifications. When he’s not working on his motorhome, he’s traveling in it. You can follow his blog at www.divver-city.com/blog.

Send and receive faxes while traveling

0

By Chris Guld
www.GeeksOnTour.TV


RVers use the Internet for everything else, why not faxing?  Even if you do travel with an all-in-one printer/fax machine, most of them will need a cable from a landline telephone in order to work.  There are websites that you can use for faxing.

Receiving is easy.  All that’s required is a phone number that receives the faxed document and redirects it as an attachment to an email.  We’ve used eFax.com for many years and have had no problem with our grand total of about three faxes per year!  Here’s how it works: You sign up for a free account; you will be assigned a fax number; now you can give that number when anyone wants to send you a fax.  To them it’s just like sending to any other regular old fax number, but to you it looks like an attachment to an email.

Is it really Free? If you go to eFax.com you will see eFax Plus for $16.95/mo. and eFax Pro for 19.95/mo. There is a free version, honest!  You need to browse to www.efax.com/efax-free in order to sign up. With the free version you can’t choose your phone number, and you’re limited to receiving no more than ten faxes per month.  You can’t send faxes with eFax-free.

When I need it, I use a different free service: FaxZero.com. To use the free fax-sending service of FaxZero, you don’t even need to sign up for an account! You just fill out the form with the name and the email of the sender (you) and the name and fax number of the receiver. You can then type a note for the cover sheet and upload a document to be sent. FaxZero will send an email to the address given for the sender. When you see that email and click the confirmation, your fax will be sent.  You will receive another email to confirm that the fax was sent successfully. The free FaxZero is limited to faxes of no more than three pages plus cover, and no more than five faxes per day.

If the document you need to fax is a physical piece of paper, then we have another step.  If you have a printer/scanner, then you’re all set.  Just scan the paper — now you have a document on your computer that you can upload and fax with FaxZero.  Don’t have a scanner?  In a pinch, I take a photo of the document, but FaxZero specifies that the uploaded file must be a .doc, .docx, or .pdf.  I open up my word processing program and choose Insert Picture, specifying the picture of the paper I just took.  Now I have a document file!  I might even use Word’s ability to Save As a .pdf file to make it smaller and more efficient.

Watch out for tree branches at the campsite

0

By Jim Twamley


RVers have a love/hate relationship with trees. We love them because they provide shade on hot days, and loathe them when they reach out and grab our RV while we’re backing into or pulling out of a campsite.

Here is an example of how a tree limb can remove RV siding with surgical precision. Tree limbs are also brutal on rubber roofs, causing punctures, or rubbing and tearing on roof edges. A good patch kit will fix the rubber roof, but the siding will need more extensive repairs.

I’ve seen RVers on their roofs with saws and pruning hooks trying to avoid the embrace of a tree. It’s fine if you want to hug a tree, but it’s not a good thing when a tree hugs your RV. To avoid these unfriendly encounters with wood, I suggest you always check the overhead clearance before you pull into or out of your campsite.

And trees aren’t the only “roof destroyers.” Be careful when pulling into service stations, too. Plenty of damage has been done to RVs at the pump through the years.

Don’t give up gardening to RV: Grow a “bumper garden”

Does RVing mean you can’t enjoy gardening? Absolutely not! An RV bumper garden is easy to build and keeps fresh greens practically at your doorstep.

Hit the lumberyard for a few cedar fence boards and construct a “loose” bottomed box in a size your rear bumper will accommodate. We held ours together with galvanized metal corner brackets, the end result being a one-foot by four-foot box. A little open space where the bottom meets the edges allows for water drainage.

Connecting the bumper planter to our “square tube” bumper required a little finesse. Just screwing the planter into the bumper proved too unstable, what with the weight of the soil taken into account. We built a custom bracket to moor the box securely. We laid two strips of “plumber’s tape” perpendicular to the bumper, one at each end of the planter box. Holes were drilled through the planter box to run appropriately sized carriage bolts through the tape and box bottom, one on each side of the bumper. At the far end of the bolts we put another strap of plumber’s tape, and used lock washers and nuts to firmly strap the box to the bumper. Total requirements? Four carriage bolts, washers, and nuts, plus four plumber’s tape straps.

To enhance the “drainability,” add a layer of gravel and top it off with good-quality planting soil. Our first “sowing” included tomatoes, both the “cherry” variety and larger slicers, good for use on hamburgers — guess who’s talking here! As the tomatoes got taller we added stakes to support the vines. These were uprights screwed into the planter box, with garden twine to help support the plants and their stakes against road bounce. In cool country we covered the uprights and twine with plastic to keep out the cold.

We’ve gardened tomatoes, strawberries and beans, but of course, taller plants like row corn might not be able to hold their ground as well in the planter box. Our beans are the bush variety, and when they get too tall, we may need to relocate the license plate for the sake of visibility. Maybe keeping shorter plants on that side of the planter box would have been wiser. The “intensive” method of gardening will lend itself well to mobile gardening. You are indeed dealing with a postage-stamp size bit of soil, and the more you can pack in, the better off you’ll be — done properly. Keeping your plants trimmed will help them bush out at the bottom, which seems to do better.

Handle it right and you can put a whole new meaning on the phrase, “bumper crop”!

“Funny” screws save time and frustration

By Russ and Tiña De Maris


Reader Fred Campbell of New Mexico recently wrote in concerning his fondness for Robertson screws, which some of us airheads refer to as “square drive.” As Fred aptly points out, “Robertson screws are those with the square hole in the head as opposed to a cross or a slot.”

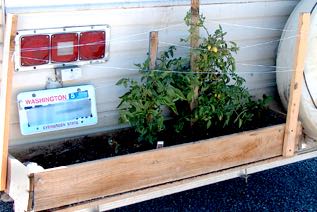
You’ll find many RV manufacturers have used Robertson screws to varying degrees. What’s the advantage? The Robertson is square – to a point. Below the top level of the screw head the socket has a taper, which makes getting the bit in the socket easier and can keep the screw on the bit without fussing. Try that with a straight slot or Phillips.

You can thank Canadian P.L. Robertson for the invention, way back in 1908. He had licensed the design to a British party, but they deliberately drove the company into bankruptcy, thereafter buying the rights to the design from the bankruptcy court. Yes, you might say Robertson got screwed in the deal, as he then spent big money buying the rights to his own design back from the crooked character.

Interestingly, Henry Ford gave Robertson screws a shot on Model T Fords, liked them, and tried to buy the license for use. When Robertson refused, Ford would only use the screws on Canadian-built Model Ts, and the Robertson screw never took off in the U.S.

Got any Robertsons in your RV? Fred Campbell warns, “I have seen more people try, and fail, to remove a Robertson screw with a Philips head screwdriver than I care to mention.” The frustration is real, and the Phillips head suffers. But a genuine Robertson driver or bit? We can personally attest that we’ve lost more Robertson bits than we’ve ever worn out.

Fred has a similar story: “I had to purchase a Robertson out of necessity when I couldn’t remove a screw near a water tank in the old (1970) Layton. It had rusted due to condensation on the tank. I purchased the driver at a Sears tool outlet for about $5 in 1975, and I still have it to this day. I purchased a second one within the past few years and modified it to fit in my portable 3/8″ drill. I use these all the time in my RV.”

You can find Robertson screws at specialty hardware outlets and some hardware stores. They’re great for putting in stuff you’ll want to take back out later, without the hassle of torn screw heads. We’ve found they help clean up a fellow’s language, too.

Many thanks to Fred for sharing his thoughts with us.

photo: saforrest on wikimedia commons

Keep temps under control digitally


By Greg Illes

When we first traveled in cool weather in our RV, we luxuriated in the coziness of the cabin heater. After decades of tent camping, we literally basked in a 70° F coach while gazing contentedly through the windows at the chilly world outside.

But our satisfaction was periodically interrupted. The cabin would come up to heat, the heater would shut off, and then the cabin would begin to cool down. And cool down some more. Eventually, when it got down to around 65° F or so, the heater would kick back in. So we’d find ourselves with oscillating periods of comfort and chilliness. On some really cold nights, this would happen about every 15 minutes or so. (We don’t use air conditioning much, but the problem is the same there, as well.)

The culprit was discovered: an old-tech, mechanical bi-metal thermostat. These dinosaurs need a big temperature swing to mechanically trip the switch on or off. Researching turned up a bevy of digital-style thermostats which are sensitive to only one or two degrees of temperature change.

Not just any old digital thermostat will necessarily work. Different systems have different requirements, depending on how the heater and A/C are powered and controlled. Choices include programmability or simple manual settings. Our 2003 Itasca unit needed to be battery-powered but we didn’t need programmability. We found a wiring diagram of the heater and air conditioner control circuitry online at Winnebago, showing us the correct control wires needed for hookup. The actual installation was quite simple.

Fan speed was an issue. Our coach has a two-speed capability, but most thermostats have only one. The choice was hard-wiring to only one speed, or adding a two-way switch (SPDT) to preserve the option. After experimenting with sound, efficiency, and battery drain, we found we preferred the LOW fan speed setting. It’s now hard-wired.

While the new thermostat fit where the old one did, we opted to install a new base panel, made out of textured ABS. This stuff is wonderfully easy to work with, and it makes for a really professional, modern appearance as well.

Cold winter nights are now more enjoyable than ever, and our cabin temp stays within a couple of degrees of where we set it. Brings a real smile to our faces as the wind howls around us.

Greg Illes is a retired systems engineer who loves thinking up RV upgrades and modifications. When he’s not working on his motorhome, he’s traveling in it. You can follow his blog at www.divver-city.com/blog.

Caring for your RV after a rainy getaway

By Russ and Tiña De Maris


The universe is known to have a perverse sense of humor. For weekend RVers, it generally manifests itself in providing five wonderful, sunny days during the week and then puckering up and raining when you finally get to take the rig out for the weekend. If this is your sad situation, how do you care for a “wet” RV when you come home?

Before putting the rig back in storage, start praying for a dry day. When the sun shines (or at least, the rain stops), roll out your awning and let it dry out. This little bit of air time will discourage mold growth, prevent staining, and keep your shade-maker smelling fresh.

Pop-up owners, you’ve got a similar need. No, it won’t hurt to “implode” your pop-up to bring it home. If you’ve got a barn or tall garage, pop open the unit and open the door and curtains for a complete air-out. Better, this should be done under the sun, if possible. So by all means, when Sol appears get cracking.

Even hard-sided RV owners will find a little “after-the-trip” work will make things far more pleasant for the next trip. Crack a roof vent and a window or two, letting a little cross-flow ventilation remove the built-up moisture that accumulates with use. If you won’t be RVing for awhile, be sure to drain down the fresh water holding tank.

Protecting your RV’s bathroom door

By Cheryl Probst


Most RV bathrooms are cramped; some are just barely big enough to turn around in. This frequently means the bathroom door will bang against the toilet or other fixture when it’s opened. Bang hard or long enough and eventually the door could be damaged. Making a buffer to protect the door and toilet is a quick and easy process.

Start by assembling the tools and materials needed to build the buffer: half-inch self-adhesive stripping tape, a tape measure, spray paint, and scissors or box cutter. We used automotive stripping because that’s what we had on hand, but you can buy weather stripping tape at any hardware or building supply store. The tape usually only comes in gray or black, but you can easily spray paint it any color you want.

First, use the tape measure to measure around the toilet at its widest point. If the shower door will hit the toilet when it is open, you’ll want to use a longer strip of tape to protect that side, too. Next, cut the tape to the desired length. Spray-paint the tape and let it dry. Peel off the adhesive backing and position it around the toilet bowl. Apply pressure so it will stick to the toilet.

Your door and toilet are now protected.

Lingering in the desert? Keep cool the low-energy way

By Bob Difley


Some RVers like to stick it out in the desert until the increasing heat thoroughly thaws out their bones before moving north. However, some spring days can easily reach into the 90s — even triple digits. When you’re dry camping, then running an air conditioner from your main engine or a generator for hours should not be an option.

There are two effective methods to control your interior heat. One is to buy a roll of heat-reflective, foil-backed insulation (available from Home Depot and other building materials or hardware stores) and cut sections to fit your front and side windows that face the sun during midday. Taped on your windows they will reflect most of the sun’s heat. Open the rest of the windows to allow air circulation.

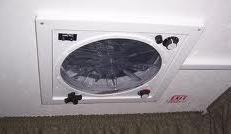
Another method is to install — if it isn’t already installed — a Fan-tastic Vent (photo). This vent and fan operates on very low amperage and can run for hours off your batteries without pulling too much juice out of them. Set to the highest speed, the fan will turn over the air in your rig in minutes. During the hottest part of the day, set it to draw the hot air out. During cooler periods in late afternoon or early evening, set it to reverse and draw in the cooler outside air.

By monitoring your internal and outside air temperatures, you can close your windows when the outside air is hotter than inside. Then when the outside air cools to below the inside temperature, open all the windows to encourage thorough ventilation replacing the inside hot air.

You can find Bob Difley’s RVing e-books on Amazon Kindle.

Use self-fusing tape for weatherproof connections


By Greg Illes

Standard vinyl electrical tape has been around for a long time — too long, some would say. The problem with this commonly used product is its adhesive. It doesn’t really stick very well, and after awhile it starts to peel loose, leaving a gooey mess behind.

Some years ago, a worthy alternative appeared — a silicone rubber tape that was self-fusing. It bonded to itself with enthusiasm, and had no adhesive to age or create a mess. Furthermore, it was impervious to many chemicals, ozone and UV, which age and deteriorate lesser products.

Recently, this self-vulcanizing tape has seen a surge in popularity. It’s now sold in many colors and widths, all at affordable prices (although much more expensive than its cheaper brother). Sold by everyone from Ace Hardware to Amazon, a 1″ x 12′ roll runs about $10-$14, and 2″ x 36′ will set you back $40.

You apply the tape by peeling off its backing (being careful not to let it touch itself — it bonds instantly). Wrap the tape around the object to be covered, and make the first wrap go over itself. Then stretch the tape in the direction you want and continue wrapping. It’s easiest to cut off a piece in advance rather than applying it from the roll. A little experience will show you how much to use, and it takes very little: Two to three inches will weatherproof most electrical joints.

Notice that the tape doesn’t actually stick to anything but itself. This means that it’s easy to remove, but it also means that it can’t be used for any application that requires a sticky seal. The best way to think of this “tool” is as a rubber-molding process. Once the tape is applied and wrapped around the object, it is literally as if the object were cast inside a mold. In fact, I’ve cut open 5-year-old wrappings and they still looked as if they were just one solid piece of rubber.

Due to its stretchy nature, the tape is fabulously conforming. It will create a solid rubber sleeve around the most odd-shaped joints and other objects. In addition to electrical, the tape can be used for any purpose where a rubber coating is desired. For example, my flagpole gave up its rattle after I rubber-taped the base. Your imagination is your only limit.

Greg Illes is a retired systems engineer who loves thinking up RV upgrades and modifications. When he’s not working on his motorhome, he’s traveling in it. You can follow his blog at www.divver-city.com/blog.

Too many extras equals too many problems

Dear RV Shrink:
rvshrinkWhen my wife and I bought our motorhome the salesman was our best friend — now he doesn’t even know our name. Our new best friend is the head mechanic at the dealership. I just wanted to camp, but my wife wanted the doorbell that played a dozen different tunes, electric steps, push-button awning and a media center that is so hi-tech our toad is a Geek Squad VW with two guys in it.  So far we have spent more time on the road looking for RV repair service than fishing. When things aren’t working right I find myself blaming my wife for talking me into all these expensive extras. It has caused a lot of frustration and arguing in our marriage. Am I wrong? Do I need an attitude adjustment? I hate conflict — I just want to go fishing. —Broken Down in Biloxi 

Dear Broken:
Every rig has its problems. The more toys you have the more problems that come with them. I don’t think you can blame your wife. I have to assume you agreed to all the options you ended up with. She was thinking about options and you where thinking about fishing.

You have to work through every relationship problem to a conclusion. As Phyllis Diller always said, “Never go to bed mad — stay up and fight.” Clear the air and let your feelings be heard. If you would have practiced this method during the purchase phase of your new adventure you wouldn’t be having to do so much of it now.

You have two things going for you. A toad (not with two guys in it, I’m sure) and a media center. When things break down, you can easily find a repair video on YouTube, like the RV Doctor, showing you exactly how to fix it. They have everything on there from soup to nuts. Then you can get into your toad and go back to the nearest town for parts.  Our motorhome is a 21-year-old Class “C” Jayco, and we have been broken down twice in the last month due to ignition problems. Instead of fighting, we worked together. We Googled up a YouTube video and watched a guy troubleshoot and explain repair procedures for both problems. We then Googled the nearest parts store, called to make sure our part was in stock, jumped in the tow car and picked it up. It was an adventure. Stopped for ice cream, made the repair, then my wife went fishin’ (with me). So turn your lemon into lemonade and start sucking the juice out of life.  —Keep Smilin’, RV Shrink

#rvs737