

By Cheri Sicard
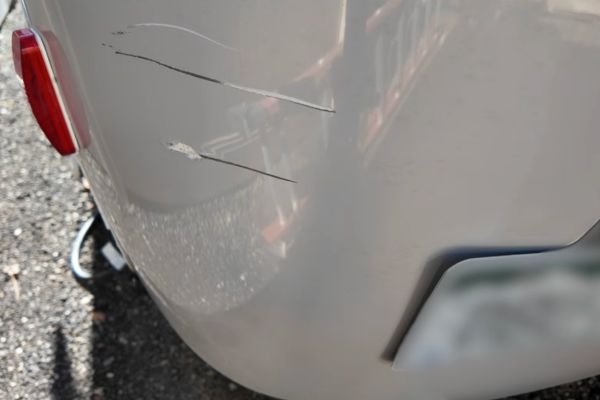
That scraping sound against a gate is the kind of mistake every fiberglass trailer owner fears. After backing a Casita Spirit Deluxe into metal, the owner found a gouge and scratches in the shell, but the damage stayed shallow enough for a DIY fix.
Instead of paying about $500 for a body shop repair, the goal was simple: Learn how to fix fiberglass trailer body damage. That entailed sealing the fiberglass, rebuilding the low spots, and making the area look clean again.
The video at the end of this post from High Desert Camping Adventures shows the full process.
The damage looked worse than it was
The first check mattered most. Once the area was cleaned up, the damage looked like a gouge with surface scratches, not a crack that had gone through the shell. That changed the whole plan.
Because the shell was still intact, this became more of a fill-and-seal repair than a major rebuild. The main concern was keeping moisture out and stopping the damaged spot from getting worse or starting small cracks over time.
Why a marine repair kit worked on a Casita
A fiberglass camper and a fiberglass boat use similar materials, so a marine fiberglass repair kit for boats and campers made sense here. The kit included a two-part epoxy filler made for chips, gouges, and small damaged areas.
This wasn’t a show-quality body shop finish. It was a practical owner repair with basic tools, including sandpaper, a mixing tool, a spreader, and a cleaning cloth. The key prep step was having everything ready before mixing, because epoxy starts curing fast.
The repair came together in a few careful steps
Clean first, then mix and fill: The damaged spot needed a clean surface so the filler could bond well. After that, the two epoxy parts were mixed until the color and texture looked even. Once mixed, the clock started. The filler was pressed into the gouge to push out air pockets, and a little extra was left on top so it could be sanded flush later.
Leave it alone overnight, then sand slowly: After the low spots were filled, the excess filler around the damaged area was cleaned off. That small step cut down the sanding work the next day.
The hardest part came next: Waiting.
After curing, it could be sanded: By morning, the filler had cured and could be sanded down. The sanding went slowly so the repair could blend into the original fiberglass without cutting too deeply. Once it was smooth, the patch already looked much better than expected.
A few small habits made the job easier:
• Tools were laid out before the epoxy was mixed.
• Extra filler stayed mostly inside the damaged area.
• Cure time got a full night.
• Sanding stayed gradual instead of aggressive.
A decal solved the touch-up paint problem
This is where Casita owners hit a snag. Casita doesn’t provide touch-up paint for the fiberglass shell, so matching the finish can be tough.
Since a sticker was already planned for that spot, the repair was finished with a U.S. flag decal for the camper wall. It covered the scratches, hid the color mismatch, and gave the camper a bit of personality at the same time.
A practical fix that saved the shell
The final result didn’t need to look like a body shop makeover. The gouge was filled, the shell was sealed again, and the damaged area looked clean and finished.
For a minor fiberglass hit, that kind of repair matters most. A mistake with a gate turned into a solid DIY fix, and even into a small upgrade.
RELATED
- What caused crack in RV’s fiberglass sidewall? How to fix it?
- What is the proper exterior maintenance for a fiberglass RV?
- What is best product to restore sun-faded RV fiberglass?
- What can I do to restore faded fiberglass and damaged RV decals?
RVDT2908
This fiberglass repair kit comes with paint matching tints.
A rogue wind clocked at 60+mph ripped the anchors and threw our free standing canopy against the side of our RV. A couple broken struts punctured the side of the RV. It took more than a casual glance to spot the repair.
Here are some additional tips for fiberglass repair:
This is one of the worst repair jobs I have seen! Cover the repair with a flag decal? I had to repair the rear right lower corner of my Class A for damage caused by the previous owner. I used a fiberglass filler product: “Bondo”, 1lb. can. Apply it to the area in layers as needed. It is sun activated and cures rapidly – also gets hot during curing. The final paint coat is Rustoleum silver and matches perfectly! This repair was made in 2008 – no changes! Keep the can closed and it will stay ply-able for good length of time. Years? (I could check it now, but I don’t want to open the can!!).