

With peak RV travel season here, you may want to consider these three RV tips. They were all new to me!
Truck travel organization
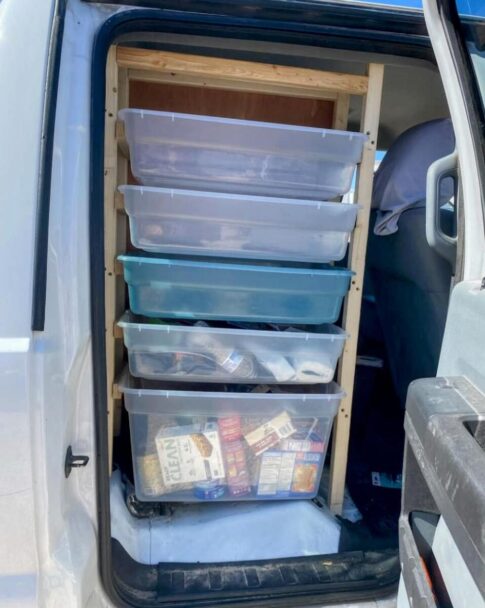
A Facebook RVer recently posted this fantastic DIY idea. Diane Gunter and her husband needed to find a better way to keep things organized during travel. Their solution? Remove the back seat of their truck.
Once the back seat was gone, Mr. Gunter built what is basically a box to fit in the now-open space. He made the box to fit behind the front seat (when in travel position) and the rear of the cab.
Next, the DIYer fashioned wooden “glides” to accommodate the plastic storage bins. The bins simply slide in and out of the box via the glides.
The clear bins make it easy to see what’s inside. Travel food, clothing, and more ride safely inside the bins during travel and are easily retrieved when needed. When arriving at the campground, the bins are quickly transferred into the fifth wheel or travel trailer.
My DIY husband plans to adapt the Gunter family’s idea. However, he wants to add a strap midway between the two sides and extending from the top rail to the bottom. The removable strap would ensure that the bins can’t shift out of position when driving on bumpy or curvy roads. We already have several storage bins, so we’ll design our travel box glides to fit our existing bins. (I will need to label each one since our bins are not transparent.)
Table storage
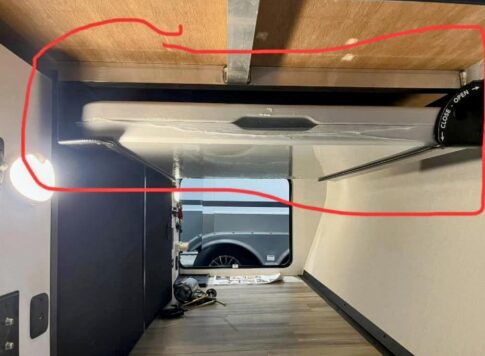
Another Facebook user, Mark M. noticed a portable table storage rack at the Houston RV Show. He was unable to find the product name or manufacturer, so he posted a photo on Facebook. Other RVers happily provided the information needed. Here’s what he used.
I have to agree with Mark. This is a nice way to save storage space in your RV basement. By hanging the storage rails on the ceiling, you free up space and have easier access to the table, too!
Utensil holder
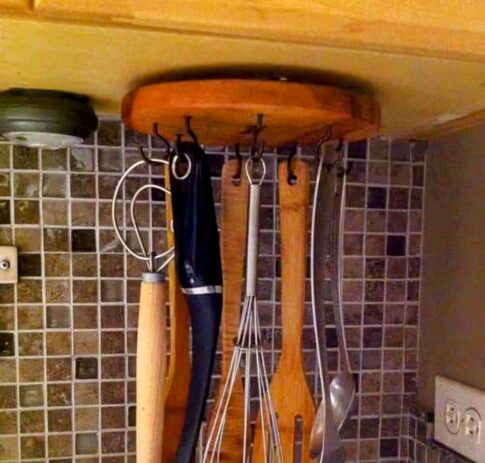
This is another great idea I recently found on Facebook from Law Whatley. Install cup hooks around the perimeter of a lazy Susan. Mount the lazy Susan upside down under your kitchen cabinet. Hang utensils from the hooks to keep them handy and also clear the countertop! Genius.
How about you?
Have you DIY’d a project that makes RVing easier? Or do you use a product in your RV that other travelers might also use? Share your tips and DIY projects in the comments below. Thanks!
RELATED
- Frugal RVing tips from RVtravel.com readers who know how to save on the road
- No mess, no hassle RV sewer hose storage tips
- 22 tips and gadgets for a small RV kitchen
RVT1220

Thank you! We’ve been looking for the table storage holders for awhile!
Bryan, Here’s what I’ve done for table storage in the pass through.
I’ll try to put a link in to pictures. But our trailer has aluminum framing. I attached 4 wood blocks by drilling horizontally through the aluminum and bolting the block to the framing. Then I got some inexpensive “ladder hooks” from Harbor Freight, cut off the little tip to create a large ‘L’ bracket. Predrilling for the hooks before mounting to frame would be helpful. They will hold a 2 x 4′ table and the telescoping ladder. The table sometimes slid out and fell but not very often. I have a piece of 3/8″ plywood in the picture. I haven’t put the table on the plywood but it would probably slide easier.
My husband made a similar storage cabinet, with shelves, in the backseat of our truck without removing the seat. The things we put in the backseat stay in the backseat until needed. This idea saves on weight in our trailer, especially storing our two cast iron Dutch ovens. He also hung a papertowel holder and a power strip for chargers on the side of it, that we can reach from the front seats. It works great!
Fwiw, IKEA sells those heavy plastic sliding bins with big edges for about $4 each. Called, TROFAST 12 x 16.5″.
Backup target for trailer camera: 4 (at least one a different color) 4-foot fiberglass driveway marker rods, 24″ piece of 2X2. Tools to make- a square and a drill press. 2 parallel holes in the top center of the wood near each end (must be drilled exact size for snug fit of rods). 2 aligned holes in each side of the wood with slight angle down. Use 2 different colors for rods sticking up from top.
Put the target at the back of the site pointing the direction the trailer must come in. The side rods will be close to the width of your trailer. When you back, if you see 1 upright rod in the camera you are backing straight. If you see 2 rods, you are not straight.
To store, remove the 4 rods from the wood and put in a bay. I bundle them with an elastic bungee cord. Lightweight and more accurate than a spouse waving hands out of sight of my side mirrors (and she admits she still doesn’t get the ‘if she can’t see me in a mirror, I can’t see her’)
I love the Lazy Susan idea for utensils. Thanks for sharing.
Agree but how is it mounted?
If the utensils weren’t put in a drawer for travel, they would make a nice musical wind chime effect while moving down the highway.
I love the Lazy Susan utensil holder idea. I’ve sewn polar fleece bags to protect fragile items and to keep other items from banging around while on the road. I’ll just make a drawstring bag large enough to pull up over all the utensils and then attach it at the top to a couple of the cup holders. (P.S. I personally hate the name “Lazy Susan.” Signed, Susan M.)
Thank you for sharing the modifications, Gail! DW found these dividers to compartmentalize our clothes inside the dresser drawers (https://a.co/d/fFZ3qHE). We also have affixed decorative items at a few places. All are held in place during travel with museum putty (https://a.co/d/9XeQkhF). Have a great week and safe travels!
The table storage rack, including the table, has been a standard feature on Lance RV’s for years.