
Does your motorhome need a tire change? Do you need to work on the brakes? There are plenty of maintenance and repair items that can call for jacking up a motorhome. But how do you jack up your motorhome safely? Sad to say, not a year goes by where we don’t see news items about RVers who’ve been seriously injured or killed when their rig has fallen on them. If your motorhome has levelers, we have the answers. We turned to U Fix It Garage on YouTube.com for a good, safe rundown.
Jack up your motorhome safely — ON THE LEVEL!
To jack up your motorhome safely, start with the PRIMARY rule: NEVER try to jack up your motorhome—or any vehicle—on anything but LEVEL ground. The best surface is concrete. Gravel can slip and slide. Asphalt, particularly when warm or hot, can compress underneath your equipment, making for a major safety issue. Jacking up on even a slight incline can lead to disaster.
Choosing the right jack stands
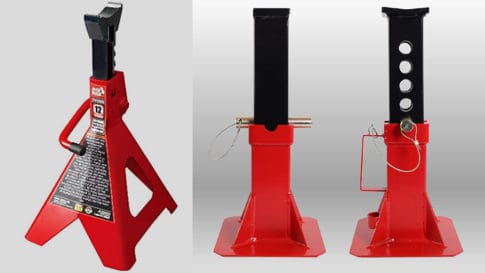

What equipment will you need? Savvy and safe shade-tree RV mechanics will tell you. Jack stands properly rated for the weight of your rig are CRITICAL to how you jack up your motorhome safely. Always use a set of jack stands that meet or exceed the weight of your rig. When shopping for jack stands, the weight rating is based on a pair of stands. So a set of 12-ton jack stands will support 24,000 pounds between the two of them.
Do you want “ratchet and pawl” style jack stands, or jack stands that utilize a heavy pin to make the height adjustment? Back in 2020, the ratcheting style took a hit when Harbor Freight Tools had to recall more than a million jack stands for safety issues. Still, many folks like the ratcheting style, saying they’re easier to use and give greater “levels of adjustment” than the pin type. Still others argue that if you’re under the rig and accidentally kick the lever on the ratcheting style, you could end up with an unwelcome chest compression. The choice is yours. In either event, the price is about the same for the pin style or the ratcheting type on Amazon—both about $140 a pair.
Plenty of blocking
What else do you need to jack up your motorhome safely? Wood blocks which are suitable for use under your rig’s levelers. You probably already have these, or you can fabricate them out of pieces of 2×4 lumber. Wheel chocks—enough to block both rear wheels at the same time. Also needed, several two-foot chunks of railroad cross-ties. Can’t find any? You may be able to fabricate these out of 4×4 lumber pieces, screwed together. Don’t go cheap on screw length—these need to firmly hold the wood together.
With your rig parked safely on a FLAT hard surface, there’s still another safety check. Each time you use any jack stand, inspect it first. Look closely at any welds and make sure there is no sign of a crack. Stands OK? Ensure there are no kids or critters that could stray into your work area. It’s best not to work alone on a project like this—have someone handy who can help if something goes wrong.
Chock the rear wheels of your rig. Put your jack stands near the rear wheels so they’ll be in easy reach. Now slide your wood stacking blocks under the front leveler (or levelers) of your rig. Stack them high enough that the leveler won’t have far to come down before contacting the block. Similarly, put blocking under your rear levelers as well.
Jack up your motorhome safely — up goes the front
Blocking in place, extend the FRONT leveler(s) to get the front tires off the ground first. You don’t need to go gung-ho, just get the tires a few inches clear of the ground. At this point, only the front leveler(s) are supporting the rig. Should something go wrong with the system, you could be in deep doo-doo. Carefully use your heavy blocking—the cross-ties—under the front cross member of your rig. Add additional blocking close to the cross member. Now retract the front leveler(s) so that the rig’s weight rests on the heavy blocking. If you’re only working on the front end, you’re close to ready to proceed. Read on.
And the rear
If you’re working on the rear end of the coach, extend your rear levelers until the rear tires are clear of the ground. From a safe working distance, move the jack stands into place under the frame. Extend the stands until they are as close to the frame as possible. Don’t overextend ratchet-and-pawl stands! If necessary, relocate the stands to under the axle for a better reach. Just be careful not to impact the brake lines.
Now retract the levelers to lower the weight onto the jack stands. Keep the leveler feet in contact with the blocking as an added safety protection. Reinspect the jack stands to ensure the frame or axle is in the center of the jack stand cradle. As well, where the jack stand comes into contact with the ground, all points should be in firm contact.
But before you crawl underneath…
Finally, before putting yourself under the rig, do a walk-around. Give a few pushes to each of the four faces of the coach: front, rear, and both sides. Any motion you feel should be barely perceptible, but no rocking. If you’re using pin-style stands, you may feel a bit more motion. NEVER rock the rig with anyone underneath!
And taking it back down
When your work is done, coming down off the stands is basically reverse order. Raise the rear levelers enough to remove the jack stands. Then lower the rear of the rig, moving both levelers simultaneously to keep from shifting weight to either side.
With rear tires on the ground, extend the front leveler(s) to remove the leveling support timbers. Retract the levelers until your tires are back on the ground, and remove the blocks that were under the levelers.
Final caveats
One more point: If you’re at all concerned about the safety of this process, or your own ability to do the work safely, HIRE THE WORK OUT. Even if they put pockets in caskets, the cash you save ain’t worth it! If you should choose to do the work yourself, the authors, and RVtravel.com, assume NO liability for your outcome.
As mentioned, U Fix It Garage produces a great YouTube video that will walk you through the process, using a Workhorse P32 chassis-based rig as a model. The principles apply to other big coaches. In any event, jack up your motorhome safely and live to make another road trip!
##RVT1106
Unfortunately, this article isn’t much help as I have a travel trailer without levelers. It has a spare tire but no jack. Would it be possible to do an article on how to properly jack up your travel trailer/fifth wheel safely? Or maybe there is already an article that you can point me to?
Same here. I have asked for exactly this information. The manufacturer certainly does not supply tools NOR instructions on how to safely change a tire on their trailer – and single vs multiple axles are different.
I agree. We have a 25’ long class C that does NOT have levelers, so this article is of no help. Would appreciate reading a piece that addresses this issue for rigs that do not have levelers.
Yes, a detailed explanation of how to jack a fifth wheel for tire changes safely and correctly would be greatly appreciated.
Place the jack under the axle, not the frame as the axle is where the weight is carried. This also allows you to only jack up several inches instead of the many it would take to get the tandem axle system to be suspended.
If no built in levelers and no jack; we have two axles on our travel trailer and use Beech Lane Camper Levelers (these are the heavy duty curved crescent ones that you can roll up onto https://www.beech-lane.com/camper-levelers) Anderson also makes them. We hook the trailer to the truck and use the Beech Lane levelers to roll up onto larger 6x6x10 wood blocks for only the one tire that does not need to be changed (next to the tire that needs to be changed) in order to raise the tire that needs to be changed off the ground on the same side. Then we chock on all tires on both sides of the camper. We are able to change the tire easily using this method.
To lift a TT or Class C, most will require a bottle jack equal to the GVWR of the vehicle to be lifted. The vehicle will need to be held stationary from rolling by wheel chocks or suitable means. The hydraulic jack needs to be placed under the frame rail, axle, or control arm, not a cross member or a radiator support or holding tank. Once the vehicle has been lifted on one side, a jack stand should be placed under the frame or axle if getting under the vehicle or moving the jack to the other side to lift and support it to an equal height. While not the safest and while jacks are designed for lifting, not supporting, a tire can be changed if not going under the vehicle using only a jack to support a stationary vehicle that cannot roll away.
My grandfather (dad’s dad) was crushed and died when working under a vehicle leaving my grandmother to raise 7 children on her own. Call it “overkill” but I always have three supports before I ever crawl under a vehicle: The jack, a jack stand, and stacked wood blocks. I’ve been doing this for 54 years now, working under cars, trucks, tractors, and trailers. I’ll never know if any of those three supports ever failed because I always had two more to count on.
And why would you retract your levelers? The levelers, the jack, & jack stand give you 3 supports. If the jack & jack stand failed, the levelers just saved your life. Better a damaged leveler than 6 feet under.
A word of caution when raising levelers to try and raise just part of the motorhome up. You have to be careful that you don’t twist the motorhome and in doing so could break the windshield. I had a friend who had this happen.
One thing to keep in mind about class A motorhomes, if you need to change a tire you better be VERY healthy and strong. A tire/wheel combo can weigh over 100 lbs. as an 80 year young person I wouldn’t attempt to handle one. The last one I had I was 58 years old and it was all I could do to keep it upright without falling over. Believe me it’s worth the cost of roadside service insurance to have a young mechanic change the tire. It’s not worth the savings if you have it fall on you and break a part of your body or worse yet have a heart attack.
Great advice that I hope to never have to use. I shudder to think about having to crawl under our 19-ton DP to try to repair something. I’ll try to leave all that to Newmar, Spartan Chassis, or Diesel Plus (employer of Les Glenn, super RV tech).
Make that, Lee-Smith (employer of Les Glenn, super RV tech). 🙂
Am I wrong to think that if you are going to attempt any undercarriage work one would assume you have enough common sense to use the proper steps regarding your own safety? Perhaps I am thinking of our older generation and not the look it up on the computer age group, although there are very good articles there, but again kick in your common sense. If you are thinking you should support whatever you are working beneath, or if you have safety concerns, by all means err on the side of caution.
Thank you, Russ and Tina! 🙂 I would like to attempt this, but we have no concrete on which to put RV #2. The RV barn has a gravel floor. 🙁 I am glad to.know that there is a process, an accepted method to safely elevate and secure a big RV. Thanks again, have a great day, safe travels, and safe stays! 🙂
S T O P !! You don’t need, and should not use, a jack to change a tire if you have two or more axles on a trailer. Three 2X6s set up in a ramp style will lift the good tire off the road surface and allow the bad tire to be suspended in the air so it can be changed. Be sure to loosen the lugs nuts on the bad tire first. Doing this allows you to never have to crawl under the trailer to put a jack in place. As well, if you can’t put the jack under the spring hangers, but you put it on the axle, you’re taking a chance of bending the axle which will throw out your wheel alignment.