
Dear Dave,
My city water connection went south on me and I was wondering if having to replace the connection was standard on all RVs or not. I am having to replace the whole connection from hose connection, back flow and to the connection that goes to the rig—the entire plate. —David, 1999 Fleetwood Bounder 39Z

Dear David,
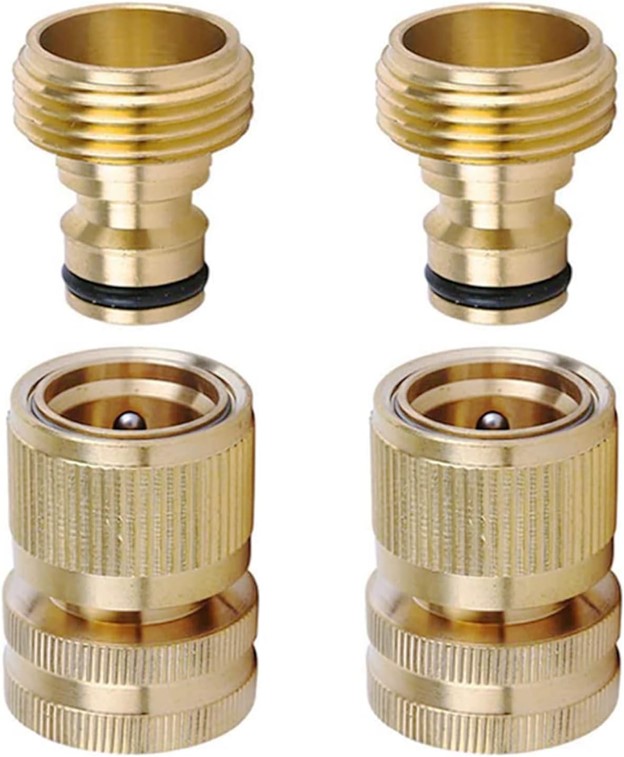
Your Bounder is a basement model design. That means most of the systems are underneath in a compartment rather than mounted to the sidewall of the rig. Most of these have a generic city water fill valve similar to the one you have provided. However, I believe you have the valve pictured with the male end which would go to the inside of the compartment wall. You will need the outside threads to be female or inside the fitting like this one available on Amazon.

For years, RV manufacturers used the Valterra brand for most of the plumbing fittings. I searched through the Winnebago parts catalog and found this PN (product number) used for many years.
010230-06-000 EA FILL – CITY WATER – W/CHECK VALVE – MPT
Your Bounder most likely has a fresh water tank fill valve, as well. That is a lever that diverts city water to the tank so you can fill it without needing to disconnect. Here is a diagram of that connection on a 1999 Winnebago Adventurer, which should be similar.
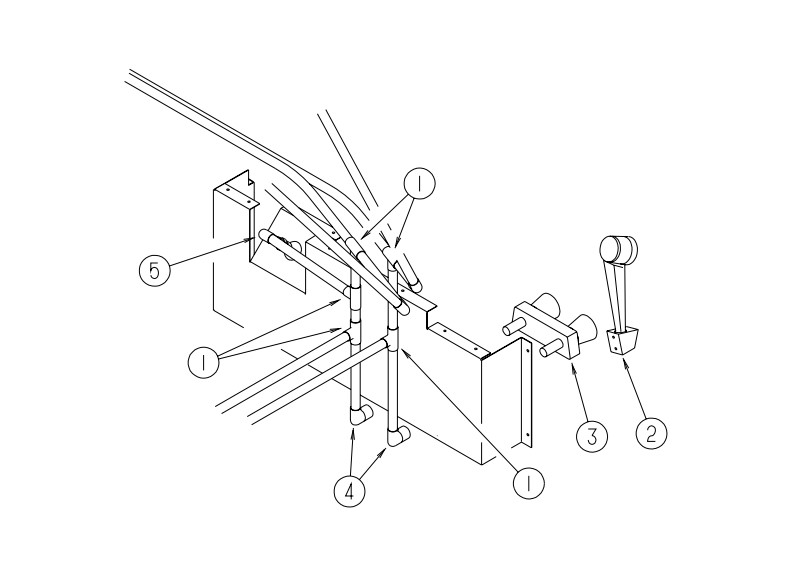
Number 5 is the city water fill valve, 1 are “T”s. With this setup you don’t have much flexibility in the hoses to work with. Therefore, you might need to access it from the back or take off the panel. Start by removing the three screws on the outside flange and you should be able to tell how it is plumbed.
Make sure the type of hose connection you have
Most look fairly generic; however, it would be good to remove your old one first to get an idea of what type of hose connection you have. This model has a 3/4” traditional garden hose thread which might not work on your rig. Some RV manufacturers just bring plastic piping like PEX or Flair-It and have a pinch clamp holding it on. So this type of threading would require an adapter that has the threads and then a flush pipe or barbed fitting. Some use a traditional 1/2” MPT plumbing hose connector similar to the type used for water supply lines for a toilet or faucet.
Another area to look at is the depth. Some are 3” and others are shorter. If your rig has PEX piping, it is a little more rigid and you need to make sure it will reach to the new valve. Most have a 3” flange so it should cover the existing hole. Make sure you don’t get the type with the inverted connection or bowl type, as these are designed to be installed on the sidewall.
What I prefer
I like the larger plastic with brass insert as it is easier to connect a hose. Sometimes it is hard to connect since it is flat against the side of the compartment flange. I like to use a quick disconnect (QD) as it is easier to connect and disconnect hoses, especially when the fittings get a little nicked or bent taking them in and out of compartments.
What typically makes these fail is a buildup of calcium, lime and rust. The buildup causes the backflow valve to stick or the screen to clog—which is an easy fix. That is why I like to use a filter on the incoming line—most of the water available is hard water—and not run through a water softener.
You might also enjoy this from Dave
Your RV’s fresh water system: What you should know
This is Part 5 of Dave Solberg’s “Everything you need to know about RVing” series. Today, Dave looks at RV fresh water systems and tells you just about everything you need to know about them, whether this is your first or 101st trip.
Dave Solberg is a leading expert in the RV industry and the author of the “RV Handbook.”
Read more from Dave here.
HAVE A QUESTION FOR DAVE?
Send your inquiries to him using the form below.
##RVDT2434
In my experience with “quick or push to connect” fittings a 2nd tug or push to test if the inlet fitting is completely seated and I suggest a pressure reducing valve to limit an over pressure situation and a flood in a compartment if so located. Better known as “an ounce of prevention is better than a pound of cure”.
Thank you, Dave! 🙂 I enjoy your tutorials and rarely fail to learn a lot from them. Thanks again, have a great day, safe travels, and safe stays! 🙂