

By Cheri Sicard
Let’s face it. RV toilets aren’t the most glamorous part of RVing. There are tons of videos about black tank maintenance, but what about the basics? Many people buy a used RV and never get a walkthrough, leaving them clueless about how to properly use and clean their RV toilet.
In today’s video, Jason Epperson of RV Miles covers everything from how to use an RV toilet to cleaning it without causing damage.
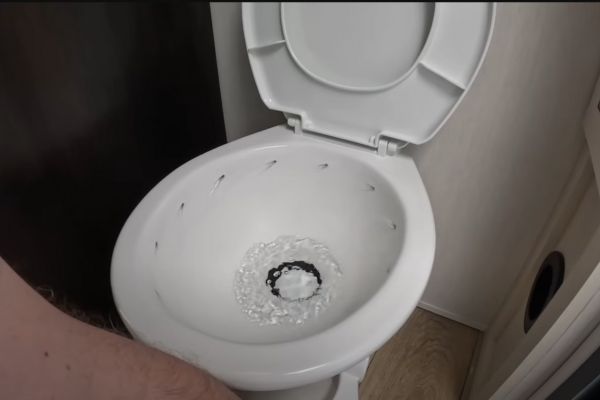
RV toilets typically come in two main materials: ceramic and plastic. The Dometic model, like the one in the video, has a ceramic bowl with a plastic seat and lid.
• Ceramic: Offers a more familiar feel, similar to a household toilet.
• Plastic: Lighter and more prone to scratching if cleaned improperly.
The material of the bowl dictates how to clean it.
Anatomy of an RV toilet
Understanding the parts of an RV toilet helps the owner maintain it. Here are the key components:
• The bowl: Made of either ceramic or plastic, this is where waste goes.
• The seal: The black rubber ring at the bottom of the bowl. It keeps odors from escaping the black tank. You should be using a seal lubricant to keep it from cracking.
• The ball valve: Located under the seal, this opens to flush the toilet.
RV toilets work a bit differently from a regular toilet. Instead of a tank, a foot pedal controls the water flow and the opening of the ball valve.
Before doing anything, it’s important to put some water in the bowl. Press the pedal partially to add water without opening the ball valve. This helps prevent streaking and keeps things moving smoothly.
How long the toilet is flushed depends on how full the black tank is. Using an RV toilet correctly involves more than just doing the deed and flushing. It’s about managing water and waste effectively.
Water conservation vs. black tank health
Conserving water is important, but so is keeping the black tank healthy. It’s a balancing act.
Here are some tips for managing the black tank.
• Closed valve policy: Always keep the black tank valve closed unless actively dumping.
• Water is key: Enough water in the black tank keeps odors down. It also helps things empty smoothly.
• The 1/3 full rule: After dumping, close the valve and add water until the tank is about 1/3 full. This ensures there is enough water to break down solids and prevent the dreaded poop pyramid of doom.
How to clean RV toilets
Cleaning an RV toilet requires a gentle touch. Harsh chemicals can do more harm than good.
Avoid these cleaners. They can damage the toilet’s components.
• The dangers: Caustic, acidic, and abrasive cleaners like bleach, vinegar, and powdered cleaners.
• Vulnerable parts: The ball valve, rubber seal, and plastic components.
The gloss finish on plastic toilets and seats is part of the manufacturing process. Harsh cleaners will break down the gloss, causing waste to stick.
Here are some safe options for cleaning RV toilets.
• Dish soap and sponge: A little dish soap and a soft sponge is a safe and effective option.
• RV toilet bowl cleaners: Some manufacturers sell toilet bowl cleaners made for RVs.
• Antibacterial dish soap: To disinfect the toilet, antibacterial dish soap can be used.
• Hot water: Using hot water helps loosen waste.
• Sponges: Soft sponges are preferable to abrasive pads.
Choose brushes carefully to avoid problems.
• Brush selection: Avoid stiff-bristled brushes or cheap brushes with glued-on heads.
• The risks: Brush heads can detach and cause clogs in the black tank.
Here’s how to keep those nasty smells away.
• Water as a natural deodorizer: Water helps minimize odors.
• Tank additives: Use tank additives to control odors and break down waste.
• Liquified RV toilet treatment: This product is an effective solution. Use 1 oz. per 40 gallons of water. Pour it in and flush. Don’t let it sit in the bowl.
• Importance of the seal: A working seal will block odors.
Seal maintenance
The seal is key to preventing odors.
• Cleaning the seal: Clean the seal to maintain a proper seal.
• When to replace: Replace the seal when it no longer holds water. It’s a good idea to carry a spare.
• Lubrication: RV toilet seal lubricants can help keep the seal in good condition.
Cleaning below the seal
Waste can build up in the area below the seal.
• The problem: Waste buildup in the area below the seal and the collar that connects to the black tank.
• Cleaning solutions:
-
- Silicone brush: Use a silicone brush for scrubbing the area. This is the brush Jason recommends.
- Water sprayer wand: A water sprayer wand can provide a more powerful cleaning action.
- Soapy water spray bottle: Alternatively, a spray bottle filled with soapy water can be used to reach hard-to-reach spots.
Troubleshooting smells
Here are some tips to troubleshoot smells.
- Black tank vent: Black tanks have a vent that can get clogged.
- Vent cap: Replacing the vent cap with a “wind direction airflow type” may help.
RV toilet maintenance might seem daunting, but it doesn’t have to be. By understanding how the toilet works, using the right cleaning products, and following a few simple maintenance tips, anyone can keep their RV toilet clean, fresh, and trouble-free.
RELATED
- How to adjust your RV toilet seat height
- Not every RVer uses their RV’s toilet the same way… Wait, what?!
- Easy leaking toilet fix: Replace the ‘ball seal’ on your RV’s toilet
- An easy, quick way to fill your RV’s toilet bowl
- Best toilet brush for the RV bathroom
RVDT2912
I’m pretty sure it’s not a good idea to use Antibacterial dish soap: To disinfect the toilet, antibacterial dish soap can be used. This can kill the good bacteria needed to break down waste in the black tank. Antibacterial soaps are a big NO NO if you have a septic system at home. These soaps can kill the bacteria needed to keep your septic tank functioning properly.
You’re using some soap on a sponge or washcloth, not gallons of soapy water. It won’t affect anything. -Jason
I use Blue Streak, (non-formaldehyde based), toilet chemical in my porcelain toilet. It is mixed thru a patented automatic wall mounted injector/tank which is attached to the water line into the toilet. I have used it for several years now with no adverse effects. It is a pleasant blue color and has a mild pleasant baby powder scent. Also a tank chemical. Comes in 32oz bottles. http://www.bluestreakchem.com or cls@bluestreakchem.com (Made in the USA too!)
Geez, that’s too much work. Dawn dish soap and a bunch of water to swish around on the way home has done it for me, over 30 years.
I’m not eating lunch in my Black-grey-gray tanks…
Don’t think I’ve ever heard of the 1/3 fill rule. That would be 16 gallons of water in my black tank. I always add about 5 gallons of water with chemicals to my black tank after I dump and flush the tank.