

By Gail Marsh
It’s a job that many RVers dread—especially as newbies. I’m here to tell you that you need not dread this necessary job. You just might need a few tips and tricks to make dumping your RV tanks easier!
Y-connector
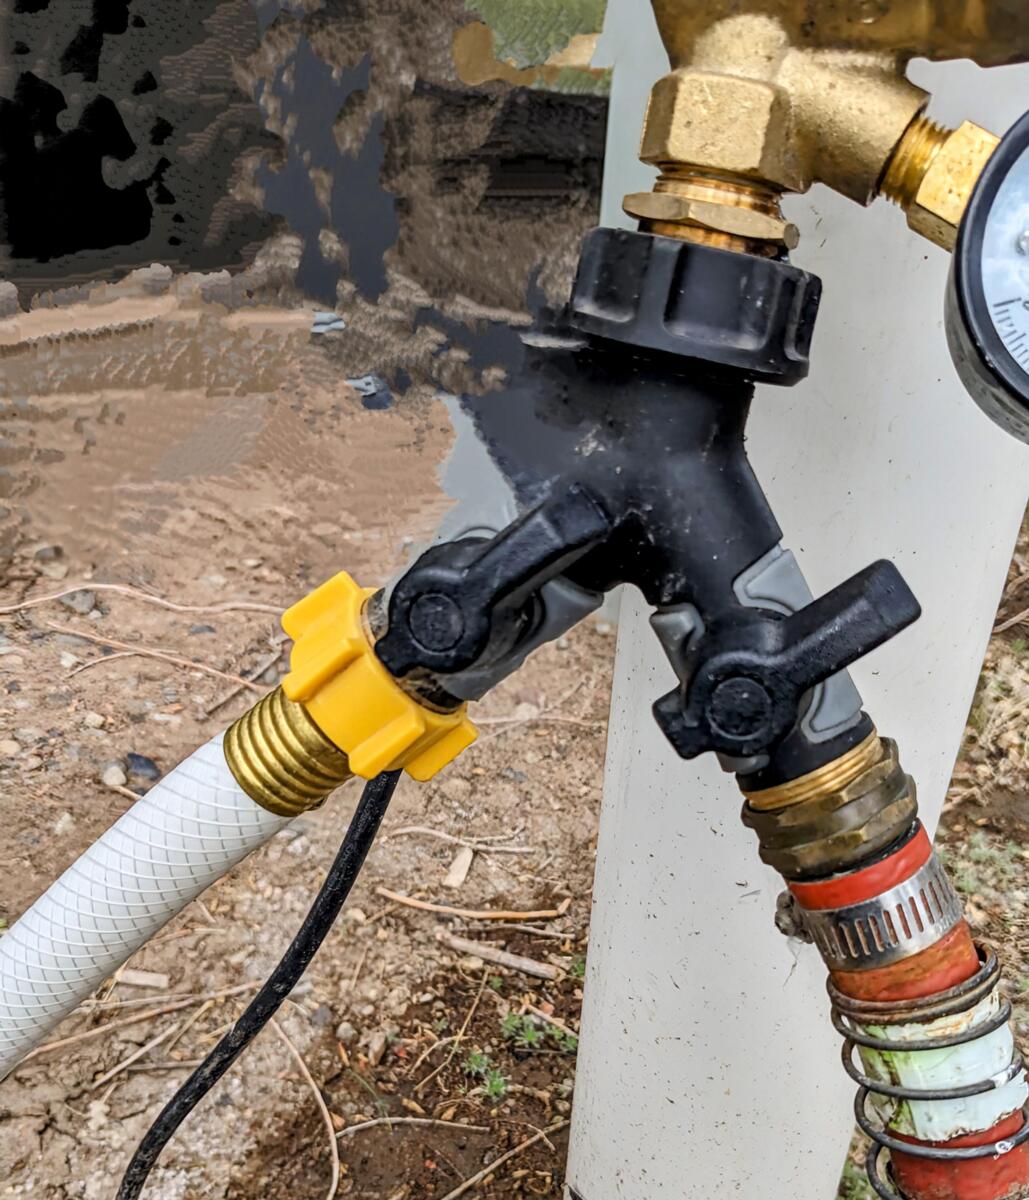
We use a Y-valve water connector on the campground’s water supply. This allows us to use separate hoses, one for drinking, cooking, etc., and the other for flushing the black tank or washing the RV or truck.
This Y-connector makes it easy to switch from one hose to the other, using the toggle to close off one hose before opening the other.
Clear connectors

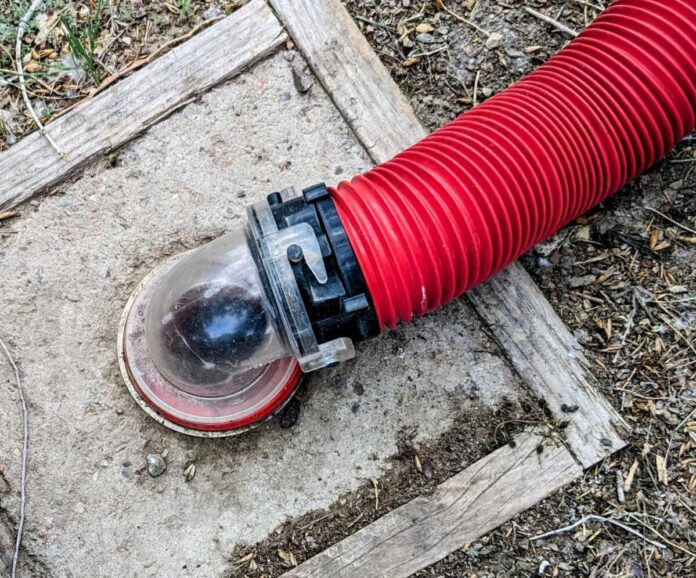
Use a clear connector at each end of the sewer hose. That way you can see what’s happening as the tanks are flushed.
A clear, elbow connector at the end of the sewer tank allows you to securely attach your sewer hose to the campground’s sewer with no mess or odors.
Open the gray tank
Before opening the black tank valve, open the gray tank for just a few seconds. The gray water will lubricate the sewer hose, helping the contents in the black tank to flow smoothly. Close the gray tank valve.
Plenty of water
Open the black tank valve to empty the black tank. Depending on the size of your black holding tank, this could take several minutes.
If you observe (by watching the clear connectors) that the black tank is not completely flushed, close the black tank. Add water to fill the tank, then open the valve and watch the clear connectors to see that the sewage has been completely washed out.
Repeat the black tank refill/empty process until you’re satisfied that the black tank is empty and clean.
Gray tank
Make sure your gray tank is full or nearly full, then empty. This will allow the most water to flush out the sewer hose.
Lubricate tank handles
If your RV has manual tank levers rather than electronic ones, you’ll want to keep the tank levers in tip-top operating condition by lubricating the tank valves regularly.
With the holding tanks empty, pull out the black tank lever. Apply a dry lubricant to the lever mechanism and open and close the valve a few times to work the lube into the mechanism. Repeat the process for the gray tank lever.
Your tips
You may have additional tips to offer. Please share your tips and tricks for dumping your RV tanks using the comments section below.
RELATED
- An easy trick that’ll make RV dumping a lot more sanitary
- New and improved Dump Buddy is a must-have gadget for RV dumping
- Not wearing gloves while dumping? Big mistake!
- Dump station drama will drive you nuts! Rude RVer holds up line for three hours!
- The best apps to use to find RV dump stations
RVDT2920
It helps when the sewer connection where you dump is lower to the ground(ground level), makes it flow alot better, like in your picture.
And when flushing out the sewer hose, keep it connected to the ground inlet and lift the hose so all the waste is flushed into the ground.
Not on the grass, gravel or pad.
And definitely NOT ON THE PICNIC TABLE!!
OH, and wear disposable gloves.
The “Y” with independent valves is a great idea. But you don’t have to put it at the park spigot. Instead, mount it at the city water intake on your RV. You can still use a 90 at the city water intake; leave it attached to the “Y”. Now the hose to connect to your black tank flush is always the same (and usually much shorter) distance from the “Y”. Less hose to haul. Always use a back-flow preventor on your black water hose near the tank flush connection.
Agreed. I use a 3-way splitter with stubby jumper hoses that shut off each circuit to connect my single line to my fresh fill, city fill and black flush. My pressure regulator is mounted to the inlet of the splitter to ensure my plumbing never sees excessive pressure.
Lastly, I have a backflow preventer at the splitter’s outlet to the black tank AND I have a valved elbow at the black tank inlet.
That said, I kinda question the BF preventer since the minute I turn the splitter or the elbow off, ain’t nothing gonna flow past it. Instead, I get whatever water is in that line dumping into my bay drain.
I’m glad someone already mentioned using a back flow preventer because I had a “what’s wrong with this picture” moment when I saw the photo!
I suggest to read up on how a ‘vacuum breaker’ works and why you should allow any water left in the line to drain out between uses. Hint: It’s supposed to do that and there is a reason why.
Carry a “Y” connector. Never can tell when your site has to share the water connection.
When using this method to connect to anything related to Black water tank, be sure to use a backflow preventer.
Thank you for the reminders, Gail. Our manufacturer-installed macerator has a peculiarity that the system on RV #1 lacked. The system on RV #2 (Newmar DP) requires that both waste tank valves be open in order to run and expel the contents through the sewer hose. The gray tank volume is 50-percent greater than that of the black tank and always reaches “empty” after the black tank has done so. Shopping for RV #3 now and curious to see if this is a trend or an anomaly. Meanwhile, have a great day and safe travels!
Neal, I know of no such requirement on the wet bay macerator on my ’21 New Aire. Of course, there is the macerator on the toilet itself before the black tank. Then the macerator in the wet bay. Just like when dumping with a stinky slinky I first open the black valve and run the bay macerator until the black tank is empty. I shut off the macerator. Then close the black and open the grey. Turn the macerator on again until grey is empty. Sometimes I empty only one or the other.
Thank you, Mikal. The first time that I dumped the tanks after taking delivery of our 2022 New Aire, I pulled the handle to route the contents of each tank through the macerator. Next, I opened the black tank valve, turned on the macerator, and … nothing happened. Puzzled, I additionally opened the gray tank, turned on the macerater, and … waste began flowing. Thank you for sending the info on New Aire procedures. I will see if it works with our setup. Have a great day and safe travels!