


I recently received this question from RVtravel.com reader Michael V.:
“What is the easiest way (tools, parts, technique, education, practices) to add air to the inside dually of the 1996 Holiday Rambler Navigator 40 pusher and daily work truck 2007 GMC 3500 Sierra. I have large hands and have trouble with this simple task. I have been reading and enjoying technical knowledge for some time now.”
The quick answer is just to get a “double foot” Air Hose Extender end, as seen here:
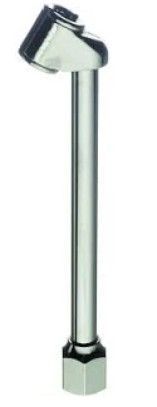
However, having used this type of hose end myself, I know that achieving a solid connection to a valve with minimal or no air leakage can be challenging.
What if you’re using external TPMS on valve stem?
Also, what do you do if you are using an external tire pressure monitoring system (TPMS) sensor on the end of your valve stem? It can be difficult to get the sensor screwed off and back on again without dropping the sensor down between the inner and outer tire. My solution was to get a set of “hose extenders,” as seen here:
Below is a Wheel Master hose kit #8001 as seen on my RV.
I DO NOT recommend the similar “airless” hose kits from other manufacturers, as your TPMS sensor will not register the tire pressure.
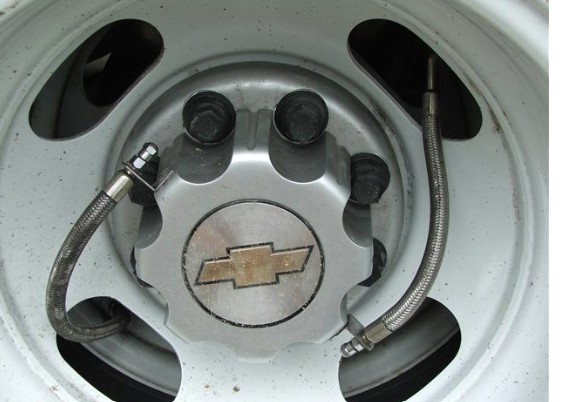
I selected and prefer this hose kit because it provides for a SOLID attachment for the hose ends.
I see posts with complaints about TPMS sensors on the end of a hose or even just the hose itself failing and causing a loss of air. However, I believe it is not the hose itself that fails but the flimsy “spring” clips or rubber donuts that are supposed to support the hose where it goes through the “hand hole” openings in the wheel.
Installing the extender kit
The task to install this extender kit does require some mechanical ability, a few tools and a bit of planning. You will need to do all these things safely.
1. Jack up the rear axle and remove the outer tire. Be sure the jack is on solid ground. Use a 6-point socket of the proper size to remove the lug nuts. I keep the inner dual on the hub by placing at least 2 lug nuts back on the studs finger tight, to keep the wheel attached to the axle while working on the hose attachment.
2. Attach the hose with the straight end to the metal valve stem after cleaning the threads and confirming the valve core has no leakage. Now is the time to replace the valve core with a new core. I recommend you use the “clicker” valve core tool available at many auto parts stores and Amazon. The tool is less than $8 and “clicks” at the specified 3 to 5 In-Oz torque.

3. Attach the hose end with the 90° end to the outer wheel (that also has a new valve core) and run the hose back through the hand hole.
4. Orient the outer wheel with the hose at 180° from the hose from the inner wheel and re-mount the outer wheel. Be sure neither hose can contact the edge of the outer wheel hand hole. Be sure to apply the lug nuts with the proper torque spec for your RV. I have a low-cost torque wrench from Harbor Freight, as I keep this wrench in the RV so it does not get a lot of usage. The spec for my RV is 140 Ft-Lb, so I would select a wrench that is capable of at least 50 Ft-Lb greater than what is required.
5. Now comes the hard part. You need to attach the 90° angle brackets to the center hub after making sure the long threads on the hose are well through the bracket. There are two nuts for each hose end to secure the hose in the bracket. Once the bracket is located with no part of the hose contacting the wheel, you can mark and then use the “pop-rivits” to secure the bracket to the hub. NOTE: If you have stainless “wheel simulators” you will need to be sure the hose does not contact the sharp edge of the simulator as that can “saw” through the hose and cause a loss of air. So you need to pay attention when locating the “L” bracket to the simulator.
BIT OF ADVICE: When adding air to the hose, I suggest that you support the hose in the bracket with your hand as the force from the air hose could loosen the bracket.
You can now attach your TPMS sensor to the end of the hose and you should be good to go.
Roger Marble
RELATED
- Learn the basics of setting tire pressure and testing TPMS
- My RV tire pressure is showing a significant increase. Is this OK?
- Is the tire pressure too high?
- The importance of knowing your RV’s ‘4-corner weights’
- If I upsize my RV’s tires, can I lower their inflation?
- A relevant question (plus much info) on 4-corner weights
*****
If you have tire questions, check out Roger’s Blog as well as his posts on RVtravel.com. There are hundreds of posts covering everything to do with tires.
If you still have a question for Roger after searching the above posts, send your inquiries to him using the form below.
##RVT1219

It is much easier to use a straight “double foot” Air Hose Extender on an inside dual than the angled double foot extender pictured. And if you use double seal high pressure flow through valve caps (like the Alligator brand), you don’t need to stick your hand between the tires to remove and replace the valve cap.
Thank you for the careful instructions, Roger! Thankfully, Newmar (Spartan RV Chassis?) was generous enough to add metal extenders to the inside duals of our RV. Have a great week and safe travels!