

By Cheri Sicard
Old RV decals can make a solid RV look tired in a hurry. In the video at the end of this post, Todd and Carla Rose, the Runaway Roses, have owned several used campers and truck campers, and each one came with the same problem: faded graphics and cracked gold stripes that were stuck on like concrete. This guide walks through what they tried, what failed, and the simple method and RV decal remover that finally took those decals off in minutes instead of days.
The struggle with cracked RV decals
Over the years, the Roses’ campers had all carried the same scars:
- Bigfoot travel trailer
- Lance 1172
- Lance 865 truck camper
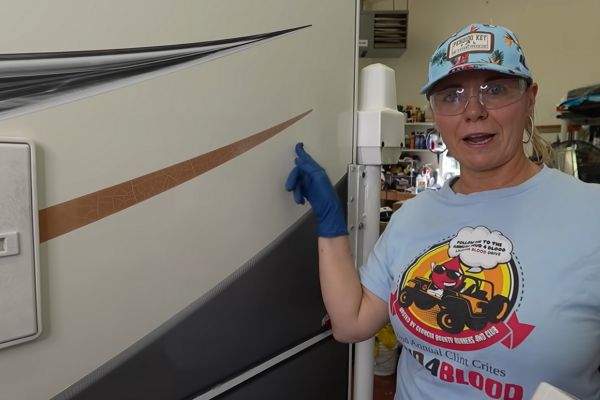
Each had gold decals that were baked on and cracked. The white and other colored graphics still looked decent, but those gold stripes were dried out and ugly. On past rigs, getting them off took hours with heat, scrapers, and chemicals.
The Roses finally found a better way after watching a helpful YouTube video, which led them to GraphXOff™.
RV decal removal: When an easy start turns into a nightmare
On their Lance 865, the first decal the Roses tackled was on the back of the camper. A plastic razor blade slid under it, and it peeled off quickly. That gave them false hope.
Once they moved to the passenger side, things changed. The decals there were dry, cracked, and stuck hard. On previous campers, the same type had taken hours to remove. The frustration started all over again.
Plastic razor blades: safe and gentle, but slow
They rely on plastic razor blades for almost every decal job. These little tools are sharp enough to lift vinyl, but safe on fiberglass, gel coat, and paint since they are not metal.
They like that:
- The blades are double-sided.
- A box usually comes with around 100 blades.
- They work great on RVs and cars for stickers and residue.
For anyone who wants to try the same style, they used a scraper set similar to this one:
Plastic razor blade scraper kit.
The downside is that for baked and cracked decals, the blades alone still demand a lot of elbow grease.
Chemical helpers they tried first
Before finding GraphXOff™, they tried a long list of products:
- Goo Gone® with plastic scrapers
- WD-40® to see if it would soften the glue
- Mineral spirits
- Goof Off® Pro Strength to remove stubborn adhesive
All of these are adhesive removers. They help with the sticky residue, but do not do much until the vinyl itself is off. Out of those, Goof Off Pro Strength worked best on leftover glue. The lighter-duty products did not cut it on the old gold stripes.
On an older Bigfoot, Todd tried a vinyl eraser wheel. There is a 3M™ Stripe Off Wheel. They used a version called a Whizzy Wheel, which also produces a Wonder Wheel decal remover eraser.
It mounts on a drill and rubs the vinyl off. It works fairly well on less brittle decals, but it is hard on the arms and still leaves adhesive behind. They also tried a more aggressive wheel style, which did not work as well as the Whizzy Wheel.
Even with the wheel, they still had to finish with Goof Off to get the glue off.
Heat guns and hair dryers: helpful but risky
For decals that are not cracked, heat can help. A heat gun or even a hair dryer softens the vinyl so it peels more easily with a plastic scraper.
On their Lance, the Roses were nervous about overheating the fiberglass wall. Between the outer wall and the foam, there is adhesive, and too much heat can cause delamination. Even a hair dryer can get a small spot too hot if held in one place.
The worry about damage and the slow progress finally pushed them to look for another way.
Finding GraphXOff™ and why it worked
After a round of frustration, Carla went online, found The Flippin’ Tilbys video on decal removal, and discovered GraphXOff. In the video and in their own test, GraphXOff took care of both the vinyl and most of the adhesive in a single step.
They bought GraphXOff decal and graphic remover directly from the maker. [It appears to be available only from the maker at this time]. The 16 oz. bottle they bought went a long way. In their video, the Roses also made it clear that they are not affiliates. They just like how this product worked.
Prep tips before using GraphXOff:
Before brushing on GraphXOff, they followed a few simple rules:
- Test a small, hidden area first.
- Wear rubber gloves and safety glasses.
- Use a natural bristle brush, not synthetic, to apply the product.
Step by step: How they used GraphXOff
The Roses removed several decals on the driver’s side of the Lance 865 and filmed the process. Here is how they did it.
1. Apply a thick coat
They painted GraphXOff directly over the decal using a natural bristle brush. The label suggests about 1/16- to 1/8-inch thick. They made sure to cover the edges well, since that is where the scraper will start.
A little overlap onto the surrounding gel coat was fine, but they tried not to spread it too far beyond the graphic.
2. Let it sit
The product instructions say it can sit for 1 to 30 minutes. Todd first tried 13 minutes on one side. On the next section, they waited about 20 minutes.
As it sat, they could see the decal start to bubble in places. The remover also began to take on some of the color from the graphic, a sign that it was working.
3. Scrape with a plastic razor blade
After the wait, Carla used a plastic razor blade and firm, even pressure to lift the edge of the decal. The vinyl came up in wide strips instead of tiny flakes.
They kept a paper towel handy to wipe the blade clean as they scraped. In most spots, the decal released right down to the gel coat.
They did learn that pressing too hard can leave a small mark. Carla managed to scratch one small area for the first time ever with a plastic blade because she pushed too aggressively. Normal steady pressure is enough.
4. Rinse and clean residue
Once the decal was off, they sprayed the area with soapy water and wiped it down. GraphXOff should be rinsed off after use.
If any light residue remained, they touched it up with a bit of Goof Off Pro Strength on a rag, then wiped again with clean water.
Real-world results on the Lance 865
On the driver’s side, Carla removed several small decals plus part of a large one across the front. The product made fast work of graphics that had been stubborn with every other method.
Todd pointed out that this was the first time the job felt reasonable. No endless scraping, no burning hot panels, and far less mess.
After removal, they could see a faint “ghost” outline where the decal had protected the gel coat from the sun. That is normal, and Todd plans to polish the whole camper to blend the finish.
After decal removal: Polishing for a fresh look
Under the old decals, the gel coat looked shinier than the faded surrounding wall. To even everything out, Todd plans to use a polisher over the entire camper.
Once polished, the Lance 865 should look much newer, with clean white sides and no cracked gold stripes dragging it down.
Final thoughts
For anyone staring at baked-on and cracked RV decals, this story will sound familiar. The Runaway Roses team tried scrapers, chemicals, heat guns, and eraser wheels on several campers, and each time the worst graphics still fought back.
GraphXOff finally gave them a simple way to remove old decals without wrecking the gel coat or losing an entire weekend to scraping. With a thick coat, a short wait, and a plastic razor blade, the decals on their Lance 865 came off in minutes.
After a quick wash and a full polish, the camper will look cleaner and more modern, ready for more miles without the faded gold stripes. Anyone planning an RV makeover can use this same process to get back to smooth, clean walls a lot faster.
RELATED
- Dealing with water intrusion and damage behind RV decals
- Should RV decals be waxed or not?
- Protect cracking and fading RV decals, and when to replace them
RVDT2791
I purchased Graphyxoff about 5 years ago to remove the faded and cracked decals on our old Minnie Winnie. It worked wonderfully. We had previously tried the eraser wheel, and goo gone, and nothing worked as well. I highly recommend
It’s an excellent product.
Used it four years ago to remove a large decal on our Crusader fifth wheel trailer. Works like a charm. I highly recommend it.
Excellent videos and written summary. Thanks!