Home Blog Page 2199

Used RV parts: Are they really a bargain?

By Steve Savage, Mobility RV Service

Every so often I’ll get a call from someone asking about used parts for their RV — whether I have any, how much can they get for theirs or whether I am willing to swap parts from one RV they own to another they also own. With those issues in mind, here are my thoughts.

The dollar value of used parts, unless they are of very recent vintage (say a year or two old) is very small, as is the demand. Parts manufactured before the year 2000 have almost no value at all. The reasoning goes like this: Who is willing to pay for something using technology from a bygone era, no warranty, unknown history of use, often no parts availability, etc. Scrap value would be about it.

In my opinion, parts from the ’80s have no value. I’m not saying an Onan generator from that decade won’t work. What I am saying is buying one and installing it, only to discover it needs work is a gamble I would rather not make. If someone gave me one and I was low on cash, maybe. Anything other than Onan from the ’80s and ’90s is better put to use as a boat anchor, from my perspective. Appliances one and all? Off to the recycler.

Move to the ’90s and the likelihood things are still working is better, but where are you going to get parts? For some appliances from some manufacturers, parts are still around. For others, parts have not been available for years (this is also true for some things that were on stage in the 2000s). The lifespan is anyone’s guess. Once you get beyond, say, 2005, things are looking up for used — but make sure it works before plunking down your cash!

How about parting-out an RV you have and putting the parts into another rig you own? If you are doing the work yourself and think you know the history, maybe — but make sure the one you want to keep is working and is the same brand. For example, some control systems will not work with other brands and some flat out won’t fit. Paying me or someone like me to do the work is costly. Why? You are paying me to both take the old one out and then put it into the new location. Can I do it? Probably, but the labor for the installation is all I will warranty. When it comes to whether the part swap will result in a working appliance or system is entirely in your ballpark!

photo: Allan Cleaver on flickr.com

Hanging cot increases sleeping room in your RV

By doityourselfrv.com

RVs are great for living but sometimes, when the grandkids or in-laws show up, things can get a little tight for sleeping. What can you do with all those extra relatives for sleeping? Hang ’em up. No — not the relatives! Let them sleep on a hanging cot.

A few years back, Brian at TheSamba.com came up with a hanging cot scheme and ever since, RVers have been brainstorming to make the original idea work even better. Here’s one of the latest incarnations, costing less than $35 to build.

Though originally designed for putting up in the front seat of a van, the hanging cot can be adapted to work in a car, truck or RV. The design calls for the use of schedule 40 steel pipe — making it very easy to scale for your needs. A pipe’s schedule just refers to the wall thickness of the pipe. The original intention was to make this for children to sleep on. With the materials indicated, the cot will hold up to 150 lbs. It seems reasonable to expect that with some tweaking, the hanging cot could be used for an adult who’s a bit heavier.

As many folks who use this have pointed out, it also serves as a great stash for gear when not used for sleeping.

Hopefully you have access to a sewing machine — you’ll definitely need it!

RV hanging cot parts list
• 1 1/4″ Schedule 40 Pipe (some choose steel pipe)
• 2x 50″ Schedule 40 Pieces (measure your chosen hanging cot area before cutting)
• 2x 24″ Schedule 40 End Pieces (could be wider if necessary)
• 4x corner pieces made from T-joints with one leg cut off and a slit for the strap to go through (slits and trimming of T-joints optional, based on application)
• Screws for attaching long pieces to corners (option of using glue, many prefer to be able to remove and clean canvas)
• Straps/rope for suspending cot
• 3/4″ pipe to string rope/straps through to hold hanging cot in the air (some have used radiator hose to prevent damage to vehicle door)
• Canvas/fabric for sleeping hammock
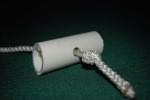
Construction instructions (overview)
• Cut Schedule 40 pipe to fit your desired area
• Cut your T-joint pieces
• Fabricate frame without fastening
• Lay out and sew canvas/fabric to fit snugly inside your hanging cot frame
• Slide canvas onto frame and fasten joints with screws/glue
• Route straps so weight on the hanging cot holds end pieces in place
• Some campers have taken the design a step farther by installing a pouch for their accessories that hangs from the bottom of the rack

doityourselfrv.com thanks Jason D. of Gulfport, MS, for his suggestion!

Why a voltmeter will help you to be a happy camper


By Greg Illes

There’s a lot of confusion out there about batteries, not the least of which is how to tell if your batteries are properly charged or not. Pretty much the only handy, inexpensive way to do this is with a (good) voltmeter. Let’s make sure we have the basics down pat:

A fully charged battery will measure approximately 12.6V under the proper conditions.

For best battery life, discharge should not exceed 50 percent, at which point the battery will measure about 12.2V under the proper conditions.

You have to check your specific battery manufacturer’s spec sheets for the exact numbers, but they will be near these values.

Now for the confusing parts. You have to provide “proper conditions” to make meaningful measurements. Here’s how:

Charging or loading condition

You cannot get an accurate battery voltage if it is being charged or heavily loaded. To measure the proper voltage, shut off the engine, shore power and/or solar first. Shut off any but the lightest loads (like the fridge or an LED light).

Float charge

After being charged, all batteries will have a “float charge” on their internal plates, making their output voltage look much higher than it will be after the float charge dissipates. You must load the battery to get rid of that charge (this can take many minutes), then unload it and measure the voltage.

Voltmeter accuracy

All the precision setup conditions won’t help if your voltmeter is out of whack. This is a more common problem than you might think, even with brand-new units. Check the voltmeter against a known standard or another voltmeter, to be sure your instrument is reliable. Expect to pay $35 and up for anything that you can count on. You can check out some voltmeters at Amazon.com.

How and where to measure

Measuring directly at the battery terminals is sure-fire, accurate and very inconvenient. If you have 12V sockets for your coach batteries, you can make a connection there. Otherwise, you will need to do some wiring (or have it done). By far, the best overall solution is a built-in unit that you can easily monitor any time you like.

Once you get the hang of checking your battery voltage, you will have the ability to make informed decisions about loading your batteries and charging them. You’ll be able to keep them at 50-percent charge or above, and your batteries will thank you with the longest possible life.

Greg Illes is a retired systems engineer who loves thinking up RV upgrades and modifications. When he’s not working on his motorhome, he’s traveling in it. You can follow his blog at www.divver-city.com/blog.

Traffic jams at the RV dump station

By Jim Twamley

RVers who frequent Army Corps of Engineers campgrounds, state campgrounds, RV rallies or high-traffic tourist destinations on a weekend may occasionally find themselves waiting in line at the dump station. You are probably in a hurry but you know you need to empty your tanks before you go, so there you sit. Here a few suggestions to help move things along.

1. Be ready to take care of business when it’s your turn. This is not the time to get distracted talking to people or flush your system until it sparkles like new. What your fellow RVers are counting on is efficiency, so take care of the basics and move along.

2. If you notice someone is having trouble getting things done (a new RVer, perhaps) then go help them. Show them how to do it (quickly) and help them move along.

3. Other approaches include leaving earlier, emptying your tanks with a portable the day before, or just relax and read a novel or magazine. You can always get out and socialize with other RVers in line while you wait.

Refinish those worn-out exterior RV hatches and trim

By doityourselfrv.com

Tired of yellowing RV hatches, vents and trim? Consider this method for making the yellow disappear and the pieces look brand-new again! Cost effective, too!

Sun, rain, wind and dust all take their toll on exterior finishes. Perhaps some of the most obviously affected areas of your RV are the hatches, trim pieces and other random plastic inserts that dot the outside. These pieces start out white and begin to slowly turn yellow or brown over time.

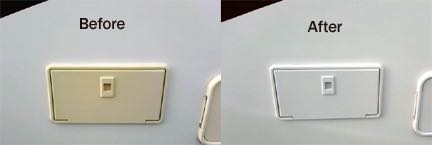
You could start the process of removing and replacing every piece with a shiny new one at a considerable cost OR you could use this cost-effective method.

All you’ll need is elbow grease, sandpaper, tape and some specialty paint.

An RV owner who goes by the name “Quicksilver” at the GlamisDunes Forum shared this method. He was annoyed with the yellowing RV hatches and trim that housed his dump hose, outside shower and other similar connections.

Materials needed:
• Spray paint (Krylon Fusion was used in this case. There are many colors to choose from.)
• Painter’s tape
• Sandpaper (320 grit was used here)
• Caulk sealant (optional)

Procedure:
• Sand each piece that you intend to paint, scoring the surface so the paint will stick.
• Tape off the pieces to avoid over-spray of the paint.
• Start the painting.
• Repeat coats as needed. In this example there were three coats.
• Run a new bead of caulk sealant around each piece after paint dries, if necessary.

This simple method can be used for other surfaces on your RV as well. Roof vents and coverings can also be painted. You could fix up all sorts of plastic pieces on your RV, including side mirror housings, tire well trim and door handles.

How to maximize your RV storage with plastic totes

By Curtis Carper

A place for everything, and everything in its place. Sounds like the mantra for someone with a compulsive disorder, but in reality neatness counts when you’re restricted to only a few hundred square feet of living space.

Most RVs today have an ample amount of storage, both inside the rig and outside in compartments that are supposedly watertight. I know my own experience has shown that in time, watertight may become water resistant and eventually turns into leaks like a sieve.

Outside storage compartments are great places to store things like camp stoves, the BBQ and charcoal, and other items best left outside. Once you start stuffing in extra clothing or dry goods, moisture can quickly turn your belongings and dinner supplies into a soggy mess. Kids’ toys, Fido’s favorite squeaky toys, even craft supplies for that day when the rain seems like it will never end — all need to be stored in a manner that will ensure their usability when the time comes you want them.

Plastic totes come in a wide variety of sizes and shapes. You can stack them, buy them to fit odd-shaped spaces, and mix and match as you see fit. I like to cook, so my collection of spices takes up quite a few shoebox-sized totes. I can have the more common spices in a tote stored in a kitchen cupboard, but the collection of more exotic spices are in a separate tote stored in an outside storage compartment.

As I am a full-time RVer, many things such as financial papers, bills to be paid and even old tax documents are stored away in plastic totes buried deep in my larger storage compartment. Should a water line develop a leak, I have no concern because everything will remain dry, sealed up nice and tight in a plastic tote.

To aid in identifying the contents of your totes it’s recommended you go with a translucent style that you can see through to some degree, allowing quick identification of the contents.

Being neat and orderly and storing your items grouped together in plastic totes will make life simpler and more efficient. Nothing is worse than digging through all your scrambled belongings looking for one particular item. Placing things in plastic totes will put the mess in its place.

Convert your RV to “all electric”? Not a good idea!

By Steve Savage, Mobility RV Service

Every so often someone seems to reinvent the notion that an all-electric RV — one with no propane system at all — is an idea just waiting for folks to snatch up. I’m afraid that belief is mistaken and remarkably shortsighted, unless you’re speaking about an all-electric system that is designed from the ground up.

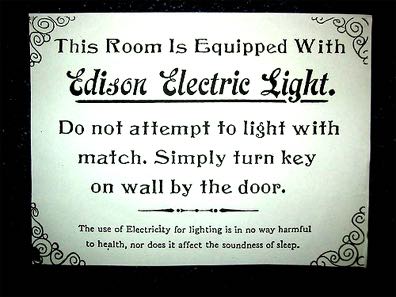
This idea normally comes about from someone who was born with a fear of propane. Never mind that many — if not the majority — of RV fires are due to issues that fall into the categories of either “electrical” or “other.” The reality is that propane systems are safe — as long as they are not modified and are used as designed. RV fires overall are hardly common. How many RVers have ever even seen one? I would venture to suggest only a very small number.

Here is the issue with ripping out the propane system and going all electric. To do so requires appliances with substantial power draws and the use of either a 50-amp system or a highly modified 30-amp system so appliances are not all attempting to “drink” from a 30-amp power cord at the same time.

Then there is the issue of flexibility. What do you do when you want to camp where there is no shore power? Don’t say that you will just use a solar array and a battery bank to feed an inverter — at least not until you calculate the numbers and costs of same. Solar systems are never cheap investments and large battery banks add costs and sometimes maintenance. I have worked on systems which depended on ten 125-pound batteries and multiple 3,000-watt inverters, but you would be hard-pressed to pack that much into a standard RV.

The option of running a generator to meet the demands of this all-electric RV all the time brings to mind a case a number of years back. In that instance, an RVer parked near another RVer’s rig. The former felt that his right to uninterrupted power trumped his neighbor’s need to sleep. The neighbor became increasingly irate (perhaps due to a lack of sleep) and began beating on Captain Electric’s generator — receiving a fatal gunshot for his efforts. I do not know how it ended for the shooter, but the story is true.

Then there are questions regarding what heat source for winter camping, what if the generator refuses to start and it is dinner time, and all of the other issues having the option of propane as a backup power source represents. Just a whole lot to consider before starting on the revamp road creating a one-of-a-kind that also likely will languish at some point in the resale market. Just my opinion, if you will, but a really bad idea.

sign photo: davidflanders on flickr.com

Fill-up time: regular or premium?

0

By Russ and Tiña De Maris

“If a little is good, a lot more must be better!” It’s a common equation to a lot of problems, but as you’ve no doubt experienced, “It ain’t necessarily so.” And so it is when you pull up to the pump with a hungry fuel tank. Do you want to pump in “regular,” “midgrade,” or that high-octane “premium” fuel? Is a bigger octane number better?

The “octane rating” listed on a fuel pump is a measure of the ability of the gas to reduce engine knock. “Regular” must have a minimum octane rating of 87, midgrade from 88 to 90, and premium needs a rating of 91 or higher. The higher the rating, the slower the fuel burns, preventing “knock” when engine cylinder pressures are high.

When an engine runs at full throttle, cylinder pressures are naturally at a high level — you can expect a bit of knock then. Towing a rig, particularly when climbing a steep hill, calls for higher cylinder pressures resulting in some ping. But prolonged engine knock can cause damage. Fuel-injected gasoline engines automatically adjust for driving and performance conditions, squeezing the most mileage out of whatever gas your vehicle is burning.

What gas should you use? As a rule of thumb, fuel up with the octane grade your manufacturer recommends. Pumping in premium or even midgrade gas when your vehicle calls for regular won’t improve fuel mileage or engine performance, but will reduce your wallet’s thickness. If you consistently have knocking issues while towing, you may want to consider pumping in a higher-octane fuel. We say “may” with this caveat:

If your engine knocks or pings it isn’t necessarily the gas — it could be you have an engine problem needing work. You could have electronic control systems, ignition timing or exhaust gas recirculation problems. If you’re dealing with an older or high-mile rig, it’s possible you have a buildup of carbon in your cylinders causing the problem. Once engine problems are ruled out, consider pumping in the higher octane fuel. It won’t hurt your engine, and if knocking vanishes, then you may find using higher-octane fuel when towing helpful.

Gas with added ethanol can have an impact on your RVing. Ethanol, or grain alcohol — typically produced from corn — is often added to gas to reduce air pollution. Grain alcohol doesn’t have as much energy per gallon as gasoline, so your tow vehicle or motorhome will indeed use more gas per mile driven. Industry says you may see a 3 percent drop in fuel economy with the use of 10 percent ethanol — many drivers say they lose a lot more. If you fill up without ethanol, or at least less than 10-percent ethanol, you’ll get better fuel economy.

photo: Barbara L. Hanson on flickr.com

Leave your RV refrigerator on 24/7?

0

By Steve Savage, Mobility RV Service

Many RVers like to keep their campers plugged in with the refrigerator going when it’s sitting at their house. Doing so will not damage the refrigerator or anything else that is running, like the power converter. But like most things in life, there is a downside.

All electrical components have a lifespan, just like an electric light bulb only burns for so many hours before it has to be replaced. The same holds true for the parts in your refrigerator and power converter. When they’re left on constantly, you’re using part of their lifespan. They won’t last as long that way, as compared to if they were simply cycled a couple of hours a month when at the house and then used steadily while camping.

At the same time, it’s not a good idea to simply leave everything turned off. Even batteries will spontaneously discharge but, again, nothing is gained in terms of longevity by leaving things on when they are not being used.

It’s your call. Use the lifespan while parked at the house or when camped; but either way, when something is turned on its lifespan is depleted to a degree.

An unusual approach to RV reroofing

By doityourselfrv.com

Ever wonder what it would look like when you tear off the roof of an RV? Hopefully, you never have to know. If you do, it means you probably had water damage, possible damage from falling tree limbs or other maintenance concerns.

RV roof replacement can be one of the most daunting projects to undertake, especially considering the level of labor and cost. It is more common than we would like to admit, given that most RV roofs are not designed with longevity in mind — water will find its way in eventually. Sometimes it doesn’t even matter how diligent you are with your maintenance schedule.

Most RV owners choose to seal or partially repair their RV roof and avoid replacing it at all costs. A RVer who goes by “onearmyrider” at the RV.net forums decided to go all in and tear off the roof of his 2006, 37-foot Weekend Warrior 5th wheel and a do a full RV roof replacement after discovering significant water and rot damage.

After the grueling process of tearing off the roof, he moved on to removing all the low-quality insulation. Not surprisingly, only around 50 percent of the roof was insulated. We assume the factory never expected an owner to tear off the roof to see the poor insulation.

Then the RV roof replacement got interesting. Once down to the bare minimum, both spray and traditional insulation were installed where needed. Then plywood was installed over top of the roof structure, which added most of the additional weight (the repair increased the RV weight by 380 pounds).

Lastly, in an interesting twist, Line-X (yes, the truck bed liner) was used to coat the roof, as opposed to the typical rubber roof material. Though unconventional, the premise is a good one. Line-X is a rugged, weather-resistant material that seals and permanently locks out dust, dirt and, most importantly, water.

The cost for a more traditional rubber roof does vary, but in this case it would have run more than $5,000. The Line-X coating, which ran from the back of the fifth wheel all the way to front end and over the front cap, cost $4,000. Perhaps you could save even more if you used a DIY bed-liner kit. When you consider the cost of the typical 2006 fifth wheel, you can see why most folks decide not to do RV roof replacement as it is cost-prohibitive. But, in this case, the roof should last for many years without any problems as long as the vents and A/C unit are properly sealed and maintained.

Here’s an important side note: Another RVer commented about their experience with the Line-X product. They used the stuff on two outdoor roof decks 14 years ago. One of the decks that was completely exposed to the elements cracked and leaked. However, a house painter told the user that a good porch paint over the top of the Line-X might have prevented the problem. They took the painter’s advice, painted their second deck, and it’s in perfect condition.

Editor’s note: If you decide to try this method, use good judgment. You’re traveling into an area where you’ll be using a product in a way that it was neither designed for nor tested.

How to easily repair water-damaged cupboards

By Curtis Carper

Buying a used RV or even having your own little mishap can leave the kitchen cabinets looking a bit tattered on the inside. Be it a plumbing problem gone unnoticed or a long-ago spilled container of cleaning product, the cabinet floor or shelves can become stained or damaged to the point you often avoid opening the door to retrieve your cleaning utensils.

A quick, easy cure to the unsightly mess — assuming the wood is still structurally stable — is to cover up the stains with vinyl flooring material. This provides two functions: Not only does it immediately clean up the area and provide a nice, fresh, inviting look to the inside of your lower cabinets, but it also protects them from future spills and accidental damage.

The best choice is to install a single piece of vinyl flooring cut to match the area. Simply remove all shelves and drawers and make a paper pattern of the area. You can likely buy a scrap of vinyl at your nearest home center that will leave you with very little waste. The pattern isn’t all that important because the doors will be closed most of the time. The goal is to clean up the area, not necessarily decorate it.

In some cases one-piece vinyl is impossible to install. In my instance there was a vertical separation that would have made it very awkward to install. The next best solution is to use 12″x12″ peel-and-stick vinyl square tiles. With care you can trim and install, making sure the seams meet solidly. This will make an almost waterproof surface and still provide a high level of protection against further damage from spills.

If you live in a cold climate or have other concerns that the peel-and-stick adhesive will release, you can install spiral nails that are normally used to install carpet trim strips. Just nail down each corner of the tiles and your new covering will stay in place through most anything.

This same technique can be used to give worn closet shelves a fresh, new look. The paper woodgrain-covered boards used in closets tend to peel off their covering over time. It’s a simple matter to peel off any loose paper covering and install a layer of floor vinyl. Peel-and-stick tiles work very well for this purpose, as well.

This is an easy project that can go a long way in improving the look of your older RV. Opening cupboard doors to see fresh, bright vinyl is just so much more appealing than looking at stains and damage caused by leaks and spills.

Move your TV for viewing comfort


By Greg Illes

Maybe you’re one of the lucky ones and your TV is perfectly situated in your RV for the best viewing comfort. But all too often, the TV is placed more for décor reasons and less for ergonomics.

In our Class A motorhome, the TV placement is just plain horrible. It normally lives up high in the forward overhead, between the driver and passenger seats. This is a perfect position for watching programs — while standing up next to the kitchen sink. For any other seat in the RV, it’s a total neck-buster, and much too far away. Watching the news for a few minutes is no big deal, but a 90-minute movie is a real strain.

Making a TV set movable is not too difficult (provided it’s a flat-screen type). Inexpensive wall mounts can be used to reposition a TV to almost any imaginable location. For our floor plan, it made sense to build a small stand to mount the TV at about belly-height. The stand can be positioned for viewing either from the captain’s chairs (swiveled around) or the dinette seats. The TV is closer and at ideal viewing height. The base of the stand is shaped to fit just behind the driver’s chair, and it takes up virtually no space while we’re traveling.

It takes a bit of amateur carpentry and a set of extension cables. All that’s required is to remove the existing TV mounting system and replace it with a dovetail-style mount. An example is the VideoSecu LCD, available on Amazon.

First, remount the TV in its original position with the VideoSecu mount. Then, install a second mount at your alternate location(s). Add extension cables for power and video, and you’ll be ready to watch TV in total comfort. When you’re ready to travel again, you can disconnect and store the extension cables or (as we do) just stuff them up behind the TV in its original location.

For our installation, making up the movable stand was the best option — a fun afternoon’s work with $10 worth of red oak and some basic tools. But depending on the nature of your floor plan, you might want to simply mount it to another wall or the side of a cabinet.

Be generous with extension cable lengths — they won’t detract from image or sound quality and you can tuck them aside while the TV is “deployed.”

Greg Illes is a retired systems engineer who loves thinking up RV upgrades and modifications. When he’s not working on his motorhome, he’s traveling in it. You can follow his blog at www.divver-city.com/blog.