By Russ and Tiña De Maris
If it’s time to replace your entry door window glass or the associated frame, it’s not a tough job. Entry door window frames are a two-piece design. The frames are sold as halves, either an exterior half for the outside of the door, or the interior half. But you’ll probably find a dire warning printed on the packaging: “It is strongly recommended that both interior and exterior frames be replaced at the same time.”
So why not sell both halves at a reasonable price together in one package? Since our own job was to replace a weather-cracked exterior frame half, and cheapskates that we are, we simply bought the exterior half because the interior side looked good enough to us. We later found out one possible flaw in the reasoning.
When replacing door glass, don’t run to the big box hardware store looking for a replacement. The original glass is tempered — for a good reason. When broken, non-tempered glass has a nasty way of shattering into long, sharp, deadly shards. When replacing glass in an RV, code calls for tempered glass which, when broken, typically chunks into smallish, rounded pieces, far less likely to cause great bodily harm.
 You can get the glass from the local glass shop but it may require a few days from order to readiness. Tempering requires cooking the cut-to-size glass in an oven, and many shops have to send out the glass for the tempering process. You can use plastic, but don’t use inexpensive Plexiglas. Plexi is easy to work with but it gets brittle at low temperature and breaks easily. Lexan, although more expensive, is your best alternative. Before ordering either one check with local RV parts dealers. Many keep replacement glass in stock and their price may beat the glass shop. If you know you have a change-out job coming up, look on Amazon — you may find sellers that will equip you with a complete two-piece frame and glass for far less than you’d imagine.
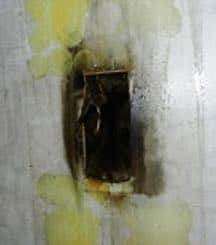
You’ll need a helper, as the actual glass is not directly attached to the window frame, and you’ll find yourself juggling three pieces — one of them breakable. For easy removal, use a cordless drill equipped with a #2 Phillips screw bit. There are 12 screws that hold the frames together. Zip out the screws while your helper stabilizes the whole shooting match. If the sealant on the exterior frame is still intact, remove the interior frame and glass from the inside of the door.
 With the frame removed, clean up any frame piece you’ll be reusing. A flat scraper and at times a rag with solvent are about all you’ll need. If the glass is intact, use a scraper to remove sealant and clean the glass with glass cleaner. Using a bench or table to complete your prep work makes the job easier. Lay the exterior frame on the bench with the “outside” down. Put a layer of butyl putty tape around the far outside perimeter of the window frame. By covering about half of the surface of the frame with putty tape then coming back and cutting off the excess (the tape is much wider than the frame’s flange), you may be able to use the cut-off piece to complete the “puttying” of the frame.
Next, silicone sealant is used to form a complete bead around the interior perimeter of the exterior doorframe. This is the bed that the door glass will seat into, and keep the rain from coming in around the glass. We opted to go with a nonstandard approach and use an acrylic sealant instead. We hate the “nothing will ever stick to silicone” issue, and if we need to reseat the glass in the future, prep work will be much faster. If you have time to wait, put down the bead of sealant and lay the glass in place. Leave putting on the perimeter of putty tape until after the other sealant has set up and now firmly holds the glass to the frame. This will make handling the glass and frames oh-so-much easier. Since we were living in the trailer when we had to replace our glass, we didn’t have that luxury, and manipulating two frames and a chunk of glass — all nicely wet with sticky sealant — was like a page from the Laurel and Hardy playbook.
Using help, bring the exterior frame and its glass companion around and shove them in the open hole of the door. By the way, the exterior frame has no screw holes in it. The screws go in from the interior frame only. With the new window frame in place, align the interior doorframe with the exterior frame. Here’s where buying both interior and exterior frames brand-new may make a difference. There was a slight bit of warping in our old interior frame, which made alignment a bit tricky. Like any good follower of the “Red Green Show,” we said, “What the heck?” and grabbed screws that were just a bit longer than the originals. After all, that little bit of extra length made alignment easier. The first screw put in practically nicked the helper’s hand on the far side of the door — the screws you take out are precisely the correct length. Snug the screws down tight enough to squish out some of the putty tape, but don’t overdo it.
If your installation is anything like ours, now is not “Miller Time.” The hash job we made with not having enough hands to juggle fresh glass adhesive and the addition of plenty of putty tape spillover meant an extra 20 minutes spent rubbing off “goofs,” in addition to using the scraper to remove the excess putty tape.
Despite the hassles, the new window frame is a big improvement over its predecessor.


 And there’s no doubt about it. These inexpensive devices are great for taking the chill off or for supplementing the onboard heating system. But, beware … there can be dangers. Among them is catching an RV on fire.

 However, after days or weeks of no hookups (conserving precious water and holding tank space), we miss being able to take a long, hot shower.
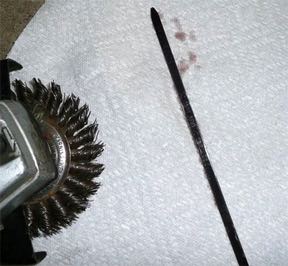
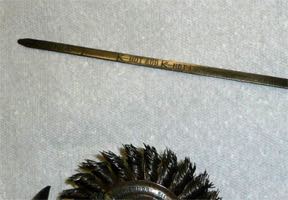 I used a wire wheel brush to clean up my automatic transmission dipstick. Now I can clearly see where the lines are and I don’t have to guess what the level is.


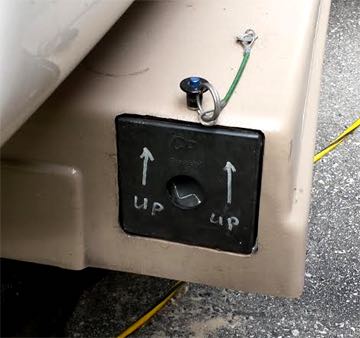
 Sounds good so far, but most electricians think wiring a 30-amp receptacle is a 240-volt job, like they would for a welder. The problem is an RV needs 120-volts, not that higher, welder-friendly 240 volts. That is to say, they wire the receptacle with a black, red and ground, rather than a black, white and ground.


 Many RVers don’t realize this and allow their campfires to smolder until the campground looks like Los Angeles back in the ’60s. If there is a constant breeze to carry the smoke away this isn’t usually a problem. However, when there is little or no breeze, and you insist on having a campfire, then please keep it a fire and not a “smoke generator.” By that I mean, you need to keep feeding the fire so that you see flames. There will still be smoke, but flame indicates that you are achieving a more thorough burn and dissipating less smoke into your neighbor’s RV.