Dave,
I’m replacing a roof vent and noticed that the original one had screws installed in every other hole. Is that normal? Can I or should I install the new vent cover with a screw in every hole, or is there something wrong with that? —Roberto, 2007 Fleetwood Jamboree 26Q on Ford chassis
Roberto,
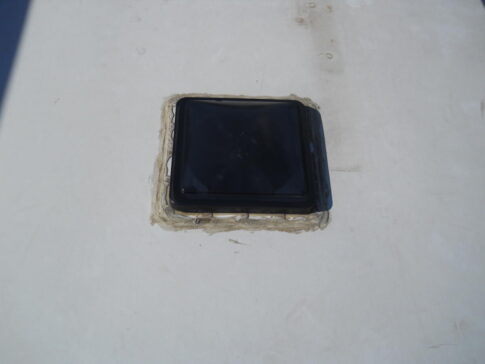
Most likely you are referring to a Fan-Tastic Roof Vent, which is installed into a square opening in the roof with a flange that sits around the edge on the top of the roof. I have replaced dozens of these and there doesn’t seem to be a “normal” way to fasten them.
Fan-Tastic has been the most popular brand of roof vents used by RV manufacturers for years. They offer several models, with most being 12” with a 10″ blade fan. The difference is fan speeds, rain sensitivity, and built-in thermostats.
How to replace Fan-Tastic roof vent
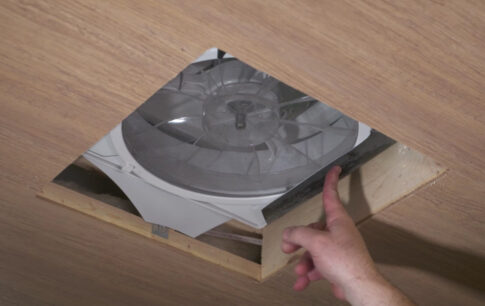
According to the Fan-Tastic owner’s manual and installation guide, you need to remove the inside shroud first, then remove the self-leveling sealant on the top flange with a heat gun on low and a plastic putty knife. There might also be putty or butyl tape between the flange and the roof material. Therefore, be careful when removing the unit so you don’t rip or tear the roof material, which is most likely EPDM rubber.
Next, clean the area and apply new putty or butyl tape under the flange. According to the installation guide, it recommends installing screws in the existing holes on the flange. I would imagine that most RV manufacturers are going to limit the number of fasteners not only for cost savings but also less labor time.
I have found that the self-leveling lap sealant holds the vent in place just as secure as the screws. Also, now that you have removed the old screws, the holes would be expanded and you most likely would need a little thicker screw. I have always applied a little sealant into the old screw hole just for an added “bite.”
Using screws
Since your old vent had screws in every other hole, you could just install new screws in the unused holes, as you would have a good fastening point on the roof. Keep in mind you are just screwing into the rubber roof material and a very thin panel, which is most likely a 1/8” luan panel. Then cover all the screw heads with self-leveling lap sealant. I also run a bead around the entire edge.
Make sure you get a sealant that is compatible with your type of roof material. When you remove the inside shroud, check the underside of the roof material, which you should be able to access inside the opening. If it is black on the underside, it is EPDM, which I believe a 2007 Fleetwood Class C would have.
You might also enjoy these posts from Dave
- What is the rule of thumb for using RV roof vents?
- Should I use EternaBond on my RV’s roof vents, A/C units and along seam edges?
- What could be causing ‘soot’ around vent on RV roof?
- Soft spot on RV’s roof from broken vent seal. Can I just leave it?
DAVE HAS ANSWERED MORE THAN 1,200 readers’ maintenance and repair questions. Read a directory here. There is so much to learn!
Dave Solberg is a leading expert in the RV industry and the author of the “RV Handbook.”
HAVE A QUESTION FOR DAVE?
Send your inquiries to him using the form below.
RVDT2934