

By Cheri Sicard
In the video at the end of this post, certified RV technician RV Repair Woman pulled a water heater from a customer’s rig, then found the kind of mess that keeps water cold and faucets sluggish. Her video guide shows exactly how that tank was brought back from a solid inch of gunk to a tank that could actually heat again.
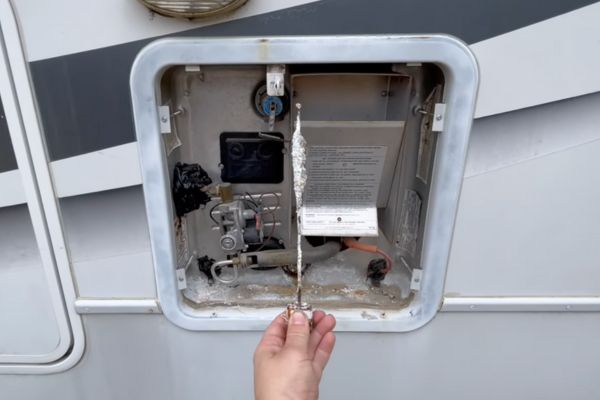
Before the cleaning, the heating element came out coated in hard water buildup. Chunks fell off as it was removed. An action camera showed the bottom so packed with sediment that the metal floor was invisible. No surprise the heater struggled. The element was insulated by scale, so heat never reached the water.
The heater worked electrically, but performance tanked because of silt and scale. The element could not shed heat into the water. The result looked like solid buildup, wall to wall.
Tools and parts for RV hot water tank cleaning
- Tank wand attachment for rinsing
- PVC funnel setup: threaded connector, short PVC, elbow, long PVC riser
- Correct thread for the tank opening: half-inch (Dometic/Atwood) or three-quarter-inch (Suburban)
- 3 to 5 gallons of plain white vinegar
- Garden hose, bucket, basic hand tools
Anode rod basics: The rod is sacrificial and should be replaced yearly, more often with hard water. Suburban tanks need it. Dometic or Atwood aluminum tanks do not use an anode rod. Adding one to Dometic can trigger corrosion. Learn more about the different types of anode rods here.
10 steps to a clean RV hot water tank
1. Cool the tank: Power off the heater and let it cool completely. These tanks hold heat for hours, so wait until it is cool to the touch.
2. Bypass the heater: Use the RV’s bypass. Some rigs have one handle behind the heater, others have three valves, and Nautilus panels use a winterize setting.
3. Remove the plug or anode rod: Dometic and Atwood use a plastic plug on the front. Suburban uses a metal plug with an anode rod attached.
4. Do a quick rinse: Hook a tank wand to a hose and spray through the opening to knock crud loose.
5. Build the PVC fill setup: Screw the threaded connector into the tank, add a short PVC piece, then an elbow, then a tall vertical pipe. Make the top higher than the tank so it can fill completely.
6. Add vinegar, then water: Pour in 3 gallons vinegar for a 6-gallon tank, or up to 5 gallons for a 10-gallon tank. Crack the pressure and temperature valve at the top to vent air, then finish filling with water until it flows from that valve.
7. Heat and soak: Turn on the heater and let it sit 8 to 12 hours. This dissolves the scale and loosens sediment.
8. Drain and rinse deep: After it cools overnight, drain into a bucket. Open the pressure and temperature valve for faster flow. Use the tank wand again for 30 to 60 seconds at a time. Expect brown water and fine silt. Keep going until the water clears.
9. Reinstall the plug or anode rod: This is a great time to install a new part. Dometic uses a fresh plastic plug. Suburban gets a new anode rod.
10. Flush the lines and test: Take the system out of bypass. Run faucets until the vinegar smell fades. Annual cleaning helps prevent the 20-year pileup.
What came out of the tank
A full bucket of thick silt and a haze of fine particles were removed from the hot water tank. That fine grit can clog faucet screens and shower heads, which can crush water pressure. The difference in clarity by the end was obvious.
This simple vinegar soak and rinse turned a stubborn heater into a workable tank again. The process used basic tools and a few gallons of vinegar, not a shop full of gear. A yearly clean keeps heat transfer strong and water pressure steady. Ready to take on the next RV fix with confidence?
RELATED
- The importance of RV water heater maintenance
- Tankless RV water heaters aren’t what you think. Here’s why
- How to rinse sediment from an RV water heater
- What’s the difference between types of anode rods?
RVDT2780
Thanks muches for the tips and instructions. Our camper is 25 years old (we bought it about 10 years ago) and probably has the original water heater. Although we’ve not experienced any problems (I rinse it out each autumn at shutdown) this coming spring I’ll do this deep cleaning.
That Camco rinser is JUNK! The wand will come off inside the water tank, then you have a real problem. Here is a much better product that will last a long time.
Amazon.com: RV Water Heater Tank Rinser
https://www.rvtravel.com/lost-flush-wand-water-heater-1842/
Just crammed the contents of this video into a comment on Dave Solberg’s column yesterday as an alternative to using bleach for sanitation. A concentrated vinegar solution also kills algae and most bacteria. And vinegar is less toxic to humans than bleach. Do not let the vinegar solution drain on your lawn, use a bucket like the video! I killed a patch of my lawn for 3 years.