
Your slide out seals are pieces of rubber that surround the edges of the slide. They create a suction seal around the slides when they are pulled in, which prevents debris and the elements from entering your RV. They also protect the walls around the slide out. In this example, the slide out sealant is separating from the wall. If the unit is left this way, over time this allows water to absorb into the wall above the slide out.
 This is an example of what happens when something like the above goes unnoticed. This 2014 Forest River Blue Ridge was repaired at my shop. The wall above the slide out was dry-rotted to the frame and halfway down the rear wall.
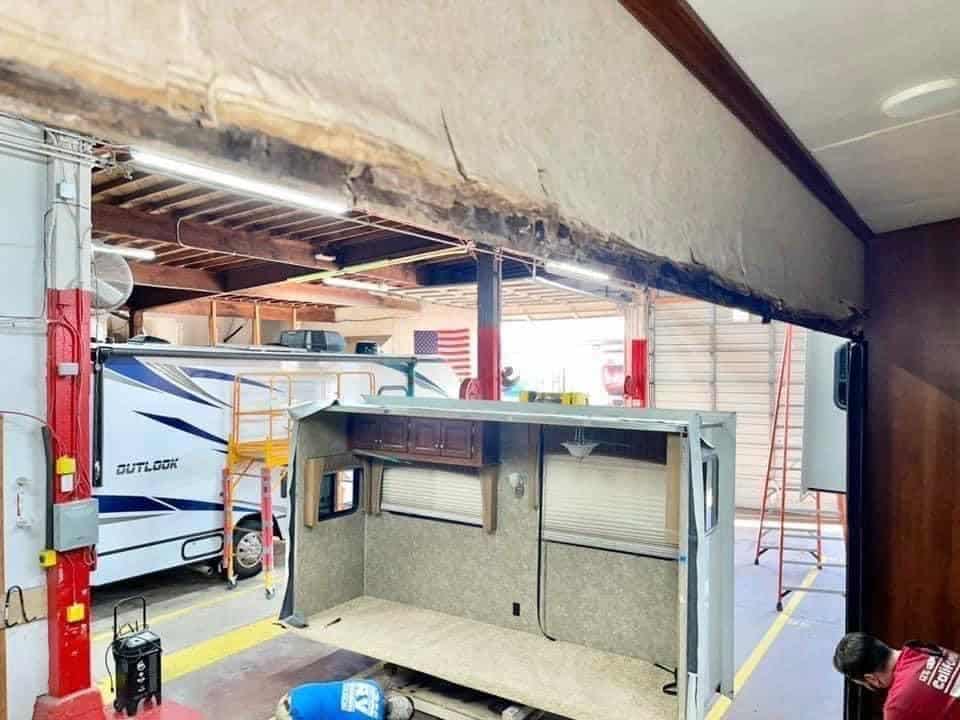
The repair
To repair it, we had to completely remove the slide out from the unit. Here’s what we did:
- We removed all rot from the unit.
- Framed in the top of the slide out and the rear wall of the slide.
- Reinstalled the slide out and synced.
- The original paneling for this unit is no longer available. We saved what paneling we could during the repair, but some paneling was too far gone. We utilized seam tape to cover these sections to blend as best as possible.
- Installed wiper seals and ensured the outside slide out was fully sealed.
- Reinstalled all slide out facia and puttied holes.

The cost of lack of maintenance
Removing and reinstalling a complete slide out is not a one-person job. As you can imagine, the labor hours on a repair like this can add up quickly.
- Labor costs: $4,200.00
- Shop supplies: $200.00
- Sales tax: $16.40
- Total cost: $4,416.40
How to maintain your slide out sealants
Keeping up on preventive maintenance is key to preventing large repair bills, as described above. Should your slide out sealants need to be resealed, please do the following:
- Scrape off any old silicone.
- Clean and wipe down the area with solvent cleaner.
- Ensure that the seal is secure against the wall. Check all mounting hardware and secure as necessary. I also recommend checking the screws in the ends of the D-bulb seal to ensure they haven’t torn loose. If so, re-secure.
- Apply silicone around slide out seals.
DIY Products
There are the products my technicians use on a repair like this:
Scrapers – These are perfect to use when removing sealant/silicone on the edges and the side of the body for resealing.
Acrysol – This is a great, low-grade solvent that we use to clean silicone/sealant, decal remover, etc.
My technicians favor BOSS 378 silicone. Here it is in three colors:
(There are other brands out there; just be sure to use a silicone that is an RV grade.)
- Kent Auto Body Degreaser
- Heavy Duty Vinyl Insert Trim, 1 inch Wide, 100 foot Roll, Black
- Heavy Duty Vinyl Insert Trim, 1 inch Wide, 100 foot Roll, White
- Heavy Duty Vinyl Insert Trim, 1 inch Wide, 100 foot Roll, Colonial White
Dicor Non-Sag Sealant — You will want to use non-sag sealant on all corners and side seams on the roof. Non-sag sealant is offered in several colors:
Dicor Self-Leveling Sealant – Roof surface, for moldings, seams, vents, skylights, etc. Multiple colors can be found here.
Accessory Installation Kit – Sealant, putty and scraper.
Whether you own a million-dollar unit, or you have an entry-level, my message to you will be the same—it needs to be maintained.
More from Dustin
Read more of Dustin’s articles here.
##RVDT2300

Amen.
I replaced all the insert trim on our 2017 TT this past fall. Already on the ladder at the roof line, so also did maintenance on all sealants at roof edges and slide seals.
My understanding is that Silicone does not stick to silicone. When I do sealant maintenance I replace the silicone with Geocel Proflex RV.
Thank you, Dustin! I’ll find out what sealant Newmar uses so that the wrong sealant is not used. 🙂