
This spring I conducted more than 100 seminars at RV shows across the country, and the “Boondocking, Getting Off The Gird” seminar was a very popular one. One of the topics is how to extend battery life, and LED lights have been part of the discussion. Also, we recently had a post on RVtravel.com concerning LED lights flickering.
I believe every new RV now comes with LED lights. However, there are still a large number of units out there with halogen lights and some with the old energy-hog incandescent bulbs. Incandescent bulbs run 1.5 amps per hour, while quality LEDs only use 0.15 amps per hour.
Not all LED bulbs are created equal
Before we get into the specifics of lumens and color temperature, we need to discuss the difference between quality LED bulbs and some of the generic “cheapies” that are flooding the market.
Several years ago we changed all the bulbs in a 1992 Itasca Suncruiser that had the old incandescent bulbs. We did extensive research on bulb quality with several dealers and original equipment manufacturers (OEMs).
I came across a company called M4 Products that had an impressive product offering and even more impressive LED tutorial. The owner is an RV owner/enthusiast. He got frustrated with the cheap LED bulbs only available at auto parts stores and started his own line of products.
When LED lights first started hitting the RV aftermarket, you could only get the entire fixture rather than just a bulb swap. At that time, a single fixture would cost about $50+ and was not an inexpensive option to do a front-to-back change out. So, many RVers would just change one or two in the living area and bedroom for reading.
Today there are bulbs available for almost every fixture and they are fairly inexpensive.
Identifying quality LED bulbs
How can you determine if it is a quality LED bulb? Here are some of the main factors.
Most manufacturers use the same chip. However, the difference comes in the number of chips used in an array, and the housing material. The chip is the most expensive component in an LED bulb. Most cheap manufacturers use fewer chips to save money.
The housing is also important as the paperboard design does not hold up in an RV application. A metal or aluminum cage not only is stronger but also acts as a heat sink, as even LED bulbs give off some heat. This means the bulb will not break down when the light is used for a substantial amount of time, unlike a bulb that is just used for brake or turn signals.
An aluminum cage also reflects light from chips that are angled in different directions so they illuminate a superior light pattern.
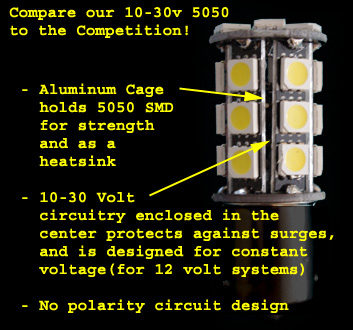
Quality LED lights are also non-polarity specific. That means they will work as designed even if the light fixture is wired wrong. We found that more than half the lights in the Suncruiser were wired backwards. This is common with RV fixtures.
I remember doing factory tours at Winnebago.As the unit came down the line, the wires hanging from the ceiling and under cabinets were purple and green. The light fixtures were white and black. All incandescent and halogen bulbs will “glow” no matter how they are wired, as it is just resistance.
Rather than check and rewire all your light fixtures, just get a quality bulb.
Lumens and color temperature
Over the years I have swapped out many old household lights with new LED bulbs and have wrestled with matching the intensity of light or Lumens. Lumen ratings are a measure of light output rather than what we perceive as visible light. Color temperature can also affect what we see as visible light.
Quality larger LED bulbs use 5050 Surface Mounted Diode (SMD) chips that are rated at 15 lumens per chip. So, the number of chips times 15 gives the lumens rating. Smaller bulbs use 3528 SMD chips rated at 5 lumens per chip. M4 Products’ Elite Series use Samsung 5630 chips rated at 35 lumens per chip.
As stated above, the reflection of an aluminum cage enhances the visual light, and color temperature is also a factor. The sterile bright light from a cool bright white bulb will look more intense than the warm white bulb.
For more information on color temperature, go to M4 Products LED Color Range Choices webpage here.
I personally like the cool white light for reading areas and the warm white light for the bathroom ceiling light.
Example of difference in lighting
Here is the difference between the old incandescent lights of the Suncruiser and the new LED ones from M4 Products. We went with the brighter cool white bulbs throughout, as requested by the owner.

Note: We had to turn the lights in the room off to be able to capture the interior lights due to the camera aperture.
Note: We turned the room lights on for this picture because the intensity of the lights created an “explosion,” once again due to the camera aperture. The difference looks almost AI enhanced; however, it was a very dramatic difference in visible light.
As a final note, it is best to research the quality of bulb, lumens, and color temperature that best fits your RV application. It might also prevent the flickering or intermittent twitch some are experiencing.
You might also enjoy these posts from Dave
- LED lights flicker in my RV. What should I look for?
- LED lights in RV are too intense. Is there an incandescent bulb adapter?
- Why did my brand-new LED lights stop working?
- New LED lights are causing weirdness on my TV
- LED lights in camper worked at dealership. Why do they now flicker?
- Interior lights in RV only work when plugged into shoreline power. Is that normal?
DAVE HAS ANSWERED MORE THAN 1,000 readers’ maintenance and repair questions. Read a directory here. There is so much to learn!
Dave Solberg is a leading expert in the RV industry and the author of the “RV Handbook.”
HAVE A QUESTION FOR DAVE?
Send your inquiries to him using the form below.
RVDT2884

I upgraded to LED’s on our last MoHo for the tail-stop & running lights & WOW it did make a huge difference, not only in brightness but they were so much cooler than the stock ones. However when I bought a replacement for my shop fluorescent fixture for over my lathe it was difficult to see my cutting tools location as it approached the work piece as it had NO shadow, was very weird!
Snoopy
I had that problem with my table saw. The fix was to move the light from directly over the saw to about a foot behind it. The blade and marking line were very visible.
Thank you for the discussion and information, Dave. Have a great week and safe travels!