


Every RV owner needs a tool bugout bag. You need a small, simple bag of tools that will fix the most common annoyances and help you perform routine maintenance.
As a mobile RV service technician, I carry everything from a miter saw to an air compressor. But 75% of what I use fits in a 19” tool bag. Today, I’m giving you a sneak peek into my hardware kit and the screwdrivers, sockets, and driver bits I use to do my job—and hopefully help you do yours!
RV tool bag recommended: Screwdriver and impact driver bits
Essential
- #2 Phillips (not Pozidriv or Frearson, which look similar)
- #2 Robertson (Square)
- T25 Torx (Star) 3.5mm and 5.5mm slotted/flathead
Optional
- #1 and #3 Phillips
- #1 Robertson (Square)
- #2 and #3 Double-Square bits
- #20, #30, #35 Torx
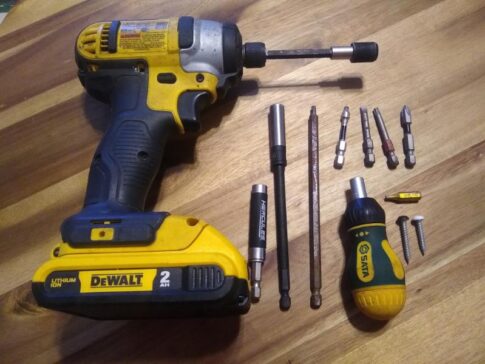
You’ll find Phillips #2 and Square #2 screws all over your RV. Many screws for RVs have a “quad-drive” pan head, which is suitable for either #2 square or #2 Phillips. I use square whenever possible since the screw won’t fall off the bit as easily. Just be careful! It’s easier to over-torque with a square bit.
Slotted screws are still used in electrical equipment such as controllers, thermostats, and circuit boards. The 3.5mm screwdriver works miracles here; the 5.5mm screwdriver also doubles as a small pry bar for loosening trim.
Speaking of trim, if your interior trim and fascia boards were installed with trim screws instead of brad (18GA) or pin (21/23GA) nails, then anything goes! Could be #1 Phillips, #1 Square, even T15 Torx … you just don’t know!
Personally, I don’t purchase regular screwdrivers unless they’re 1000V insulated electrician’s screwdrivers. I have a set of Wiha electrician’s screwdrivers that I reach for when working on breaker boxes and control boxes, even when the power is ostensibly “off.” Safety first!
I also carry a 6-in-1 “stubby” ratcheting screwdriver with quick release for those tight places where a regular screwdriver just won’t fit (looking at you, toilet valves!). It works great with 1” and 2” impact-rated driver bits.
But, to be honest, I reach for my impact driver first and my screwdrivers second. Impact drivers make quick work of things, and as long as you know how to feather the trigger, you can safely use them without over-torquing a screw. If you prefer a conventional drill, be careful, since the rotation from high torque can easily crack your wrist!
I also use locking 2”, 4”, and 6” extensions when necessary. Those will get you into 90% of where you need to be. Because I’m a technician, I also carry flexible extensions and several right-angle drill attachments for the other odd cases where access is otherwise almost impossible.
RV tool bag recommended: Sockets and wrenches
Essential
- 1/4″, 5/16″, 3/8″, 7/16″, 1/2” nut drivers and/or sockets
- 1/4” hex bit
- 3/4″, 7/8″, and 15/16” sockets
Optional
- Set of SAE Allen keys
- 1-1/16″, 1-1/2″ shallow sockets
- 13/16″, 15/16” combination or flare wrenches
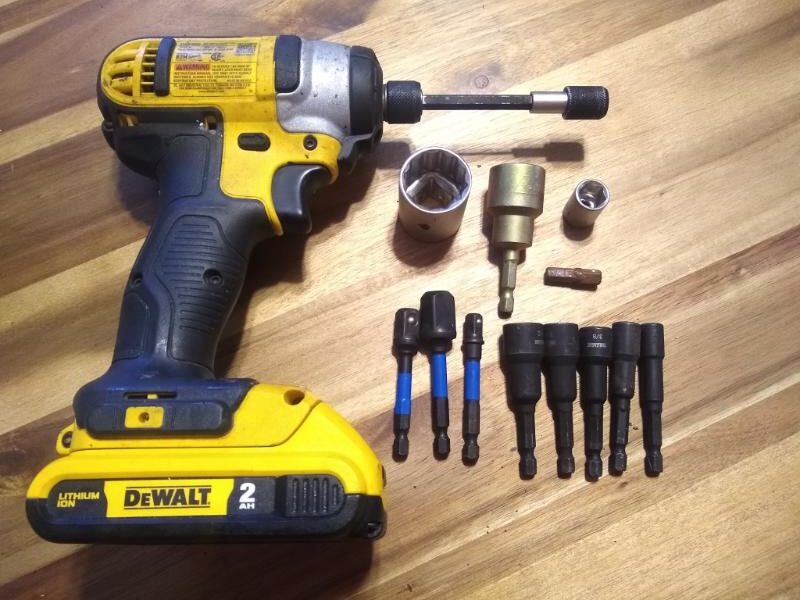
As you’ve probably noticed, not much on your RV is metric. Almost everything is SAE.
If you start working on your RV chassis or frame, you’ll notice a lot more hex-head fasteners, so come prepared with a full set of SAE nut drivers or sockets. Magnetic ones are the best!
The 3/4” socket has a special place on this list (and in my heart). It’s the fastest, easiest tool for raising and lowering scissor stabilizing jacks. Once you use it, you’ll never go back.
Most of your RV’s electromechanical systems—leveling, slide-outs, etc.—have a manual override. Usually, this requires you to rotate a shaft manually. You’ll need a 1/4” hex bit or appropriately sized socket with a ratchet or driver. In some cases, you’ll still need a slotted crank handle. Awning motor overrides commonly require a 7/16” socket.
Allen heads pop up in random places, like set screws. You usually need the individual long-handled L-shaped keys, not the Swiss Army knife-esque foldable sets; they won’t fit.
The 7/8” and 15/16” sockets are often used when removing a water heater drain plug, while the 1-1/16” shallow socket is the most common size for removing an anode rod, and the 1-1/2” shallow socket is the most common size for removing a water heater electric element. You can either use a 6-point socket or an anode rod/heating element removal tool; 8-point sockets tend to round off, especially when the anode rod hasn’t been inspected recently (shame on you!).
The 13/16” and 15/16” wrenches are used when working with 3/8” and 1/2” flare nuts, which are standard on propane lines. You can use regular straight-sided wrenches or flare/line wrenches. Don’t break into your propane system without knowing what you’re doing, however! Propane is combustible and explosive, and you can kill yourself.
If you’re really tight on storage space, you can use an adjustable crescent wrench rather than purchasing multiple sizes. But avoid using vice grips or tongue n’ groove pliers on nuts or bolts. They will damage the metal and can easily round the corners of hex heads.
If you want to work on hydraulic leveling systems, slide-out mechanisms, and other big-boy/big-girl systems, then this list is just the tip of the iceberg. Trying to work on an Accu-Slide cable-driven slide-out without ratcheting SAE wrenches is an absolute nightmare, for instance.
An RV technician’s handy tips for DIY maintenance
Most steel bits can be made magnetic with a simple $5 magnetizer. Worth its weight in gold!
Most screws for RVs have a #8 diameter. If the original hole wallows or strips out, you can often replace the screw with a slightly larger size, like #10.
If you have any pesky screws that habitually vibrate out of their placement, try bedding them in non-sag caulk. There’s no need to use superglue, JB Weld, or anything so strong—just a little bit of non-sag sealant will do the trick.
Many RV interior screws have painted pan heads. Black or white is most common. You can find these online by searching “RV screws.” If you don’t care about the black or white head, you can find comparable regular or stainless steel screws with #2 Square pan head at many industrial hardware stores.
Fascia and trim are often installed with 23-gauge pin nails or 18-gauge brad nails. The latter is difficult to install by hand; the former is impossible. If you don’t own a nail gun, you can use regular trim nails with a smooth-faced hammer, or you can replace the nails with trim-head GRK FIN screws, which I adore.
It’s not uncommon for the heads of hex-head sheet metal screws to break off when you’re screwing into the steel chassis frame. You can reduce the friction (and therefore torque) by using some kind of lubricant on the threads, like anti-seize, cutting fluid, or even WD-40 in a pinch.
A parting thought
This isn’t an exhaustive list of RV tools, of course. I have an entire van full of tools! Sometimes I need a crow’s foot flare wrench, a precision slotted screwdriver, an NPT thread chaser, or a strap wrench. But those instances are rare for DIY work.
Please be careful out there. Don’t get shocked, sliced, or burned. Oh, and don’t forget the headlamp. You’ll need it!
RELATED
- Every tool that should be in your RV’s toolbox and why
- The types of RV screws and bits you should have in your toolbox
- Cool Tools: The AWBLIN Automotive Test Light
- Cool tools and gadgets to help with RV repair
##RVT1201
Good article, but there’s just something missing that should be in every tool kit regardless of what type, and the “just the tip of the iceberg” just does cover it. At a minimum, every tool kit should include at least one hammer, one pair of pliers, a utility knife and duct tape. These are our ‘go-to’ tools, we make sure we have whenever doing any work of any type on our RV.
Pliers: ‘channel locks’, slip joint and needle nose. And a pair of medium sized wire cutters.
I have full sized head hammer with a stubby handle, and a tack hammer.
24 inch breaker bar, torque wrench and socket to fit lug nuts. These can be stored in one of the compartments.
Even the inexpensive Harbor Freight torque wrench and breaker bar suffice.
Multimeter?
I carry most of the tools Andrew addresses here plus more. I carry them in an old hard-side briefcase with 3 plastic baby wipes boxes. One box for wrenches, 1 screwdrivers and 1 for pliers. A plastic bag with metric wrenches. An SAE-Metric socket set 1/8″ – 3/4″ with extensions and 1/4″ – 3/8″ ratchets and a Harbor Freight 3/8″ torque wrench + misc. stuff including duct/silicone tape and about 18″ of bare steel wire. Reused the old briefcase and the plastic boxes too! Win Win. I have used most of them on the road or at home at one time or another on my motor home. The whole case weighs 38 lbs.
Flashlight!
Recommendations here are good, but I also carry Vice-Grips. A large jaw, a very small jaw, and a needle nose jaw. They are very useful for clamping something off (such as a leaking hose) until I can repair or replace. Good for removing rounded off bolts or screw heads when someone before me used the wrong tool.
Thank you for the list, Andrew! I will begin to acquire these. For me, a drill beats an impact driver because I can feather the drill far better than the impact driver. I will keep working on my technique. Certainly it is much easier, faster changing bits on the impact driver. Have a great week and safe travels!