By Dustin Simpson
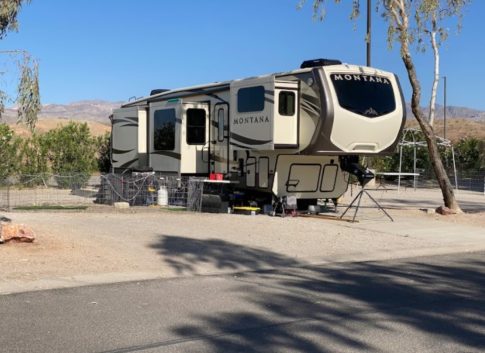
Join me in the video below as I explain how to use a slide-out lock made by American Technology. These locks are typically used to secure a slide in a fixed position. It’s a mechanism designed to prevent the sliding portion of an RV from moving, providing an additional level of stability.
Having one of these locks will maintain the integrity of the external water and dust seal so travelers will arrive at their destination knowing that their RV will be clean and dry.
Slide out locks come in three standard sizes that easily adjust:
If you have a specific slide-out lock from American Technology that you’d like more information about, I recommend referring to the manufacturer’s documentation or contacting their customer support for detailed instructions and guidance on how to use the lock effectively and safely.
According to MJ and Izzy of Endless RVing, a whopping 70% of RV owners regret their purchases. Yowza, that is a lot of unhappy travelers!
The couple has learned from their own experiences buying RVs and from countless conversations with other RVers. In the video below, they break down some of the biggest reasons why people regret buying an RV, and what you can do to prevent RV buyer’s remorse. They’ve made mistakes in the past and don’t want you to repeat them.
Izzy and MJ know firsthand what it’s like to jump into an RV purchase without fully understanding their needs. They excitedly bought their first RV, however, they quickly realized that it wasn’t the right fit for their lifestyle.
Think about what type of RV travel you plan to do. Are you planning to be a full-timer, a weekend warrior, or something in between? Do you want to go off-grid, or do you prefer the amenities of a campground?
The couple says it’s important to be selfish. I learned this mistake the hard way, myself.
It’s tempting to buy an RV that can accommodate all your friends and family, but resist the urge. Buy for your needs, not for the occasional guest. I did this, but honestly, on-the-road guests are so rare that I would have done better with another floor plan.
Towable considerations
If you’re considering a towable RV, make sure your truck can handle it. Is your truck capable of towing the weight? Can it handle long distances? Towables also have some inherent inconveniences. It’s harder to use the bathroom while traveling, and setup time can be longer.
The real price tag: Beyond the sticker shock
The sticker price of an RV is just the beginning. There are many other costs to consider, and they can add up quickly.
Think about all the hidden costs of RV ownership:
Fuel
Insurance
Maintenance
Campground fees
Storage
Transportation
For example, if you buy a destination trailer, you’ll need to factor in the cost of seasonal campground fees, storage, and transportation. As a general rule, Izzy and MJ say you should budget an extra 10-20% of the RV’s purchase price to cover these additional costs.
Here are additional reasons many RVers regret their expensive RV purchases:
• Separating fact from fiction: Salespeople can sometimes exaggerate the capabilities of an RV. It’s essential to do your own research and not believe everything you hear.
• Solar power deception: Many people want solar power so they can go off-grid. However, solar power has limitations. Do your research on RV forums to get real-world experiences from other RVers.
• The long game: Think about how your needs might change in the future. Izzy and MJ’s son used to love camping in the RV. Now that he’s in college, he doesn’t come as often. They’re planning for their next RV to have recliners instead of bunks. If you are planning to add to your family in the future, you might want to consider an RV that can accommodate that growth.
• The $700,000 wind noise: Izzy and MJ test-drove a motorhome that cost more than $700,000. There was excessive wind noise coming from the passenger door. When they asked the factory rep about it, he simply said it needed to be adjusted. That’s not acceptable for a motorhome in that price range!
• Financial reality check: RV loans can be for long terms. What will your life look like in 10, 15, or 20 years? It’s important to consider the financial implications of a long-term RV loan.
Don’t skip the checkup: The importance of RV inspections
Even new RVs can have problems. RVs are built by humans, and mistakes happen. A thorough RV inspection can identify issues before you take delivery. It’s important to choose an inspector who is unbiased, knowledgeable, and working in your best interest.
Choose an inspector with:
Qualifications
Certifications from manufacturers
Certifications from component makers
Even if your RV has a warranty, it’s best to have any issues fixed before you take delivery. Once you take possession, you might go to the back of the service line at the dealership.
Kick the tires (and drive it around the block)
Izzy and MJ didn’t test drive their current motorhome, “Nelly,” before they bought it. They got lucky, but they won’t make that mistake again. A reputable dealer will allow serious buyers to test drive a motorhome.
Remember the $700,000 motorhome with the wind noise? A test drive would have revealed that issue. A test drive can reveal a lot about an RV:
Wind noise
Handling
Overall feel
Do you know of other RV buying mistakes? Be sure to share in the comments below so that we can all learn from each other.
There are a number of posts on various RV websites with the question of whether or not you should carry a spare tire in your RV. This is not a “technical” issue, but one that has several questions you need to consider. Those are: (1) your physical capabilities; (2) your knowledge; (3) the space availability in or on your RV; and (4) your finances.
Basically for Class C, Class B and towables with 14″, 15″ and 16″ tires, most of us can probably do the job if we have the required tools and the basic knowledge of how to change a tire. If you have never changed a tire or do not have the required jack or lug wrench or socket and bar, then you probably will need to plan on calling for “road service.”
Road service
There are a number of programs you can pay for so all you need to do is call for road service and pay the fees. The costs should be identified when you contact road service insurance companies, so you can plan accordingly. If you have a Class A with 19.5 or 22.5 size tires, then road service is the most likely option. Remember, a mounted Class A tire can weigh more than 200 lbs.
If you feel you are physically capable of changing a 14″ through 16″ tire for a trailer through Class C, then we are back to the question of having the required tools and experience. I would suggest that you test yourself while at home and with a knowledgeable person observing for safety reasons. You need to confirm you can do the job with the tools you normally carry.
Issues to consider regarding changing a tire
There are a number of issues you need to consider, so do not attempt this job if you have not changed a tire in the last few years. Be sure you know the proper location for the jack under the RV. Do you have chocks to keep the RV from moving while you are replacing the wheel & tire? Do you have the strength and tools to generate the 75 to 200+ foot-pounds of torque to loosen and tighten the lug nuts? Are you strong enough to get the spare tire from its storage position to the ground? Can you reattach the flat tire back into the storage location? Do you know how tight the lug nuts need to be after you change the tire?
Where to carry a spare tire
Regarding carrying the spare, not all RVs have a good place to store a mounted spare tire. Is it hanging under the RV, or is it in an inside a storage location? If inside, can you lift the mounted tire and wheel back into the RV? If it is hung under the RV, when was the last time you confirmed the “crank” still worked? I have seen the driver of a small Class C-type vehicle discover that the crank that held the spare tire under the RV was rusted tight and would not turn.
Here is an old video (when my blog ended with .com not the current .net) regarding RV spare tires:
There are other details to consider. I will post more next week.
Roger Marble
*****
If you have tire questions, check out Roger’s Blog as well as his posts on RVtravel.com. There are hundreds of posts covering everything to do with tires.
If you still have a question for Roger after searching the above posts, send your inquiries to him using the form below.
Every RV owner needs a tool bugout bag. You need a small, simple bag of tools that will fix the most common annoyances and help you perform routine maintenance.
As a mobile RV service technician, I carry everything from a miter saw to an air compressor. But 75% of what I use fits in a 19” tool bag. Today, I’m giving you a sneak peek into my hardware kit and the screwdrivers, sockets, and driver bits I use to do my job—and hopefully help you do yours!
RV tool bag recommended: Screwdriver and impact driver bits
Essential
#2 Phillips (not Pozidriv or Frearson, which look similar)
#2 Robertson (Square)
T25 Torx (Star) 3.5mm and 5.5mm slotted/flathead
Optional
#1 and #3 Phillips
#1 Robertson (Square)
#2 and #3 Double-Square bits
#20, #30, #35 Torx
You’ll find Phillips #2 and Square #2 screws all over your RV. Many screws for RVs have a “quad-drive” pan head, which is suitable for either #2 square or #2 Phillips. I use square whenever possible since the screw won’t fall off the bit as easily. Just be careful! It’s easier to over-torque with a square bit.
Slotted screws are still used in electrical equipment such as controllers, thermostats, and circuit boards. The 3.5mm screwdriver works miracles here; the 5.5mm screwdriver also doubles as a small pry bar for loosening trim.
Speaking of trim, if your interior trim and fascia boards were installed with trim screws instead of brad (18GA) or pin (21/23GA) nails, then anything goes! Could be #1 Phillips, #1 Square, even T15 Torx … you just don’t know!
Personally, I don’t purchase regular screwdrivers unless they’re 1000V insulated electrician’s screwdrivers. I have a set of Wiha electrician’s screwdrivers that I reach for when working on breaker boxes and control boxes, even when the power is ostensibly “off.” Safety first!
I also carry a 6-in-1 “stubby” ratcheting screwdriver with quick release for those tight places where a regular screwdriver just won’t fit (looking at you, toilet valves!). It works great with 1” and 2” impact-rated driver bits.
But, to be honest, I reach for my impact driver first and my screwdrivers second. Impact drivers make quick work of things, and as long as you know how to feather the trigger, you can safely use them without over-torquing a screw. If you prefer a conventional drill, be careful, since the rotation from high torque can easily crack your wrist!
I also use locking 2”, 4”, and 6” extensions when necessary. Those will get you into 90% of where you need to be. Because I’m a technician, I also carry flexible extensions and several right-angle drill attachments for the other odd cases where access is otherwise almost impossible.
As you’ve probably noticed, not much on your RV is metric. Almost everything is SAE.
If you start working on your RV chassis or frame, you’ll notice a lot more hex-head fasteners, so come prepared with a full set of SAE nut drivers or sockets. Magnetic ones are the best!
The 3/4” socket has a special place on this list (and in my heart). It’s the fastest, easiest tool for raising and lowering scissor stabilizing jacks. Once you use it, you’ll never go back.
Most of your RV’s electromechanical systems—leveling, slide-outs, etc.—have a manual override. Usually, this requires you to rotate a shaft manually. You’ll need a 1/4” hex bit or appropriately sized socket with a ratchet or driver. In some cases, you’ll still need a slotted crank handle. Awning motor overrides commonly require a 7/16” socket.
Allen heads pop up in random places, like set screws. You usually need the individual long-handled L-shaped keys, not the Swiss Army knife-esque foldable sets; they won’t fit.
The 7/8” and 15/16” sockets are often used when removing a water heater drain plug, while the 1-1/16” shallow socket is the most common size for removing an anode rod, and the 1-1/2” shallow socket is the most common size for removing a water heater electric element. You can either use a 6-point socket or an anode rod/heating element removal tool; 8-point sockets tend to round off, especially when the anode rod hasn’t been inspected recently (shame on you!).
The 13/16” and 15/16” wrenches are used when working with 3/8” and 1/2” flare nuts, which are standard on propane lines. You can use regular straight-sided wrenches or flare/line wrenches. Don’t break into your propane system without knowing what you’re doing, however! Propane is combustible and explosive, and you can kill yourself.
If you’re really tight on storage space, you can use an adjustable crescent wrench rather than purchasing multiple sizes. But avoid using vice grips or tongue n’ groove pliers on nuts or bolts. They will damage the metal and can easily round the corners of hex heads.
If you want to work on hydraulic leveling systems, slide-out mechanisms, and other big-boy/big-girl systems, then this list is just the tip of the iceberg. Trying to work on an Accu-Slide cable-driven slide-out without ratcheting SAE wrenches is an absolute nightmare, for instance.
An RV technician’s handy tips for DIY maintenance
Most steel bits can be made magnetic with a simple $5 magnetizer. Worth its weight in gold!
Most screws for RVs have a #8 diameter. If the original hole wallows or strips out, you can often replace the screw with a slightly larger size, like #10.
If you have any pesky screws that habitually vibrate out of their placement, try bedding them in non-sag caulk. There’s no need to use superglue, JB Weld, or anything so strong—just a little bit of non-sag sealant will do the trick.
Many RV interior screws have painted pan heads. Black or white is most common. You can find these online by searching “RV screws.” If you don’t care about the black or white head, you can find comparable regular or stainless steel screws with #2 Square pan head at many industrial hardware stores.
Fascia and trim are often installed with 23-gauge pin nails or 18-gauge brad nails. The latter is difficult to install by hand; the former is impossible. If you don’t own a nail gun, you can use regular trim nails with a smooth-faced hammer, or you can replace the nails with trim-head GRK FIN screws, which I adore.
It’s not uncommon for the heads of hex-head sheet metal screws to break off when you’re screwing into the steel chassis frame. You can reduce the friction (and therefore torque) by using some kind of lubricant on the threads, like anti-seize, cutting fluid, or even WD-40 in a pinch.
A parting thought
This isn’t an exhaustive list of RV tools, of course. I have an entire van full of tools! Sometimes I need a crow’s foot flare wrench, a precision slotted screwdriver, an NPT thread chaser, or a strap wrench. But those instances are rare for DIY work.
Please be careful out there. Don’t get shocked, sliced, or burned. Oh, and don’t forget the headlamp. You’ll need it!
“The function of journalism is, primarily, to uncover vital new information in the public interest and to put that information in a context so that we can use it to improve the human condition.” —Joshua Oppenheimer
Need an excuse to celebrate? Today is National Goof Off Day! Woohoo!
On this day in history: 1963 – The Beatles release their debut album, “Please Please Me”.
The latest news for RVers
Camping World is under fire after a South Carolina TV station exposed complaints about its North Charleston dealership. The report highlights the experiences of several customers, including a senior citizen sold a moldy RV and a young couple whose dream of full-time RV living was ruined by constant defects. With multiple lawsuits and an “F” rating from the Better Business Bureau, Camping World’s practices are raising red flags. Click through to read the story.
A federal judge ruled the National Park Service must reinstate 1,000 employees fired earlier this year, but park management has told superintendents to hold off on contacting them. As parks brace for a busy visitor season, delays in rehires could mean more cuts to hours and services. Will these workers return in time to make a difference? Click to read the full story.
Steve Hubbard via BBC.
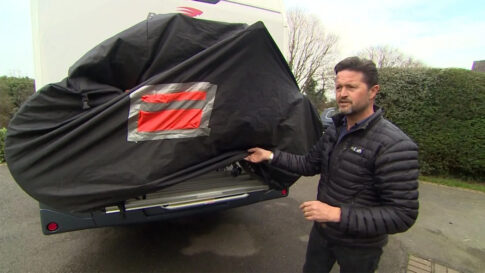
Imagine parking your RV after a vacation, unzipping the bike rack cover, and finding someone hiding inside. That’s exactly what happened to a British couple after their trip to France—but instead of praise for reporting the stowaway, they were hit with a massive fine. How did this happen, and could it happen to you? Click to uncover this crazy story.
Let’s clear the air about some significant changes happening at Thor Industries that have caused confusion and sparked rumors. The big news is that Heartland RV is being reassigned within Thor’s organizational structure. It’s moving under the umbrella of the Jayco family of RVs. Previously, Heartland operated as its own branch of Thor. Continue reading to learn more.
Pilot/Flying J unveiled its first B99 biodiesel station for commercial fleets in Decatur, Illinois, marking a big step toward sustainable fuel options. While primarily aimed at trucking fleets, RVers can also take advantage of this cleaner, low-carbon fuel—provided their rigs are equipped for the rapid-fill pump. With two more locations opening soon, could biodiesel be in your RV’s future?
From slowing down big rigs in New Mexico to raising speed limits in North Dakota, speed rules are a hot topic. Across the U.S., lawmakers are debating changes, with potential impacts for commercial trucks, RVers, and everyday drivers. While some aim to reduce accidents with split-speed limits, others propose higher speeds on interstates. Curious how these changes might affect your next road trip? Click to learn more about the latest developments.
Campground crowding, comments & concerns You tell us: What’s the difference between campgrounds, RV parks and RV resorts?
This week, Nanci Dixon relates more of our readers’ complaints about the lack of maintenance and upkeep on RV parks with full-time residents, and the disappointment of first-time snowbirders in Florida and what they found in an RV resort. An RVer has learned the hard way to not pay full price when making reservations. And a longtime boondocker says even some boondocking spots are getting crowded. Read more.
FUN NEWS: Several dozen people gathered Saturday at an apartment complex along the South Carolina coast to remember a longtime resident who died the day before — an alligator named Walter who sunned beside a pond on the property for more than a decade.
More RVing news
Last month, we reported that the authorities shut down camping reservations in some of Yosemite National Park’s most popular campgrounds. With spring travel season upon us, the California park has announced Yosemite reservations are available and some of them are being released this week. Learn more and book your spot!
Speaking of Yosemite… Your plans may need a reroute if you’re coming in to the national park from the Merced, California, area. A landslide near Yosemite has shut down a major access route—indefinitely. Here are the details.
And now, speaking of closed roads… If you’re planning your next adventure to Washington’s Olympic National Park, there’s some exciting—and unprecedented—news to share. The much-loved Hoh Rain Forest is set to reopen after significant road repairs. The repairs will come thanks to a mix of state funds, community efforts, and an unexpected lottery twist. What a great story!
Camping World raised a massive 3,200-square-foot American flag in Greenville, North Carolina—without city approval. When the council voted against allowing the oversized display, CEO Marcus Lemonis refused to lower it, leading to daily fines… and they’re adding up quick. How long will this go on?
A public meeting in Oregon was canceled because the U.S. Army Corps of Engineers couldn’t pay for the venue due to a freeze on government credit cards. The meeting was part of a series to discuss the 2025 Master Plan for the Cottage Grove and Dorena reservoirs. While other meetings are still scheduled, the cancellation raises concerns about public access to government decisions.
FUN NEWS: Serial Guinness World Record-breaker David Rush may have created a new title category by juggling in all 63 U.S. national parks. Rush, who holds the most concurrent Guinness World Records, visited all 63 U.S. national parks with his family over the course of five years, and at each park he took some time to film himself juggling.
?? MYSTERY PRODUCT OF THE DAY ?? What do bread and your butt have in common? Think… think… You’ll never, ever guess. But when you see this, you’ll understand. Bread can save your butt!
Latest fuel prices
The latest U.S. average prices per gallon of gasoline and diesel fuel as of March 17, 2025: Regular unleaded gasoline: $3.06
Change from week before: Down 1 cent; Change from year before: Down 40 cents. Diesel: $3.55
Change from week before: Down 3 cents; Change from year before: Down 48 cents.
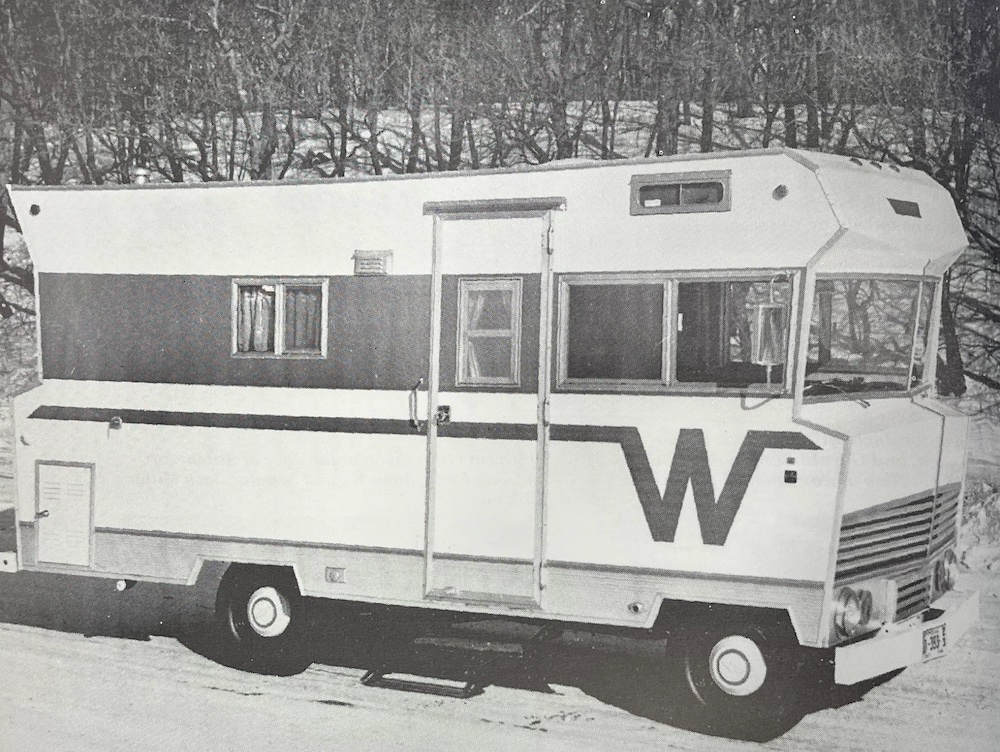
In 1966, less than 10 years after the rise and success of Winnebago’s travel trailers, Winnebago began production of its first self-contained motorhome, a 19-footer called the F-19. It was built on a Ford chassis, then in late 1966, the famous D22 was built on a Dodge chassis for the 1967 model year. By the way, the company’s name was changed from Modernistic Industries to Winnebago Industries in 1961 by founder John K. Hanson, who named it for the county in Iowa where it was located. In 1969, the Winnebago Chieftain motorhome debuted. Among its many standard features was a built-in vacuum cleaner.
Upcoming RV shows & seminars
Phoenix RV Supershow, March 21-23, Avondale, AZ
**Seminars by RVtravel.com’s Dave Solberg
Las Vegas RV Show, March 28-30, Las Vegas, NV
Colorado Springs RV Show, April 3-5, Colorado Springs, CO
Washington State Evergreen Spring RV Show, April 4-6, Monroe, WA
Vacationland RV & Camping Show, April 5-6, Auburn, ME
For more upcoming RV shows and seminars, click here.
OFF-SEASON DESTINATION SPOTLIGHT: Visit Iceland in the spring for fewer crowds, slightly warmer weather, and a chance to see puffins returning to nest along the cliffs in April and May. RV rentals are widely available.
Trivia
There were an estimated 10,000 grizzly bears in California in 1850, and less than 75 years later, there were none.
The perfect scam Dream Kitchen Renovation Ruined by a Scam
Suzi and Gary retire to Tucson and find the perfect house with a less-than-perfect kitchen. They love to cook and entertain, so they put their energy and money into renovating their dream kitchen. Construction starts and is going smoothly until the payment for cabinets is due. The designer requests immediate payment by wire transfer, but a week later they discover that the designer never received the payment. Suzi and Gary discover that they are the victims of a BEC (business email compromise) scam.
RANDOM RV THOUGHT: Don’t speed when driving. Slow down. Use the right lane when possible. Lowering your speed five or ten miles per hour won’t delay your arrival time by much, and you’ll save fuel and be safer. What’s the hurry?
Laugh of the week
Thanks for sending, Howard S.!
Today in history
Today’s weather forecast across the nation THIS MAP UPDATES TWICE A DAY
When you choose a campsite online to book (or however you book your sites), do you usually try and book a pull-through campsite or a back-in? Do you have a strong preference either way?
Of course, we’re sure it depends on what kind of RV you have and how easy it is to maneuver, but perhaps there are other reasons, too. Back-in campsites may give you more privacy (sometimes), but pull-through sites may be larger (again, sometimes).
Pull-through sites are often the go-to choice for RVers with larger rigs or those towing additional vehicles. They eliminate the hassle of backing up entirely, saving both time and the potential frustration of trying to position your RV perfectly. They’re also a favorite for those who prefer quick and easy setups, especially for short stays where convenience is key.
On the other hand, back-in sites often appeal to those who value a more traditional camping experience. These sites are sometimes tucked away in quieter corners of the campground, offering more shade or a sense of seclusion. Backing in might take a little extra effort, but many RVers feel the trade-off is worth it for a more peaceful stay.
Another consideration is the layout of the campground itself. Pull-through sites are frequently positioned along the main roads, making them more exposed to passing traffic and noise. Back-in sites, while trickier to access, are often part of loops or quieter sections of the campground, where you’re more likely to feel immersed in nature. For some, that added serenity can make all the difference.
Oh, yes… Back-in sites are usually less expensive than pull-throughs.
After you respond, please tell us why you answered the way you did. We’d like to hear. Thank you!”
RV sales have slowed and fewer people are buying RVs. Has that changed campgrounds? Is it easier to find a campsite now, particularly in state and national parks?
Campgrounds are changing and evolving, some for the better and some for the worse. RV Travel readers discuss their experiences and offer tips to help other campers find that perfect spot.
Here are a few observations from our readers. These do not necessarily represent the views of RVtravel.com.
Stay at an RV resort in Florida or winter up north?
Cheryl B. was disappointed in the RV resort they stayed at and wrote, “We are snowbirders for the first time and made the trip to Florida. We are used to campgrounds, so RV parks are new to us. In order to go as far south as we could afford, we ended up in an ‘RV resort’. It was not a parking lot for RV’s, which was good. However, a good portion of the residents were full-time or long-term (meaning that the RV was there year-round).
“I’m not sure what I expected, but I did think that people were there only for snowbirding season and would be different each year. Don’t get me wrong, it was nice… but not private, and it was ‘busier’ than we wanted or expected. However, given the option of staying at an RV resort in Florida in the winter or staying up north… I’ll go back to an RV resort.”
Editor’s note: If you had to define campground, RV park, and RV resort, what would you say? Are they all the same? All different? How so? Please leave a comment and define all three. Thank you!
Campgrounds that don’t allow dogs?
Tim and Donna R. suggest a poll about campgrounds that don’t allow dogs. They write, “You had a poll asking if campers preferred campgrounds without children. Why not have a poll to see if campers prefer campgrounds that don’t allow dogs? One county campground in the Tampa area has a separate area for campers with dogs. We love that (even though a few campers still sneak their dog in—super inconsiderate!).”
Even boondocking is getting more crowded
Ken B. is a longtime boondocker and sees even those areas getting crowded. He writes, “For the last decade I have gone boondocking two to three months straight through. But each year it has become more crowded and restricted. I have camped all my life but it doesn’t work out there anymore. Heartbreaking.”
Shoddy, rundown parks
Lonnie S. is not a snob but doesn’t like the rundown sites (who does?). He writes, “My pet peeve is the shoddy, rundown permanent dwellers in parks. I don’t live among such stick-and-brick homes and am not a snob. But parks should keep the sites clean and uncluttered.”
Changing plans on the fly due to weather; no longer going to pay in full when reserving
Denise W. writes about no refunds even when there are weather issues. “This year, with the strange weather, we have had to change plans on the fly in order to avoid being stuck. I have, as in the past, planned the full two months of travel many months in advance and paid in full for all reservations. This year, I got burned several times because there were several parks that would not refund a penny. I didn’t expect to get a full refund but got dinged a night or so in charges. That is not the case this year. I will be crossing them off my list for next year and will no longer pay in full when I reserve.”
Lake/mountain/glacier/seashore cabin on wheels
Mike M. is an RV traveler with his cabin on wheels. He writes, “Just finished planning two trips. One from PA to Mount Rushmore and back to PA in June, the second from PA to St. George, UT, and back to PA with no problems getting campsites we requested. Bear in mind, we are travelers, not campers, and seldom stay more than three days at any location. Our success is planning ahead and being flexible. Our 21′ travel trailer is our lake/mountain/glacier/seashore cabin on wheels.”
Summer trip plans to Alaska
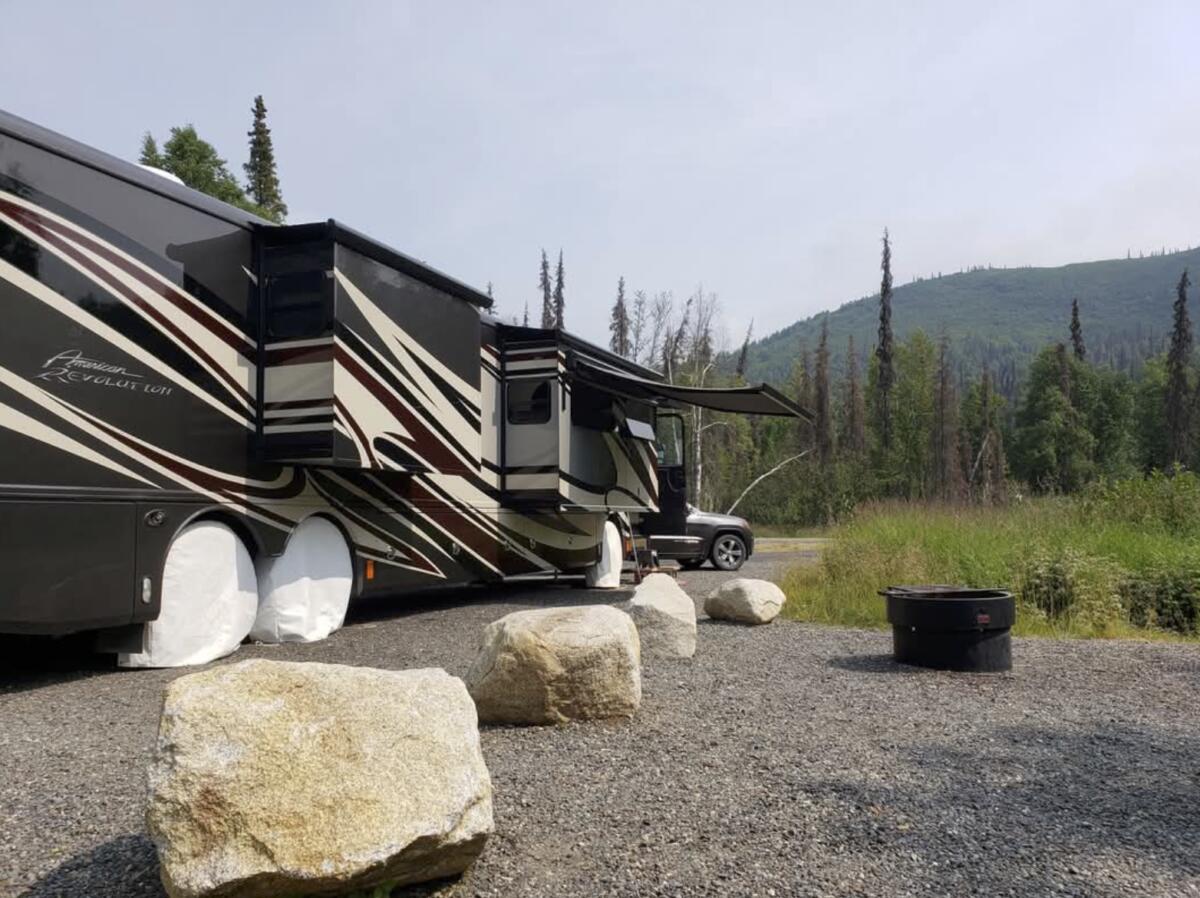
Neal D. shares some of his summer plans for Alaska. “We are beginning to plan a summer trip to Alaska. Have booked a week at an Alaska state park—K’esugi Ken—near Denali, which we loved during our 2019 trip. Also booked five nights that include the Independence Day holiday in Seward. Working on reservations for the U.S. outbound and return parts of the trip. Looking at campgrounds along the Cassiar Highway next, given how few there are. Preordered the 2025 Milepost, but working off the 2024 edition until it arrives, probably in April. Photo is our K’esugi Ken campsite in July 2019.”
Photo credit: Neal D.
Now, some questions for you:
Are you finding campgrounds booked up or is finding a site not a problem?
What are your summer RVing plans?
What do you like best about RVing?
What are your pet peeves?
Are you seeing more permanent and seasonal RV parks?
Are rising costs affecting your camping style?
Do you have favorite campgrounds or RV parks?
What is the most memorable experience you have had RVing?
Do you have any tips or secrets you’d like to share?
Please use the form below to answer one or more of these questions, or tell us what you’ve experienced with campground crowding in general.
“When patterns are broken, new worlds emerge.”—Tuli Kupferberg
Need an excuse to celebrate? Today is National French Bread Day!
On this day in history: 1952 – Alan Freed presents the Moondog Coronation Ball, the first rock and roll concert, in Cleveland, Ohio.
Tip of the day The ABCs of full-time RV living
By Nanci Dixon
We used to be full-time RVers, living our dream. We belonged to that ever-growing group of adventurous people who have sold their sticks-and-bricks houses, gotten rid of almost all their belongings, and left friends and family behind to live the dream of RV living full-time.
A full-time RVer has stopped vacationing in an RV and begun calling it home. Full-time RV living is taking all of the fun and excitement of an RV vacation and combining it with the everyday chores and sometimes mundane aspects of daily living. Continue reading this very in-depth look at full-time RVing.
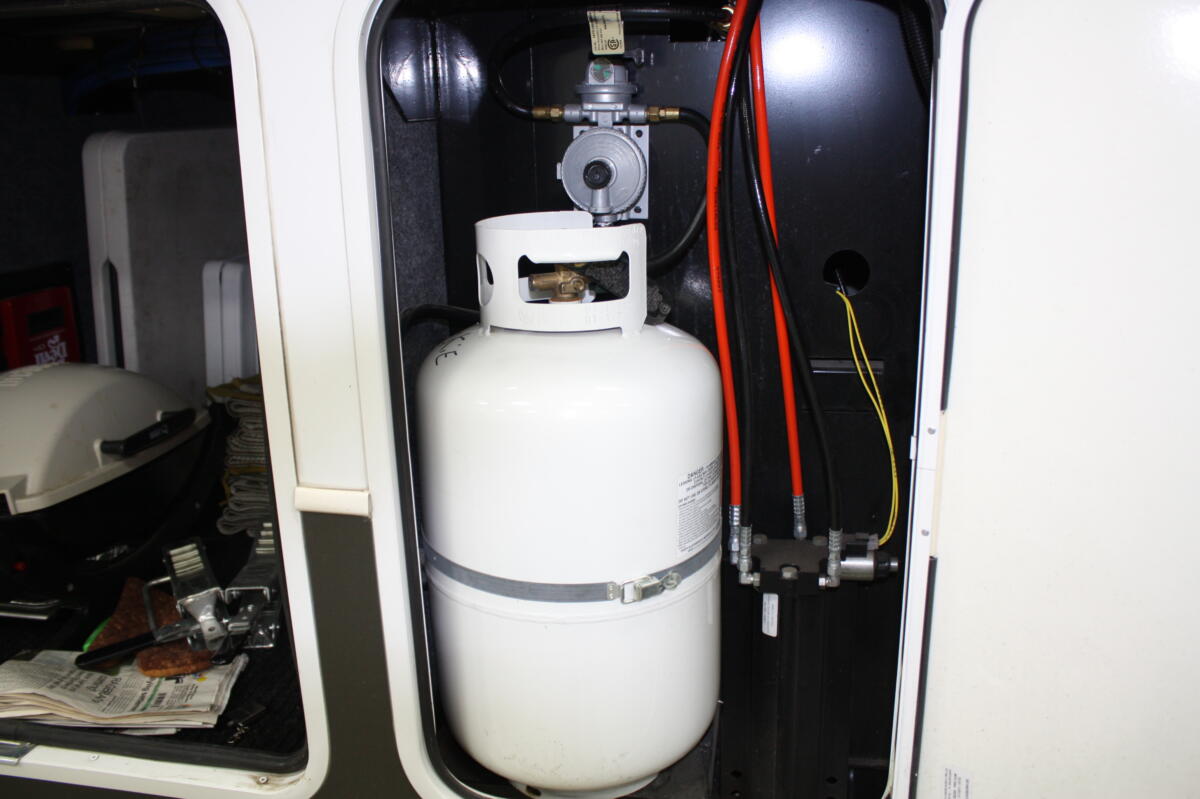
Ask Dave One of my RV’s two-stage LP regulators hums. Is this a safety issue?
By Dave Solberg Dear Dave,
My propane’s 1st stage valve is humming. It’s a 7-lb. bottle, and the humming begins at 2 lbs. and continues to zero. The tank and 1st stage (hummer) is at the farthest distance (opposing side) from the other bottle and the main 2nd stage selector valve. Question: Why does humming occur at low quantity only, and only on the distant side? —Ron, 2021 Reflection 150 Series Read Dave’s answer.
If you’re in the Phoenix area, be sure to attend some of Dave’s great seminars at the Phoenix RV Supershow today through Sunday, March 23. You’ll definitely be educated and entertained!
In the RV shop with Dustin RV roof inspection after bad tree damage
By Dustin Simpson
Join us on an exciting RV roof inspection adventure as we uncover unexpected tree damage on a 2021 Grand Design Reflection. Read our recommendations for a full roof replacement or the option to patch up the damage. Click here to read and watch the video.
Video of the day RV inspector shares her oddest inspection to date
By Cheri Sicard
In the video below, Deb, a certified RV inspector from Deb’s RV Services, shares her oddest RV inspection to date. Imagine buying a brand-new RV, ready to hit the road, only to discover a major issue before you even leave the dealership. That’s exactly what happened to one of Deb’s clients during a pre-purchase inspection of a 2025 Coachmen Nova 20D. This story highlights why getting an RV inspectionbefore you buy is super important.
RANDOM RV THOUGHT:To help keep your RV fridge cold when you are traveling without having it turned on, place two or three frozen ice packs inside before departing. When you arrive and turn your refrigerator back on, place the ice packs back in the freezer compartment to freeze for your next journey.
Featured article How EVP systems work and why RVers should care about them
By Gail Marsh
You may think you’ve memorized the alphabet soup of important initials connected to RVing. You know all about FHU (full hookups), GVW (gross vehicle weight), and so much more. How about EVP? Huh? Whoa! Back that big rig up! I’d never heard about this set of letters and I wondered, “What are EVP systems and why should RVers care about them?” Find out here.
That 7-way connector on your travel trailer or fifth wheel is a critical component. When not plugged into your tow rig, the thing is susceptible to the onslaught of dirt, rain and even bugs. Here’s a plug cover that slips right over your precious plug and keeps out the crud. One user on Amazon says, “This works perfectly to keep the plug on my RV clear. Rather than attaching it to my plug, I remove it when not in use and place it in my ‘RV emergency tool kit.’ This way, it’s not knocked around when driving.” At about $7, the GR Innovations 7-way plug cover may just be some of the cheapest “insurance” you can buy for your plug. Find it here.
Stops to Make Along the Civil Rights Trail
RVing along the Civil Rights Trail should be high on your list of trips to take. It’s not too late to add this to your 2025 travel plans.
? MYSTERY PRODUCT OF THE DAY ? Want someone to be attracted to you? Like, reallllllly attracted to you? Well, we’ve discovered the secret of how to make that possible. See it here.
Recipes of the day Bright and fresh spring recipes to savor the season
Spring is finally here, and with the new season comes new recipes, flavors and fresh produce. These spring recipes are light, fresh, and of course delicious. Check them out and make yourself a wonderful spring meal this weekend.
Trivia
The tradition of Girl Scout cookie sales dates back to 1917, when a Muskogee, OK, troop, the Mistletoe Troop, began selling sugar cookies in their high school cafeteria as a service project. Want to try out the original recipe? Find it here.
Readers’ pet of the day
“A full-time RVer since she was a puppy, Valerie (Poodle, 4 years old) operates on the saying, ‘Have ball, will travel.'” —Darla Van Alphen
Send us a photo of your pet with a short description. No blurry photos and please do not submit your photo more than once. Thanks!
If you shop at Amazon.com we’d appreciate you using this link. We get an itty bitty commission if you buy something, but they add up and help us pay our bills (most importantly our hard-working writers!).
Dear Dave,
My propane’s 1st stage valve is humming. It’s a 7-lb. bottle, and the humming begins at 2 lbs. and continues to zero. The tank and 1st stage (hummer) is at the farthest distance (opposing side) from the other bottle and the main 2nd stage selector valve. Question: Why does humming occur at low quantity only, and only on the distant side? —Ron, 2021 Reflection 150 Series
Dear Ron,
My first thought was that it hums because it doesn’t know the words. (Sorry.)
LP cylinders in the Reflection 150 Series
According to everything I can find on a Reflection 150 Series, your RV is a 5th wheel model. It typically would have two 30-lb. LP cylinders, one on each side. This translates to 7 gallons in each cylinder.
DOT propane cylinder
It has a two-stage regulator which helps provide a constant pressure of 11” of water column for the numerous LP appliances you have in your 5th wheel. These would include the furnace, stove top, water heater, and other appliances.
Both regulators have a rubber diaphragm that moves up and down to regulate the pressure. This can cause a humming or buzzing, especially when the cylinder gets low. This does not indicate a defective regulator—unless there are other performance issues or leaks.
Next thing to check
However, if all LP appliances are working properly and you have verified there are no leaks, the next step would be to verify if it is the regulator or the tank. There is an overfill protection device (OPD) in the cylinder, an excess flow valve in the POL connection (named after Presto-O-Lite, the oldest of these valves), and then the regulator. Swap the cylinders to verify it is the regulator and not the cylinder.
Liquid propane (LP) is a byproduct of natural gas and crude oil refining, and will have a small amount of oil in the product. Residential systems have a drip leg to catch the oil; however, RVs do not. I have talked with a few owners that did have one added. However, it typically is not an issue unless the appliances are not working properly. I have witnessed several regulators that have been removed and had excessive oil and moisture.
Typically not a safety issue
Again, the humming is typically not a safety issue, although it can certainly be an annoyance due to the sound. If that is the case, I would suggest having a qualified technician inspect the regulator. Typically it is less expensive to replace it with a new one rather than pay for the labor at $200/hour to try and clean it.
You might also enjoy this from Dave
Is there a ‘back seat’ on propane valve? Should it be fully open?
Dear Dave,
Is there a “back seat” on propane valves on our tanks, like the valve on an oxygen cylinder? Should the valve be opened ALL the way, or just enough to provide enough gas to flow for your needs? —Stormy, 2014 Forest River Wildwood
By Nanci Dixon
We used to be full-time RVers, living our dream. We belonged to that ever-growing group of adventurous people who have sold their sticks-and-bricks houses, gotten rid of almost all their belongings, and left friends and family behind to live the dream of RV living full-time.
What is full-time RV living?
A full-time RVer has stopped vacationing in an RV and begun calling it home. Full-time RV living is taking all of the fun and excitement of an RV vacation and combining it with the everyday chores and sometimes mundane aspects of daily living. Until recently, we were living in an RV full-time and living our dream, traveling this amazing country, but our lives were still filled with “to-do” lists and everyday chores.
Living in an RV full-time: Haven’t made up your mind yet?
Full-time RV living is certainly a big decision. It is not one to make without careful, informed consideration. There are a lot of things to think about, questions to ask and explore before taking the plunge:
If in a relationship or married, are both equally excited by the idea? If not, it is important to talk it through and set up some parameters both can agree to. Perhaps it is taking a test run for a few months and then deciding. It may be that one person is okay with a trial period but doesn’t want to change anything on the homefront yet.
What is your risk tolerance? There is a certain amount of risk involved in any major change. Illness, money, accidents are all amplified when living in an RV full-time.
What is your capacity for change? The first big change is changing everything, and the next one, particularly if traveling, is changing places, people and climates often.
Try it out. Try living in an RV full-time for six months without making any major changes at home. That will help you determine if it is right for you.
Can you afford it? Make a realistic budget ahead of time. Living full-time in an RV is not necessarily cheaper than living in a house or apartment. Things break down, gas prices are high and campsites can run as much per day as an apartment.
Full-time RVing costs and expenses
Figuring out a rough budget will help determine the next steps. Balancing costs against financial resources will determine what is essential and what is nice to have. There is not a set amount for full-time RVing costs. Each circumstance is different. Do your research for your specific state, vehicle and needs. These are the general costs to consider.
RV purchase
This is obviously the biggest investment. If towing an RV, you will need a vehicle to pull it. If you’ll be in a motorhome, you may want a tow car to give more flexibility when you arrive at your destination. Connecting and disconnecting an RV just to go to the grocery store gets old really quickly. Factor in interest payments, or long-term rental costs if not buying.
Campsites
Campsites can range from $20 to more than $100 a night depending on the type of campsite or RV park. State, county and city parks are usually the cheapest but with limited hookups. RV resort camping is the highest.
Monthly RV park rental can be substantially less costly for the full-time RVer than are nightly rates, but they will usually charge separately for electricity. Work camping will reduce or eliminate campsite costs, while boondocking or dry camping is usually no cost but have no hookups.
Internet and phones
Staying connected with friends and family or when working remotely is more important than ever. We keep two different cell providers to have service wherever we travel and have invested in Wi-Fi and cell booster systems. If you’ll be working from your RV, you will probably need to invest in equipment that allows access to enough data and bandwidth to work. We have invested more than $2,000 in equipment to keep ourselves connected because RV park Wi-Fi is notoriously slow and sometimes nonexistent.
Maintenance and repairs
Repairs can take a huge chunk of your money. Even in the newest RVs, things can go wrong, very wrong, and it is expensive, particularly when out of warranty. Your tow vehicles, whether towing a trailer or being towed, will need servicing, as well. When living full-time in an RV, maintenance and repairs become a major issue, particularly if you can’t stay in the RV during the repairs.
Equipment
There may well be equipment you want to add to your RV. Things like satellite dishes, air compressors, tire minders, water filtration systems, antennas and boosters, tow bars or tow dollies all add additional expense. Starlink Roam is a good option and becoming better all the time.
Pets
Costswill be similar, if not higher, for the care of your pets when on the road. They are more prone to accidents while in new, unfamiliar areas, and not having a permanent vet may cause visits to be more expensive.
Food
Costs can be similar to home if you plan to cook most of your meals in the RV. Food costs will be much higher if you decide to enjoy the local cuisine and want to eat out often.
Clothing
Clothing is usually a minimal cost as there is not a lot of closet space and most of your clothing will be casual! Even if working from your RV, you probably won’t need a suit and tie.
Mail service
Will you subscribe to a mail service ($20 – $40 a month) or have someone forward your mail? Either way, there are costs to getting your mail.
Fuel
Fuel costs are still high. Full-time RV living implies that you will be moving, at least part of the time, and it can get expensive. If you want to cut fuel costs, staying in one place for a month or a season will significantly reduce those costs.
Propane
Many RVs heat and cook with propane. Like all fuels, the costs have risen. Because we generally use electric heaters and minimal propane, we can get by on about 80–100 gallons a year when we RV full-time.
Electricity
Most overnight or short-term RV parks don’t charge for electric use. If renting by the week or month, you will generally need to pay a separate charge for individual electric use. That can really add up in hot summer months or if you’ll be heating with electricity. We made a significant investment in solar power that is more than adequate when boondocking.
Vehicle registration
The amount of your vehicle registration and ongoing licensing will depend on the state you decide on for residency. If you’re buying a new or relatively new RV, expect a big chunk of sales tax in whatever state you have residency in.
Vehicle insurance
You will need full-time RV insurance. Check with your agent. Progressive, GEICO, National General are all popular policies when living in an RV full-time. Just like a house, insurance can cover belongings in the event of a catastrophic loss.
Health insurance
Talk with your health insurance agent. Research is needed to make sure any existing policies will cover different states while traveling.
Recreation and entertainment
Living in an RV full-time provides the opportunity to explore and see new things. There are admission fees, travel fees, and memberships to account for. If your bucket list contains the national parks, buying an annual pass or senior lifetime pass can cut costs.
Storage units
If you just couldn’t get rid of all your stuff, storage units are available for monthly or yearly rental. Storage units can run from $35 to well over $200 a month. Long-term storage can definitely eat into your bankroll. We paid for two years’ storage and realized we could buy the stuff for less than our storage fees. That being said, we did force our kids to hold on to a few things for us.
Establishing a full-time RV budget
When establishing a budget you will need some flexibility – things happen, plans change. A good starting point is to look at the current day-to-day expenses that you will still have when full-timing. As we put most of our expenses on a credit card or are paid online, I could get a rough idea of costs we would still have.
We already owned our house and our RV. It was easy to see that full-time RV living could be equal to or exceed our current monthly expenses. The highest costs would be gas, campsites and potential RV repairs.
I created a rough spreadsheet and easily listed known costs, food, clothing, medical, medications, and subscriptions that we planned to keep.
I then added those items that will be replacing those estimated costs. For example, existing home cable Wi-Fi would be exchanged for increasing data on existing and new cell plans. Cable TV would now be exchanged for Netflix, Hulu, Starlink and/or Amazon Prime video.
Gas was in the unknown category. Fuel costs were going to jump in an RV. How much depended on how much we planned to travel.
Some RVers put aside money every month into an emergency fund to cover repairs, hotels, and airfares if needed.
After several years living in an RV full-time, I had a good idea of costs. When we traveled for the summer and I spent money with abandon, I could count on racking up thousands of dollars a month. When we hunkered down for the winter and work camped, I still spent with abandon and our costs could be less than a thousand dollars a month. The advantage of an RV is that there is only so much room. Something in, something out. By now, we have all the major items purchased and no place for anything else.
By Cheri Sicard
In the video below, Deb, a certified RV inspector from Deb’s RV Services, shares her oddest RV inspection to date. Imagine buying a brand-new RV, ready to hit the road, only to discover a major issue before you even leave the dealership. That’s exactly what happened to one of Deb’s clients during a pre-purchase inspection of a 2025 Coachmen Nova 20D.
This story highlights why getting an RV inspection before you buy is super important.
The unexpected discovery during a pre-purchase RV inspection
The inspection started with a bit of a delay. Deb arrived at the dealership, but the RV wasn’t quite ready. It turned out the tech had to change out the water pump because it was clogged. Red flag number one! After about 20 minutes, the RV was ready, and Deb could start the inspection.
First impressions matter, right? The tires were dated 2024, and the undercarriage looked good. That’s a win! Deb checked the exterior outlets and made sure the GFCI was working correctly. All good so far.
But then, while checking the bug screen on the rear of the RV, Deb noticed a tear. It was a minor issue, but still worth noting in the report so the client could get it replaced. Small tears can let bugs in, and nobody wants that!
Then, Deb moved on to the sink and started a leak test. Turning on the water and checking under the sink, Deb found something unexpected: a wet rag. It looked like a tech had been working under there, maybe fixed a leak, but left the saturated rag behind. Not a huge deal, but not exactly professional either.
Deb removed the rag and double-checked for any other leaks. Thankfully, everything seemed dry. But after turning off the water, Deb noticed something strange with the water pump. Instead of running smoothly to fill the lines and then stopping, it kept glitching and making a weird sound. The unusual sound the water pump was making concerned Deb, so she made note of it in her report.
The inspection wasn’t over yet. Deb found a loose outlet that needed to be tightened. The batteries were also low, likely because the RV hadn’t been connected to shore power or getting a trickle charge from solar panels. Deb noted that the batteries were at 12.3 volts, which is lower than ideal.
It’s worth mentioning that letting lead-acid or AGM batteries drop too low (below 50 percent) can permanently damage them. Hopefully, in this case, fully charging the batteries would solve the problem.
The reveal: What was clogging the water pump?
Now for the really weird part: What was actually clogging the water pump? After finishing the inspection, Deb gave the client a list of everything that needed to be addressed. The client talked to the dealership, and they got a tech to come out and take a look right away. This is key because they hadn’t signed the contract yet. Once you sign the contract and drive off the lot, you’re no longer a priority.
The tech found that the pump was clogged again. But this time, they discovered the source of the problem: insulation-like material in the fresh water tank! The client sent Deb pictures of the filter and the inside of the tank. It looked like pinkish insulation was floating around in the water.
They ended up having to order a whole new tank for the RV. Yes, it delayed the client’s plans, but imagine what would have happened if they hadn’t had the inspection.
This story proves that even brand-new RVs can have significant issues. Don’t assume that just because it’s new, it’s perfect. Dealerships typically do a pre-delivery inspection (PDI), but it’s not the same as a thorough, certified RV inspection. PDIs are often quick walkthroughs to make sure everything is generally working. They don’t always catch the hidden problems that a certified inspector will find.
This experience highlights another important factor in RV inspections: timing. Deb mentioned that many clients want to have an inspection done right before they take the RV home, expecting any issues to be fixed immediately. But that’s not always realistic. Dealerships often need to order parts and schedule repairs, which can take time.
In this case, the client had to stay overnight while waiting for a part to be delivered. If you’re thinking about getting an RV inspection, it’s important to book well in advance—ideally one to two weeks. This gives the inspector enough time to do a thorough job and the dealership enough time to make any necessary repairs before you pick up your RV.
Join us on an exciting RV roof inspection adventure as we uncover unexpected tree damage on a 2021 Grand Design Reflection! Read our recommendations for a full roof replacement or the option to patch up the damage.
The RV roof damage adventure begins
Initial inspection
1. Spotting the damage
We start our inspection by examining the roof for any visible signs of damage. Unexpectedly, we discover significant tree damage that requires immediate attention.
2. Assessing the severity
A close-up examination reveals deep gouges and punctures in the roofing material. Water stains and soft spots indicate potential water infiltration.
Options for repair
1. Full roof replacement
Pros
Provides a brand-new, watertight seal for the entire roof.
Eliminates the risk of hidden or future damage related to the current issue.
Adds to the overall value and longevity of the RV.
Cons
Higher initial cost compared to patching.
Requires more time for completion.
2. Patching the damage
Pros
Lower cost compared to a full replacement.
Quicker turnaround time for the repair.
Cons
May not address underlying issues completely.
Potential for future leaks or damage if not done meticulously.
Step-by-step repair process
1. Preparing for the repair
Step 1: Cleaning the area: Clean the damaged area thoroughly to remove debris and ensure proper adhesion of repair materials.
Step 2: Removing loose material: Cut away any loose or severely damaged roofing material.
Step 2: Installing patch material: Apply a patch made of compatible roofing material over the damaged area. Ensure the patch extends beyond the damage to provide a secure seal.
Step 3: Sealing the edges: Apply additional sealant around the edges of the patch to prevent water infiltration.
3. Full roof replacement (if chosen)
Step 1: Removing old roofing: Strip away the old roofing material down to the substrate.
Step 2: Inspecting the substrate: Check the substrate for any signs of damage or rot and repair as needed.
Step 3: Installing new roofing: Install new roofing material according to manufacturer specifications.
Step 4: Sealing and finishing: Apply sealant to all seams and edges for a watertight finish.
Expert tips for RV roof maintenance
1. Regular inspections
Perform routine inspections of your RV roof, especially after storms or parking under trees.
2. Immediate repairs
Address any signs of damage or wear promptly to prevent further issues.
3. Use quality materials
Invest in high-quality sealants and repair materials designed specifically for RV roofs.
4. Professional help
When in doubt, seek the assistance of a professional RV repair shop for extensive damage.
Tree damage to your RV roof can lead to significant issues if not addressed promptly. Whether you choose a full roof replacement or a patch repair, taking swift action is crucial to maintaining the integrity of your RV.
Join us on this adventure to learn more about RV maintenance and don’t forget to subscribe for more valuable tips and insights!
We use cookies to ensure that we give you the best experience on our website. By continuing to use our site, you consent to accepting cookies. We NEVER have or will sell reader's data. For more info, please see our privacy policy page.