How does the old saying go? Seeing is believing. When it comes to RVing tips and tricks, seeing is also understanding.
Sometimes all it takes is a photo to understand another RVer’s idea. Here are some examples—and some really helpful pictures! [Click any image to enlarge.]
Table cover
One savvy RVer decided to inject a bit of whimsy into her RV kitchen. She used a baby crib sheet as a tablecloth. Too cute!
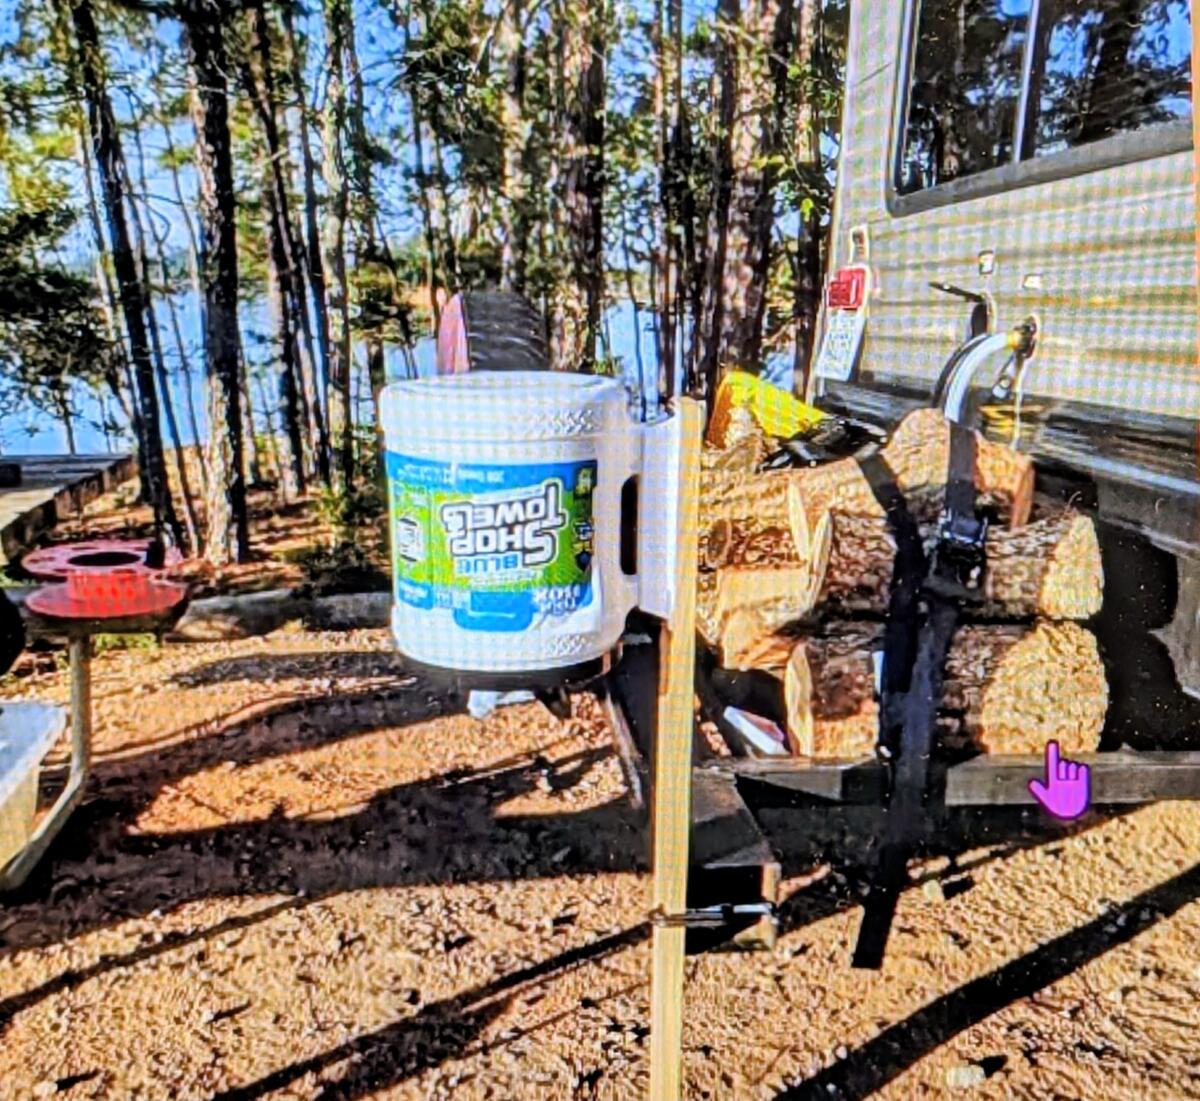
Always at hand
George Faile always seemed to need a paper towel at the campsite. He bought a container of shop towels at Harbor Freight, mounted it upside down on a pole, and now the paper towels are always within reach.
No mo’ rockin’
Ryan Hee posted the results of a stabilizer idea that’s featured often on Facebook. His homemade project really helps keep his RV “rock solid.”
(I’ve often wondered why some manufacturer hasn’t made/sold these. Especially if they work as well as folks say.)
Keep it together
James Wolfe likes his coffee. And creamer. And tea, sometimes, too. Also, spoons and napkins. He found a container on Amazon that makes a great coffee bar. See if this might work for you.
Kitty kit
Enterprising RVers (and cat lovers) fashioned this litterbox inside a basement storage space. A hole allows kitty to access the litter box, while the mess and smell stay outside. Note the chicken wire to prevent the cat from exploring further!
Pool noodles
Here’s yet another use for the pool noodle. Cut lengths to the width of each cabinet. Brace the noodle into the front of the cupboard (and fridge) to keep things in place on travel days.
Trim trick
Use these hanging baskets on your interior RV trim. The baskets can hold fruit and more!
Hitch help
Use a strip of self-adhesive reflective tape to mark your bumper hitch. It can help you see the hitch better and quickly connect to your RV.
Stick ’em up
If your top RV cabinets have trouble staying open, consider affixing a small hook in the ceiling. If your cabinet handle is like this one, there’ll be no more bruised knuckles!
Photo credit: Tammy Redmond
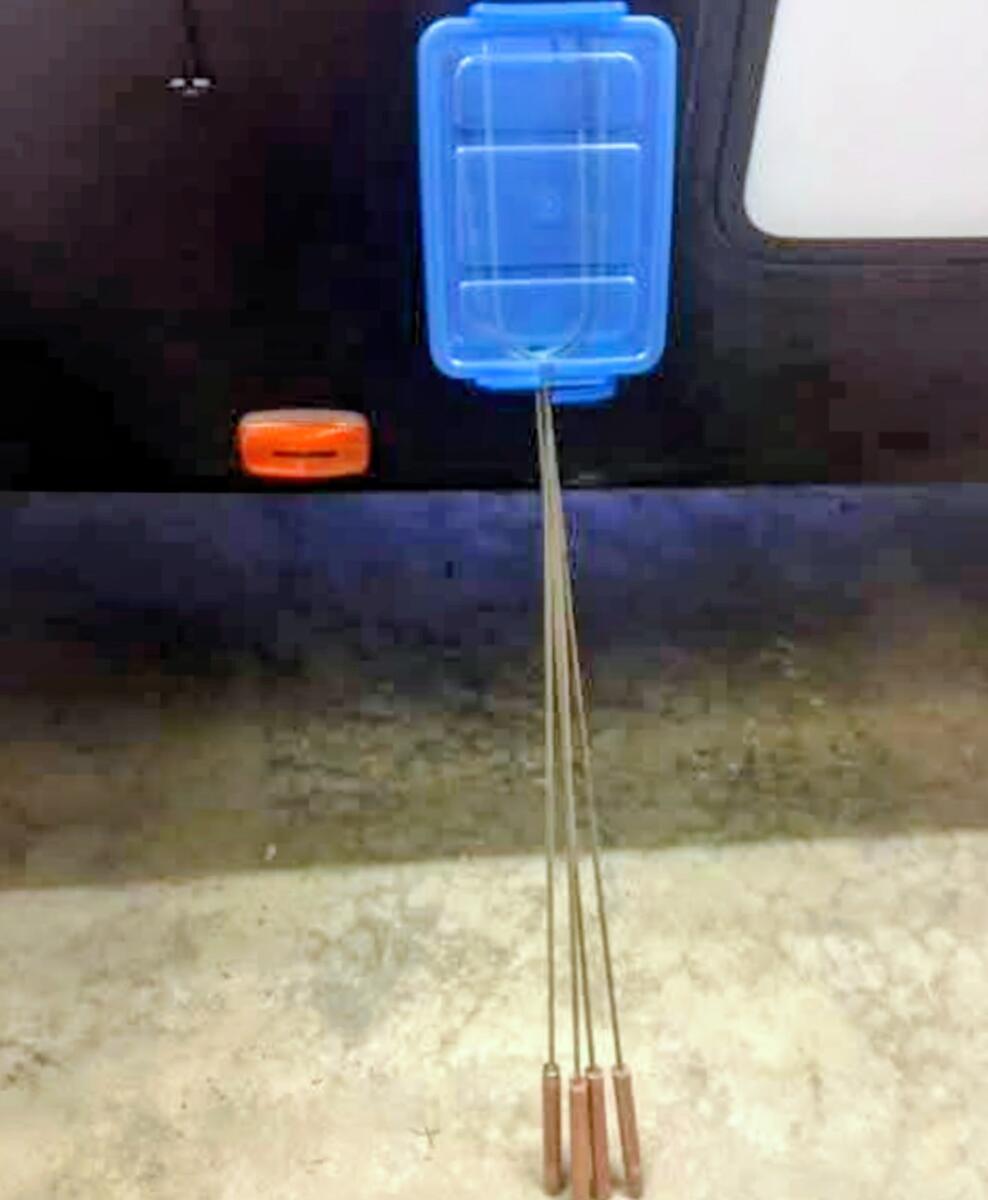
Stick covers
Doesn’t everyone store their roasting sticks like Chris Morgan? All it takes is a Dollar Store plastic container and a utility knife. Sticks stay clean, and so does your RV storage bay!
Do you have additional ideas to share? Do so in the comments below.
By Cheri Sicard
Have you ever wanted to do a cross-country road trip in your RV but don’t know how to start planning? The team from the Long Long Honeymoon is here to help.
In the video below, they share five tips for beginners planning a cross-country trip. For the record, the tips will work even if you are planning a cross-country trip in a car, as opposed to an RV.
Top 5 beginner tips for planning a cross-country road trip
#1 Be realistic about your travel time: According to our hosts, the typical cross-country road trip takes about 35 to 45 hours of overall driving. Of course, this can vary widely depending on your starting and destination points, but it’s a decent rule of thumb. If you are traveling in an RV, be aware this will take longer than if you were doing the trip in a car.
Our hosts also advise planning your route in such a way as to avoid going through big cities at rush hour. They also encourage traveling on scenic highways as opposed to interstates to make your trip more enjoyable. I wholeheartedly agree. Overall, they say the trip will probably take a little longer than you expect, and that’s OK. Slow down and enjoy the journey!
#2 Prepare for trouble before you leave: It’s RVing, and things can go wrong on a long road trip—it’s just the nature of the beast. Our hosts have had cross-country road trips with no issues, and others that were fraught with them.
To avoid the latter, do vehicle checks and maintenance before leaving, and carry a good basic tool kit with you. They go into detail of what to put in it in the video. They also advise carrying a good first aid kit, a few lightweight mylar blankets, and a seatbelt cutter/window smasher tooljust in case of accidents or emergencies.
#3 Phone a friend: Be sure to let someone know your route, where you are going, and when you should get there. Checking in regularly is a good idea when on the road. You can also share your location with some of the phone tracking apps, such as WhatsApp or Apple’s built-in Find My Friends. That way, your friend or family member can check in anytime and see where you are.
#4 Check the weather frequently: Rain, snow, wind, hail, anything can happen when you are crossing the country. Lest you find yourself stranded, check the weather often and adjust travel plans and routes accordingly. Along those lines, be prepared in case you do get stuck, like our hosts did in snowy Yellowstone. Have full propane and water tanks and a full pantry and riding out the storms won’t be bad at all.
#5 Pack like Goldilocks—not too much and not too little: You want to be well-prepared without overpacking. Our hosts give packing tips and strategies that work for them in the video.
Every few years, somebody rediscovers Utah’s Scenic Byway 12 and declares it one of America’s most beautiful drives. This time it’s the travel editors at Travel + Leisure, whose recent feature highlighted the 122-mile route between Bryce Canyon and Capitol Reef and the remarkable scenery packed into a relatively short stretch of road.
They’re not wrong.
For many of us RVers, Scenic Byway 12 is one of those trips that sits on the bucket list for years. The road winds through red rock canyons, climbs into cool mountain forests, skirts the edge of dramatic cliffs, and passes through small Utah towns that seem almost frozen in time.
But if you’re towing a trailer or piloting a motorhome, this is also a route that rewards a little homework before you head out.
The Travel + Leisure article notes the route’s changing elevations, limited cell coverage, and the recommendation that travelers allow more than a single day to experience it. Those are all good tips. For RVers, they’re also reminders that Scenic Byway 12 is best treated as a destination in its own right, rather than simply the road between two national parks.
That’s especially true during the busy travel season, when fuel stops can be crowded, weather can change dramatically between desert valleys and mountain summits, and the temptation to cram too much sightseeing into one day can turn a memorable drive into an exhausting one.
Why RVers love it
Scenic Byway 12 stretches roughly 122 miles across south-central Utah, connecting Bryce Canyon and Capitol Reef while passing through portions of Grand Staircase-Escalante National Monument and some of the most striking landscapes in the Southwest.
The scenery changes constantly. One minute you’re surrounded by towering red sandstone formations. A short time later you’re climbing through pine forests at elevations above 9,000 feet. Then the road drops back toward desert country again.
That variety is one reason many experienced travelers suggest allowing at least two or three days for the drive instead of treating it as a simple point-to-point trip.
The famous section everyone talks about
Ask RVers about Scenic Byway 12 and sooner or later somebody will mention the Hogback.
The Hogback. It’s the kind of place where you’ll want both hands on the wheel and your attention on the road rather than the scenery. U.S. Department of Transportation photo.
This narrow ridgeline section between Escalante and Boulder is one of the most photographed stretches of highway in Utah. The pavement is good, and the road is well-maintained, but the views can be dramatic enough to make drivers grip the steering wheel a little tighter than usual.
Thousands of RVs cross it every year without incident. Still, you’ll want both hands on the wheel and your attention on the road rather than the scenery.
Don’t count on services around every corner
One lesson many first-time visitors learn quickly is that Scenic Byway 12 isn’t an interstate.
Towns are small. Fuel stops are limited. Cell service can disappear for stretches of the trip. Depending on the season, weather conditions can change surprisingly fast, particularly on Boulder Mountain.
None of that should discourage RV travelers. It simply means arriving with a reasonably full fuel tank, downloaded maps, and a flexible schedule is usually a better strategy than assuming the next services are just a few miles away.
Slow down and enjoy the drive
The biggest mistake may be trying to rush it.
Because Scenic Byway 12 links two popular national parks, many travelers view it as transportation between destinations. In reality, the highway itself is one of the attractions.
Pullouts, overlooks, hiking opportunities, scenic photography spots, and small-town stops can easily fill several days. That’s why many RVers who have driven the route say the best plan is the simplest one: Leave extra time on the schedule.
The scenery isn’t going anywhere.
And if you’re finally checking Utah’s Scenic Byway 12 off your bucket list, there’s no reason to hurry past what you came to see.
Aging is a funny thing. One day you’re bouncing back from anything, and the next day you make a strange noise just standing up from your camp chair. But here’s the thing: Age and health don’t always go hand in hand the way people assume they do.
Some RVers in their 70s are hiking trails, climbing into truck campers, and exploring the country like they’re decades younger. Others feel every mile in their joints by the end of a travel day. And, honestly, most of us probably fall somewhere in between.
Health can mean a lot of different things, too. Maybe you deal with aches and pains, but still feel strong overall. Maybe you take medications or have limitations, but consider yourself healthy for your age. Or maybe you feel better now than you did 10 years ago because you finally have less stress and more time to enjoy life.
RVing itself can sometimes be a pretty good motivator to stay active. Walking campgrounds, setting up camp, exploring small towns, hiking trails, and just getting outside more often can keep people moving in ways they might not at home. Of course, long drives, bad campground roads, and climbing RV steps don’t always help the knees!
And let’s face it—many RVers know somebody who says, “I’m falling apart,” while towing a fifth wheel across three states and chopping firewood before dinner. Perspective has a lot to do with it.
So we’re curious: How would you rate your health considering your age?
After you vote, leave a comment. If you’d like, tell us your age range and what helps you stay healthy on the road—or what challenges you deal with while RVing. Your experiences may encourage someone else. Thank you!
I was researching an upcoming RV trip with my grandson. As we pored over maps and Googled routes, he asked, “Why isn’t there an Interstate 50 or 60?” I was baffled. Together we searched for the answer. Here’s what we found.
Coexist in harmony
The Interstate numbering system was built to play nicely with the older U.S. numbered-route system. When planners laid out the two-digit Interstates, they intentionally avoided using the same numbers that already existed as U.S. routes inside the same state.
Take this scenario as an example: If a driver were told to “take Route 50,” they might be confused. Does “take Route 50” mean U.S. Route 50 or Interstate 50?
To avoid this potential confusion, a non-duplication rule became a formal part of how the Interstate system was set up.
On the map
The Interstate numbering is effectively a mirror of the U.S. numbered highways. In both cases, the even-numbered roads run east–west. Odds run north–south. Highway numbers increase in a consistent direction.
U.S. Route 50 and U.S. Route 60 were long, established east–west highways. They already crossed much of the country when the Interstates were being numbered. Rather than rename or displace those familiar U.S. routes and risk local confusion, planners simply skipped “50” and “60” for primary Interstate designations.
A quick example
If the Interstate system had used I-50, that new I-50 would likely have occupied many of the same states as U.S. 50 (which runs roughly from Ocean City, Maryland, to Sacramento, California). Imagine driving and being told, “Merge onto 50.” Does that mean the older U.S. 50 or the Interstate? Avoiding that overlap was a deliberate design choice.
What about I-60?
Same idea. U.S. 60 already existed as a long east–west route when numbering for the Interstates was created. Planners skipped “60” for the same reason they skipped “50.” The goal was to keep navigation clear and minimize renumbering efforts for towns, maps, businesses, and locals that already used the U.S. route numbers.
A few oddballs
The highway numbering system generally follows the rules. However, politics and history sometimes bend them. I-99 is an example. In the 1990s, efforts were underway to upgrade portions of U.S. Route 220 in Pennsylvania to Interstate standards. The project had strong backing from then-U.S. Representative Bud Shuster, who chaired the House Transportation and Infrastructure Committee.
When the designation was included in federal transportation legislation, the specific number “99” was written directly into the law. Because Congress has authority over the Interstate system, the Federal Highway Administration accepted the designation, even though it didn’t fit the established numbering grid.
As RVers, it’s important that we recognize the standard highway numbering system. Knowing the few exceptions to the rules is also helpful as we travel.
By Dustin Simpson
This is a real unit, with a real problem, and it’s in our real shop. This series was created in hopes of helping you better understand your unit and how to best maintain it. This episode shows you the danger of not keeping an eye on your RV’s insert moldings.
In my experience, one of the most missed items is the insert molding screw cover. This protective plastic covers the screws at the roof line edges as well as the vertical and horizontal side seams of all RVs.
Unless you visually inspect under the insert moldings, you will not see potential water damage until it’s too late. Insert moldings help to keep the moisture, condensation, rain, dirt, and other elements out of your RV. Sealing the edges of the aluminum molding protects the screws along the roof, body, front, and rear seams.
This is important and, from my experience, often a missed step when weatherproofing and protecting your unit. When water gets past this plastic insert molding screw cover, it can cause serious damage. Water spreads through the unit and invites the growth of mold, rusts screws, and causes dry rot in walls, roof joints, and floors as the water travels down the aluminum framework in the wall.
I recommend that you replace the insert molding, as needed, every 2-3 years.
Insert molding screw covers shrink in both directions and will allow water to get in. This shrinkage is caused by age, sun, soaps, and elements. The tattletale sign is tapping it and seeing if it makes noise within the track. I hope this tip helps protect your investment.
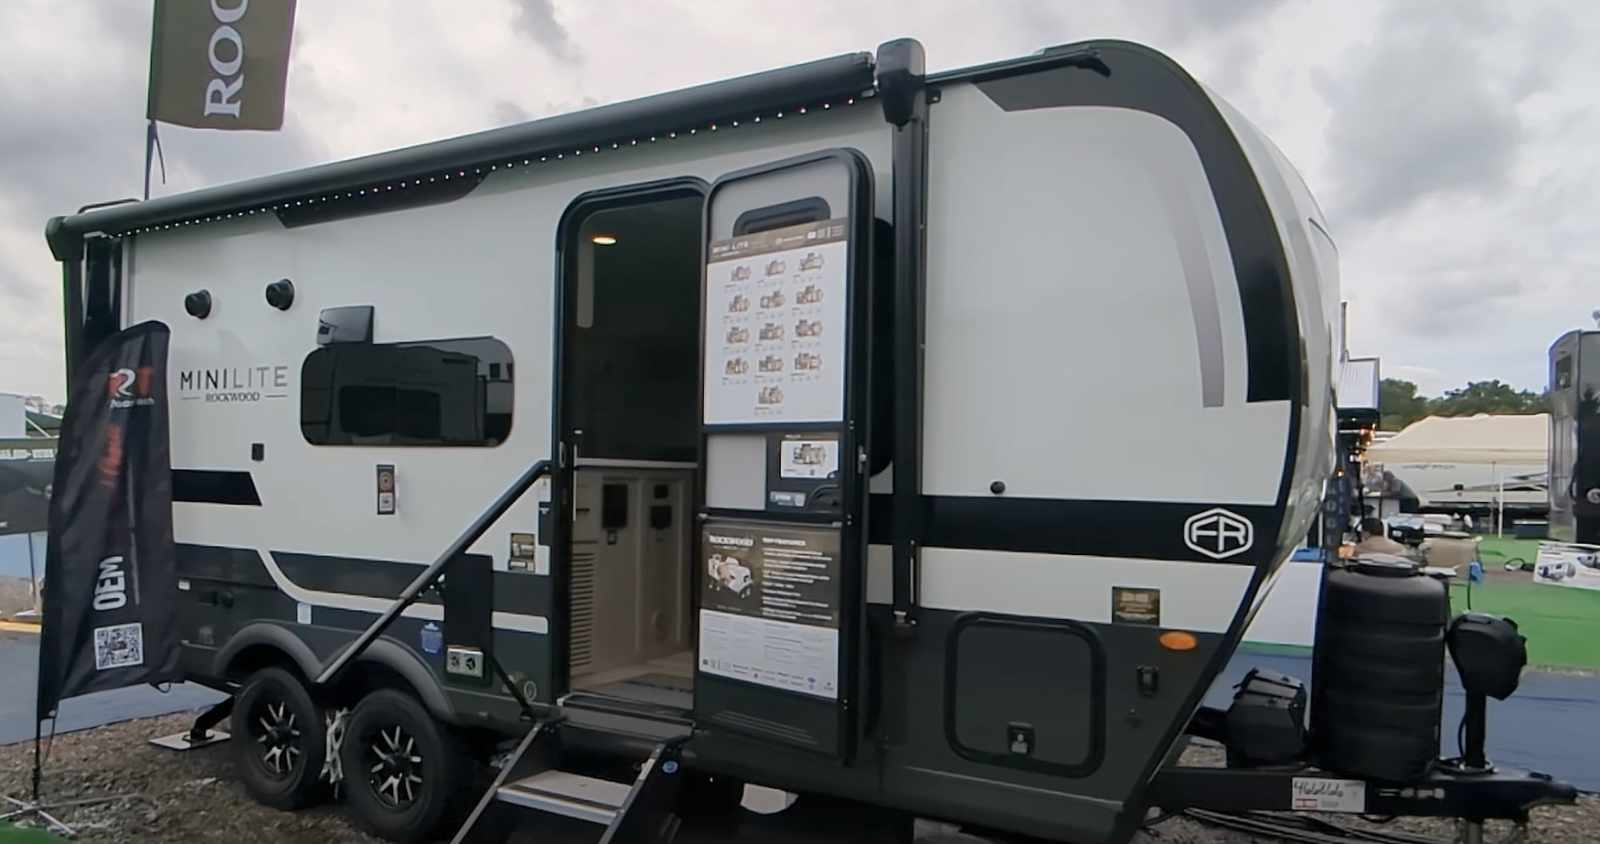
Today’s RV review is of the new-for-2026 Rockwood Mini Lite 2108RB. This is built on the smallest of the Mini Lite platforms and is a really unique bit of packaging that’s mostly positive. Know that the Flagstaff 21SRB is identical—we even have an article about why RV builders make twins.
Rockwood (and Flagstaff) have three basic “boxes” that they build the Mini Lite and Micro Lite in: the 2100, the 2200, and the 2500. Most Rockwood-Flagstaff RVs are built in the largest 2500-series box, including our own Rockwood Mini Lite 2506FK model, which measures 26 feet in overall length. This model measures 22’2” in overall length and features a single slide.
Start at the road with the Rockwood Mini Lite 2108RB
Anyone who regularly reads these reviews will know that I advocate looking under any travel trailer or fifth wheel before ever setting foot inside. The reason is that RV makers do a good job of making RVs pretty inside, but what really sets one apart from another is in how they’re built.
For example, the Mini Lite line features American-made Goodyear Endurance tires with built-in, banded tire pressure monitors like most vehicles have nowadays. Rockwood also fills the tires with nitrogen, but then also puts balancing beads inside to help them stay in balance.
The suspension on these is a Dexter torsion axle.
Essentially, as your RV is being towed down the road, the fewer vibrations and harshness that get transmitted from the road to your rig, the longer the RV itself will likely last. This tire and suspension combination is one of the better ways to minimize road harshness.
As for the walls themselves, Rockwood uses a lamination process that vacuum-bonds the layers together. The outer wall is fiberglass, but then under that is a layer of human-made material. We’ve all become familiar with Azdel, but now other manufacturers can make this product. It’s essentially the same waterproof material. Then there is a welded aluminum structure with block foam insulation and wall board. Rockwood is also using a better glue than most—all these little details really do matter.
Up on the roof, that, too, is a vacuum-laminated structure with the ducts for the A/C molded into the insulation. Atop this build is an AlphaPly roofing system, which tends to require less maintenance than cheaper systems.
And, see—We haven’t even gone inside yet!
Rockwood Mini Lite 2108RB - 2026
1 of 16
Rockwood 2108RB floor plan
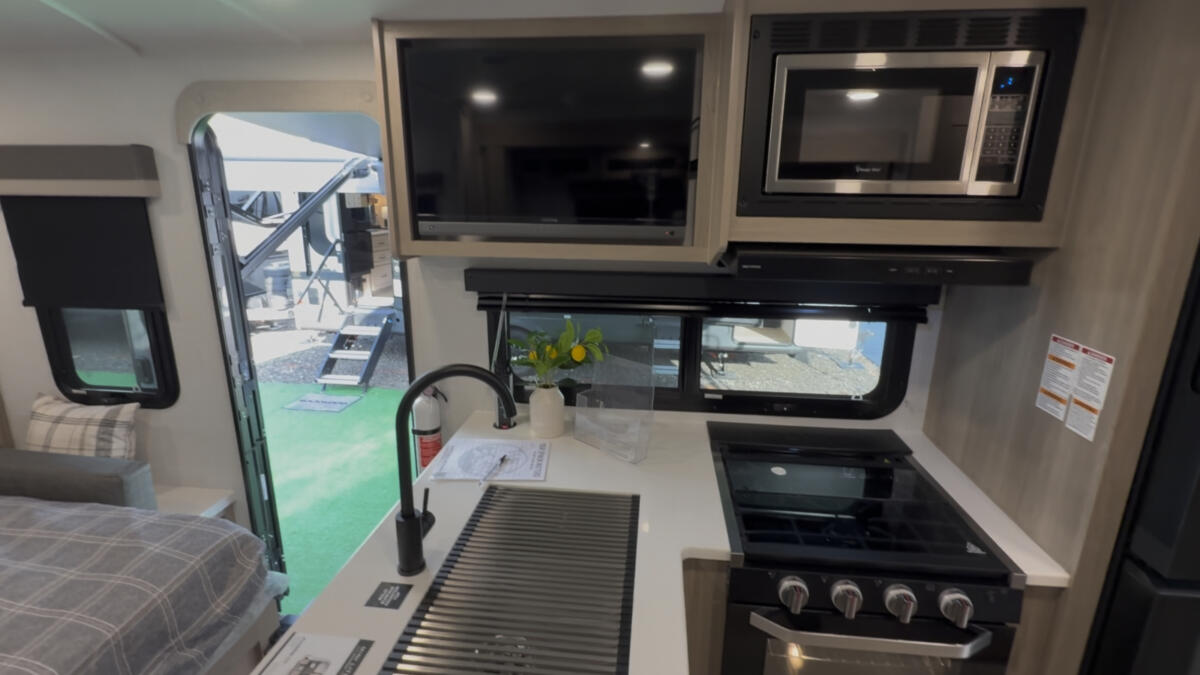
A 12 volt TV and microwave in the Rockwood Mini Lite 2108RB
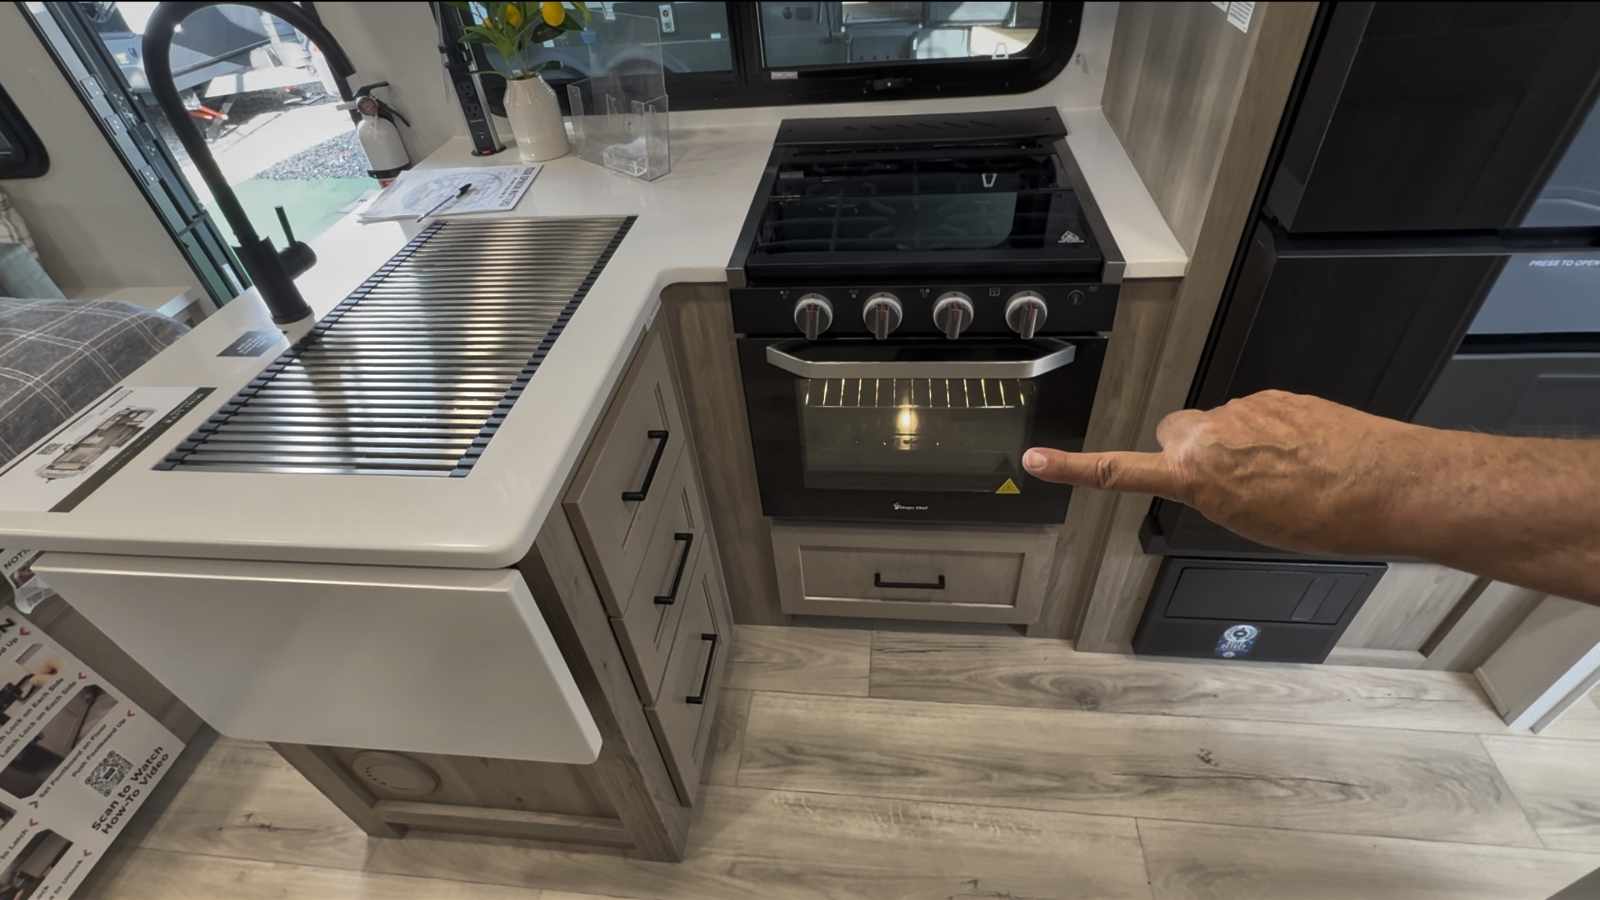
A 21 inch oven is a usable feature in the Rockwood Mini Lite 2108RB
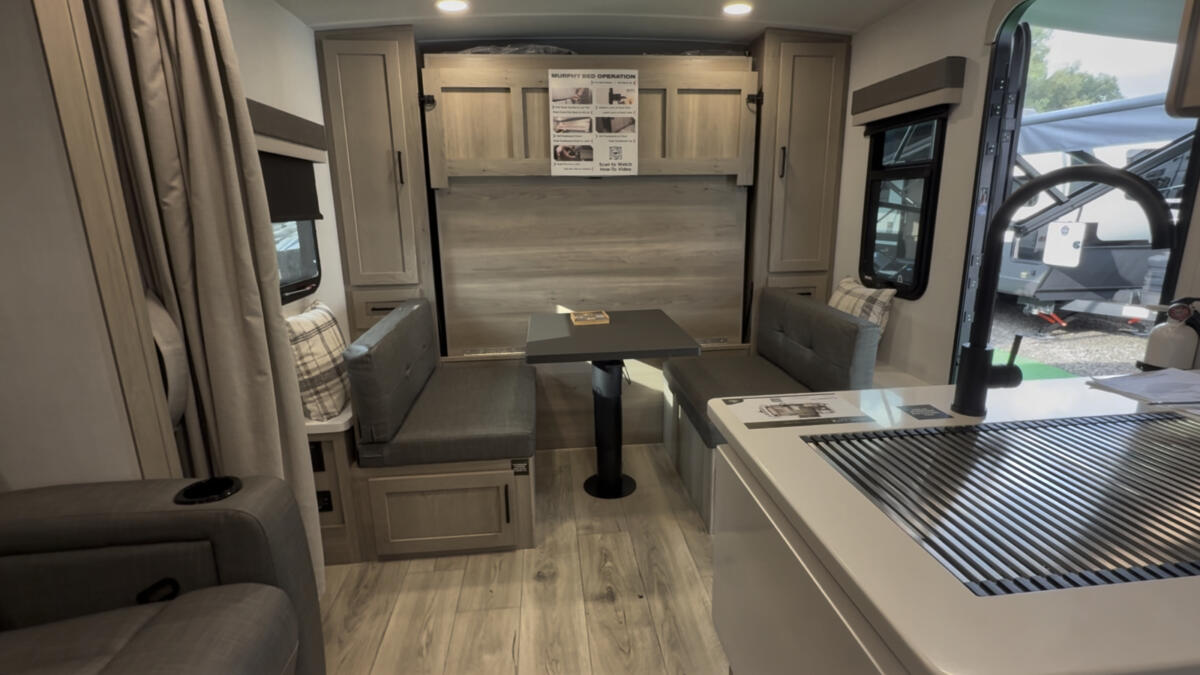
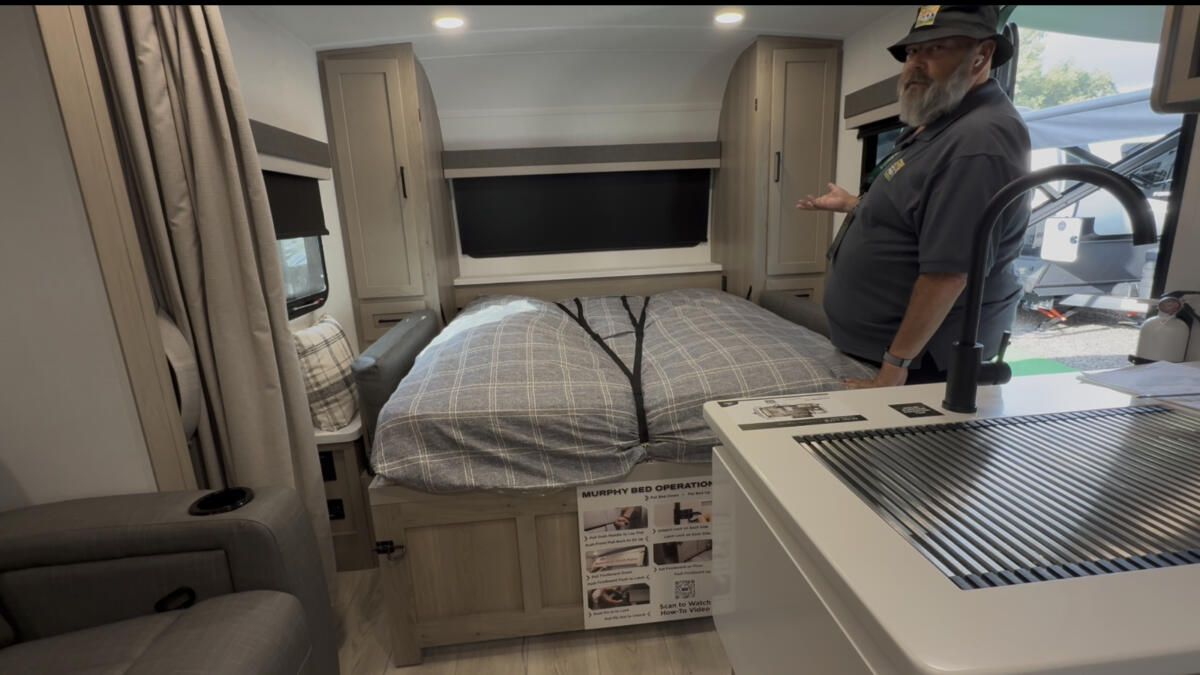
A mini dinette and Murphy bed are highlights of the Rockwood Mini LIte 2108RB
A flip-up counter extension for the kitchen of the Rockwood Mini Lite 2108RB
A high-performance Maxxair vent fan in the bathroom of the Rockwood Mini Lite 2108RB
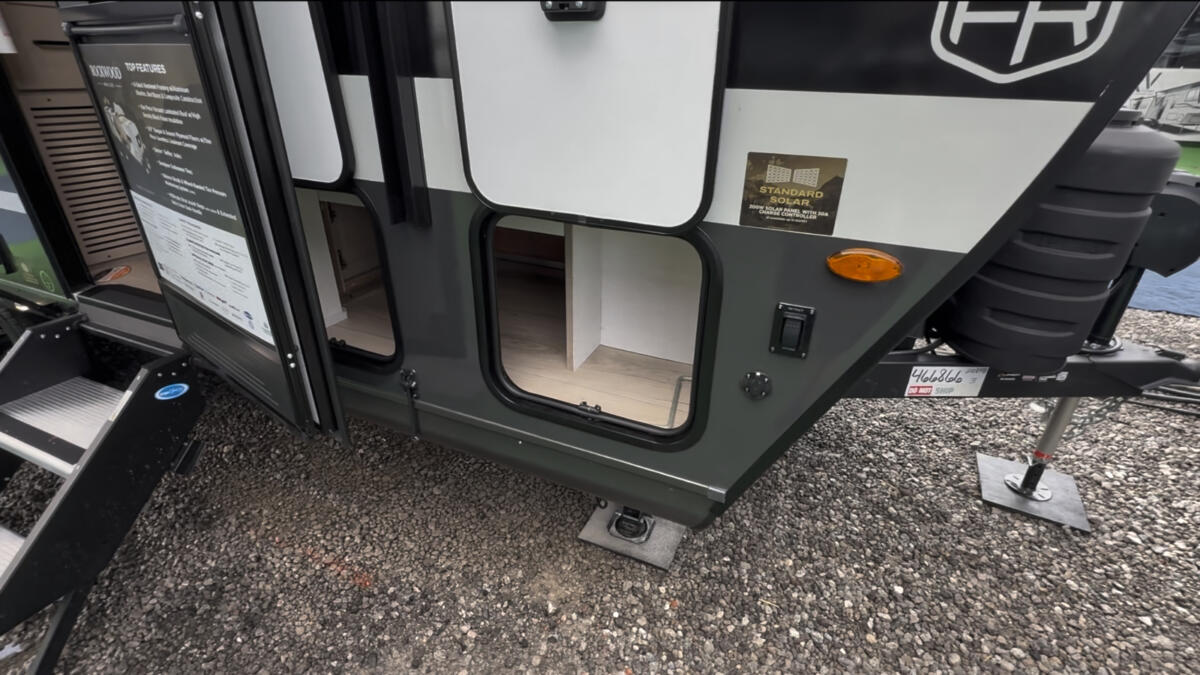
A small and large baggage compartment in the front of the Rockwood Mini Lite 2108RB
A small pantry in the kitchen of the Rockwood Mini Lite 2108RB
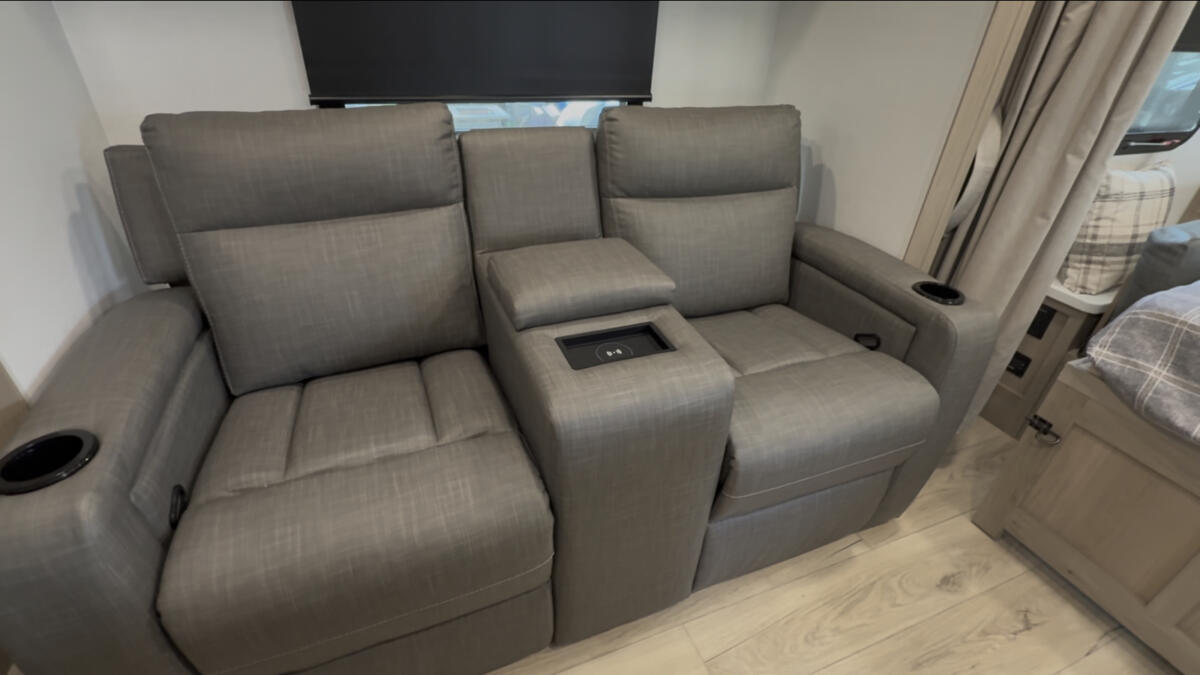
A two-place theater seat offers a direct view of the kitchen and 12volt TV
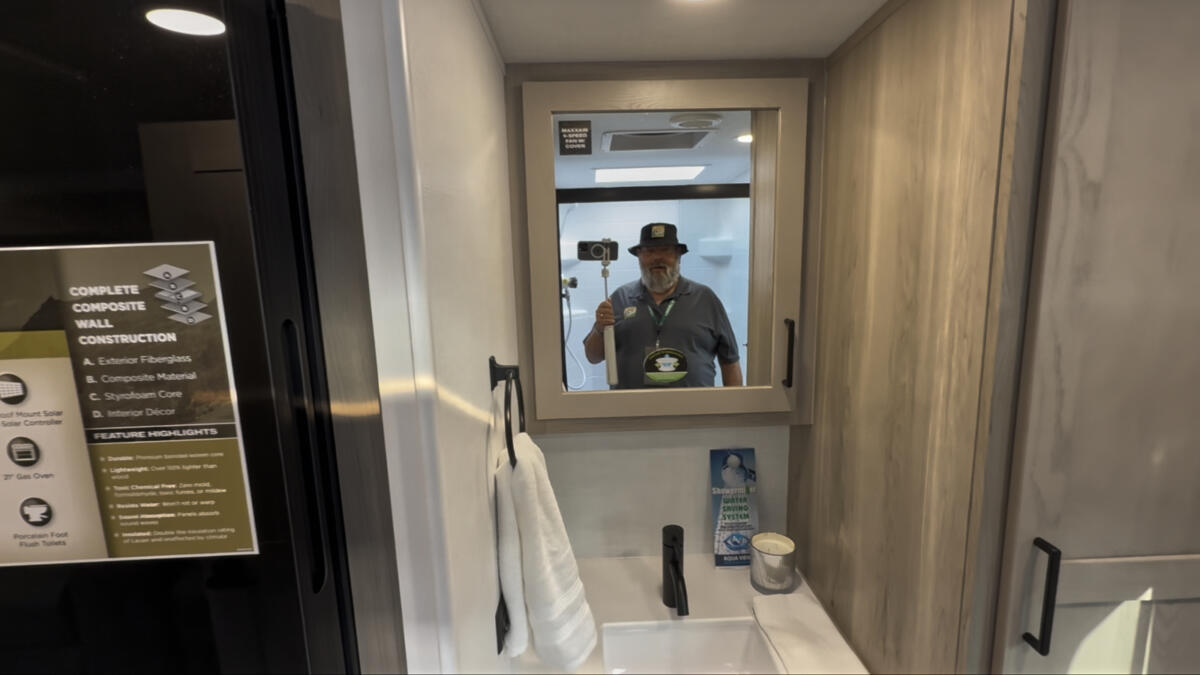
Bathroom sink and medicine cabinet in the Rockwood Mini Lite 2108RB
Reviewing the 2026 Rockwood Mini Lite 2108RB
The Murphy bed deployed in the Rockwood Mini Lite 2108RB
The roof of a Rockwood Mini Lite (foreground) compared to others - Rockwood's roof uses aluminum trusses and is vacuum laminated and fully insulated.
Aluminum bases for beds and dinettes in Rockwood and Flagstaff RVs
Dexter torsion axle suspension system
What’s inside the Rockwood Mini Lite 2108RB
Okay, now that we’re inside, one more bit of nerdy talk. Rockwood uses a welded aluminum structure for things like bed bases, dinettes, and that sort of thing. It’s lighter and stronger than wood, although it’s more expensive.
When you first step into the trailer, you’ll see a small dinette at the front and then a sofa over in the slide room. Something I love about the new dinette table that Rockwood is using is that it can move front-to-back and side-to-side a few inches. That means those of us who displace a lot of water in the pool still have room to be comfortable. It’s fat-folk-friendly! That table also can be pushed up and down and will stop where you like. Therefore, you could have it be desk height or table height or mash it all the way down to make a daybed.
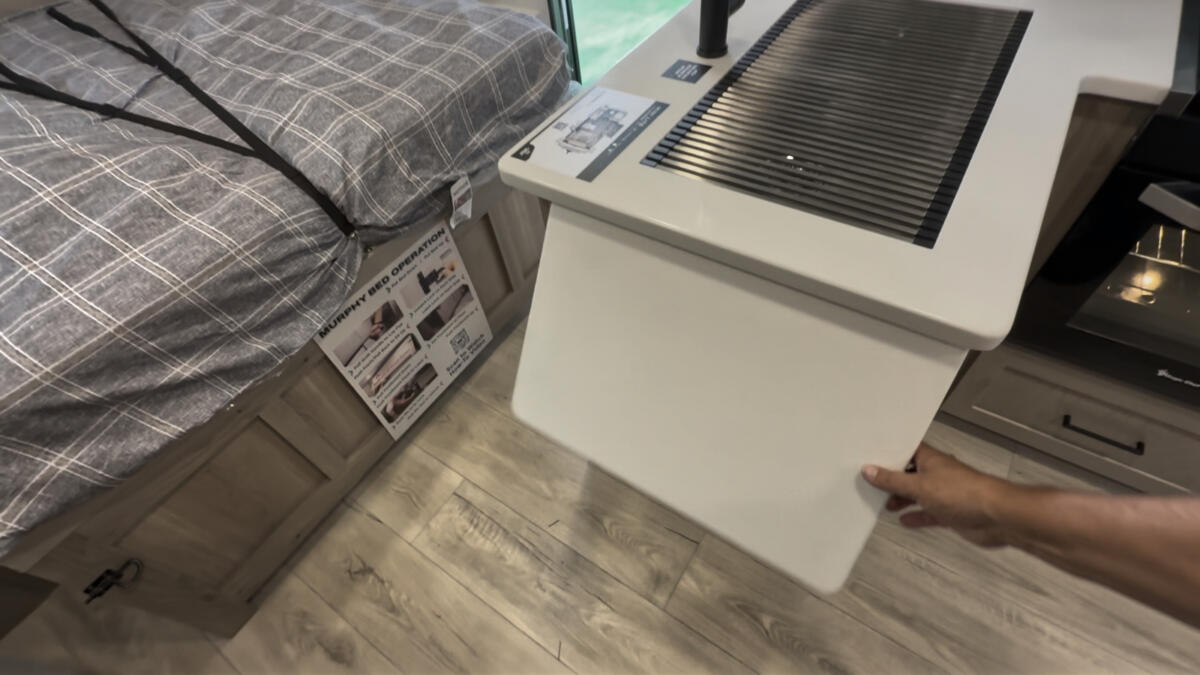
But then, once the table is down, you also have a Murphy bed here. Rockwood does the best Murphy beds in the business, period. End of story. No debate. Why?
These are all one piece, so no requiring a bendy mattress to make this work. For us, this was a good solution, and that’s where we learned about the RV Superbag to make this even better.
The bed in here is a “short queen” at 64” x 74”, which is what we had in our first Mini Lite. You could leave the bed down and still bring the slide in and out.
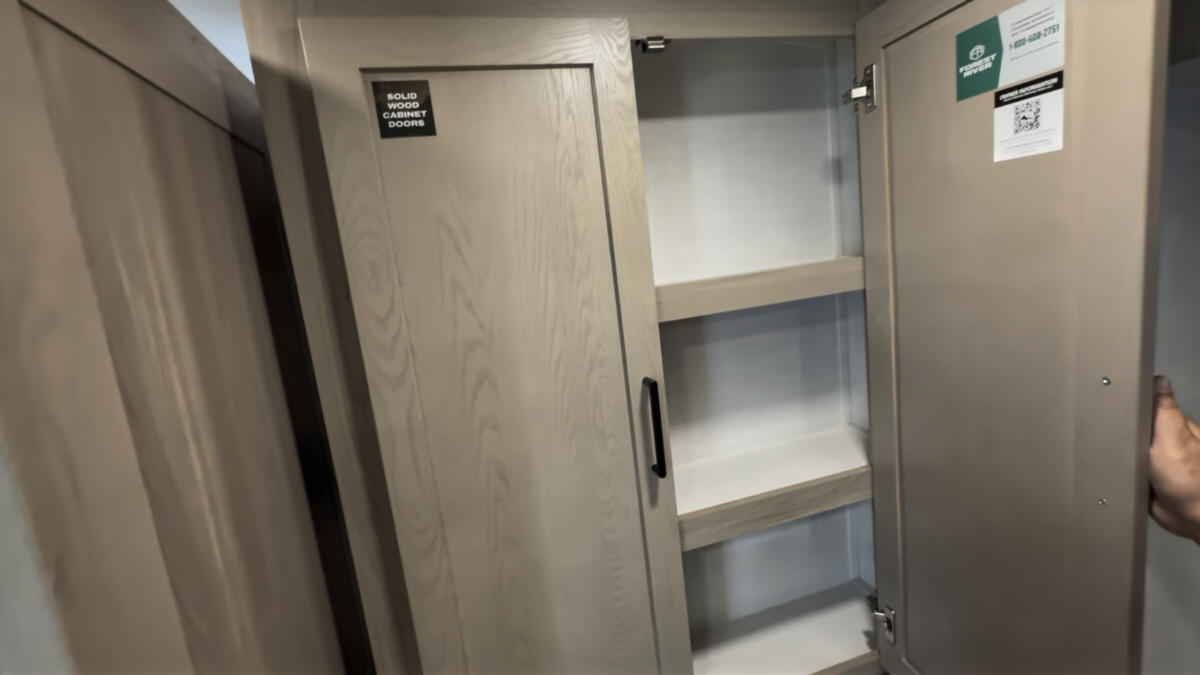
Around the bed are closets on either side.
Since there’s that mini dinette at the front, there’s a theater seat in the slide of this RV. This is a lot of good seating in a relatively small trailer.
Kitchen in the Rockwood Mini Lite 2108RB
As much as I was impressed by the amount of seating in this trailer, I was equally impressed by the kitchen. There’s a full-sized (10.7 cubic foot) 12-volt refrigerator. I shared how much I like these new fridges and how efficient this particular model is in this story.
Rockwood also uses a three-burner propane stove along with the larger-than-average 21” RV oven. I have the same oven and, yes, we’ve used it for all kinds of things, including pulled pork, roasted veggies, and more. The larger size of these 21” (vertical) ovens really does make a difference.
The countertop is an “L”-shaped unit with a sink sort of facing the Murphy bed. For a trailer of this size, the counter space ain’t half bad. To make things more useful, however, there is a countertop extension. The countertops in this trailer are solid surface, which tends to last longer.
Bathroom in the Rockwood Mini Lite 2108RB
The bathroom in this extends the full width of the rear of the trailer, which means you have good space for what you need to do here. There’s a porcelain foot flush toilet and a decent linen closet, along with a rectangular sink.
The shower is a rectangular unit that incorporates a feature called the Showermi$er. It redirects water into the system while you’re waiting for it to get hot in the shower, thereby not wasting water if you’re boondocking. We use this feature a lot in our own trailer.
Rockwood has also recently upgraded its plumbing so that they’re not using the troublesome clamp system on flexible lines that has been prone to failure. The tanks on these are supported, so you can travel with water aboard.
Boondocking and travel access in the Rockwood Mini Lite 2108RB
For those who enjoy boondocking as much as I do, this can be a great choice. Rockwood includes a 200-watt solar panel along with an 1,800-watt inverter and a 30-amp charge controller. While the 200 watts of solar aren’t going to do much more than be a battery tender, this rig is set up to support additional solar panels, for those who want them.
Plus, the inverter runs several outlets, which would absolutely support things like CPAP machines and the like. A lot of this RV can run natively on the 12-volt battery power, including the fridge, which isn’t unusual, but also the smart TV, which is.
I like that Rockwood/Flagstaff models come with a Showermi$er, which is a way to redirect water back into the system when you’re waiting for it to get hot in the shower.
Something I really like is that Rockwood still uses the six-gallon traditional gas-electric water heater with a tank. I know lots of RV companies are bragging about their tankless water heaters, but these are often a lousy solution. Why?
Tankless water heaters work based on demand. If they sense that you’re requesting hot water, they turn on the burner and heat the water as it passes. But if your water pressure is low, it may not trigger the burner. And, if you’re at high elevation, that may not allow the burner to ignite.
And you only have propane to heat the water, no electric. But the reason RV companies like these units is that they’re relatively easy to winterize, and they’re inexpensive for RV companies to purchase. Rockwood tends to favor things that serve the customers better, like 21” RV ovens, welded dinette bases, and gas-electric water heaters with a tank.
Rockwood Mini Lite 2108RB specifications
Final thoughts on the Rockwood Mini Lite 2108RB
Is this RV perfect? Absolutely not. For example, I think it’s goofy that there’s a windshield and a Murphy bed. You have a windshield when you don’t want it at night, but the bed being stowed blocks the windshield by day. See? Goofy! But at least on all the windows, Rockwood uses roller blackout shades, which really work well.
Oh, and I also like these frameless windows that Rockwood uses. Also, they have a Maxxair high-performance vent fan in the bathroom with a rain cover to increase air flow.
Overall, this is a well-designed trailer with some very usable, unique aspects to the design.
Can you find happiness in van life as a senior? According to the video at the end of this post from TinyHomeTours, yes!
Lynne didn’t move into a van for novelty. After retirement, a breast cancer diagnosis, and the cost of staying put, caused her to decide that the rest of her life needed to feel lighter.
Lynne gave up a Massachusetts apartment by the beach and built a home on wheels around her budget, health needs, and dog, Milo. That choice turned one fixed view into the freedom to go almost anywhere.
Why the van made more sense than the apartment
A van life video first planted the idea, but cancer made the decision feel urgent. Lynne wanted to travel more than stay put and rent, and she knew Social Security alone would not cover both. Her apartment ran about $1,200 a month. The van payment is $400 a month, and that ends in about three years.
The numbers that made it possible
2015 Ford Transit cargo van, $19,000
Custom build, about $20,000
Total all-in, about $40,000
Monthly van payment, $400
Car insurance, about $100 per month
Lynne lives on about $1,800 a month from Social Security and keeps roughly $9,000 to $10,000 in emergency savings. For her, the math worked.
A cozy build shaped around daily life
Lynne worked with Jonnie at Midwest Van Builders and stayed involved through the whole build, often sleeping in the van as each stage was finished. She wanted natural wood, an open layout, and no walls cutting up the space.
That process paid off. The van has a twin bed, a 24-by-72-inch couch that doubles as a guest bed, nine upper cabinets, and a rear garage with a 20-gallon water tank, generator, and shoe racks.
Her kitchen and power setup are built for real needs
Lynne likes to cook, so the kitchen had to work. There is a deep sink, a wide counter, an air fryer, a slow cooker, toaster, griddle, a pancake maker, a grill, and a butane stove for backup. She jokes that people call her a power hog, but her setup can handle it.
A Bluetti EB200 Max battery, 600 watts of roof solar, and a generator keep things running. Under the couch, she keeps a separate fridge and chest freezer. The fridge stores insulin because Lynne is an insulin-dependent diabetic. The freezer holds about 40 days of homemade dog food for Milo, and stays cold longer if the power drops.
Small choices made the van easier to live in
Lynne skipped a built-in shower and uses a shower tent with a quick-connect hose and 2.5 gallons of hot water. A Trelino composting toilet fits in a cabinet. She also added fans and a swamp cooler for desert heat.
Lynne’s mornings are simple. She checks her blood sugar, feeds Milo, makes coffee, takes her pills, and sits in a space that feels like home. Even when her family offers a guest room, she prefers her own bed in the van.
Final thoughts
At 72, Lynne calls this stage of life “the final quarter,” and she wants happiness more than anything else. Her van gave her lower costs, a home she loves, and the freedom to stay wherever she wants.
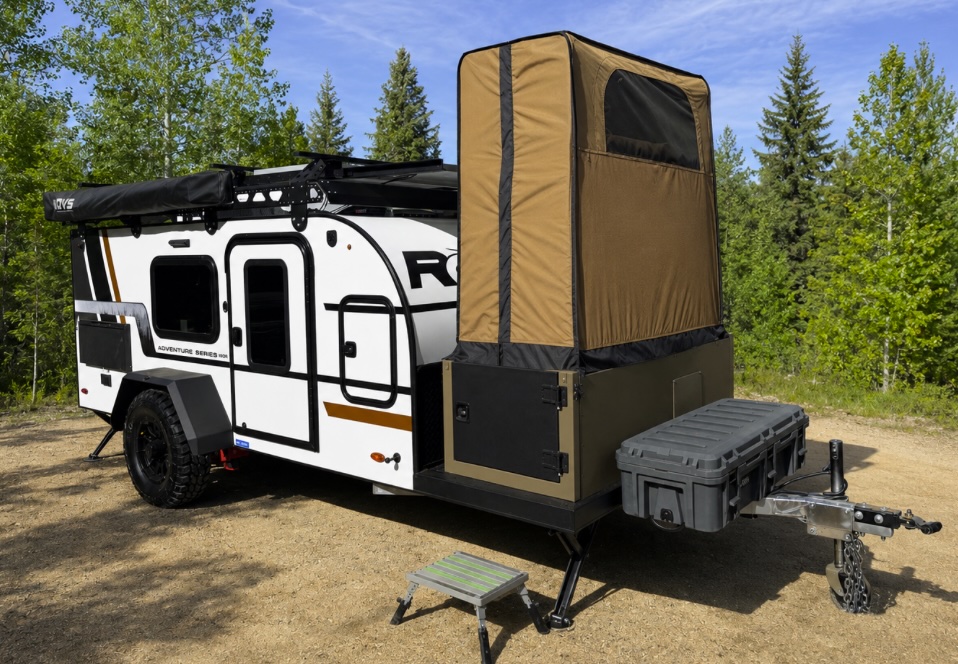
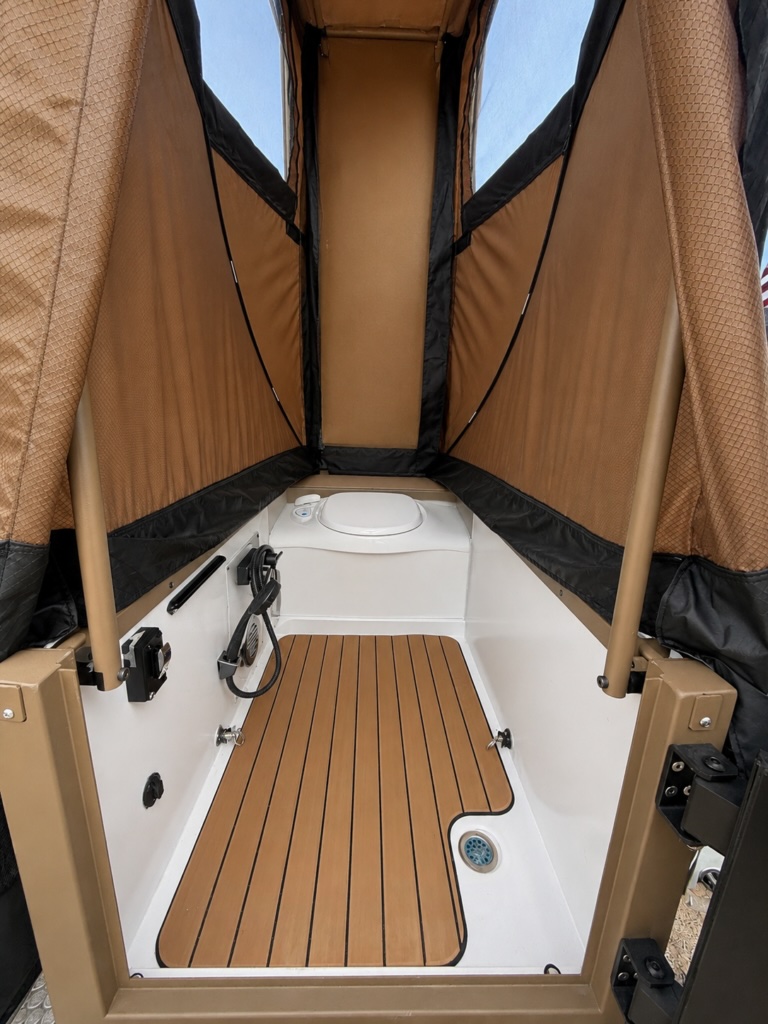
At first glance, this is genius! A pint-sized trailer, less than 4 feet high, that manages to include a wet bath with a stand-up shower. How is that possible? Actually, it’s surprisingly easy. It just took some creative thinking to make it happen.
The bathroom, you see, rides on the tongue of the trailer, folded down for travel, then easily raised at the campsite.
Encore RV calls it an adventure trailer, which it could be. But I think this would be great for a couple who wanted to get away for a weekend, or even a week, and stay in a primitive campground—BLM, Forest Service, or even in the middle of nowhere on government lands — to enjoy the outdoors and sleep protected from the weather, and have a private commode and a standard-sized shower to freshen up.
Toilet and shower are easy to set up in a minute or so.
The new RŎG 12RK-FB and 12BH-FB models include a front-mounted bath module that rides on the trailer tongue and folds down when not needed. When closed, it resembles a storage box. Deployed, it becomes a wet bath with a shower and cassette toilet.
Bath module
The trailer is built on Encore’s lightweight RŎG platforms, aimed at campers who want off-grid capability without moving to a larger RV. The aluminum bath module uses a pop-up tent enclosure with screened windows for airflow and magnetic closures intended to simplify setup. Heat from the trailer’s 18,000-BTU furnace can warm the bath area during cooler weather.
Rog Shower
The trailer carries 43 gallons of fresh water and includes an on-demand hot water system designed to support extended dry camping. When folded for travel, the top of the bath module doubles as cargo space and can carry gear or up to two bicycles.
Encore says the trailer uses wood-free construction with an all-aluminum frame and chassis to reduce weight and improve durability. The unloaded weight is about 2,800 pounds, with a low tongue weight intended to keep it towable by many midsize SUVs and trucks. The compact design also allows storage in most standard garages, potentially avoiding paying for storage.
The walk-around video below from Encore RV highlights the trailer’s compact footprint and the easy set up of the bathroom. You can learn more about the trailer at the company’s website.
A strong, reliable flashlight is essential gear for any RVer. If you’re in the market for a new one—or your old flashlight is due for an upgrade—you’d be hard-pressed to find a more versatile option than the Infinity X1 7,000-lumen dual-power rechargeable flashlight. Yes, it’s a powerful flashlight, but what really sets it apart is its flexibility.
What I especially like about the Infinity X1 dual power rechargeable flashlight
• Dual power means you will NEVER be without light. It comes with a rechargeable lithium-ion battery as well as nine Duracell AA batteries, so if one power source runs out, you have a backup ready to go. I haven’t had to use the Duracells yet since the flashlight recharges easily via USB. But it’s reassuring to know they’re there if needed.
• The exterior is made of durable aircraft-grade aluminum.
• It has a USB output charging port you can use to charge your phone and other small devices.
• It has low, medium, and high light intensity settings.
• At 7,000 lumens, it is SUPER BRIGHT!!! Seriously, almost blindingly bright—which could be a real advantage in a self-defense situation. At full power, it also throws light up to 250 meters (about 820 feet).
• Speaking of self-defense, this is a sturdy, heavy-duty flashlight that could double as a club if necessary in an emergency situation.
What can be improved?
At the highest power setting especially, the lens can get quite hot if used for extended periods. That’s something to keep in mind. One reviewer suggested this might have been avoided with LED technology, though it’s possible the company’s hybrid power system influenced the design choice. Either way, heat buildup is the one notable downside I found.
You also need to exercise care, as this light is so bright, you would not want to shine it directly in someone’s eyes (unless it was a self-defense situation).
More information or to order
If you are a Costco member, you can pick up one of these flashlights at the store or order directly online from Costco. It is also available on Amazon.
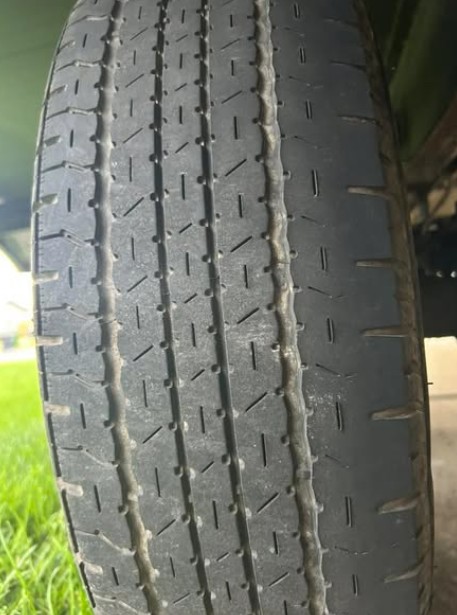
I received this question on uneven tire tread wear:
“Goodyear Endurance tires, rear axle. My left rear tire has wear only on the inside. The right side is also wearing on the inside, but not as badly. The front axle is fine. About 6500 miles on them.“
Uneven tire tread wear
My answer
As a Tire Design and Forensic Engineer with 50 years of experience, including some design patents, I can tell you that uneven wear, as you are describing, is almost certainly caused by the wheels being out of alignment. You can confirm with a tool you can use yourself.
This is a tire camber gauge.
Tire camber gauge
This tool is available from many on-line companies for less than $12, including Amazon. You could spend a lot more, but for your purposes, I would suggest that would be a waste of money. You can confirm the most likely cause if the camber is more than 1.5° Negative Camber with your tire having the top tilted inward.
Trailer axles are seldom adjustable, so you will need to find a shop that can “bend” the axle or replace it. If BOTH tires are “out of spec,” then it may be easiest to replace the axle.
“It is better to travel well than to arrive.” —Buddha
Need an excuse to celebrate?Today is National Creativity Day! We love being creative!
On this day in history: 1911 – At the Indianapolis Motor Speedway, the first Indianapolis 500 ends with Ray Harroun in his Marmon Wasp becoming the first winner of the 500-mile auto race.
Featured news
Your next RV may have a much more complicated electrical system than your old one
As RVs add larger lithium battery banks, solar systems, and powerful inverters, the industry is updating safety standards to keep pace. Engineers recently met in Elkhart to discuss new electrical-system rules aimed at addressing the growing complexity behind today’s RVs. Here are the details.
RVer dumps sewer tank into gas station’s diesel tank. Big time bad news! Most RVers worry about putting gasoline into a diesel truck. One Colorado RV driver apparently managed something far worse. A bizarre mishap at a Maverik gas station near Colorado Springs left diesel pumps shut down after an RV driver reportedly emptied black tank waste into an underground diesel storage tank instead of a proper dump station.
$67 million in National Park visitor fees redirected to Trump’s D.C. projects
RVers who buy national park entrance passes or pay gate fees often assume that money stays close to the parks they visit. But that’s only partly true. The National Park Service is using at least $67 million in park entrance fee revenue to help pay for projects in the nation’s capital. That includes repairs to ornamental fountains and work on the Lincoln Memorial Reflecting Pool. Here’s the story.
Lawsuits keep piling up at one Camping World dealership
Camping World dealership lawsuits don’t usually make national news, but a growing number of cases filed against one South Carolina location are attracting attention from RV owners around the country. Customers allege a variety of problems involving RV defects, repairs and service after purchase. Yikes…
Starlink Mini may be getting a built-in battery
The Starlink Mini has become a popular piece of gear among RVers who need internet where cell coverage is spotty or nonexistent. It’s small, relatively easy on power, and easy to tuck away when it’s time to move on. But there’s still one thing most users have to bring along: a battery. Now, SpaceX may be working on a way around that.
Homeless veteran gives up his dog to get help. Then an RV changes everything
Sometimes a story comes along that reminds us an RV can be more than a way to travel. After Texas veteran Brian found himself homeless, he made the painful decision to leave his dog, Jake, at a Fort Worth fire station. What happened next eventually brought RV housing, a second chance and a reunion with his four-legged companion.
This fifth wheel hitch bent badly—and somehow stayed together for 300 miles
A fifth wheel owner recently posted photos showing a fifth wheel hitch failure so severe it is hard to believe the setup stayed together for another 300 miles. The owner said they discovered the damage only after the trip was over. If this showed up in your truck bed after a travel day, your stomach would probably hit the floor.
Your tow vehicle may be hotter than your RV. Here’s how to cool it faster
Sometimes the hottest part of an RV trip isn’t the RV at all. RVers looking for ways to cool a tow vehicle faster during summer travel know how quickly a truck cab can turn into an oven. The same can be said for that toad car. A recent article from Southern Living looked at ways drivers can cool down a scorching-hot vehicle faster in summer.
The RV market just sent a mixed signal: Towables down, motorhomes up
If you’ve been hoping RV prices might soften a bit—or wondering whether the RV market is finally cooling off—the latest shipment numbers may be worth watching. But this time, they look a little different…
RV carbon monoxide alarms are changing
A new line of RV carbon monoxide and propane alarms announced this week does more than introduce new products. The alarms are built to updated safety standards, and one key change addresses a question many RVers never consider until it’s too late: What happens to the detector if the RV loses power?
Fuel prices may not stop RVers, but may change how far they go
For many RVers, the question this summer may not be whether to travel—it may be how far. A recent report from a Northern California campground suggests rising fuel prices could be influencing travel decisions. Managers at one North Bay campground say they’re seeing more visitors from nearby communities and fewer travelers arriving from longer distances. Continue reading.
Long lines, full parking lots and traffic jams: Yosemite’s no-reservation summer gets its first test
If Yosemite National Park’s first big holiday weekend without entry reservations was supposed to prove the system could handle summer crowds, many visitors left unconvinced. Long entrance lines, overflowing parking lots and traffic jams greeted thousands of Memorial Day weekend visitors as Yosemite’s new reservation-free approach faced its first major test.
FACTOID:Nearly 85% of wildfires in the United States are caused by people and are preventable.
NEW PRODUCTS FOR RVERS! Did you know Amazon has a whole section for just-released products? These are all the newest products in their automotive category. See if there’s something you want or need.
RV review USA debut: Skydream is a trailer George Jetson would love
A lot of RVs promise smart features. The 2026 Skydream Space Camping Travel Trailer is built around them. This 28-foot travel trailer mixes sci-fi styling with self-parking, huge battery capacity, and a cabin full of motors, screens, and hidden storage. The result feels less like a normal camper and more like a rolling tech lounge. Now available in the U.S., we get a tour of this unique RV.
Beyond the headlines with Tony Barthel
New RV safety standards are a good thing
New safety standards are coming to RVs, and Tony Barthel says they’re long overdue. From mandatory tire pressure monitoring systems and improved electrical protection to better communication among RV components and the growing use of anti-lock brakes, the RV industry is making changes designed to keep RVers safer on the road. Some of these features won’t be required until the 2028 model year, but Tony explains why they matter and what you should look for.
News briefs
Thursday was the 102nd anniversary of the U.S. Border Patrol.
The RV Industry Association continues to warn about supply chain disruption and higher RV manufacturing costs tied to tariffs and trade uncertainty. Manufacturers are talking about price increases on some models and components. That could mean higher prices for new RVs later this year, more expensive replacement parts and longer waits for repairs and upgrades.
A historic site in Georgia could become America’s 64th national park. The 3,000-acre Ocmulgee National Historical Park preserves ancient Muscogee lands with roots dating back 17,000 years, and legislation to redesignate it as Georgia’s first national park is currently pending in Congress.
Shenandoah National Park will conduct periodic sobriety checkpoints from June through Nov. 15 along Skyline Drive as part of a traffic safety campaign during the park’s busiest season.
The world’s only all-glass gondola ride has opened in east Tennessee. Located in the Anakeesta adventure park in the Great Smoky Mountains, the Crystal Express travels more than 600 feet above downtown Gatlinburg, ascending more than 2,000 feet up the mountainside as riders experience the sensation of floating.
An alligator was spotted and captured earlier this week at the Seven Oaks RV Resort in Mission, Texas. Nobody was eaten or even harmed. The city is trying to find a home for the trespasser.
Trail Ridge Road, the highest continuous paved road in the U.S., has reopened for the season in Rocky Mountain National Park, though drivers should still watch for possible icy conditions at higher elevations.
Better not feed any bears in Colorado. Of course, you shouldn’t feed them anywhere. But, in Colorado, the penalty for feeding Yogi or Boo Boo just got stiffer. Here are the hefty penalties.
Zion National Park has implemented Stage 2 fire restrictions due to increasing fire danger and dry conditions across Southwest Utah. Also, the park has reopened South Campground. Make reservations.
Texas is getting a new giant state park. Texas Parks and Wildlife has acquired 54,000 acres about 150 miles west of San Antonio to create Silver Lake State Park, which will become the state’s second-largest state park. The new park will surpass both the 39,000-acre Chinati Mountains State Natural Area, which remains closed to the public, and the 37,000-acre Devils River State Natural Area.
Oregon State Parks will waive day-use parking fees for residents to all its parks on June 6.
Spring is a beautiful time to RV, hike, and wander. However, it’s also birthing season for big game animals. So, watch out, RVers! The National Park Service is warning you to stay away from wildlife this time of year, as their young may be nearby, making them more aggressive than usual.
NOW OPEN: The Beartooth Highway (US-212) from Red Lodge to Cooke City, Montana, is now open for the season. Temporary travel restrictions or closures still can occur at any time without notice. Prepare for winter driving conditions, have flexible travel plans, and watch for quickly changing weather conditions.
A 6-year-old child died last Saturday after being struck by a travel trailer at Link Creek Campground near Suttle Lake in Central Oregon. Authorities said after the child had retrieved a stuffed animal, he entered the area between a slow-moving tow vehicle and trailer, where the driver likely could not see him.
The national average for a gallon of regular gasoline is down 12 cents from last week at $4.42 amid reports of peace talks with Iran. But AAA notes they could spike again if a ceasefire deal isn’t reached.
The new Northport RV Park in Northport, Alabama, is expected to open this June, after being in the works for several years.
Yosemite National Park has changed its fishing policy in Yosemite Valley from seasonal to year-round. Seasonal closures that previously restricted winter fishing access have been removed.
A hiker was attacked by a bear in Glacier National Park on May 21, just weeks after a fatal bear attack elsewhere in Montana. Witnesses near Lake Josephine reported hearing screams before a member of another hiking group ran back yelling, “Bear attack!”
The Montana Department of Transportation was expected to begin resurfacing sections of Interstate 90 between Saltese and Haugan, mile markers 11.2 to 15.7, this week through August. Motorists should expect delays, reduced speeds and single-lane traffic.
And, lastly, be grateful you’re not this woman, who, after breaking every rule about approaching wildlife in Yellowstone National Park, faceplants as she runs from a bison.
A DEET-free mosquito and tick repellent … that works! If you’re one of those people that mosquitoes love (we all know at least one person like this), this product is for you. A very impressive number of five-star reviews. This awesome DEET-free insect repellent works for mosquitoes, ticks, black flies and fleas. Keep this one handy, folks. As RVers, there’s a good chance you’ll probably need this. Learn more or order here.
BE CAREFUL ON THE WATER! Alcohol is responsible for 1 in 5 boating deaths in the United States, where the primary cause is known.
Reader poll Would you pay more for an RV with additional safety features?
You may share this Tanner Toon, unaltered, on your website, blog or social media with our compliments. The musings from Tanner Woods’ creative mind appear in this newsletter every Saturday and Sunday and in many RV Daily Tips newsletters through the week. Sign up for our RV Daily Tips Newsletter so you don’t miss them.
RV and RV-related recalls
• Brinkley RV is recalling certain 2025-2026 Model Z trailers. The shock bolts may have been incorrectly tightened, which could become a road hazard. Recall: REC-2602. Info: 574-501-4280. •General Motors is recalling certain 2018 Chevrolet Silverado 1500, GMC Sierra 1500, 2019 Chevrolet Silverado 2500, Silverado 3500, GMC Sierra 2500, and Sierra 3500 vehicles. The left-side or right-side roof rail air bag inflator end cap may detach from the inflator or the inflator sidewall may rupture. Recall: N262557310. Info: 800-222-1020. •Tiffin is recalling certain 2025-2026 GT1, 2026 GH2, and GH1 motorhomes. A screw may have punctured the fuel tank during manufacturing, causing a fuel leak. Recall: TIF-148. Info: 256-356-8661. •Ford has recalled 16,200 model year 2021-2022 Broncos equipped with Molded-In-Color hard tops. Roof pieces may crack and become loose, and detach. More details.
Stolen RV
Keep your eyes out for this brand-new 2026 Surveyor Camp 29 trailer (VIN: 4X4TSVE21TL052815), which was stolen from an Anderson, Calif., RV dealership (near Redding) on May 8. It was new, unregistered, with no plates. Surveillance video shows it being towed away by a white, 4-door truck. A reward is offered for info leading to recovery and/or arrest. Know something? Contact the Anderson Police Department. Confidential tips are welcome.
? MYSTERY PRODUCT OF THE DAY ? Do you stay up later than your partner or do they stay up later than you? Whoever goes to bed earlier probably doesn’t want all the overhead lights on, right? Well, this will certainly help. This is very smart!
The circumference of the Earth at the equator is 25,000 miles. The Earth rotates in about 24 hours. Therefore, if you were to hang above the surface of the Earth at the equator without moving, you would see 25,000 miles pass by in 24 hours, at a speed of 25000/24 or just over 1000 miles per hour.
Laugh of the week
Top scams RVers should watch for right now
Summer travel is underway, and scammers are taking advantage of crowded campgrounds, busy highways, and travelers making reservations on the go. Here are three scams RVers should watch for this week:
Fake campground websites: Scammers are creating lookalike websites for popular campgrounds and RV parks. You think you’re making a reservation, but your payment goes straight to a scammer—and no reservation exists when you arrive.
Roadside assistance membership scams: Emails and texts claim your roadside assistance plan is about to expire and urge you to renew immediately. The message often includes a payment link that steals your credit card information.
Facebook Marketplace “RV accessory” scams: Deep discounts on generators, solar panels, towing gear, and other popular RV equipment continue to lure buyers. The item either never ships or isn’t what was advertised.
These scams all rely on the same tactic: creating urgency. If someone wants your money immediately, take a few extra minutes to verify before you pay.
Something wrong with your RV? To diagnose, first test the airflow
Dave Solberg writes, “To troubleshoot properly, you need to know how a component should operate and get accurate readings for temperature, voltage, airflow, and more. This airflow meter—an anemometer—measures airflow per minute and temperature.” It’s one of Dave’s top-recommended tools. Read his article or order one here.
Today in history
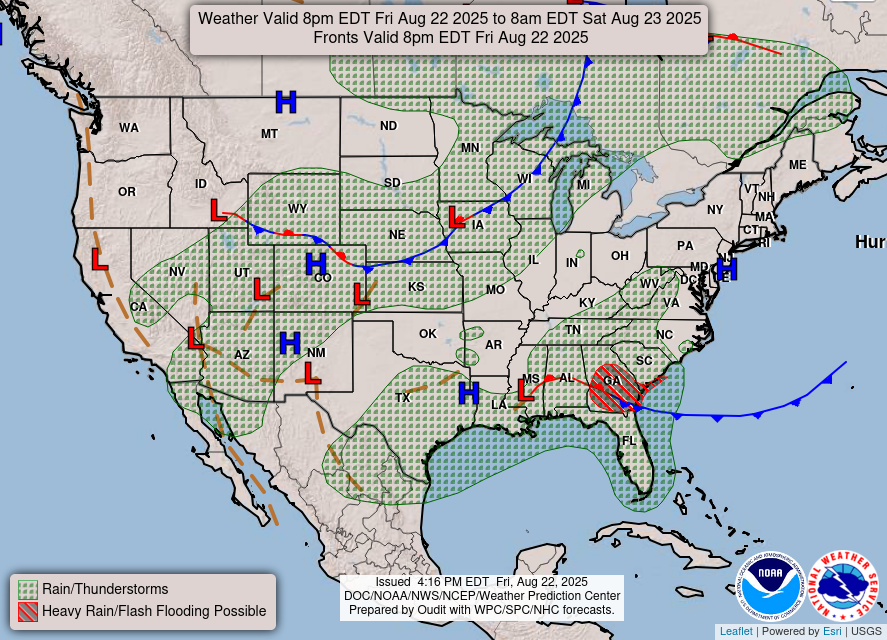
Today’s weather forecast across the nation THIS MAP UPDATES TWICE A DAY
We use cookies to ensure that we give you the best experience on our website. By continuing to use our site, you consent to accepting cookies. We NEVER have or will sell reader's data. For more info, please see our privacy policy page.
!")


 Trim trick