Love’s overnight RV Stops are becoming quite popular, and it seems like they’re expanding by the day! We publish story after story about new Love’s RV Stops opening up around the country. We know some of you have stayed overnight with your RV at one of these stops, and others of you haven’t come across one yet.
Have you ever stayed at one? If so, multiple times? Just once? And if not, do you think you’ll stay at one in the future or probably not?
If you have stayed at a Love’s RV Stop, please leave a comment and tell us about your experience.
Here are a few articles we’ve written about Love’s RV Stops:
If you enjoyed this RVtravel.com reader poll, keep in mind that we have polled our readers at least 5,000 times through the years. It’s fascinating to see how they have responded, sometimes very surprisingly. You’ll find an archive of some of the polls here. So what are you waiting for? Check ’em out.
By Cheri Sicard
The short video tutorial below, demonstrated by Dr. Erica W. Tinson, BSc, BVSc (Hons), MVSc, could possibly save your dog during an emergency, by teaching you when and how to properly perform canine CPR.
Dr. Tinson specializes in veterinary emergency and critical care, and this five-minute video follows current CPR guidelines as recommended by the American College of Veterinary Emergency and Critical Care (ACVECC) Reassessment Campaign on Veterinary Resuscitation (RECOVER) initiative.
This is an emergency measure that is undertaken when the dog is unconscious and not breathing. Dr. Tinson stresses that cardiopulmonary arrests such as these are generally associated with low survival rates. That said, CPR or cardiopulmonary resuscitation remains the most effective way of treating this emergency.
In the video, Dr. Tinson uses a dog mannequin to demonstrate how to correctly do canine CPR.
1: Recognition and performing the ABCs
Before starting canine CPR it is important to check the ABCs, meaning:
Airway
Breathing
Circulation
It’s important that this step takes no more than 10-15 seconds. Dr. Tinson says you can recognize an animal in cardiopulmonary arrest by its being unconscious and not breathing at all.
Don’t waste time checking for a pulse. Follow along with the video instead for a demonstration of how to quickly and effectively check for breathing. She also advises trying to wake the dog. Also, if possible, try to call for help before starting canine CPR.
2: Animal and hand positioning
Again, watch the video to see exactly how you should position the animal and your hands. Where you will perform chest compressions will vary depending on the type/breed of dog. Dr. Tinson covers various scenarios with demonstrations of how it should look, how fast you should do the compressions, and how long you should continue.
3: Mouth-to-snout ventilation
If you are in an emergency situation in the middle of nowhere, chances are intubation (insertion of a ventilator tube) probably won’t be possible. In these situations, mouth-to-snout ventilation is called for. Dr. Tinson shows you how to do it in the video, providing 2 breaths for every 30 compressions.
4: Putting it all together
Dr. Tinson then puts the steps together to demonstrate what proper CPR on a dog should look like.
The video is only about 5 minutes, but for dog lovers, it is 5 minutes well spent towards protecting your beloved companion, no matter where you roam.
By Cheri Sicard
This short but fascinating photo compilation of America’s most unusual campsites (Part I) is from the Campsite Photos YouTube channel. Theirs is a handy website to bookmark as it lets you easily browse high-quality, current photos of individual campsites in national parks, state parks, the U.S. Forest Service, BLM, RV parks, and other campgrounds throughout the U.S.
Naturally, such a website has a lot of material to choose from. I am not sure how unusual some of these campgrounds are. Some are unusual, others are just great campsites, but they all have some interesting features. And the video sure covers a whole lot of them very quickly!
Even if you never visit, you can still enjoy some mighty pretty eye candy.
Here are just some of the unusual campsites covered:
#1 Norris Geyser Basin, Yellowstone National Park: Hear the geyser blasts from your campsite!
#2 Lost Dutchman State Park, Arizona: Camping at the base of and in the shadows of Superstition Mountain.
#3 Julia Pfeiffer Burns State Park, California: Situated right on the cliffs of the spectacular Big Sur coast.
#5 Gordon Hirabayashi Recreation Area, Arizona: Camping in what once was a Japanese internment camp.
#6 Goblin Valley State Park, Utah: Enjoy awe-inspiring natural rock sculptures from your campsite.
#7 and #8 Mill Creek Campground, Del Norte Coast State Park, and Jedediah Smith State Park, California: Share your campsite with old-growth redwood giants at these two California state parks.
#9 Furnace Creek Campground, Death Valley, CA: Park your RV at 190 feet below sea level.
#10 Bahia Honda, Florida Keys: Watch the sunrise from your waterfront campsite.
#11 Ballarat Camp, California: This one’s a little creepy but allegedly Charles Manson’s old abandoned truck is just a short walk from camp.
#12 White Sands National Park: Camp among the snow-white gypsum dunes.
#13 Angel Island State Park, California: Camp with views of the San Francisco Bay and the Golden Gate Bridge.
And that lucky 13 only takes you through half of this short 5-minute video. Be sure to watch for more interesting, if not unusual, campsites.
By Dustin Simpson
Join me in our RV shop as I explain how the entry door hold back on your RV plays a crucial role in keeping your door securely in place while you enjoy the comforts of your home on wheels. Over time, these components can wear out, leading to difficulties in keeping the door open.
In this guide, I’ll walk you through the steps to replace your RV entry door hold back, ensuring smooth functionality and added convenience.
Materials and tools needed to replace an RV entry door hold back:
Step 1: Identify the type of RV entry door hold back
Different RVs may have different types of door hold backs. It’s essential to identify the specific type you have before proceeding. Common types include latch-style hold backs or gas strut-style hold backs.
Step 2: Locate and remove the existing hold back
Using a screwdriver (depending on the fasteners used), carefully remove the existing door hold back from the RV. Take note of the placement of screws and any specific attachment points for easy installation of the new hold back.
Step 3: Detach the hold back from the door
Once the hold back is removed from the RV, detach it from the door itself. This may involve removing additional screws or fasteners that connect the hold back to the door.
Step 4: Install the new door hold back
Align the new door hold back with the existing attachment points on the door. Secure it in place using the original screws or new screws, if necessary. Ensure a snug fit to guarantee proper functionality. (If required, you can use tri-fold rivets 3/16″ x 3/4″ if holes are damaged.)
Step 5: Attach the hold back to the RV
Now that the hold back is securely attached to the door, align it with the designated attachment points on the RV. Use the appropriate tools to fasten it in place, making sure it is firmly secured.
Step 6: Test the door
Open and close the RV entry door several times to ensure that the new hold back functions correctly. Check for smooth operation and make any necessary adjustments if the door doesn’t align properly.
Step 7: Lubricate (optional)
If your new hold back has moving parts, consider applying this lubricant to ensure smooth operation. This step can help prevent premature wear and tear.
Replacing your RV entry door hold back is a straightforward process that can significantly improve the functionality and convenience of your RV door. By following these step-by-step instructions, you can easily install a new hold back and enjoy hassle-free entry and exit from your RV. Regular maintenance and periodic checks will help ensure that your door hold back continues to operate smoothly for years to come.
If you have been paying attention to information on tires in RV application, you probably have heard the phrase “4-corner weights.” Let’s dig into the basic concept of vehicle weight and why this is so important.
Most cars, trucks and RVs have four tire positions. Yes, I know that some of you have small “pop-up” trailers with a single axle and only two tires. But I do not recall hearing about a small trailer having hundreds more pounds load on the tire on the “driver side” versus the tire on the “passenger side” of the RV, for example. I have, however, heard of some large RVs having more than 1,000 lbs. more load on one end of an axle than the load on the other end, and that is what concerns me.
RV tire loading
For the purpose of RV tire loading, we are focusing on the four positions of right front, left front, right rear and left rear. Most big and heavy RVs have “dual” tires on the rear axle, so we are talking about the tire position, not the individual tires. Yes, some very large Class A RVs also have an extra axle or “tag” in the rear. When the topic is “4-corner weights,” we are not talking about the load on an axle but the tire positions.
I am concerned with “4-corner weight” because a vehicle may have a significant unbalance end-to-end on an axle. The owner gets an axle weight and may simply assume a 50/50 end-to-end load split. In that case, we are looking at the potential of serious tire overload. Hopefully, most of you realize that tire overload is the reason for many tire failures.
Here are links on how some get their weights. To weigh your RV (motorhome or travel trailer) on a CAT Scale, you need to drive onto the scale with the RV positioned correctly and use the CAT Scale app or speak with a scale operator. CAT Scales are commonly found at truck stops and are designed for weighing commercial vehicles, but they also accommodate RVs.
Read about steps for weighing your RV on a CAT Scale here.
NOTE: Most CAT Scales have a guard rail that prevents you from being off-center side-to-side.
RVs may not be loaded evenly
I fully realize that learning the “4-corner weights” is not always easy, as very few truck weight platforms do individual tire positions. Commercial trucks have “axle weight” laws and regulations. However, the reality is that most trucks have their load more evenly distributed, side to side.
We RV owners have some of our “heavy stuff” built into the RV. So, a heavy commercial refrigerator, the water holding tank, and a slide-out could all be on the driver’s side of the vehicle. However, relatively lightweight items like clothes or toilets could be on the passenger side. If the owner gets an axle weight and simply assumes a 50/50 end-to-end load split, we are looking at the potential of serious tire overload.
Getting your RV “4-corner weighed”
If you attend RV gatherings such as an FRVA convention or an Escapees event, there are many times people there who do RV-focused “4-corner weighing.”
Here is information from Recreation Vehicle Safety Education Foundation (RVSEF) on Wheel Position Weighing.
Here is information from Escapees RV Club on SmartWeigh.
Yes, it will take a little effort to get real “4-corner weights.”
This is my RV on a scale in Oregon. The red circle is the weight sign.
This “state scale” is turned on even with the scale officially closed. I took the opportunity a few years ago to get my own “4-corner weights” and it was free.
What to do until you get your RV “4-corner weighed”
Some have asked what to do until they get actual individual tire position weights. I have offered that they at least get CAT Scale axle weight and assume one axle end is supporting 52% to 54% of the load. But this is a poor substitute for learning the facts.
Finally: Remember that once you learn YOUR actual axle end weight you need to use the “heavy-end-weight” for each axle and consult the Load Inflation tables to learn the MINIMUM inflation required to support your load.
If you have tire questions, check out Roger’s Blog as well as his posts on RVtravel.com. There are hundreds of posts covering everything to do with tires.
If you still have a question for Roger after searching the above posts, send your inquiries to him using the form below.
By Gail Marsh
You’re driving down the road, happy to be headed to your campground destination, when suddenly your tire pressure gauge indicates a problem. Now what? That was the question we recently faced. We’d been driving for hours in seemingly endless traffic and were tired and hungry. Adding to our frustration was the fact that we were in the middle of a 25-mile construction zone. We couldn’t pull over because there wasn’t a shoulder! Not the best of luck, huh?
Overloaded
When one tire from a set of dual tires loses air, the other (non-flat) tire carries the total weight that both tires usually share. In other words, one tire was carrying half the weight of our truck plus the hitch weight of our fifth-wheel.
Normally, we would have pulled our entire rig completely off the roadway and called for roadway assistance, but because the highway offered no shoulder, we were forced to drive on. We put on our hazard lights, considerably slowed down our speed, and pulled off the highway at the very next exit.
Driving on one dually tire
We hoped to find a gas station or Walmart at the exit. And … yes! We limped into the Walmart parking lot, jumped out to view the tire damage, and called our emergency service provider. Within an hour, the tire was replaced.
Damage
So, is it okay to drive with one flat dually tire? Experts say “no.” We really had no choice because of the road construction, but large trucks and tow vehicles have dually tires for a reason—the ability to handle the weight of the truck plus whatever you are hauling. Industry experts say that if a tire is driven when more than 20% of its air is gone, the tire is considered to be a “run-flat” or a “ruined tire.”
Further damage
Not only that, but you risk serious damage to your rig. A ruined tire can come apart suddenly, and slap mercilessly against your truck or rig. The hard rubber banging against the plastic RV skirting can quickly make mincemeat out of your RV’s exterior. Driving too long on a damaged tire can almost guarantee that the compromised tire will be unsavable.
TPMS
Our TPMS (tire pressure monitoring system) saved us from RV damage and quite possibly helped us avoid a wreck. We had no idea that the tire was losing air. The warning signal on our monitoring system was the only way we knew about the compromised tire. A tire pressure monitoring system is one special piece of equipment that is a must for all RVers, everywhere.
A few months ago, I wrote about taking ahuge step out of our comfort zone and buying a property on five acres in northern Arizona. We backed out when we learned the 1,400 ft. well was dry, that it was 40 to 74 miles to the nearest grocery store/medical/hardware, and it SNOWED when we visited! All things you wonderful readers warned us about. Both your encouragement in taking that huge step, experience, and understanding when we backed out were so comforting.
We are late on leaving this Arizona hotbed—115 degrees forecast for today—because we are trying yet again! This time, we researched the area much better and know what we want. Having friends living nearby helped with needed advice.
We spent some time in the nearby “village”—yes, it is called a “village”—and we really liked it. They have a small market with milk, limited groceries, and a deli. 15 miles away are all the major grocery stores.
We instantly fell in love with the land, the space and the mountain views. At least I fell in love with the mountain views, my husband more with where he could build a Quonset hut for the RV. The house is an old Southwest brick style and, umm, it’s interesting from the outside. The inside, not so much. As a matter of fact, I think I said “yuck” or “ick” when stepping in. Maybe it was, “Ugh—Hate the inside.”
There is a reason it had not been selling. Yet the land and location lured us, and we made a low-ball offer. It was accepted. Again, there is a reason it hadn’t been selling besides the dismal housing market.
So, on with inspections and a list of things to do on this project house. “Project house” is so much more positive than fixer-upper! The previous owners built and lived in the house for 45 years until they passed away at 91. So it is old, outdated, and does need some TLC. Actually, a lot of TLC. What my husband calls just cosmetic is actually roof resurfacing, wiring, tearing out the walls, and decades-old carpeting. But it has lots of water in the well and no grass to mow or leaves to rake!
So, once again, we are out of our comfort zone. No HOA or close neighbors, and no more easy living in the convenience of a retirement community. We have renovated houses before and have taken years to do it. This time, we may not have years, and this could well be our last hurrah. Our hope is that with our wonderful friends volunteering to help and the people we can now hire to help, the renovations will be done before we pass on.
So, now we’re holding our breath and trying to figure out if the free-range cattle in the area have been able to navigate the plugged-up cattle guard.
By Tony Barthel We’ve all seen an RV driving down the road with half the stinky slinky flailing about as it snakes its way out of the bumper and onto the side of the road. This is one of the more universal challenges we RVers face—the vanishing sewer hose.
Of course, you don’t find out until you’re ready to dump your tanks, which are filled to the brim, and you’re in a hurry to get home.
Camco magnetic sewer hose cap
Nothing like going with hat in hand to a neighboring RVer and asking to borrow their sewer hose.
What’s the solution to the disappearing sewer hose?
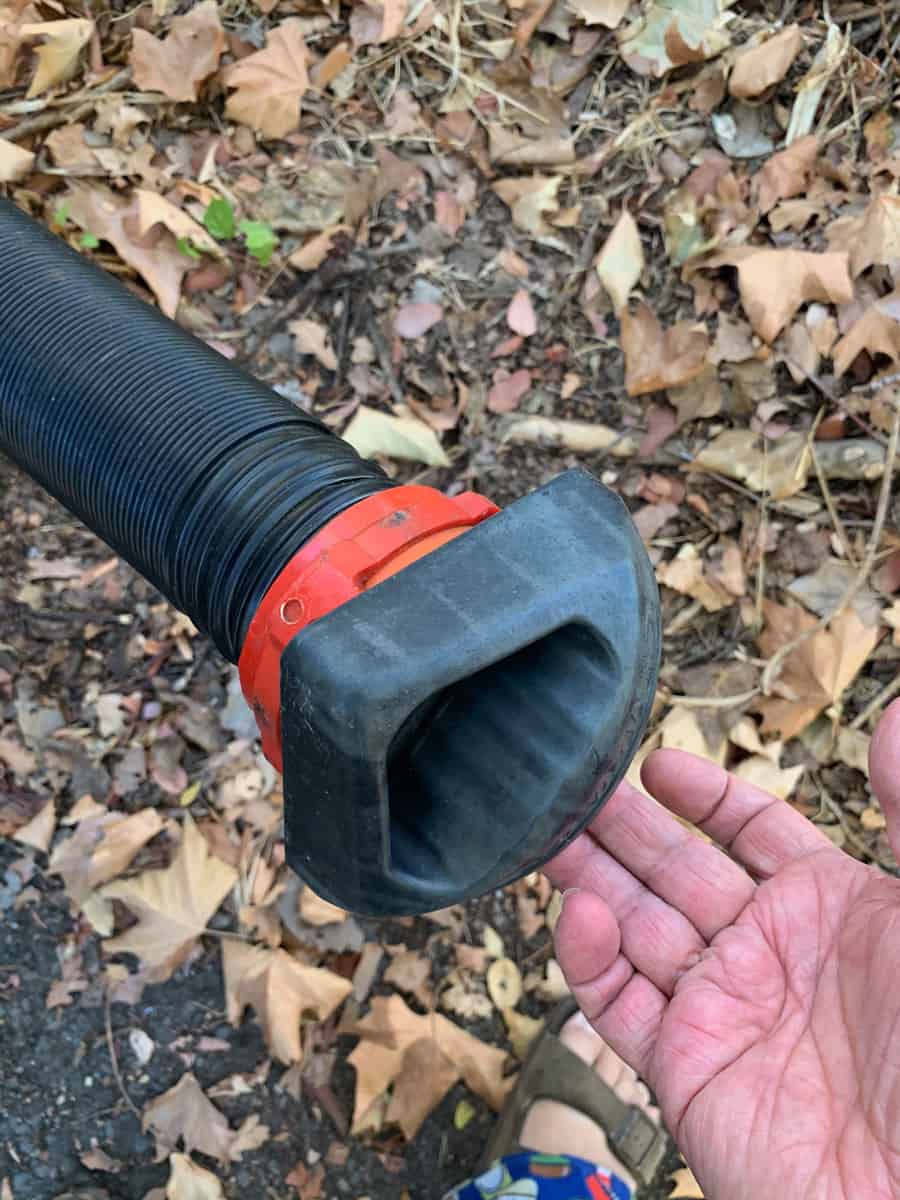
So what’s the solution? A better sewer hose cap—and I’ve found one! Once again, the campers at Camco have created a solution to a problem lots of RVers have. I’ve had the Camco 4-in-1 Magnetic Bumper Cap with Lug Fitting End and Standard Cap Set for a year or so now, and it’s one of those little things that makes a big difference.
First of all, I like that the cap on one side of the bumper (you choose—I bet you’re going to choose the side where the valves are) is magnetic. The magnets they’ve chosen are pretty darned strong.
Inside this cap are the pegs so that your sewer hose can attach to the cap itself, so when you pull it off the bumper, it’s like some stinky slinky valet and the hose comes right along with it.
On the opposite end is a cap that squeezes onto the bumper but is made of a better flexible plastic than whatever came with our RV. It takes a legitimate squeeze to get it off the bumper, so you’re not likely to have the situation of the stinky slinky dancing its way out to the chagrin of drivers behind you.
While this is a simple fix to a common problem, those are the best kind, and for a worth-it price, you can prevent the loss of a much pricier sewer hose. Plus, the whole sewer hose valet feature.
We all love a good scenic drive, right? Discovering an ideal RV scenic route can make for an unforgettable experience. For some of us, scenic drives might be our favorite part of RVing. Twisty coastal roads, winding mountain passes, red rock canyons—the views can be hard to beat. But seasoned RVers know something many newbies don’t:
The most beautiful RV scenic route isn’t always the best one when you’re hauling a big, heavy, slow, home on wheels.
In fact, the smartest RVers often intentionally avoid the scenic road in favor of the safe, stress-free, and equipment-friendly one.
Here’s why—and how to make the call when planning your own trip.
The route may be scenic… But is it RV-friendly?
Just because Google Maps or your GPS shows it as a road doesn’t mean it’s a road for you. Some famously beautiful drives are also famously terrible for RVs. For example:
• State Highway 1 in California: Stunning views… and stomach-churning drop-offs, hairpin turns, and almost nowhere to pull over.
• Going-to-the-Sun Road in Montana: Gorgeous, but vehicles over 21 feet aren’t even allowed.
• Tail of the Dragon in North Carolina: More than 300 curves in 11 miles! Wow! Great for motorcycles. Nightmarish for motorhomes.
• Valley of the Giants, U.S. 101 through the California’s Coastal Redwoods. This is a spectacular stretch of two-lane road through the towering redwoods, but much of the beauty is high above you. If your vehicle’s windows only offer limited visibility, you’ll miss the magic.
Before you commit to the scenic route, ask yourself: Can I actually enjoy the view when I’m white-knuckling the wheel?
Prioritize clearance, shoulders, and pull-offs
Scenic byways often weren’t designed with 13-foot-tall fifth wheels or 40-foot Class A rigs in mind.
Instead, choose routes that offer:
• Wide shoulders or breakdown lanes
• Reliable turnouts or pull-offs for slower traffic
• Clear bridge height and weight info
• Minimal switchbacks or steep downgrades
• Use RV-specific tools that show you the routes ahead
Know the risk factors
Scenic routes become dangerous or miserable with the wrong conditions:
• Wind: Open desert or coastal routes can whip your rig like a kite.
• Smoke: A “beautiful drive” in wildfire season can mean low visibility, closed roads, or evacuation alerts.
• Rain and flash floods: Slot canyon country and desert highways can wash out fast.
• Tourist traffic: One scenic overlook = three-mile backups in the summer.
Always have a Plan B—and check local DOT sites or traveler forums for up-to-date road info.
You don’t have to drive the pretty part
Here’s a veteran trick: Unhook the toad (or hop in the tow vehicle) and do the scenic drive without the RV. Don’t have a car with you? Maybe consider renting one for the day. You’ll enjoy the views a whole lot more—and your RV will thank you.
Yes, the scenic route can be unforgettable. But so can a day without blown tires, scraped awnings, or screaming arguments at the wheel.
Take the smarter road when you need to. You can always come back for the view.
“I honestly think it is better to be a failure at something you love than to be a success at something you hate” —George Burns
Need an excuse to celebrate? Today is National Daylight Appreciation Day!
Featured news
Diesel fuel prices have jumped sharply in recent days, and several overlapping factors are to blame—many of which hit RVers directly at the pump. The biggest immediate driver is tension in the Middle East, particularly the escalating conflict between Israel and Iran. That’s spooked global oil markets and driven diesel futures up more than 8% in just a day. You can still save on RV diesel. Read on.
OK, so diesel… What if you could save 35 to 50 cents a gallon every time you filled your RV with diesel? That’s the promise buzzing around the Open Roads Fuel Program, a discount card that lets RVers tap into trucker-level fuel pricing. It sounds like a too-good-to-be-true internet rumor—but after putting it to the test on real-world road trips, we found the savings can be very real.
Thinking of buying an RV or tow vehicle? A new bill in the U.S. Senate could let you deduct up to $10,000 in loan interest—even if you take the standard deduction. Camping World supports the proposal, part of the Trump-backed “Big Beautiful Bill,” which includes RV tax breaks—at least for now. Learn more.
REV Group, a major player in the RV manufacturing industry, has announced plans to sell its Lance Camper division. This decision marks a significant shift in the company’s strategy, focusing on its core motorized RV operations. For RVers who have generally remarked on Lance’s quality and support, this move could have notable implications.
A powerful industry coalition has come out against a Senate proposal that could lead to the sale of public lands. The Outdoor Recreation Roundtable (ORR), representing RV manufacturers, dealers, and campgrounds, warns the plan threatens access to beloved recreation areas and undermines a $1.2 trillion outdoor economy. Once land is sold, they argue, it’s gone for good—and with it, RVers’ access to trails, campsites, and natural spaces. Learn more.
If you’re out on the road and get a text saying you owe traffic fines or unpaid tolls—watch out. A wave of scam messages is hitting phones across the country, and they’re tricking people into handing over money and personal info. It’s the new fake traffic ticket scam, and you need to be aware of it.
RVers looking for their next favorite spot will want to check out the just-announced 2025 Best Places to Camp Regional Awards from The Dyrt. The popular camping app—known for offering everything from state park listings to free campsites, RV parks, and millions of user reviews—has once again tapped into its vast community to highlight the top-rated campgrounds across the country.
RV travelers heading to national parks may notice some changes ahead—especially if they’re coming from outside the U.S. The Trump administration is pitching the idea of a new “surcharge” for international visitors to national parks, while also recommending a $1.2 billion cut to the National Park Service’s budget for 2026. It’s not the first time RVtravel.com readers have heard about the potential of a park foreign visitor surcharge. Continue reading.
A German Shepherd gave Yellowstone visitors an unexpected show last Friday when it jumped from a vehicle and chased a juvenile wolf. The incident ended without injury, but let this be a reminder to keep your doggy’s back seat window (mostly) closed!
The Bureau of Land Management (BLM) is asking for public feedback on a new proposal that could open up more public lands in southern Utah to certain electric bikes—specifically, Class 1 e-bikes—on mountain bike trails. BLM e-bike comments are now open, so please leave your feedback.
NOT SO FAST! Police in South Carolina engaged in a not-so-hot pursuit as they chased a tractor excavator down a main highway for more than an hour at the speed an average adult walks. The chase reached speeds of 3 mph (4.8 kph) early Sunday morning in North Charleston, police said.
Midland (Texas) Crime Stoppers is offering a $1,000 cash reward for tips that help track down the fella responsible for a recent RV burglary with a distinctly Western twist. Someone had slipped into an RV and made off with some mighty pricey cowboy gear (think: $3,500 of cowboy hats and boots!). Here’s the story.
The continuing saga of a North Carolina city government that’s trying to get Camping World to follow the law just got deeper. It looks like Marcus Lemonis has friends in high places: North Carolina lawmakers are now involved in a debate over whether a very large American flag can be flown on private property. A potential North Carolina state law to override local flag codes could free Lemonis and his money.
REMINDER: This is the abbreviated, free edition of this newsletter. Our supporters receive the ad-free edition.
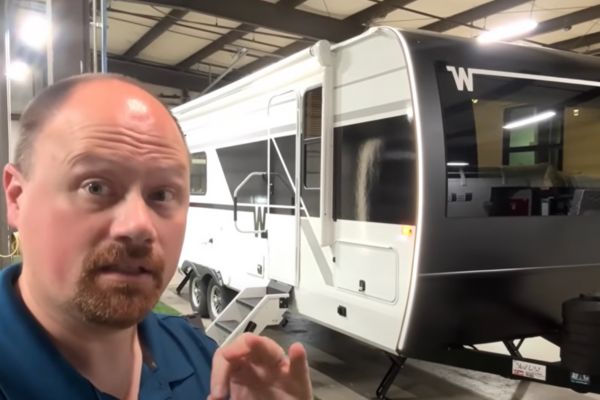
RV review First Look: The 2026 Winnebago Thrive 24RKS travel trailer sets a new standard
By Cheri Sicard
Winnebago’s new Thrive™ 24RKS brings a surprising sense of excitement to the towable RV market, and here, Josh the RV Nerd of Bish’s RV gives a sneak peek and first look at this innovative new RV. After years on the sidelines, the brand’s latest release shows real progress. The 24RKS comes in right at the 30-foot mark, puts half-ton tow capability within reach for many owners, and features a taller 6’8″ ceiling. The verdict? Click here to find out.
Book is a must-have for state park campers!
This book, “50 States 500 State Parks,” is a must-have for all state park campers and explorers. The book is a beautiful visual journey through America’s best state parks. Whether you’re looking for stunning vistas, rare wildlife, a dose of history, or an enjoyable hike, the state parks offer an array of experiences. Learn more or order.
Campground crowding, comments & concerns Maybe campgrounds aren’t “crowded”; maybe RVs have just gotten too big!
It seems the campground crowding of the pandemic era has lessened. While state and county parks close to cities or national parks may still be swamped, our readers are finding a clear path to camping overnight and for extended stays. I am so hoping this is the case… Learn why Nanci Dixon made that statement, and get some tips from readers on how to time your camping for the best experience. All that and much more here.
News briefs
Last Friday, two leaders in the RV technology space, AdventureGenie and RV Weather, announced that they are teaming up. By combining both technologies, users will now see weather‑optimized routing suggestions as part of their itinerary creation process. As you map out a multi‑day journey, the system flags upcoming weather threats and automatically recommends adjustments (i.e., rerouting around an approaching storm cell). These dynamic updates happen instantly. This could be a game-changer.
“Tornado Alley” has long referred to the corridor of the central Great Plains where the greatest number of tornadoes occur each year. Here, warm, moist air from the Gulf of Mexico collides with cool, dry air from the Rockies, creating ideal conditions for supercell thunderstorms and twisters. New evidence suggests Tornado Alley is shifting and creeping east and southward.
Ready to hit the road through Teton Pass in your RV? Big changes are on the horizon. Wyoming State Highway 22 will be fully closed for a crucial repair project. The repair is now rescheduled for the weekend of June 27 at 6 p.m. to June 30 at 6 a.m. Learn more.
You don’t see this every day—a bear with a plastic barrel lid stuck around its neck. But in Michigan, a young black bear lived that way for nearly two years. Wildlife officials with the state’s DNR finally trapped the bear this month and removed the lid. It had first been spotted on trail cameras in 2023, when it was still a cub.
Two fast‑moving wildfires—known as the Seven Springs Fire and the Trout Fire—are forcing evacuation orders and standby alerts across southern New Mexico. RVers or others planning to camp in Lincoln and Grant Counties need to understand which areas are affected, how evacuation zones are structured, and what steps to take if a wildfire threatens their safety.
WHAT THE CLUCK? Animal rescuers were called to a Buffalo Wild Wings eatery in Iowa to wrangle an unusual visitor: a live chicken. The Animal Rescue League of Iowa shared a photo on social media showing a chicken at the front door of the Buffalo Wild Wings. “What the cluck?” officials wrote. “Talk about a chicken on the wrong side of the road!” The “poor, confused hen” was collected by an ARL Animal Services officer.
The Mother Road (Route 66) turns 100 next year. It’s time to get ready to celebrate Route 66 with an RV trip down memory lane. Each of the eight states along the 2,448‑mile corridor is rolling out special events, road improvements, and memorial installations. Learn more.
RECALL: Keystone is recalling certain 2025 Fuzion and Raptor toy hauler recreational trailers. The generator’s fuel and vapor hoses may have been reversed during installation. Incorrectly connected hoses can feed fuel into the incorrect side of the carburetor, increasing the risk of a fire. Learn more.
ANOTHER KEYSTONE RECALL: Keystone is recalling certain 2025 Carbon, Fuzion, and Raptor toy hauler recreational trailers. The rear gate pins and/or leg support bracket may be missing, allowing the gate to shift during operation, which could become unstable, increasing the risk of injury. Learn more.
When a black bear poked its nose—and claws—into a tent where two kids were sleeping at Difficult Campground near Aspen, Colorado, the U.S. Forest Service decided that “difficult” was a little too “on the nose.” The result: an emergency ban on tents and other soft-sided shelters at the site, effective immediately.
Is a visit to Utah’s Bryce Canyon area on your agenda? Check ahead. The France Canyon Fire is closing in on 10,000 acres and is only 5 percent contained. All National Forest lands south of Utah State Route 12 on the Powell Ranger District are closed—except for the trails and campgrounds (Red Canyon Campground and Coyote Hollow Equestrian Campground). The East Fork road (087) remains closed. Bruce Canyon National Park is open. Get current conditions.
California State Parks, which is responsible for more than 340 miles of coastline, is begging visitors to “leave no trace” by asking them to avoid collecting sea glass, agates, or other rocks at state beaches. Get caught doing so, and you could face a $1,000 fine.
Lazydays has closed on the asset sale of its Longmont, Colorado, location to General RV Center, marking the final transaction and completion of the sale of three stores to General RV.
Cape Cod National Seashore will transition to a fully cashless system at its fee entrance stations on July 1. Only credit cards, debit cards, or mobile payments will be accepted at beach entrance booths.
The U.S. Department of Agriculture Forest Service and the U.S. Department of the Interior announced Federal wildland firefighters and dispatchers now have access to expanded mental health support through a network of licensed providers. Wildland firefighters and support staff work in dangerous, high-stress environments that can expose them to trauma and cumulative stress, increasing their risk of mental health challenges.
On June 12, Zion National Park marked the 100 millionth boarding of the Zion Canyon Shuttle System since service began in 2000.
While most of California’s Joshua Tree National Park’s reservation campgrounds are usually open year-round, partial or full closures may occur during the summer months. Currently, portions of Indian Cove, Black Rock, and Cottonwood Campgrounds are closed, along with all of Ryan, Belle, and White Tank campgrounds.
Great news for RVers exploring the great Northwest region of the U.S. Oregon’s Silver Falls State Park’s main campground swung its gates open again on Monday, June 16, 2025. The reopening comes after a nine–month hiatus. Learn more.
Fun Town RV has purchased Nature Coast RV in Crystal River, Florida. Fun Town RV has 29 retail locations and four service and PDI centers.
FACTOID:A flower’s pollinator could be a bee, beetle, ant, wasp, butterfly, hummingbird, or even a small mammal like a bat. These creatures are essential for healthy ecosystems.
Reader poll Do you keep some of your personal belongings in a rented storage locker?
TAKE A GUESS: If RVtravel.com readers had a time machine, would most choose to go 200 years back to the past or 200 years into the future? Find out here.
The latest U.S. average prices per gallon of regular unleaded gasoline on June 16 was $3.14, up 3 cents from last week, down 30 cents from last year. Diesel was $3.57, up 10 cents from last week, down 16 cents from a year ago. Most expensive gas: California ($4.65), least expensive: Mississippi ($2.67).
There are more than 100 authentic shrunken heads, or tsantsa, in the Ripley’s Believe It Or Not collection. Headhunting is believed to have occurred in many regions of the world since time immemorial, but head shrinking has only been documented in the northwestern region of the Amazon rainforest.
Laugh of the week
Cleaning gel gets rid of dust and grime everywhere!
Say goodbye to dust and grime in hard-to-reach places. Give your car a professional-looking detail in minutes with this, and clean areas in your RV like vents, blinds, window and door grooves, computer keyboards, and so much more. This stuff is amazing! The gel is made of natural ingredients, and won’t damage any surface. Simply press/push it into those hard-to-reach places, pull it up, and watch everything sparkle. Learn more or order.
The perfect scam Archive Episode: Knock Knock, Where’s My Puppy?
In this 2021 episode, Rochelle scores a great deal on a house in northern Virginia, only to have her dream home transformed a few months later into Pet Scam Central. Day after day, strangers show up on her doorstep, claiming they’ve arrived to pick up a puppy they paid for. Some have driven over six or twelve hours with their family. Unfortunately, Rochelle must break the news that she has no puppies to sell, and the hopeful would-be owners leave heartbroken, confused and out hundreds of dollars. Even worse, over the course of a year, Rochelle finds herself accused of being the con artist. Desperate, she turns to a local news station for help in putting an end to the scam.
Today in history
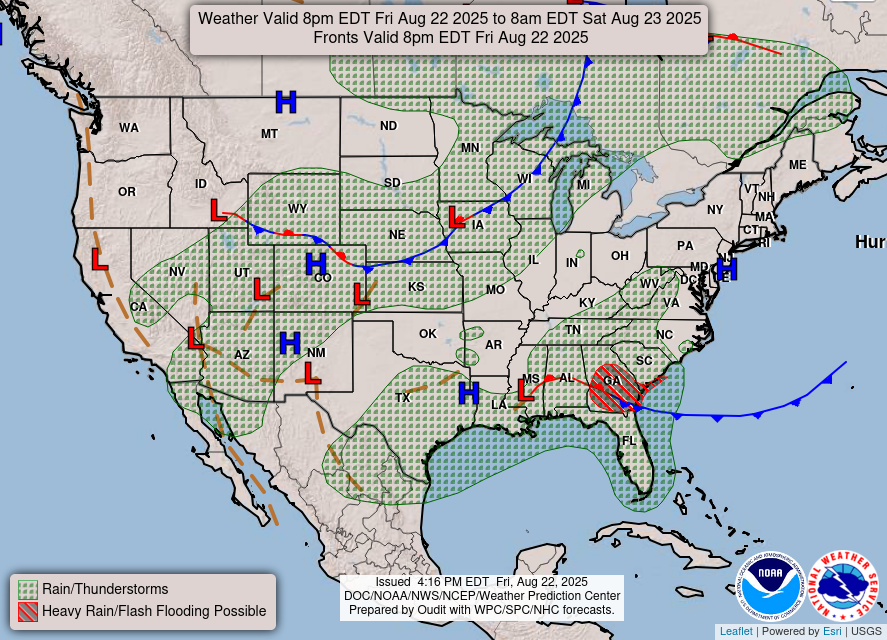
Today’s weather forecast across the nation THIS MAP UPDATES TWICE A DAY
Winnebago’s new Thrive™ 24RKS brings a surprising sense of excitement to the towable RV market, and in the video at the end of this post, Josh the RV Nerd at Bish’s RV gives a sneak peek and first look at this innovative new RV. [The RV in the video is a prototype.]
After years on the sidelines, the brand’s latest release shows real progress. The 24RKS comes in right at the 30-foot mark, puts half-ton tow capability within reach for many owners, and features a taller 6’8″ ceiling. The verdict? Winnebago understood exactly what modern RVers want and delivered in style. Josh says that longtime RV fans will notice this is some of the sharpest work from Winnebago in years.
Standout build quality and materials
Winnebago took no shortcuts on the Thrive’s structure. Its walls, slide boxes, and floor use an all-aluminum frame while the slide end walls are laminated. Only the roof is stick-built, which helps it withstand snow and towing stress. The rig features a heated, enclosed belly for three-season use, a walk-on roof, and a rugged Norco chassis with a huck-bolted frame—an upgrade that suggests longevity.
The Thrive 24RKS features a large, tinted windshield at the front, protected by a deflection layer that shields against road debris. Both entry doors sit beneath a long power awning for excellent shade, and a factory ladder encourages rooftop access. The heated, spacious storage bays stay organized and weather-protected, while skirt-mounted JBL exterior speakers add curbside entertainment.
Inside the Winnebago Thrive 24RKS
Step inside and the extra headroom is instantly noticeable. The oversized dinette runs nearly wall to wall and is perfect for meals, games, or extra sleeping space, thanks to an included cushion. Large windows keep the interior light and airy, while the tone and warmth of the décor move away from cold, sterile trends. Instead of generic furniture, Winnebago chose better pieces from its motorhome line, adding comfort and style. There’s even a handy shoe garage near the door and a versatile closet-pantry combo.
Winnebago listened to owner requests: the oven is back. The real star, though, is the one-piece molded fiberglass countertop and sink. No seams means no water intrusion headaches. Storage solutions include removable tray inserts in drawers, and the soft-close cabinetry offers a premium touch. Counter space is generous, though some may want an extra power outlet for small appliances. Shelving sizes make sense for both large and small essentials.
Bathroom
The bathroom layout keeps things easy. The shower’s tall enough for most, with a retractable screen and sturdy pan. Clean window treatments and fully framed doors keep things private. The porcelain toilet provides enough space even for bigger folks. Cabinet hardware avoids sharp edges, and Winnebago uses the same molded counter here as in the kitchen, keeping materials consistent and water out.
Bedroom in the Winnebago Thrive 24RK
Up front, Winnebago labels the bed a “King 66×80,” though RVers will recognize it as an Olympic queen bed (tip: search for “Olympic queen” when buying sheets or mattresses). The base can accept a regular queen mattress by trimming a bit of the decking. Storage is symmetrical, with soft-close drawers and side pockets for phones or books. Overhead cabinets have full doors—no wasted space.
This bedroom brings real residential comfort to the towable segment, with optional 50-amp service and second A/C, two entry doors (one windowless for privacy), stackable washer/dryer prep, and good airflow from cross-breeze windows. Plans to adjust the bathroom and bedroom doors for better movement show Winnebago’s interest in owner feedback.
The theater seating invites conversation, but some may miss built-in cup holders or prefer a folding center armrest instead of a fixed one. In contrast, the dinette is enormous—comparable to what’s found in premium brands like Arctic Fox. It easily fits four, which family campers will appreciate. Winnebago encourages feedback: Is the theater seat layout right, or should tweaks be made?
Road mode
Traveling with the Thrive is practical. Two-stage travel access means the bed, bath, and fridge stay available even with the slide closed. The stove and oven are blocked while in transit, but that’s a good tradeoff for the overall layout, especially for families who want to stop for lunch along the way.
Expect comfort in every season. Standard equipment includes a 15,000 BTU central air conditioner, and a 50-amp upgrade allows owners to add a second A/C. The 200-watt solar system with a 30-amp charge controller will keep batteries happy and is ready for expansion. A 60,000 BTU on-demand water heater means hot showers, even in chillier weather.
Some will notice that Thrive borrows design cues from the Brinkley Model I series. Winnebago doesn’t copy but finds its own take, with different equipment mixes and a more approachable price point. The result is a clean, modern rig with plenty of unique features.
The Thrive 24RKS shows real growth from Winnebago. Many updates clearly come from owner suggestions. There’s still room to improve, and feedback will influence what comes next. Are there features you’d love to see changed or kept? Let Winnebago know.
Campgrounds are changing and evolving, some for the better and some for the worse. RVtravel.com readers discuss their experiences and offer tips to help other campers find that perfect spot.
These do not necessarily represent the views of RVtravel.com.
It seems the campground crowding of the pandemic era has lessened. While state and county parks close to cities or national parks may still be swamped, our readers are finding a clear path to camping overnight and for extended stays.
I am so hoping this is the case, as our trip to Minnesota has been delayed by well over a month. I did make reservations at least six months ago for the hot spots near Minneapolis/St. Paul, but we have nothing booked for the route up. I did renew our Harvest Host membership after we got lithium batteries, so there is that option if they aren’t already booked. We are delayed due to a number of issues, most recently purchasing an old fixer-upper house on five acres of hilly mountain desert. More about that adventure later.
Here are a few emails from our readers:
Essentially empty campgrounds
Neal D. is on a monumental journey to Alaska and writes, “29 days into a long RV trip, going from Tennessee to Alaska, and we had to go with our second-choice campground for the first time today. We did boondock in a roadside turnout for two nights, but in the hope of seeing more wildlife. We have seen essentially empty campgrounds (e.g., alone in a 43-site campground) and been in crowded campgrounds (e.g., 2 open sites in a 24-site campground).”
Neal also reported on making same-day reservations across the U.S. “We did observe that most sites were occupied by day’s end. We made reservations the same day. Once entering Canada, we continued making reservations the same day, but the campgrounds were mostly empty. Now in Alaska, more of the same: day-of reservations and lots of empty sites. Last night and tonight, we are in a BLM no-utilities campground, Sourdough Creek, just off the Richardson Highway. Only three of the 43 sites were occupied last night.”
Camping for a better experience
Randy G. avoids camping during peak season and writes, “There are always things to complain about, but I always try to look on the bright side. I normally don’t go camping during the peak season. If camping locally, I will go in on a Sunday and leave on a Friday. We also prefer spring and fall when there are fewer crowds. Yes, there are irresponsible dog owners, as there are irresponsible parents. It’s annoying, but you will have a better chance at having a nice camping experience if you go during the off-peak season.”
Trying to fit a 40-foot RV into a 28-foot spot?
Phillip M. points out that crowding may be due to RV size. “Are the campgrounds you have gone to for years really crowded, or are we trying to put our new 40-foot 5th wheel into the spot we used with our 28-foot travel trailers?”
Greyhound bus-sized RVs don’t fit!
Donald W. wrote about the size differences between the mammoth RVs now and the small trailers of the past. “The main crowding problem is that the campsites were made a long time ago with single-axle trailers and smaller motorhomes. Now, folks have Greyhound bus-sized RVs that do not fit in the campsite or on the roads leading to the sites.
“As for the complaints about dogs, they seem to be very excited to visit campgrounds and hiking trails after being confined to backyards for most of their lives.”
Snowbirds are gone, and sites are open
Vanessa S. didn’t make many reservations and found open sites. She wrote, “In Feb., I left Pahrump to go to GA. Did it in 7 days with no advanced reservations except the night before. I came back last week in 10 days. Again, no advanced reservations except two COE campgrounds I wanted to stay at. All sites were pull-through except one of the COEs. Some of the parks were questionable, but okay for overnight. It could have been that it was starting to get hot, and the snowbirds had left. The parks with mostly full-timers seemed to have at least two spots for overnighters. Some of them I wouldn’t mind returning to and spending a few days.”
Now, some questions for you:
Are you finding campgrounds booked up or is finding a site not a problem?
What do you like best about RVing?
What are your pet peeves?
Are you seeing more permanent and seasonal RV parks?
Are rising costs affecting your camping style?
Do you have favorite campgrounds or RV parks?
What is the most memorable experience you have had RVing?
Do you have any tips or secrets you’d like to share?
Please use the form below to answer one or more of these questions, or tell us what you’ve experienced with campground crowding in general.
We use cookies to ensure that we give you the best experience on our website. By continuing to use our site, you consent to accepting cookies. We NEVER have or will sell reader's data. For more info, please see our privacy policy page.


 On the opposite end is a cap that squeezes onto the bumper but is made of a better flexible plastic than whatever came with our RV. It takes a legitimate squeeze to get it off the bumper, so you’re not likely to have the situation of the stinky slinky dancing its way out to the chagrin of drivers behind you.