Food poisoning is NO fun. And we mean NO FUN! It can be pretty serious if you get it bad, and it can certainly ruin a trip.
At least if you got sick in an RV, you’d have your own bathroom (hopefully) nearby… We just hope nobody ever experiences food poisoning while tent camping!
Have you ever experienced food poisoning while RVing? If so, do you know what it was from? Did your partner get it, too, or just you? Was it from something you cooked or was it at a restaurant? Does it still make you sick just thinking about that food today?
After you vote, please leave a comment and tell us your food poisoning story (if you can stand it…). Although, please spare us the dirty details. We don’t want to hear about, well, you know…
Thanks, we appreciate it.
P.S. Want to know a little secret? Chuck (Woodbury) got food poisoning while camped inside Zion National Park. Yep. He said he thought it was from the mayo on a deli sandwich he bought earlier that day. That’s one trip to Zion he’ll never forget…
By Dustin Simpson
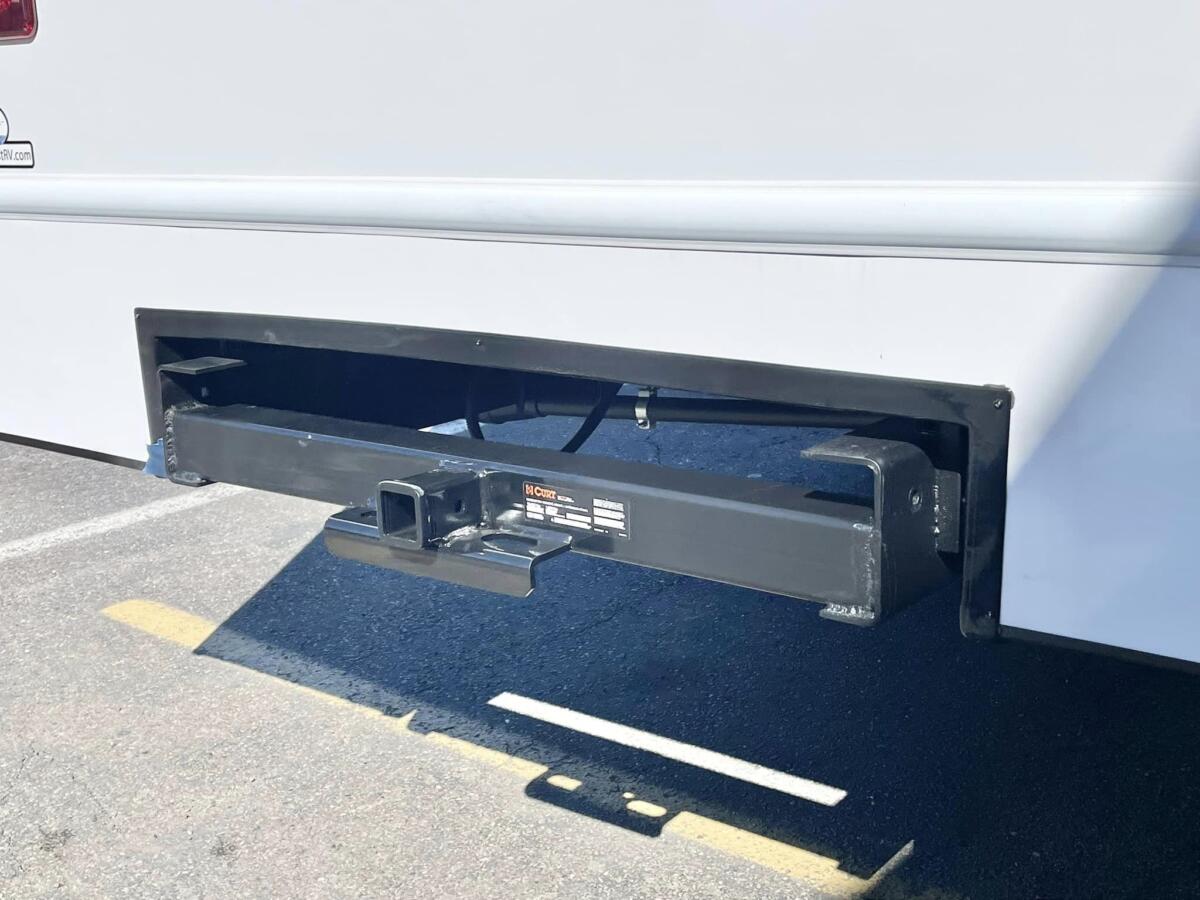
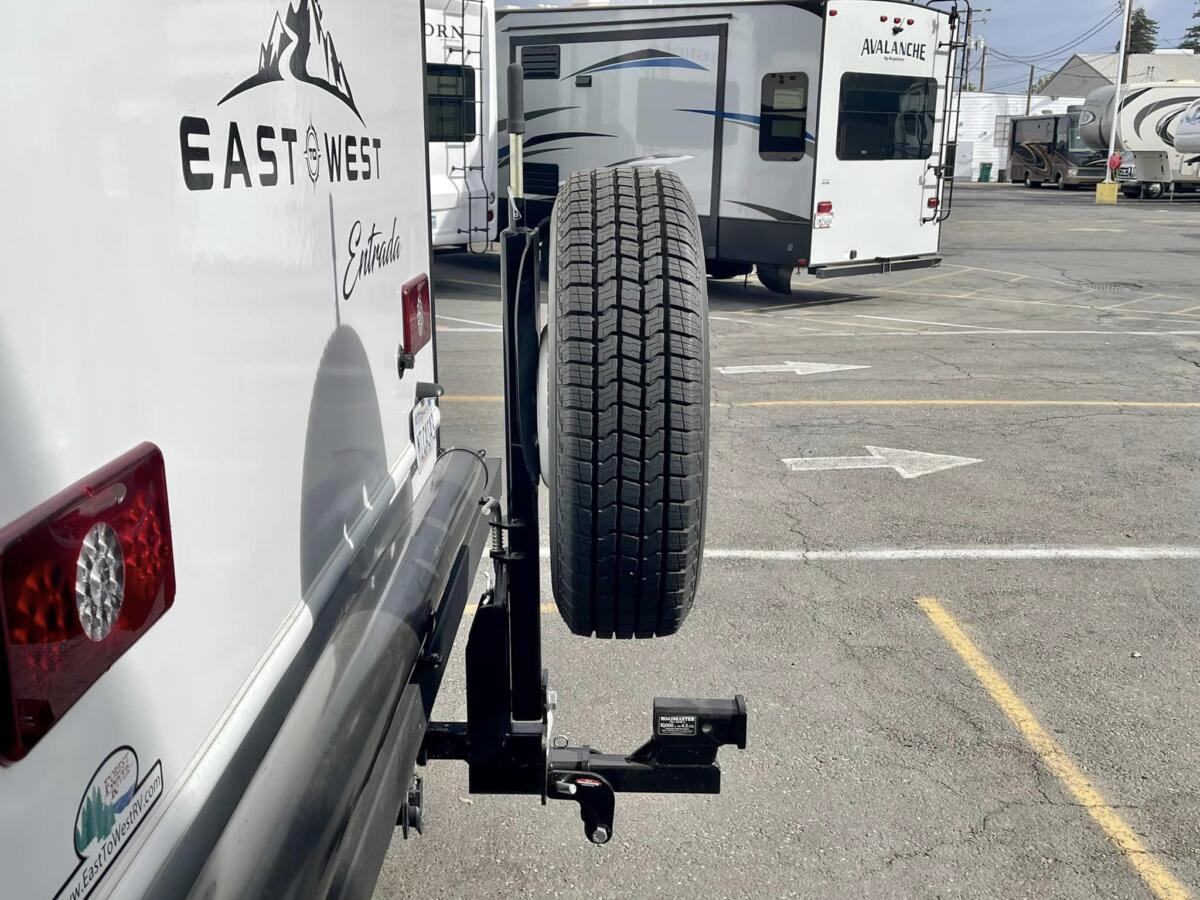
Join me “In The RV Shop” as I talk about custom tow hitch modifications that came through the shop. You can enhance the towing capabilities and the overall functionality of your RV by modifying your tow hitch. However, it’s important to approach any modifications with careful consideration of safety, legal requirements, and compatibility with your RV and towed vehicles.
The owner in these photos wanted to increase and reposition the bumper to gain hitch height, as we upgraded the hitch capacity and left room for a spare tire carrier.
Here are some potential custom tow hitch modifications you might consider:
Upgraded tow hitch
Consider upgrading to a heavy-duty tow hitch if your RV is equipped with a standard hitch. Heavy-duty hitches may have higher weight capacities and provide increased stability during towing.
Receiver hitch extension
If you need additional clearance between your RV and the towed vehicle, consider a receiver hitch extension. Ensure that the extension is appropriate for your towing setup and does not exceed weight capacity limits.
Custom welding and reinforcement
Work with a qualified welder or fabricator to customize and reinforce your tow hitch for added strength and durability. Reinforcements may include additional bracing or support.
Spare tire carrier
If your RV lacks a spare tire carrier, you might consider adding a hitch-mounted spare tire carrier. This can free up storage space inside the RV and make tire changes more accessible.
Remember that safety is paramount when making any modifications to your RV’s tow hitch. Always follow manufacturer guidelines, adhere to weight ratings, and consider seeking professional assistance for complex modifications. Additionally, check with local authorities regarding any legal requirements related to RV modifications.
“If at first you don’t succeed, try, try again. Then quit. There’s no point in being a damn fool about it” —W. C. Fields
Camp at some of America’s most unusual campgrounds
By Cheri Sicard Ready for some campsite eye candy? This 5-minute video from the Campsite Photos YouTube channel races through 13 of the most unusual (and downright stunning) campsites across the U.S.—from geyser-hearing spots in Yellowstone to cliffside perches on the Big Sur coast, desert ghost towns, redwood groves, and even a former internment camp. Whether you’re planning your next trip or just daydreaming, you’ll want to add these campgrounds to your travel list.
Traveling isn’t a vacation when it’s your life
By Charlie Ketchum
As a full-time traveler, it’s been a challenge to define what our purpose is. Are we just wandering? Do we want to see all 50 states? All the beaches? All the national parks? Museums? Are we living to write a blog or writing the blog about what we’re living? Is a few days too short of a stay? Is a few months too long? If we stop for six months does that mean we aren’t travelers anymore? If we only stay a night, does that mean we’re missing seeing something important? Continue reading (you might relate).
True or false? Popular vehicle myths explained
True or false: You should always warm your car up before driving on a cold day. The answer is false. Although the majority of the driving population may consider this to be true, it can actually cause damage to vehicles if done continuously. There are a number of automotive beliefs that drivers encounter on a daily basis that may or may not be accurate.
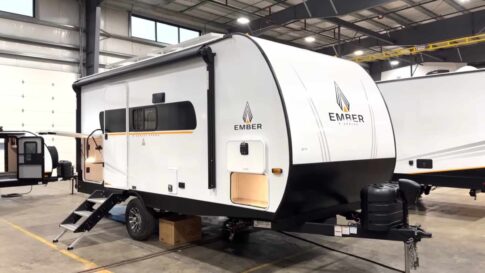
Today’s RV review… Ember RV E-Series Spark 18RBE—a big surprise
By Tony Barthel
Today’s RV review is of the new Ember RV E-Series Spark 18RBE travel trailer. I know what’s going to happen here. There are going to be a good number of readers here who poo poo this trailer without learning more. We’ll get into why that is. But first, there’s a little reward for anyone who keeps reading, as there is a big surprise in this little trailer.
RANDOM RV THOUGHT: Do a Google map/satellite search of an RV park where you plan to spend a night. You will get a good idea of its terrain, surrounding lands, nearby roads and interesting places. Close by railroad tracks (too often the case) can mean a noisy, sleepless night.
Why the smartest RVers don’t always take the scenic route
By Emily Woodbury
We all love a good scenic drive, right? Discovering an ideal RV scenic route can make for an unforgettable experience. For some of us, scenic drives might be our favorite part of RVing. Twisty coastal roads, winding mountain passes, red rock canyons—the views can be hard to beat. But seasoned RVers know something many newbies don’t: The most beautiful RV scenic route isn’t always the best one. Here’s why.
Is it OK to drive with one flat dually tire? Nope
By Gail Marsh
You’re driving down the road, happy to be headed to your campground destination, when suddenly your tire pressure gauge indicates a problem. Now what? That was the question we recently faced. Is it okay to drive with one flat dually tire? Experts say… well, read on.
Out of our comfort zone… again… because we bought a house!
By Nanci Dixon
A few months ago, I wrote about taking a huge step out of our comfort zone and buying a property on five acres in northern Arizona. We backed out when we learned a few things about the property. Now, we are late on leaving this Arizona hotbed—115 degrees forecast for today—because we are trying yet again! And this time, we bought a house!
The cutest camping decor we’ve ever seen…
You’ll make everyone jealous! These battery-operated mini LED kerosene lanterns are by far the cutest piece of camping-themed decor we’ve ever seen. These string lights are perfect for both indoor and outdoor lighting. Wrap them around the trees, patio decks, door frames, or windows for a party, holiday or summer decor. We’re ordering some for ourselves here…
RV Electricity
Don’t pay for more solar than you need
By Ken Arnold, The Electron Plumber
You’ve probably seen this happen to others if it hasn’t happened to you: A slick salesperson convinces a homeowner to buy or lease a solar system and then, after it’s installed, the homeowner finds that the system is not what they want or need. Solar installers make more money by selling more and bigger systems, not necessarily what meets their customers’ needs. Unless you don’t care how much it costs, you’ll want to aim for “good enough,” not the biggest.
Reader poll Have you ever stayed overnight at a Love’s RV Stop?
The best 4th of July gear, gadgets and accessories for RVers
The 4th of July is just around the corner, which is why we’re sharing this list we’ve made of the best, most patriotic RVing gear around! There’s lots of fun stuff in here, from T-shirts to flagpoles, to propane covers and tablecloths and much, much more. Check these out!
How to win We’ll select a winner at random out of all entries we receive today by 7 p.m. Pacific time. You can only enter once and after we notify you by email that you won, you have 24 hours to respond.
HMMM: “If we’re not meant to have midnight snacks, why is there a light in the fridge?”
Travel destinations Find 12,000-year-old pictographs at this Texas campground
By Nanci Dixon
Hueco Tanks State Park & Historic Site is a magical destination just east of El Paso, Texas. It’s named for the rock depressions, the tanks, that have held life-sustaining rainwater in the high desert for thousands of years. The tanks created an oasis for wildlife, vegetation and native peoples. Learn more about this amazing place to camp.
?? MYSTERY PRODUCT OF THE DAY ?? We bet you thought these were long gone. And we bet you mourned the day you saw them disappear. We loved them, too. But good news! They’re back and just as good as ever! You’re going to be so happy to see this!
Roadside Journal
RVtravel.com founder and publisher Chuck Woodbury muses about whatever is on his mind, as he has for nearly 4 decades. Look for Chuck’s Roadside Journal here every Sunday. Read today’s installment.
Blast from the past Pack-Away, Get-Away camper was big news in 1939
This lightweight trailer (caravan) sleeps four. When returned home after a camping trip, the RV could be easily disassembled for easy storage. We don’t think this would be a big hit today.
Highlights from this week’s RV Daily Tips Newsletter
In the RV shop with Dustin A step-by-step guide on how to replace your RV entry door hold back
Join me in our RV shop as I explain how the entry door hold back on your RV plays a crucial role in keeping your door securely in place. Over time, these components can wear out, leading to difficulties in keeping the door open. In this guide, I’ll walk you through the steps to replace your RV entry door hold back, ensuring smooth functionality and added convenience.
RV tire safety The importance of knowing your RV’s “4-corner weights”
By Roger Marble
If you have been paying attention to information on tires in RV application, you probably have heard the phrase “4-corner weights.” Let’s dig into the basic concept of vehicle weight and why this is so important. Continue reading.
Make those wheels sparkle!
When was the last time you actually noticed your wheels and hubcaps? Probably not recently because we’re guessing they’re covered in dust, dirt, oil and grime. This amazing Sonax Wheel Cleaner will make them sparkle again. Its acid-free, pH-balanced formula won’t damage a thing. Just spray it on, watch it clean right before your eyes, and wipe it off. It’s that easy! Learn more or order for a great (and worth-it) price.
RV gadgets and gizmos
The amazing disappearing sewer hose. Don’t let it happen to you!
By Tony Barthel We’ve all seen an RV driving down the road with half the stinky slinky flailing about as it snakes its way out of the bumper and onto the side of the road. This is one of the more universal challenges we RVers face—the vanishing sewer hose. But, thankfully, this gadget prevents that from ever happening to you.
The Solo Stove cast iron griddle is perfect for RVers
By Cheri Sicard
One of the things I like most about my Solo Stove Ranger smokeless fire pit is its versatility. Far beyond a convenient way to enjoy a campfire, the available accessories turn this device into a kitchen. In the past, we have reviewed its cast iron grill and its Pi Fire pizza oven, but today we look at the cast iron griddle, something all campers can put to good use.
BUMPER SNICKER: “Honk if you like sudden loud noises.”
RVing with dogs How to do emergency canine CPR and save your dog
By Cheri Sicard
This short video tutorial, demonstrated by Dr. Erica W. Tinson, BSc, BVSc (Hons), MVSc, could possibly save your dog during an emergency by teaching you when and how to properly perform canine CPR. Please watch this!
Readers’ pet of the day
“Esther (Long Hair Chihuahua) started her RV travels just three weeks after we got her at the age of two months (she’s now 10 months old). She was a natural! She loves meeting new people while she is out for walks. This season, we are adding a bike trailer to her adventures so she can explore more places.” —Carol Seithel
Want to see your pet in this newsletter? Please send us a photo of your pet with a short description. No blurry photos and please do not submit your photo more than once.
Trivia
During WWII, mail delivery services in the U.S. were overloaded with mail and needed a new system to increase organization and productivity. They started using postal zones (for example, Minneapolis was zone 16). In the summer of 1963, the Zone Improvement Plan (ZIP codes!) was introduced to the public.
Sunday funny
My friend composes songs about sewing machines. She’s a Singer songwriter or sew it seams.
And finally… A song from the past to tickle your funny bone
Wow! They don’t make songs like this anymore. Or bands. Or singers. Here, from 1942, is a young Peggy Lee with the legendary Benny Goodman and his orchestra performing “Why Don’t You Do Right.” Ya gotta love it!
True or false: You should always warm your car up before driving on a cold day. The answer is false. Although the majority of the driving population may consider this to be true, it can actually cause damage to vehicles if done continuously.
There are a number of automotive beliefs that drivers encounter on a daily basis that may or may not be accurate.
To shed some light on this topic, the service specialists at Chrysler, Jeep, and Dodge provide their car-care expertise to confirm and debunk eight common automotive beliefs.
Belief: Do not blast your vehicle’s air conditioner when sitting in traffic or while driving at more than 60 miles per hour.
Reality: False. Vehicle heating, ventilation and air conditioning (HVAC) systems are engineered and tested to operate in even the most severe types of driving environments. The air conditioner has cooling fans and condensers that allow it to operate under these conditions.
Belief: It is possible to check your tire tread with a penny.
Reality: True. Although the service specialists at Chrysler, Jeep and Dodge prefer you use a proper tire gauge to check tires, it is possible to check tire tread with the use of a penny. Simply pinch a penny between your thumb and forefinger so Lincoln’s head and “In God We Trust” are showing. Insert the penny into a tire tread groove. If the tire covers any part of Lincoln’s head, then your tires should have a safe amount of tread. If you can see Lincoln’s head in its entirety or any parts of “In God We Trust” are showing, it is time to invest in a new tire. Be sure to check all tires and in different locations on each tire because the amount of wear can vary from tire to tire and from inner tread to outer tread.
Belief: If you still have fuel in your gas tank when you refill it, use the same grade of fuel that is currently in the tank.
Reality: False. As long as you use unleaded brands of gasoline, it will not harm your vehicle if you mix different grades of fuel.
Belief: Avoid keeping your vehicle at a constant speed during the first 500 miles of a vehicle’s life.
Reality: Maybe. Most new vehicles no longer require drivers to vary their speeds during the first 500 miles of a vehicle’s life, known as the “break-in period.” If your vehicle does require the “break-in period,” then you should avoid keeping a constant speed during this time. Even varying your speed by several miles per hour should do the trick (of course, within legal limits).
Belief: Your vehicle’s engine should be “warmed up” before driving in cold weather.
Reality: False. Warming your engine up, or idling, is not the best route to take. In fact, excessive idling can be damaging to your vehicle. You should, instead, drive the vehicle to get the engine warm during the cold weather.
Belief: Premium gasoline is best for your vehicle.
Reality: Maybe. It depends on the type of vehicle you drive. Most cars are built to run on regular-grade fuel, so using premium fuel will not improve the car’s performance. In fact, using premium fuel in a vehicle that was not designed for it can harm the vehicle’s performance and fuel efficiency. Check your owner’s manual for recommended fuel grade.
Belief: For city dwellers dealing with narrow streets, do not park with two wheels on the curb, as it will destroy the vehicle’s alignment.
Reality: True, if done continuously. The Chrysler, Jeep and Dodge service specialists say that repeatedly parking a car with one side’s wheels up on a curb to provide more space for passing cars can cause excessive wear or stress to tie rods and suspension bushings, and could create alignment issues.
Belief: If the steering wheel shakes when you drive, there is something wrong with your brakes.
Reality: Maybe. If the wheel shakes as you depress the brake pedal, it may mean your brake rotors are unbalanced. If the wheel shakes as you drive, it may be the result of a wheel balance or steering-related issue.
One of the things I like most about my Solo Stove Ranger smokeless fire pit is its versatility. Far beyond a convenient way to enjoy a campfire, the available accessories turn this device into a kitchen.
In the past, we have reviewed its cast iron grill and its Pi Fire pizza oven, but today we look at the cast iron griddle, something all campers can put to good use. (Know that while I have tested Solo Stove’s awesome accessories on my Solo Stove Ranger, they do come in sizes to fit whatever model/size Solo Stove you have.)
Griddle cooking just makes sense for campers and RVers. One cooktop can handle enough food to feed a crowd, and the hot cooking surface can cook lots of different types of foods for tasty breakfasts, lunches, and dinners while camping. (Then take the griddle off and use the Solo Stove to make s’mores.)
I love the cast iron griddle accessory as much as I love Solo Stove’s cast iron grill. However, I am a huge fan of cast iron overall. Yes, it’s heavier than other cooking surfaces, which is the one and only downside of this cooking accessory. But its superior heat retention and natural nonstick cooking surface (once properly cured) make up for the weight, in my book.
I recently put the Solo Stove’s cast iron griddle to the test by making a huge pile of hash brown potatoes for a group of hungry campers. The hot griddle made cooking a breeze and gave the hashbrowns that sought-after crispy brown exterior. Everyone loved them. Of course, the griddle can also prepare the entire breakfast, including eggs, breakfast meats, pancakes, and much more.
What I especially like about the Solo Stove Ranger cast iron griddle:
• It adds to the Solo Stove’s versatility, and I LOVE multi-tasking gadgets.
• Cast iron provides an exceptional way to cook with superior temperature retention. It heats up gradually and evenly, then transfers heat steadily to maintain perfect cooking temperatures with a single layer of burning embers.
• Non-stick and polymerized, a seasoned cast iron griddle is easy to clean for lifelong use.
Note on the cast iron griddle
While the Solo Stove cast iron griddle is an excellent conductor of heat and outstanding for cooking, note that it is not pre-seasoned. The first time you use it, plan on extra time and fuel to let it burn until all the black smoke from the coating burns off. Then you will need to season it with oil.
None of this is difficult, and the griddle comes with seasoning instructions. But don’t plan to take it out of the box and immediately start cooking. The cast iron’s true non-stick quality will fully develop after 8-10 seasonings.
How to clean the Solo Stove Ranger’s cast iron griddle
Grease and crumbs can be wiped away while the cast iron is hot, and you can do this safely with rags gripped by cooking tongs. Remove your grill from the hub using heat-resistant gloves, then rinse it with just hot water. The most stubborn residue can be removed with a cast iron scraper or grill brush.
Follow cleansing with thorough drying. Never let cast iron soak or be submerged in water for any amount of time. Apply a light coat of seasoning oil to clean and dry cast iron before storing. Season your cast iron grill well and often to keep it non-stick.
By Chuck Woodbury Founder, publisher and wise, seasoned human being
Get real about what’s worrying you!
Having a bad day? Look at the NASA photo below. That’s the Artemis 2 spacecraft on its unmanned (and unwomanned) mission to the Moon and back. This photo was taken as the spacecraft passed behind the Moon. The Moon is the nearest object in the photo; the distant one is Earth, where you and I live.
I look at this photo when I am feeling down, or even feeling sorry for myself for one reason or another. You might want to do the same. That little blue orb is where we’re doing our worrying. My guess is at any given moment you and I are worrying, a few billion other Earthlings have bigger worries. I bet you will work yours out.
You and I are lucky we were even born to experience life on our beautiful, lonely speck in the Universe. Whatever our problems, they mean nothing to the cosmic big picture. It may not seem that way at times. I’ve been there and I know the pain. I learned that it helps that when we are down to just remember that soon we will be back up. This photo can help.
Moon and Earth. NASA photo
Close encounter with a cactus
I was walking through the desert near Tucson, Arizona, and the sun was low to the west getting ready to set. Right ahead of me, three times my height, stood a saguaro cactus. And there I was, my shadow, nearly upon it. So I waved and took a picture.
What a waste of time!
See below. That’s a screenshot from a YouTube video. There are dozens just like it. Each one shows a celebrity as he or she looked when young and then again when old. In this case, it’s Barbara Feldon, who in the ’90s played beautiful, sexy Agent 99 alongside Don Adams’ on the TV spy spoof “Get Smart.” I want these young/old videos to go away. They often sucker me in. They waste my time. They depress me — when I’m watching them and then afterwards when I think about all the time I wasted. They’re just clickbait — a cheap, sleazy, lazy way to get traffic to make money.
In this case, so what if Barbara Feldon is no long cover girl material? She’s still beautiful. Age happens! If you’re young and exceptionally beautiful or handsome, enjoy the ride. Beauty fades faster than any young person ever imagines. I laugh at the ads for creams that remove wrinkles: The models are gorgeous and in their late 20s, already fretting about aging. What a joke!
Screenshot
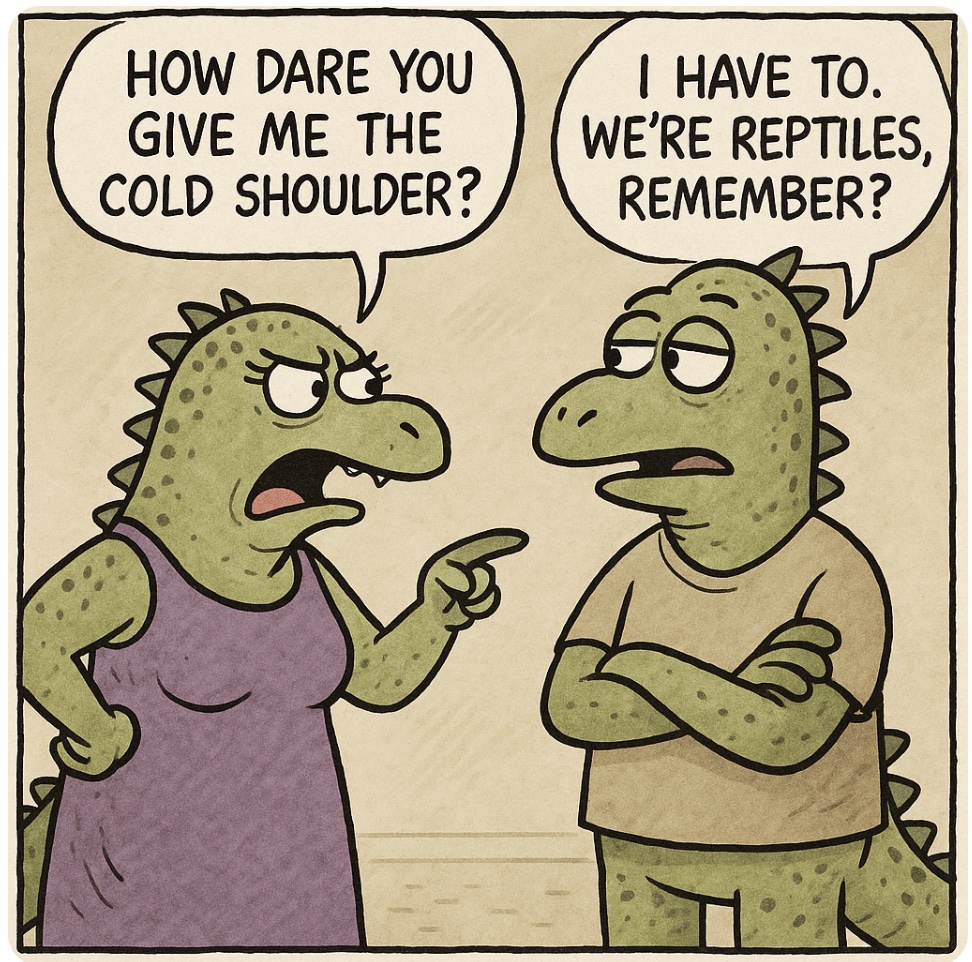
We’re lucky we’re not reptiles
Created with artificial intelligence.
We humans are lucky we are not reptiles. A reptile does fine in the hot summer, but not in the winter. The cold-blooded creatures are useless when the temperature dips below about 60.
Some scientists say we could have evolved from reptiles if things had worked out a little differently way back when. If we had evolved from reptiles, people living in the tropics would rule the world. The Russians would be wimps, because they’d be frozen up eight months out of twelve. In the United States, you’d be relatively okay if you lived in Florida or southern California.
Dating would be tough. If you made a date with a nice lady, and then it got very cold, you might show up late. She’d be mad, and so you’d probably end up arguing all evening in front of an electric heater. The term “heated conversation” would take on new meaning.
Nobody would snow ski, but water skiing on Arizona’s Lake Powell would be popular.
Power failures would be disastrous, especially for people sleeping with electric blankets. They’d be frozen until the power returned; if it never did, they’d be bedridden until spring.
Perhaps the worst thing about being a reptile would be that we’d have scales. While that doesn’t sound very attractive, the phrase “Boy, she has great scales” would become popular at the beach.
I feel very fortunate I did not evolve from a reptile.
Part 1: Understanding RV solar system sizing is crucial for optimizing energy efficiency in your setup. This introductory part will guide you through the essentials.
By Ken Arnold, The Electron Plumber
You’ve probably seen this happen to others if it hasn’t happened to you: A slick salesperson convinces a homeowner to buy or lease a solar system and then, after it’s installed, the homeowner finds that the system is not what they want or need. Solar installers make more money by selling more and bigger systems, not necessarily what meets their customers’ needs. Unless you don’t care how much it costs, you’ll want to aim for “good enough,” not the biggest commission for the salesperson.
It can also be a significant investment for an RV upgrade, much like a vehicle purchase. You wouldn’t want to get stuck with (and pay for!) a big gas guzzler if what you really need is an economical, high mpg sedan for your daily commute.
Why proper RV solar system sizing starts with data
Part one of this article will cover the best way to size an upgrade to the 12-volt DC electrical power system in your RV to enable you to make an informed decision based on your actual power and energy usage. Only one relatively simple device is needed to gather the data, and you will only use simple arithmetic to calculate how much power and energy you need.
Calculating what is truly reasonable for you implies you have good data to start with, and that depends on many different things that are unique to your rig and how you use it.
Home vs. RV solar: Why the approach is different
There are excellent tools to estimate the size of a fixed home solar system based on your electric utility billing history, but not for RVs. And it also depends on how you want to use your RV. If you usually have an electrical hookup and only need limited power while on the road, you may not need to do anything. But if you want to use your rig without an electrical hookup, you will likely need something more than what is in a basic RV.
The one tool every RVer should have
Spreadsheets and other tools you can use to calculate rough estimates are available, but they are a hassle to set up and not very accurate. If you want to know what you need to upgrade in your RV’s 12-volt DC electrical system in the form of solar panels, chargers, or batteries for your rig, the very first thing you should get is a battery monitor. A monitor will help you keep your existing 12V battery healthy and tell you how much 12-volt power you use when you’re in your rig and don’t have a shore power connection.
Choosing a battery monitor that works for you
The built-in battery capacity LED displays shipped in most RVs are nearly useless for this. You need a good battery “fuel gauge” to monitor the charge (energy) stored in your house battery. A battery current monitor (called a shunt) is a good way to find out how much current everything in your rig uses. That way you can figure out how much battery capacity (energy storage) and how many solar panels (power) you will need when you aren’t connected to shore power.
There is a wide variety of options, but this is one of those things that makes a higher-quality shunt worth the additional cost. A good one will play well with other electrical systems and likely last a lot longer than budget versions. Most people prefer a unit that will connect to a phone using Bluetooth, but if there’s a display, you can collect the numbers manually.
Most house batteries provided by RV manufacturers are 12V flooded lead-acid or AGM types, but newer RVs may have different battery voltages and types. The shunt goes between your 12-volt house battery’s negative terminal and everything that’s currently connected to the battery’s negative terminal in your rig. The instructions are reasonably clear, but if you have any doubts about it, your dealer should be willing to help walk you through it. A mobile RV service tech should be able to install it in well under an hour.
Before you buy: Measure your real power needs
Don’t buy anything else until you have the shunt installed and have a chance to measure your actual 12V energy usage. Later, you can use the data you collect to determine how much power and energy you need.
After the shunt is installed, you can begin to measure how much energy your rig uses when it’s in use. The display or Bluetooth app for your phone should display the % remaining energy in your battery, how much current is going in or out of the battery, and how long it will last if nothing changes.
Start in a place with a shore power connection. After your house battery capacity is at 100% capacity (fully charged), turn off all the lights and other devices in your rig that can be switched off and disconnect the AC shore power cord on your rig. Determine how much power is used when everything is turned off.
Usually, there will be some amount of power drained even when everything is powered down. Some devices, such as smoke and propane detectors, cannot be turned off in some rigs.
Next, turn on all the 12-volt electrical devices one at a time, noting how much current each item takes to operate.
How long will your battery last?
You can also find out how long you will be able to last on battery power only. You can also use the shunt’s display or phone app to see how much energy is left in your existing battery. Lead-acid batteries that come with most RVs should not be discharged below 50% of their rated capacity or their service life will be impaired and need early replacement.
Preparing for the next step: RV solar and battery sizing
Once you have that info, it will be easy to figure out how many solar panels, what kind of battery, and how much battery capacity you will need for your DC 12V system. The next part will address the calculations you need to perform to determine how much 12V DC power you need. Later parts will discuss the AC (120-volt) power system in your RV to help you decide what, if anything, you want to use when you aren’t connected to shore power.
Quick definitions: Power vs. energy
Electrical Power (P) is measured in Watts, an instantaneous measure. Power can also be measured in different units, like horsepower (1 HP = 760 Watts). It’s the product of instantaneous Voltage (V=volts) and current (I=Amps) and P=V*I. So a 12V device like a lamp uses 1 Amp and consumes 12*1 = 12 Watts when it’s on.
Energy is Power times the amount of time that power is applied. At home you pay for the total energy used, which is the average power over a time interval, usually an hour. Using the 12V lamp above for one hour would use 12 W*1 hour or 12 Wh of energy in one hour of operation.
Energy = P*time, usually stated as Watt-Hours (Wh) or thousands of Watt-Hours (kWh). At home, your energy usage is shown as kWh on your electric bill.
Ken Arnold, The Electron Plumber
Ken is a long-time RVer, electrical engineer, author, and recovering academic who believes you have to get old, but you don’t have to grow up. Now he has fun playing with big toys like his RV, e-bike, and plug-in hybrid car.
Today’s RV review is of the new Ember RV E-Series Spark 18RBE travel trailer. I know what’s going to happen here. There are going to be a good number of readers here who poo poo this trailer without learning more. Let’s get into why that is.
But first, there’s a little reward for anyone who keeps reading, as there is a big surprise in this little trailer.
What you won’t like
Having written this RV review column for several years now, we’ve communicated enough that I bet I can use my internal ESP to know how the comments are going to go. Does that make me A.I.? Hmmm.
But the first thing is going to be a single axle. Lots and lots of people have told me they don’t like single-axle trailers. That’s unfortunate—I dragged a single-axle trailer all over the Western U.S. for six years without a single issue, and I have zero qualms about single-axle trailers.
Know that this employs Goodyear Endurance tires and is prepped for a tire pressure monitor system, although I do wish it came with one.
But this is the E-Series Spark, Ember’s most affordable line of trailers, with E-Series being the essentials. In other words, nothing extravagant, but equipped with the things many RVers want.
Another thing you won’t like is the east-west bed, although this one has a true queen bed, so there’s that.
Lastly, there is one thing I will totally agree with you all on in the negative side of the equation, and that’s the lack of camp-side windows. Yeah, I’ll give you that one for sure.
Ember RV E-Series Spark 18RBE - 2025
1 of 9
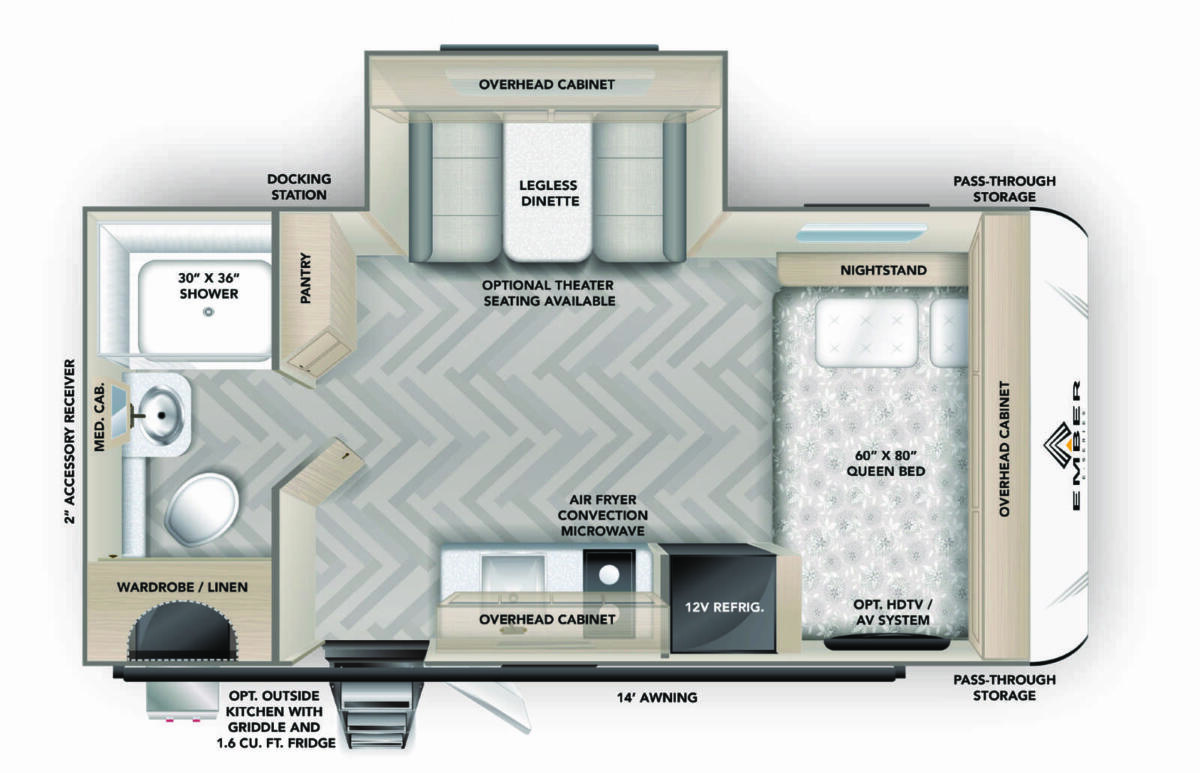
Ember RV E-Series Spark 18RBE floor plan
Interior overview of the Ember RV E-Series Spark 18RBE
Another view of the flexible storage space in the Ember RV E-Series Spark 18RBE
A flexible storage compartment in the Ember RV E-Series Spark 18RBE
A flexible storage space features washer-dryer hook-ups
Good storage in the Ember RV E-Series Spark 18RBE
A storage cubby under the bed adds more space in the Ember RV E-Series Spark 18RBE
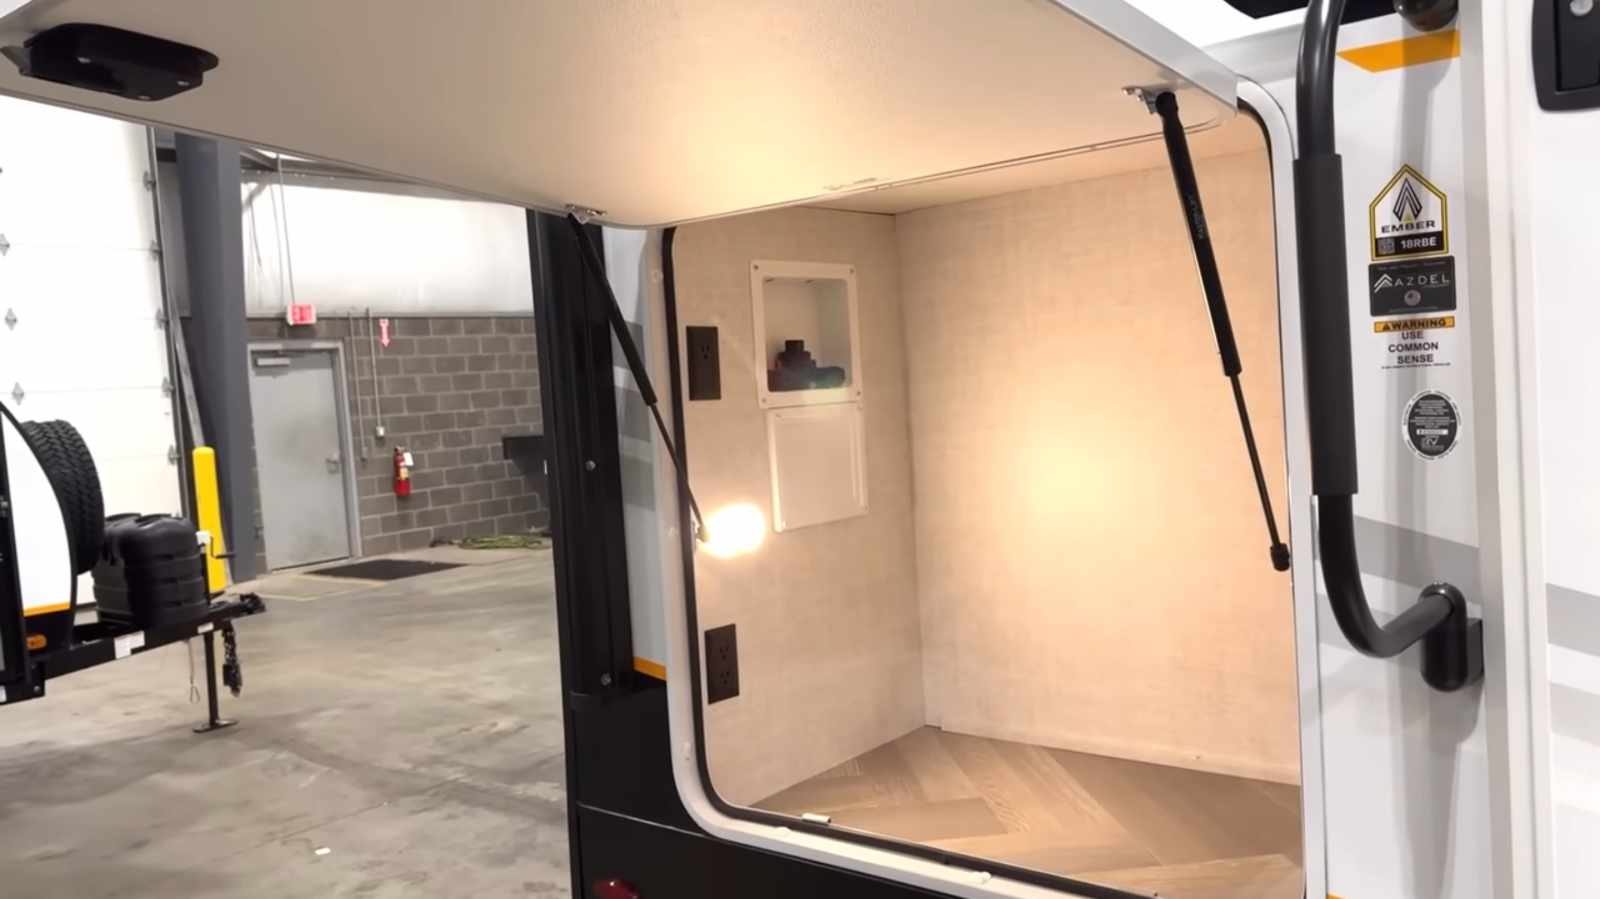
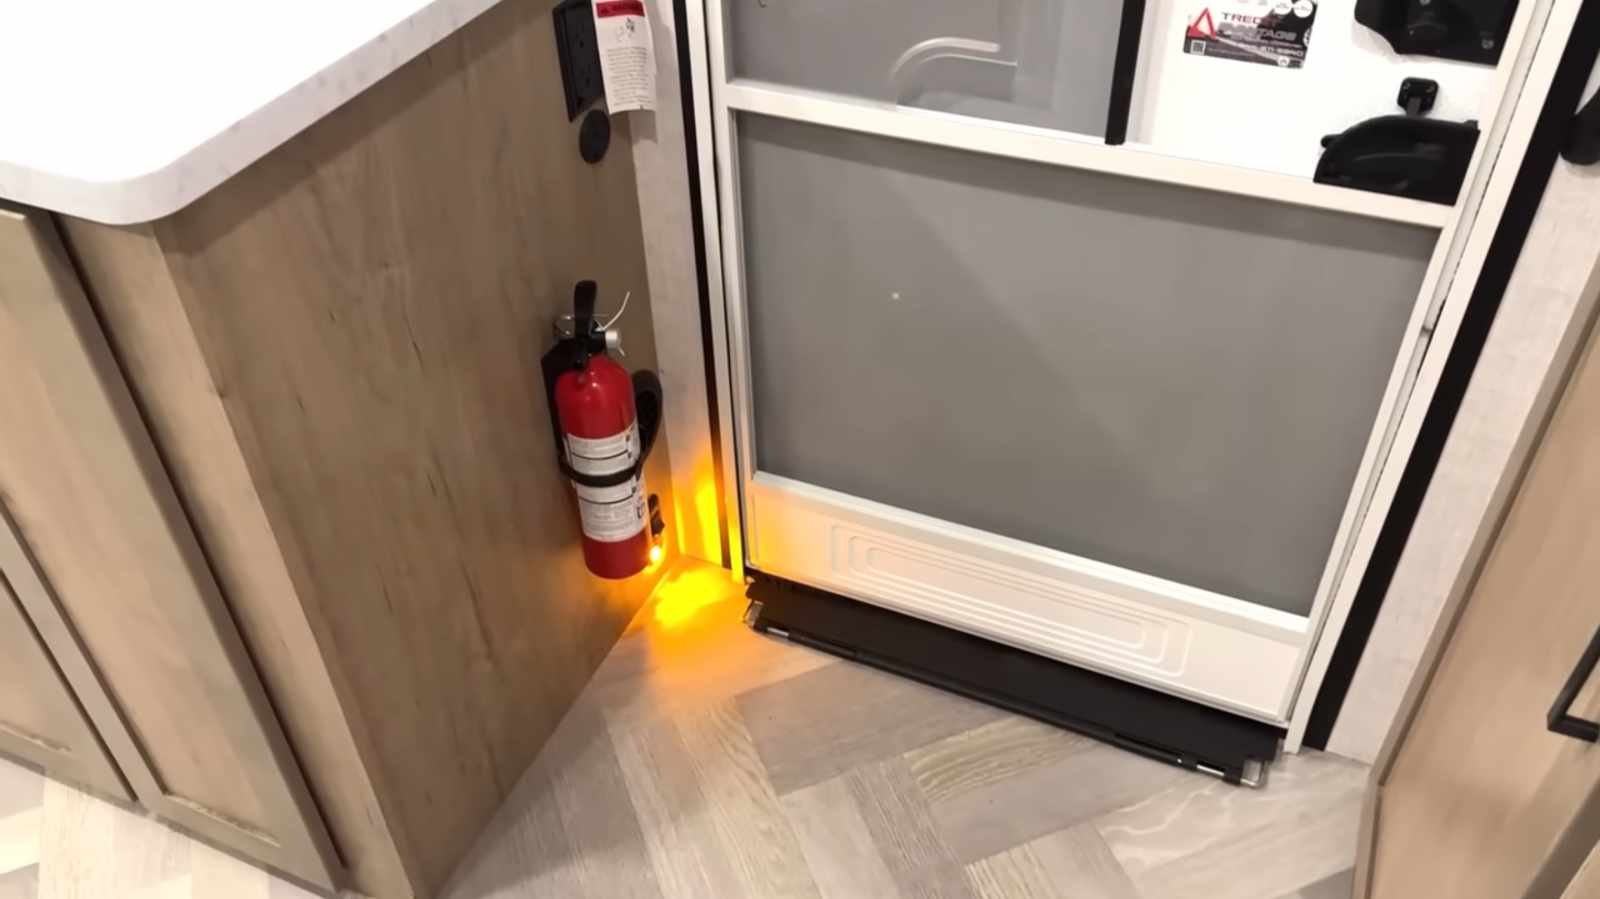
Amber entry light in the Ember RV E-Series Spark 18RBE
What I like in the Ember RV E-Series Spark 18RBE
Have we lost a bunch of readers? Oh, it’s just you and me here. Let’s talk because I have to admit I really like this trailer.
At the road, I had mentioned the Goodyear Endurance tires, but this also uses Lippert’s Quick-Drop stabilizers, which are my current favorite.
Moving up, this uses a BAL Exact-Slide® system, which has the benefit of being the only slide system that is certified for being usable even when the slide is in on a travel trailer. You motorhome folk have a different world, but we travel trailer folk know that you usually shouldn’t occupy a slide when it’s in. That’s not true here.
I also like that this is configured for a wireless side/rear observation camera installation. Yes, get them.
The E-Series Spark is built with a wall lamination that uses Azdel on the exterior and luan on the interior of the wall lamination. Ember also builds the corners of these using EternaBond tape, which is much better than the putty that’s common in the industry.
I also like that Ember features true PEX plumbing and features a shut-off valve at each fixture. Lousy plumbing is so common in the RV space, and I love seeing this, especially in a budget-priced trailer.
Up on the roof is the fantastic Furrion Chill Cube air conditioner. This, to me, is the best air conditioner in the RV space right now, with nobody even coming close. Nope, not even them.
Inside the Ember RV E-Series Spark 18RBE
The interior of this trailer belies the smaller size, but part of that is due to the higher ceiling height at 6’10”—four inches more than is typical.
Yeah, yeah, there’s an east-west bed. But that could be good if you and your significant other see the crawling over one another as a precursor to things that might require you to buy a bunkhouse trailer down the road. But this could also be a great solo traveler rig, too.
There is decent space around the bed for storage, including a larger cubby under the bed that’s the ideal spot for totes.
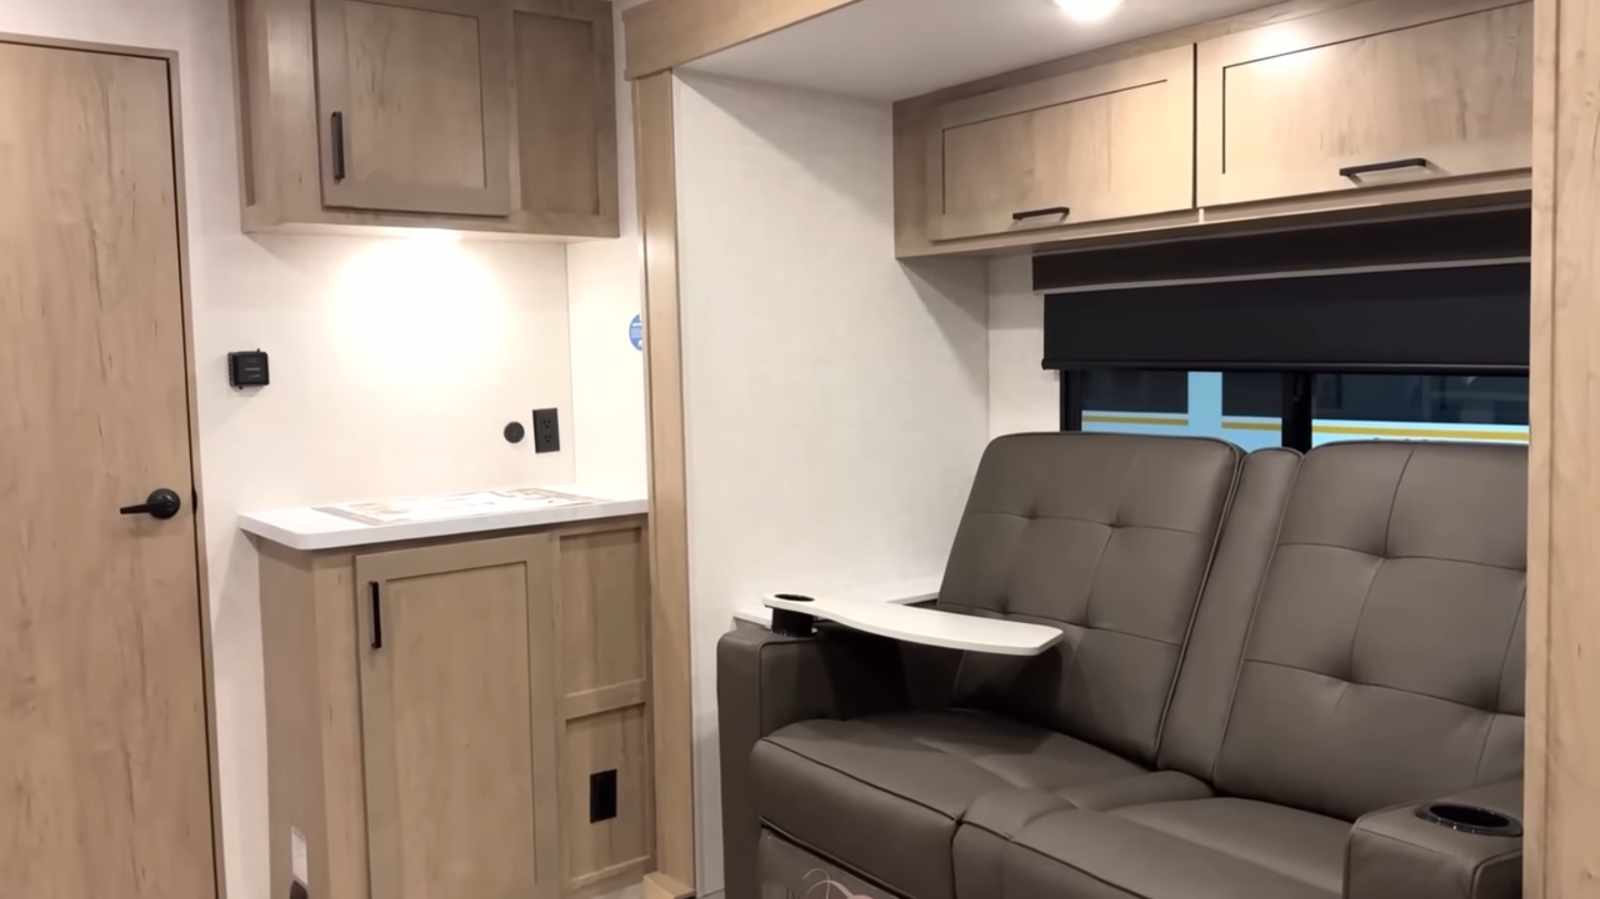
The kitchen features a decent-size 10.7-cubic-foot 12-volt fridge. There’s a small counter with a two-burner in-line propane stove—pretty typical of what you’ll find in an Ember RV.
There’s also a convection microwave and more storage, including a couple of drawers. There’s also a sort of coffee station at the back of the main living space. And more storage.
In the slide is either a jackknife sofa or theater seats, with the theater seats having little tables that drop into the cup holders.
Surprisingly, the bathroom is decently spacious with a ceramic foot-flush toilet. There’s even a high-performance vent fan in here.
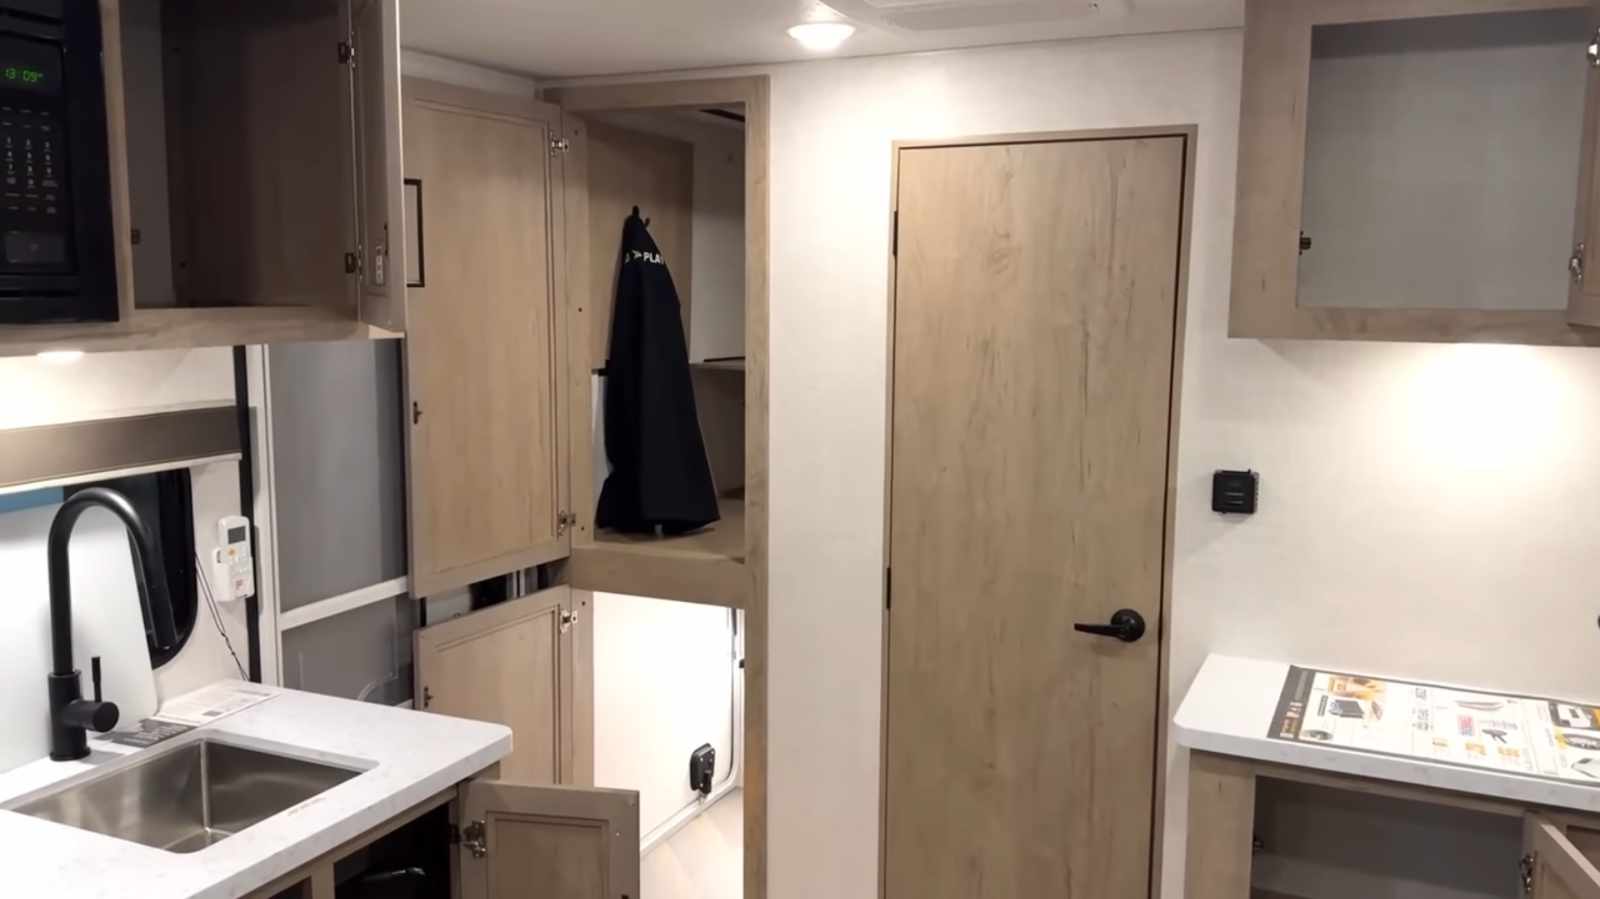
The big surprise
If you scrolled directly here, cheater cheater pants on fire. Or something like that.
But what you’ll find in this smaller trailer is something typically only in larger fifth wheels— washer-dryer prep. Yep, in the rear cargo hold is plumbing and wiring for a combo washer-dryer.
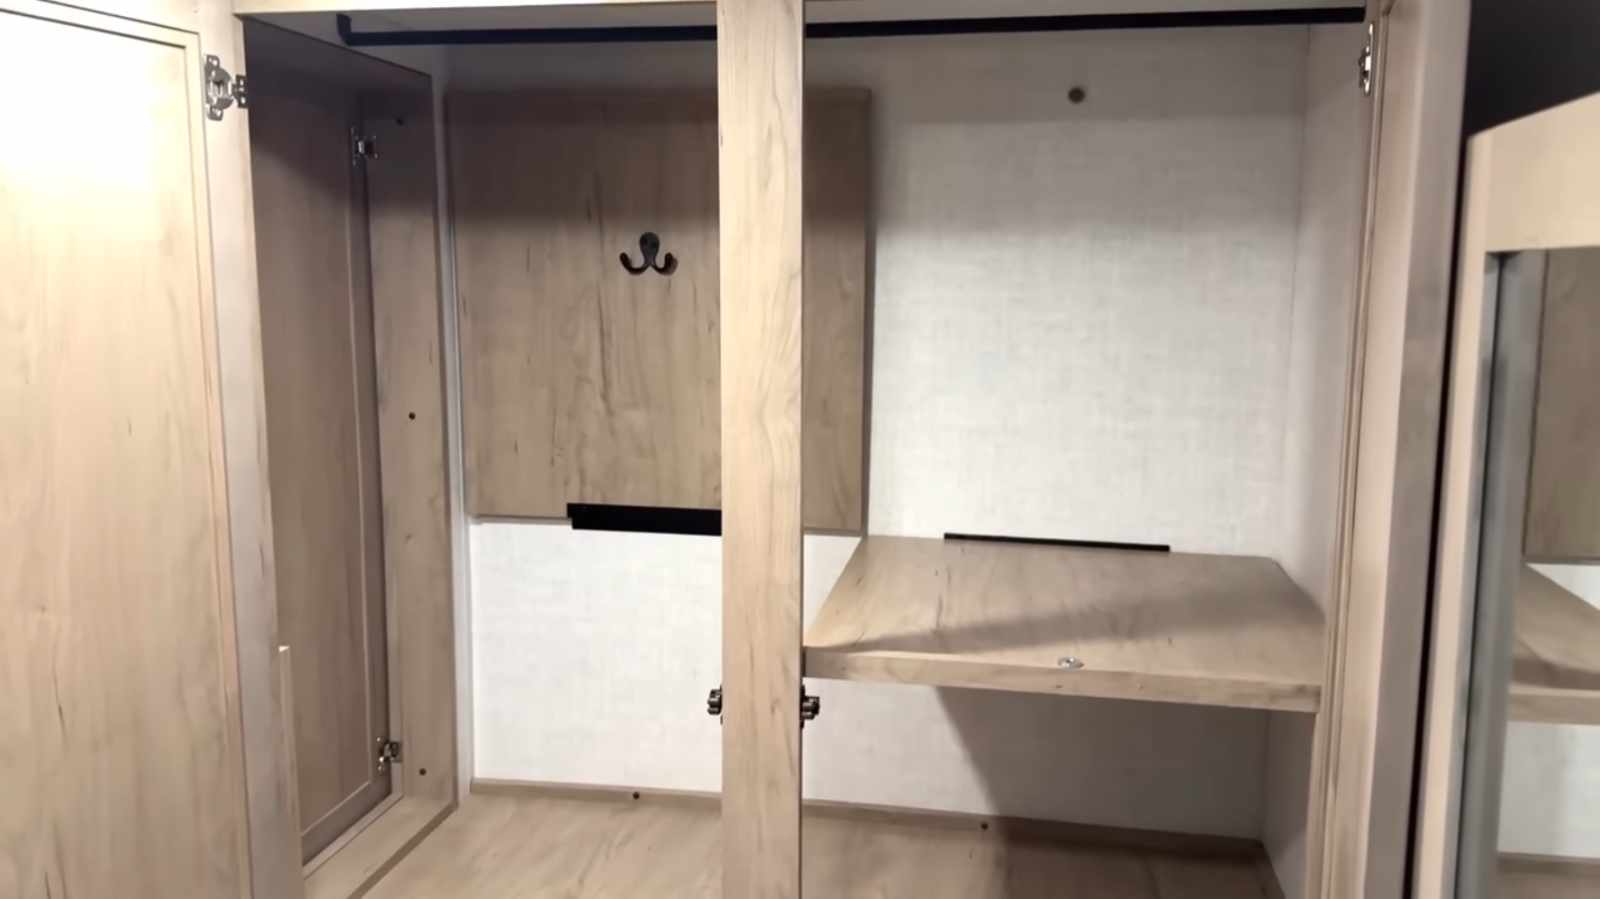
But if you choose not to use this space for that, you get a cargo bay with access both outside and in. Above that is another space that’s accessible both inside the main living space and also inside the bathroom.
This nifty spot has two flip-up shelves so you could use it for hanging storage or for stuff. Or optimize the space based on the trip you’re going on.
Ember RV E-Series Spark 18RBE specifications
My thoughts on the Ember RV E-Series Spark 18RBE
There is so much to like about this trailer, especially for those who want something smaller but not with a cheap feel.
I think Ember has nailed their idea of E-Series—all the essentials without any of the extra stuff you don’t necessarily want to pay for. Oh, and speaking of paying for this, the MSRP hasn’t been announced yet.
So, now that you’ve seen how differently this trailer is configured and how flexible the design is, have you had a change of heart?
My thanks to Josh from Bish’s RV for the video and photos in this article.
These RV reviews are written based on information provided by the manufacturers along with our writer’s own research. They are based on information from a single unit and may not reflect your actual experience. Shop your RV and dealership carefully before making a buying decision. They are intended only as a brief overview of the vehicle, not a comprehensive critique, which would require a thorough inspection and/or test drive.
Tony comes to RVtravel.com having worked at an RV dealership and been a lifelong RV enthusiast. He also has written the syndicated Curbside column about cars.
You can also check out Tony and Peggy’s RV podcast.
Hueco Tanks State Park & Historic Site is a magical destination just east of El Paso, Texas. It’s named for the rock depressions, the tanks, that have held life-sustaining rainwater in the high desert for thousands of years. The tanks created an oasis for wildlife, vegetation and native peoples.
It was a gathering place for native tribes more than 15,000 years ago, as evidenced by the hand paintings (pictographs) in the deep rock crevices. Later, native peoples of the Southwest left pictographs and petroglyphs that are recognizable—horses, people, snakes, masks, and maps. It was later a relay station for the Butterfield Overland Mail, a cattle ranch for 50 years and, finally, a tourist attraction before the state took it over in 1969.
Bouldering destination
Hueco Tanks is one of the best bouldering destinations in the country. Bouldering, similar to rock climbing, is climbing over boulders without assistance—no ropes, harnesses, anchors or crash pads. To maintain the area, only 72 people a day are issued permits to hike, climb and have access to the boulders. Each bouldering route is referred to as a problem.
Ironically, while we were there, I bouldered and got into several problems! I found out that the best way out of one of the downhill “problems” was on my problem-solving bottom. Ha!
Because of the fragile nature of the park, Hueco Tanks requires all visitors and campers to watch an orientation video before going into the park and carry the certification card with them. Plan on checking in at least an hour before the park ranger station closes. Guided tours are available of the most prominent and fragile pictographs.
We were lucky enough to have a ranger lead us into a deep crevice high on the mountain to show us the rock paintings made by nomadic tribes 10,000 to 12,000 years ago. As we slid down the deep crevice he pointed out how slick the rocks were from hands and bodies sitting on the rocks for thousands of years.
The campsites in the park have a picnic shelter, water and electricity. Several sites are large enough for 35- to 40-foot rigs. The views are amazing. The days we were there were hot, in the 80s, and the nights chilly, in the low 30s.
As it is a much-sought-after area for hiking, climbing and camping, make reservations for one of the 20 campsites and a separate reservation to explore the boulders and pictographs early. It fills up fast! You can learn more about booking a site here.
By Cheri Sicard
The video below from RVingWithJoe is only 30 seconds long, but it bears watching (pun definitely intended). Why? Because it answers the question, “How fast can a bear run?” Turns out bears can run pretty darn fast when they want to.
Joe happened upon this bear rapidly running across the road. Luckily, he was safely in his vehicle, but he did manage to get footage. We might think of bears as big, slow, lumbering creatures, but this video proves that it is not true.
It also shows why you should never run if a bear is chasing you, because the bear is definitely going to win that race. Depending on the type of bear, they can run as fast as 30 to 40 mph! (Grizzlies are the fastest.)
What should you do if you encounter a bear? Check out the posts below that have essential information for RVers camping in bear country. Heeding the advice will help keep both your family and the bears safe.
Love’s overnight RV Stops are becoming quite popular, and it seems like they’re expanding by the day! We publish story after story about new Love’s RV Stops opening up around the country. We know some of you have stayed overnight with your RV at one of these stops, and others of you haven’t come across one yet.
Have you ever stayed at one? If so, multiple times? Just once? And if not, do you think you’ll stay at one in the future or probably not?
If you have stayed at a Love’s RV Stop, please leave a comment and tell us about your experience.
Here are a few articles we’ve written about Love’s RV Stops:
If you enjoyed this RVtravel.com reader poll, keep in mind that we have polled our readers at least 5,000 times through the years. It’s fascinating to see how they have responded, sometimes very surprisingly. You’ll find an archive of some of the polls here. So what are you waiting for? Check ’em out.
By Cheri Sicard
The short video tutorial below, demonstrated by Dr. Erica W. Tinson, BSc, BVSc (Hons), MVSc, could possibly save your dog during an emergency, by teaching you when and how to properly perform canine CPR.
Dr. Tinson specializes in veterinary emergency and critical care, and this five-minute video follows current CPR guidelines as recommended by the American College of Veterinary Emergency and Critical Care (ACVECC) Reassessment Campaign on Veterinary Resuscitation (RECOVER) initiative.
This is an emergency measure that is undertaken when the dog is unconscious and not breathing. Dr. Tinson stresses that cardiopulmonary arrests such as these are generally associated with low survival rates. That said, CPR or cardiopulmonary resuscitation remains the most effective way of treating this emergency.
In the video, Dr. Tinson uses a dog mannequin to demonstrate how to correctly do canine CPR.
1: Recognition and performing the ABCs
Before starting canine CPR it is important to check the ABCs, meaning:
Airway
Breathing
Circulation
It’s important that this step takes no more than 10-15 seconds. Dr. Tinson says you can recognize an animal in cardiopulmonary arrest by its being unconscious and not breathing at all.
Don’t waste time checking for a pulse. Follow along with the video instead for a demonstration of how to quickly and effectively check for breathing. She also advises trying to wake the dog. Also, if possible, try to call for help before starting canine CPR.
2: Animal and hand positioning
Again, watch the video to see exactly how you should position the animal and your hands. Where you will perform chest compressions will vary depending on the type/breed of dog. Dr. Tinson covers various scenarios with demonstrations of how it should look, how fast you should do the compressions, and how long you should continue.
3: Mouth-to-snout ventilation
If you are in an emergency situation in the middle of nowhere, chances are intubation (insertion of a ventilator tube) probably won’t be possible. In these situations, mouth-to-snout ventilation is called for. Dr. Tinson shows you how to do it in the video, providing 2 breaths for every 30 compressions.
4: Putting it all together
Dr. Tinson then puts the steps together to demonstrate what proper CPR on a dog should look like.
The video is only about 5 minutes, but for dog lovers, it is 5 minutes well spent towards protecting your beloved companion, no matter where you roam.
We use cookies to ensure that we give you the best experience on our website. By continuing to use our site, you consent to accepting cookies. We NEVER have or will sell reader's data. For more info, please see our privacy policy page.