Finding reliable cell coverage on the road is crucial for RVers. No matter whether you’re making calls, working remotely, or streaming movies at a campground—you need reliable coverage. These cell coverage apps will help.
Did you know that there are apps that leverage crowdsourced data and official filings that can help? These apps give real‑time insights into signal strength, carrier performance, and tower locations.
Here are the top three cell–coverage apps for 2025, along with detailed descriptions of each app’s standout features.
Opensignal
Opensignal is consistently praised for its intuitive interface and crowdsourced global coverage maps.
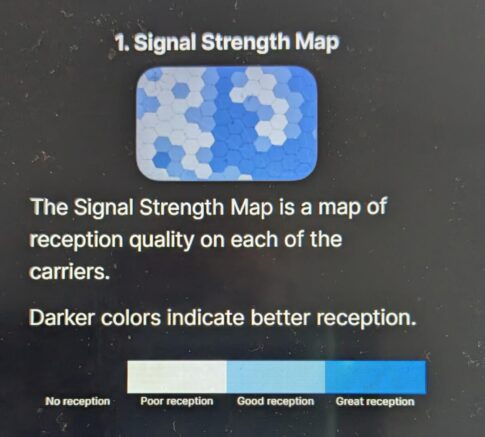
• Crowdsourced speed and coverage maps. Tap anywhere on the map to view live 4G/5G performance metrics—download/upload speeds and latency—reported by millions of users across AT&T, Verizon, T‑Mobile, and more.
• Tower locator and compass. The built‑in “Tower Compass” guides you toward the nearest cell tower.
• Network quality heatmaps. Filter by carrier, frequency band, and connection type (LTE vs. 5G) to see heatmaps that highlight “best” vs. “poor” areas—ideal for scouting remote campsites.
• On‑device speed tests. Run speed tests within the app; each result enriches the global dataset, improving future coverage predictions.
Coverage Map
The Coverage Map app stands out for its hexagon‑based crowdsourced data and robust reporting tools.
• Hexagon‑grid speed test map. Each hexagon on the U.S. map represents aggregated speed tests; tapping a cell reveals average download/upload speeds and latency for each carrier.
• Signal strength overlay. Easily toggle to a separate layer that grades coverage as “Great,” “Good,” or “Poor,” based on FCC filings and real–user tests.
• Carrier coverage reports. Generate PDF–style reports showing percentage coverage by carrier for any ZIP code, city, or county—handy for campground research before booking.
• Built–in speed test and tagging. Conduct recurring speed tests (up to 500 at once), tagging results as “Indoor,” “Outdoor,” or “Driving” to refine the map’s accuracy.
CellMapper
CellMapper is favored for its tower–level detail and open data model.
Note: CellMapper is not available for IOS devices.
• Live tower and sector mapping. See exact cell site locations and sector orientations plotted atop Google Maps—vital for pinpointing the nearest tower in sparsely populated areas.
• Band and technology filters. Filter by band (e.g., 700 MHz Band 12) or technology (LTE vs. NR) to map only the cells your equipment can use.
• User contributions and history. Contribute your own drive tests; view historical upload patterns to spot newly activated towers or decommissioned ones.
• Signal strength and latency logs. Record continuous signal strength and latency logs while driving. Then export the information for offline analysis—useful when scouting remote boondocking spots.
Making the most of cell coverage apps
So, how can you get the most out of your apps and have the clearest picture of the service you can expect at the next campground or boondocking spot? Here are some additional tips:
• Combine apps for a complete picture. No single app covers every nuance—using both a crowdsourced speed app (OpenSignal/Coverage Map) and a site–mapping tool (CellMapper) ensures you see both performance and tower location.
• Test at your destination. Always run a few speed tests on–site and contribute data to improve future forecasts.
• Check multiple carriers. In remote Western locales, coverage often varies by carrier; follow each app’s carrier filter to compare AT&T, Verizon, T‑Mobile, and more.
By leveraging these top three apps, RVers can confidently choose campgrounds with the cellular performance they need—whether for a Zoom call, Netflix night, or simply staying in touch while on the road.
Do you currently use a coverage app? Tell us which one you use in the comments below.
By Gail Marsh
I know it’s coming. Winter’s last blast has blown through, and daffodils have jumped up and smiled to greet the long-awaited springtime… and almost summer! Flowers aren’t the only thing I longed for as winter wound down. I can’t wait to dust off the grill and go full-on BBQ mode! And now it’s almost Memorial Day!
As I await more acceptable temperatures for standing out on the deck, flipping burgers, I’ve discovered a few grilling gadgets I need for the upcoming grilling season!
Grilling gadgets to up your BBQ game
Looft® air lighters
This fire starter will light a grill filled with charcoal, wood, or briquettes—all within 60 seconds! Best of all, you won’t need any lighter fluid or matches! How does this gadget work? Super-heated hot air! Not only will this lighter get your fire going, but it also has a built-in bottle cap opener, so you can also keep cool as you grill.
The only potential downside that I can see is that the lighter requires an outlet, but it comes with a nine-foot electrical cord, so that should be no problem. This lighter is also a little pricey, but when everyone’s feeling hangry, the lighter will get you grilling in a hurry!
The Grill Light Company offers a fantastic grill set for those of us who get home late from a day of sightseeing, hiking, or fishing. Grilling in the dark used to be difficult, but with a lighted spatula and grilling tongs, the job is made much easier. You read that correctly. The stainless steel, restaurant-grade spatula and tongs both feature built-in LED lights that can be activated by a simple on/off switch.
You’ll see how well your steak or burgers are cooking because the incorporated LED lights replicate midday sunlight (200 lumens) and will last 20,000 hours. You can clearly see the true color of your food without that bluish tint that sometimes comes from flashlights and headlamps. Both the tongs and spatula are said to be dishwasher safe, but I think I’d hand wash them both.
If the lighted spatula and tongs aren’t your style or you’re looking for something a little more affordable, check out this grill light instead. It attaches to just about any grill using either a clip or a magnet, your choice. The rotating, 23″ gooseneck light shines on any part of your grill and can be adjusted to exactly where you need it. It’s powered by three AAA batteries.
For you chicken-eatin’ folks, this one is for you! This chicken leg and/or wing rack is cool! It holds 14 wings or legs at once, so it’s perfect for family BBQs or other big gatherings. Or, maybe just you… It’s not hard to eat 14 chicken wings now, is it?
The tray below not only protects your grill or smoker from the drippings, but if you throw some veggies on there to cook, you’ll add a whole new layer of delicious to your BBQ menu.
The rack is foldable so it’s easy to store, and it’s even dishwasher safe.
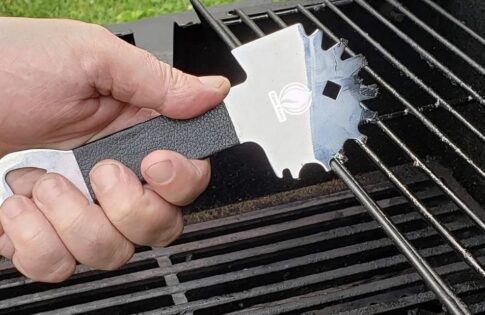
Toss that worn-out wire scraper. Get rid of the grill cleaning pad, too. It’s time to really clean your grill grates and this is the product to use. Cave Tools has come up with a brushless tool that really cleans grill grates. This stainless-steel notched tool will fit a variety of differently sized grill grates and flat grill plates, too. The tool features a good grip handle to protect against blisters. There’s even an attached bottle opener so that you can celebrate your cleaned grill when you finish the job.
Say goodbye to hot dogs that taste like last night’s fish. Remove previously stuck-on foods that burn tonight’s meal. Stop swallowing those little wires that break off grill cleaning brushes. Use Cave Tool’s brushless scraper to get and keep your grill grates clean forever.
Sometimes, a quick fix is all you need to keep exploring. In the video below, our host from softroadingthewest uses a smart camper van building hack as an interim solution while he builds his dream camper van conversion. However, for many people, the idea of using contractor drawers, the kind typically used in utility trucks, for camper van storage can be a practical, permanent solution.
They do have some drawbacks, discussed at the end of this post, but they also offer some huge benefits, especially strength and durability.
After completely gutting the interior of a Topo Toppers Mesa camper, the goal was to create a new build. But adventure still calls. So, our host put together a temporary solution to keep exploring during the construction.
The first step was preserving the existing electrical infrastructure. The wiring blocks and compressor from the previous build remained in place. A simple structure was built on top of these components. This protects the electrics and acts as a step up into the bed. Plus, it provides a spot for the Jackery 1500 power station.
The Jackery 1500 powers lights and other electrical components. The compressor, however, is hardwired to the truck battery with a kill switch for safety. During travel, the Jackery is stored on the floor, wedged in with other gear. Once at camp, it’s moved to its designated spot and plugged in.
A piece of the old countertop now houses switches for the red lights, USB ports, and a 12V outlet for an electric blanket. This panel is easily accessible when the bed is deployed, making nighttime adjustments a breeze. The cargo door got a temporary upgrade with a foam insulation wall. Previously, this foam served as a faux tailgate for diesel heater access. Now, it’s repurposed to support the diesel heater, which sits on a table inside.
Contractor van drawers were added to the camper, initially to support a nap couch. This led to the creation of a cozy spot for relaxation. The temporary nap couch consists of scrap wood and a 2×6 piece. The truck bed’s dimensions (5 ft. x 5 ft.) allowed for the use of the old couch’s foam piece. This provides a comfortable place to sit and nap.
These drawers came from our host’s dad, an electrical contractor. They were originally used in work vans for storing hardware and tools. The sturdy aluminum construction means you can even walk on them. The initial plan was to use them for clothing and essentials, replacing bulky duffel bags.
Are contractor drawers worth the cost?
It turns out these drawers aren’t cheap unless, like our host, you can find them used or free. While many companies make them, they are a significant investment. However, the ability to open the drawers from inside the camper, unlike some other systems, is a big advantage. Not to mention the fact that they can support significant weight.
However, the drawers are shallow, limiting storage capacity. Currently, our host uses crates and boxes for storing additional gear, and his temporary camper setup is a testament to resourcefulness. While it’s not a long-term solution, it allows for continued adventures during the build process.
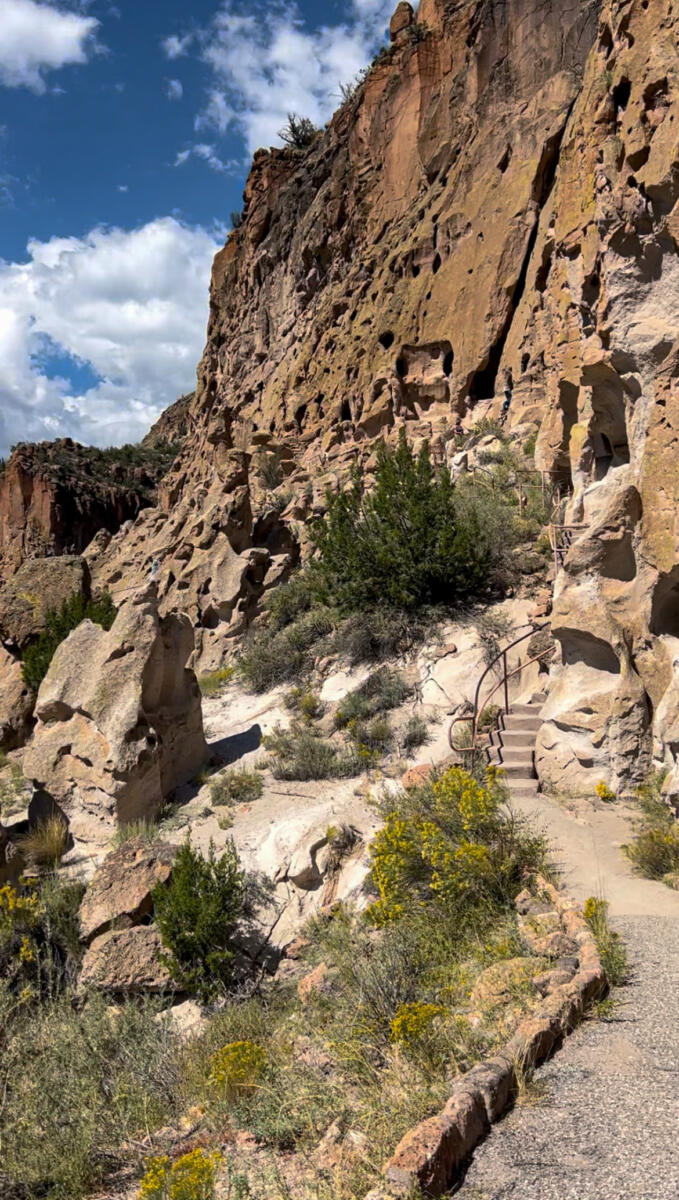
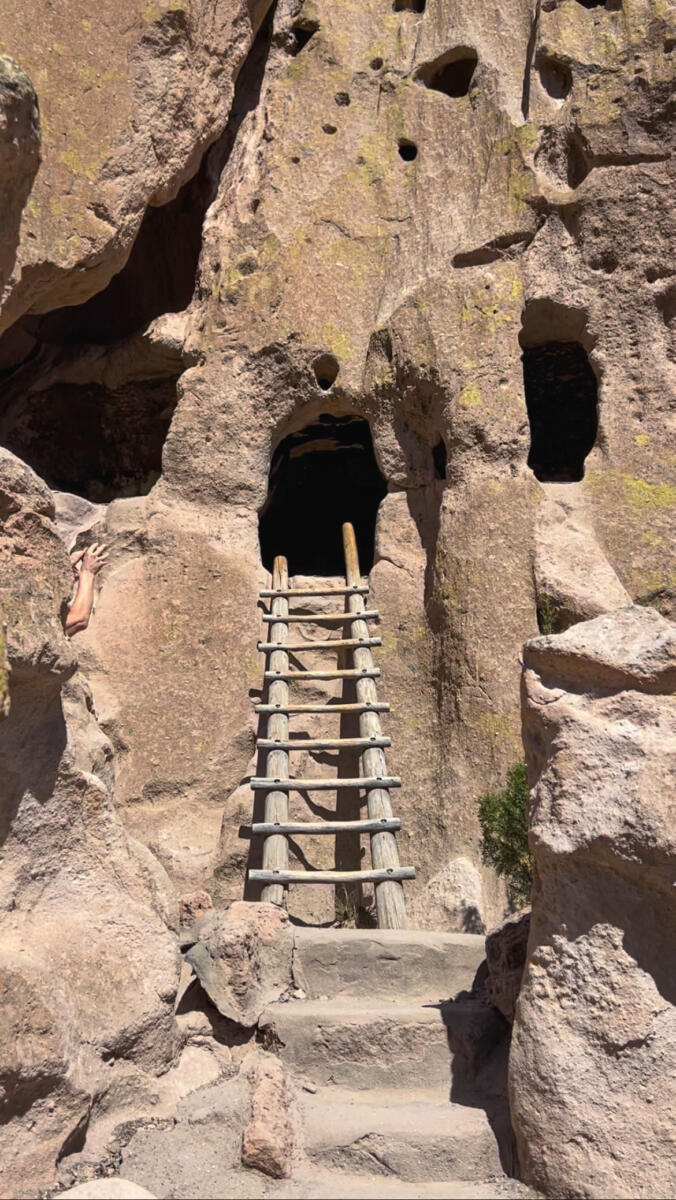
The Pueblo people (and really, all Indigenous groups) have always fascinated me. That’s why I was so excited to discover Bandelier National Monument. This New Mexico treasure is renowned for its well-preserved Pueblo dwellings.
What you’ll see
Bandelier National Monument offers a glimpse into the lives of the people who inhabited the area more than 700 years ago. The Main Loop Trail, a 1.2-mile circuit, provides access to many of these archaeological sites. There are even ladders that allow entry into some of the dwellings.
The people of Bandelier
Pueblo people, along with other tribes, built their homes into the volcanic tuff—a type of rock made from volcanic ash ejected during an eruption. The ash eventually hardens (is lithified) and the results are what you see in Bandelier.
Ancient peoples grew crops on the mesa tops—vegetables like beans, squash, and corn. The inhabitants also hunted for deer and smaller wildlife and supplemented their diet with native plants from the area.
Today, visitors are invited to explore the ancient cliff dwellings. You can marvel at the ceremonial kivas and petroglyphs, too, as you remember the people who lived at Bandelier and made it their home for centuries.
Photos by Emily Woodbury, who was here just a few months ago.
Ranger tours
Monument rangers, along with volunteers, host tours that provide visitors with interesting and educational programs. Through the tours, visitors can learn, ask questions about the peoples of Bandelier, and see for themselves what life was like for the communities that lived so long ago in this area.
Cultural demonstrations
Bandelier National Monument is dedicated to preserving the memories of the original inhabitants that once made the area “home.” Many tribal nations shaped this land. Their cultures, lifestyles, religious beliefs, and traditions live on today through a variety of cultural demonstrations. Check this website for times and locations for these free events.
Hike, boat, stargaze
Bandelier National Monument offers opportunities beyond touring ancient dwellings. The area has something for everyone, with hiking, boating, and stargazing, too. Find out more about the many visitor opportunities here.
On-site camping options
• Juniper Family Campground. Located within Bandelier National Monument boundaries, Juniper Family Campground offers 53 individual sites suitable for tents and RVs. Some sites can accommodate RVs up to 40 feet in length. Amenities include picnic tables, fire rings, and nearby restrooms. You can make reservations up to six months in advance. There are some sites that are available on a first-come, first-served basis, as well.
• Ponderosa Group Campground. If you’re traveling with a group, consider Ponderosa Group Campground, located four miles from the monument’s main entrance. Ponderosa offers visitors two group campgrounds—with spaces for 10 to 50 in each. You can make reservations up to six months in advance here.
Nearby RV Parks
For folks seeking additional amenities, several RV parks are located within a 50-mile radius of Bandelier:
• Santa Fe Skies RV Park: Situated near Santa Fe, this park offers full hookups, Wi-Fi, and panoramic views of the surrounding mountains.
• Road Runner RV Park: Also near Santa Fe, this park provides easy access to local attractions and casinos.
Navigating to Bandelier
While GPS devices are helpful, they can sometimes mislead travelers in remote areas like Bandelier. To ensure accurate navigation:
• Use the National Park Service App: This official app provides maps, trail information, and alerts for national parks, including Bandelier.
• Download offline maps: Apps like Avenza Maps allow you to download detailed maps for offline use, ensuring you stay on track even without cell service.
What you need
When heading into national monuments such as Bandelier, RV travelers should be prepared for limited services, changing weather, and some primitive road conditions. Be prepared by bringing:
• Water and food supplies: The park service recommends at least one gallon of drinking water per person per day, plus snacks and/or food. There is a water bottle fill station outside the visitor center and gift shop.
• Safety and first aid: Pack along a first-aid kit, headlamps or lanterns, layered clothing for temperature swings, and sun/rain protection. Also wear sturdy shoes or boots.
• Sunscreen/bug spray: Depending on when you plan to visit Bandelier National Monument, you may need bug spray and/or sunscreen.
• Leave no trace gear: Take trash and recycling bags and plan to pack out all waste to preserve the monument’s fragile ecosystems.
You should go!
Bandelier National Monument offers RVers a unique opportunity to connect with ancient history while enjoying stunning natural landscapes. This unique place promises to be a memorable adventure.
We know that many readers of RVtravel.com paid cash for their RVs. But we know that many others, maybe even most, financed their purchases.
These days, RV financing terms may stretch 10, 15 or oftentimes even 20 years—the last the same as a home mortgage. The difference, of course, is that in most cases, a traditional home will have appreciated in value, even doubled or tripled in value, while the RV will almost certainly have depreciated to where it is worth very little or even next to nothing.
Long loan terms can help reduce monthly payments, making RV ownership more accessible to more people. But they also mean owners could still be paying off their rig long after its best years are behind it—or even after they’ve sold it or stopped using it altogether. It’s not uncommon for RVers to owe more than the vehicle is worth, especially if they bought during a time when prices were at a peak.
And while interest rates have come down from their highest levels in recent years, they’re still high enough to make a big difference over time. That can turn what seemed like a manageable monthly payment into a long-term financial commitment that’s anything but recreational.
What about you? Are you making monthly payments on your RV? If so, how much is the monthly payment? Please feel free to leave a comment. Please do not respond if you are currently NOT making payments.
And, remember, as always, if your internet connection is slow, it could take a bit for the poll to load. So stand by … it will be along.
At first, it seemed like an oxymoron to me: Corn Palace? As a former Iowa farm girl, I worked in cornfields. It was often dusty and hot. The labor was exhausting—planting, discing weeds, and eventually harvesting. If there was a palace involved, I never saw it!
Turns out, the Corn Palace isn’t an oxymoron—it’s a real place in South Dakota that decorates, elevates, and celebrates corn, prairie life, and more! And yes, it’s really a palace!
The Corn Palace
SD Image: The Corn Palace
Mitchell’s Corn Palace debuted in 1892, just eight years after the town was platted. Town fathers set out to prove that South Dakota could sustain prosperous grain harvests. They hoped the Corn Palace would attract settlers to the region.
Built for a communal harvest festival venue, the original wooden structure hosted fall celebrations complete with stage entertainment and community gatherings.
Architectural changes
By 1905, growing crowds necessitated a new building; a third and permanent Corn Palace rose in 1921. In the 1930s, decorative Moorish minarets and kiosks were added to recapture the palace’s early exotic flair.
Annual crop‑art murals
Every fall, an ever‑changing theme springs to life on the Palace’s exterior walls. Artists nail ear‑by‑ear twelve different colors of dried corn—red, brown, black, blue, white, orange, calico, yellow, and even green—to form large‑scale scenes.
In 2025, the theme “Wonders of the World” will feature the Eiffel Tower, Grand Canyon, and Taj Mahal in vivid mosaic.
Behind‑the‑scenes guided tours
During summer months, free guided tours reveal this “a‑maize‑ing” place. The tour also includes an engaging video on the Corn Palace’s story. Afterward, visitors can explore exhibits on mural creation, agricultural history, and decades of memorabilia.
Always free admission
General admission and parking at the Corn Palace are completely free year‑round. Hours vary seasonally but are generally 8 a.m. – 5 p.m. (extended in summer). Note: There is no overnight camping on the Corn Palace grounds.
Annual festivals and celebrations
Throughout the year, the Corn Palace hosts special festivals and celebrations, like these:
• Corn Palace Stampede Rodeo (July): A high‑energy rodeo drawing competitors and spectators from across the Midwest.
• Corn Palace Festival (late August): A modern echo of the original harvest fest with carnival rides, cake decorating contests, live entertainment, and agricultural exhibits.
• Corn Palace Polka Festival (September): Celebrating Midwest German heritage with polka bands, dancing, and family fun.
Multi‑purpose venue
Inside, the Palace doubles as an arena for high school and college basketball, indoor concerts, trade shows, proms, and even circuses.
Why RVers like the Corn Palace
• Roadside icon: It’s one of the quirkiest and most photogenic stops on I‑90.
• Budget–friendly: Free admission keeps travel costs low. (Special events are the exception.)
• Family–friendly: Both kids and adults love the bright murals and free guided tours.
• Fall foliage and festivals: Plan for late August to catch the festivals and cooler temps.
• Midpoint stop: Mitchell is roughly halfway between Minneapolis and Rapid City, making it a logical overnight for Dakota travelers.
Nearby RV campgrounds
• R & R Campground & RV Park. Located just off I‑90 Exit 332, R & R offers 35 pull‑through sites and 44 back‑in sites. The campground also has 30/50-amp electric, water, and sewer hookups. On‑site amenities include a heated pool, playground, picnic shelter, free Wi‑Fi, dump station, and a pet‑friendly policy.
• Mitchell KOA Journey. Just 4.5 miles east of the Corn Palace on SD‑38, this KOA Journey features long pull‑through sites (up to 90 ft.). Visitors also enjoy 50-amp service, cozy camping cabins, tent sites, free Wi‑Fi, propane and firewood sales, mini‑golf, and a dog park. Check‑in is well‑lit after hours, and the general store stocks snacks, souvenirs, and RV supplies.
• Lake Mitchell Campground. Nestled on the shores of Lake Mitchell, this city‑run park has 48 full‑hookup RV sites (30/50-amp) and 9 tent sites. Guests enjoy fishing, swimming, canoe and paddleboard rentals, playgrounds, hiking trails, and a laundry facility.
You should stop!
The Corn Palace offers RVers a unique break from road travel. If your itinerary takes you near this iconic roadside attraction, you should definitely stop and see it for yourself!
Today’s RV review is different. We’ll look at seven high-quality travel trailers without slides. In reading your comments, which I am always grateful for, many of you have asked for my thoughts about high-quality trailers without slide rooms. I do hear you.
All of these are RVs that we’ve looked at before over the years, and I’ve provided links to my full reviews of the trailers. All of these are also brands or models that I would consider for my own RVing adventure. Sure, there are a lot of RVs that don’t have slide rooms, but this is a list of ones that I think are high quality and have a good interior layout as well.
Another “must” on my list is a walk-around queen bed (or better). Now, some of these are also available with twins, which is another nifty option, but the RVs I listed here had to have a queen at least.
Unfortunately, since all of these are high-quality models, none of them is particularly inexpensive. But ya’ get what ya’ pay for, and if you buy the best, you’ll only cry once.
Notice that I didn’t put an Airstream on this list, and that was deliberate. I think the people who buy Airstreams want Airstreams; but if you’re comparison shopping, Airstream carries such a price premium that they’re tough to justify logically. Plus, I have yet to find an Airstream with a bathroom that’s worth a darn.
Also, I put these in order of my personal favorite, saving the one I like best for last.
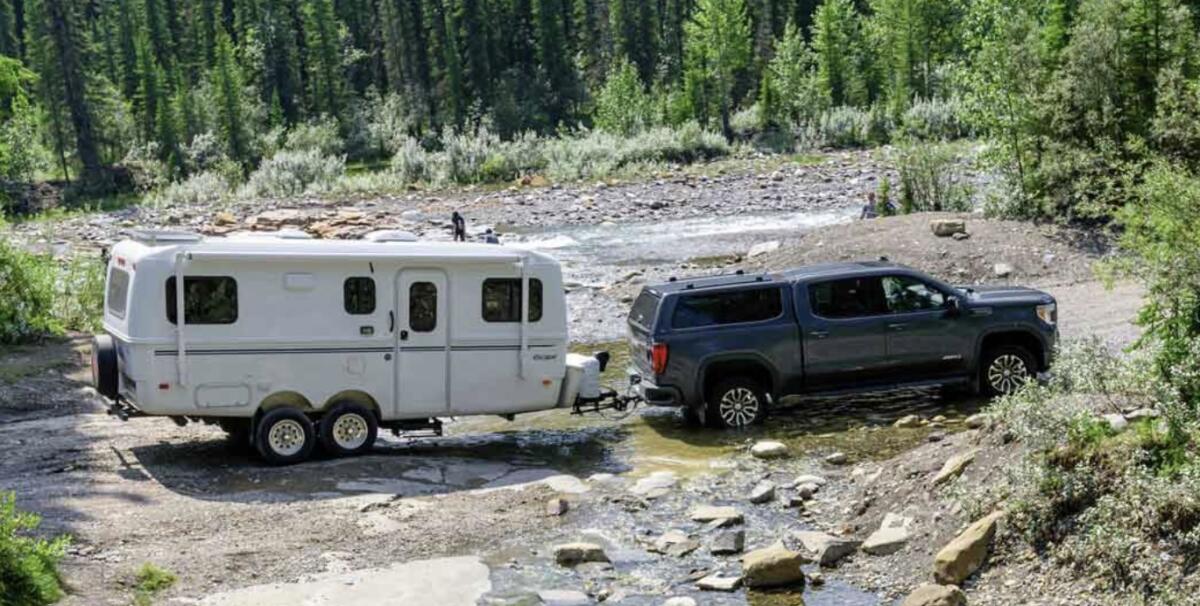
Escape Trailer - favorite
1 of 3
Escape 23
$65,999 • 24’7” long • 4,600 pounds
By nature of being first on the list, this is my least favorite in the list, but know that I considered these when I was last shopping.
I love the fiberglass shell of this trailer as well as the aluminum frame and torsion axle suspension. I’m also a big fan of the dual-pane windows with integrated shades and screens.
The trailer also comes with 400 watts of solar as well as two 100-amp-hour lithium batteries.
I know some of you are going to be super excited about this—these even still come with a propane-electric fridge. I think this is one of the last trailers on the market with this.
But what got this in this position on the list is that this features a wet bath. That means the toilet is in the same enclosure as the shower.
Escape sells directly, so they also offer a fair amount of flexibility and options, including two different main themes to the interior—one a maple and the other a white. I also saw models with a three-burner stove and 21” oven, models with just two burner stoves and a microwave, models with a convection air fryer microwave, models with queen and king beds, as well as twins. So the amount of flexibility you have in customizing an Escape trailer is significant.
Another big plus—I have yet to speak with an owner of an Escape trailer that’s anything less than thrilled with it, and that speaks volumes.
Don’t feel bad if you haven’t heard of Northwood’s Arctic Fox brand. They’re a company in the Pacific Northwest that has an incredible reputation for building first-rate towable RVs. The Arctic Fox North Fork 22G is the smallest in the Arctic Fox line and the only one without a slide room. There are also a few smaller models under the company’s Nash brand, but this one retains the walk-around bed.
This trailer has the same floor plan as the first trailer I bought new, but has a permanent 60” x 74 1/2” bed rather than a Murphy bed.
Northwood builds its own frames for its trailers and has a reputation for exceptional winter-readiness. Among the unusual features in this model is the availability of a built-in generator. They also use shocks at each wheel along with Road Armor™ dampening components. These are just solid trailers.
The aluminum frame is the heart of the inTech O-V-R Navigate travel trailer
Honest review of the inTech O-V-R Navigate travel trailer
Easily cleanable materials in the inTech O-V-R Navigate
inTech O-V-R Navigate
$64,400 • 27’1” long • 5,900 pounds
I got to tour the inTech facility during Open House and really liked what I saw. I was also surprised that my wife really liked the O-V-R Navigate, as it’s a more industrial feel than I thought she’d like.
This trailer is built differently than a lot of others in that it’s a welded aluminum cage structure, but also with an aluminum skin. The company also builds its own chassis. I like the way these are built.
I also like the optional slide-out kitchen in this and the Aucta, and you can even get a drop-down bunk in this model to add sleeping for more people. There’s also an optional onboard generator.
If the O-V-R isn’t your style, perhaps the Aucta will be. It’s built in much the same way as the O-V-R, but is a slightly more traditional design. I recently had a chance to look at the newAucta Sycamore in this review, but they have smaller and less accommodating models as well, including the very popular Oasis model.
The Aucta line was called the Terra until Forest River’s lawyers stepped in, but it’s the same product as before the renaming and is a fiberglass-skinned trailer with an aluminum frame and structure. Definitely a high-quality product, although the interiors of these remind me more of a sailboat than an RV just in the overall feel—but that’s not a bad thing.
Bigfoot 25RQ
$93,170 • 25’6” long • 4,863 pounds
When I first saw the Bigfoot 25RQ, it was in prototype form, but now it’s out in the wild. Bigfoot is another Canadian company that makes fiberglass-shelled trailers (think of Casita) but does so very differently than some of the others.
Of course, Bigfoot’s suspension is a complete departure from most, but the trailer itself is 101” wide—wider than many other brands. This allows them to put the queen-sized bed sideways but also gives the no-slide trailer a more spacious feel.
Bigfoot’s products, in general, are also very well-suited for camping in more extreme weather, which makes them great for those shoulder-season camping adventures.
Lance is a company that is known for the quality of their products and is one of the last RV companies that somehow manages to stay in business in California. But they build a lot of relatively traditional floor plans with slides. This 2075 is the exception with a really well-thought-through floor plan that has an optional outdoor kitchen under the rear dinette and a big flip-up rear window through which you could pass things.
There are so many things I like about Lance products that are just thoughtful design features. They really demonstrate that the brand has people who actually camp in the design process.
The company also does some smarter things in the build process, including using high-tech CNC routing for cabinets and walls and such, building wiring harnesses much the way automobile companies do, and more.
A rear ramp-deck expands the Ember Overland 240TKR
A Curt independent suspension and Goodyear tires give the Ember Overland 240TKR an aggressive look
Two beds offer more flexible function in the Ember Overland 240TKR
Ember Overland 240TKR
$74,935 • 28’3:” long • 6,765 pounds
This trailer almost didn’t make the list only because it’s sort of a toy hauler, and there are quite a few toy haulers that don’t have a slide room. But it’s really one of the most innovative towable RVs on the market, in my opinion.
From the ground up, this uses the CURT independent suspension, has a tongue jack that also allows you to lower your tailgate (this is one of the only “bumper pull” RVs I know that has that feature), has been climate tested from 0°-110°F, and so much more.
But the flexible interior with the Ember Track system that enables you to transform this rig from office to toy hauler to bunk model very easily is a big part of what sets it apart. Another unique feature is the front bed mechanism that can go from twin beds to a king-sized bed. There is just so much about this trailer that reflects the fact that Ember’s decision makers actually go camping and have created an RV that has a bunch of different uses.
Another thing I liked about this is that Ember has provided a portal for later upgrades like solar or satellite internet on the roof, making these changes much less intrusive and less susceptible to leaks down the road. Again, details.
There it is—a list of travel trailers I would consider buying. Note the commonality of no slide and high-quality suspensions. But there are some smaller trailers that could easily end up on this list too, including theGeo Pro G19FD, which is a slightly narrower version of the first new trailer I owned and loved. I also like that that model is available with the Power Package, which is a high-quality solar and lithium system and one that I had put into my own trailer.
Did I miss something? What do you think of this list? As always, I look forward to your comments and input.
More about these RV reviews
These RV reviews are written based on information provided by the manufacturers along with our writer’s own research. They are based on information from a single unit and may not reflect your actual experience. Shop your RV and dealership carefully before making a buying decision. They are intended only as a brief overview of the vehicle, not a comprehensive critique, which would require a thorough inspection and/or test drive.
Tony comes to RVtravel.com having worked at an RV dealership and been a lifelong RV enthusiast. He also has written the syndicated Curbside column about cars.
You can also check out Tony and Peggy’s RV podcast.
By Dustin Simpson
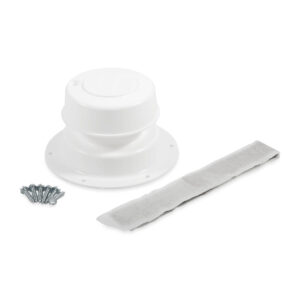
Today, I want to share some tips on how to remove and replace an RV roof plumbing vent cap and reseal it properly.
First, you’ll want to remove the old vent by carefully unscrewing it from the roof. Once it’s removed, clean the area around the opening and make sure it’s free of any debris or old sealant.
Next, you’ll want to apply a new layer of sealant around the opening where the vent will go. Make sure to use a high-quality sealant that is specifically designed for RV roofs like this one to ensure a watertight seal.
Then, carefully place the new vent into the opening and secure it with screws. Finally, apply a generous amount of sealant around the edges of the vent to ensure it’s properly sealed to the roof.
It’s important to make sure the vent is securely sealed to prevent any leaks or water damage to your RV.
I hope these tips help you with your RV plumbing vent maintenance!
Last summer, social media led me to my new favorite eating vessel: a tackle box. Yes, a fishing tackle box.
I don’t fish, but I did go out in search of the perfect tackle box. The requirements: It had to be big enough, and it had to have enough movable compartments that I could adjust to different sizes and/or shapes. (Yes, I did end up with a pink tackle box. Judge or be judged… whatever.)
So what do a tackle box and an eating vessel have in common? Just wait…
The “snackle box” took over social media last summer, and I gotta say, it’s brilliant.
The concept is simple: It’s basically a charcuterie board in a tackle box. Fill it with bread, crackers, cheeses, cured meats, olives, smoked salmon, nuts, chocolates, dried fruit, fresh fruit, jams, honeys… the opportunities are endless!
I started making them all the time. I brought them kayaking, camping, on day trips, to the beach, to friends’ houses… I pretty much brought one everywhere I could.
Here are a couple of examples of mine from last summer so you can visualize what the heck I’m talking about:
My snackle box on a kayak trip last summer. Private beach and snacks? I’ll take it!My snackle box at a campsite last summer. The perfect camping lunch!
My favorite snackle box combo so far: Take a cracker, top it with Red Dragon Mustard Cheddar (a cheddar with a strong mustard flavor), a good piece of smoked salmon, and a cornichon (a small, sour pickle). It’s the perfect bite—delicious!
I’ve seen people making every themed-snackle box imaginable: s’mores boxes, taco night boxes, movie-night boxes, crudité boxes… you name it, it’s probably been made into a snackle box. If you have kids or grandkids, they will LOVE this. Google “snackle box ideas” and you’ll be entertained for hours.
Look at this Bloody Mary snackle box from Girl Camper!
So get yourself a tackle box (yes, a new one and NOT the one sitting in your garage… yuck-o) and make yourself a Memorial Day picnic snackle box. You’re going to love this! If you do make one, send me a photo to editor@rvtravel.com. I’d love to see!
In case you like my hot pink one, you can find it here (and there are other colors available, too).
Oh, and if you need other uses for a tackle box, they’re great as jewelry storage, arts and craft storage, or toolbox storage.
We love the spiciness of the Buffalo cheeseburger recipe. Infusing the burger patties with pepper jack cheese adds a spicy kick to the burgers. And, the sauce… It’s zesty and slightly tangy with a hint of heat from Buffalo sauce. Blue cheese crumbles bring their bold flavor. Topping with potato chips adds crunch. This is a savory and indulgent cheeseburger with a unique twist. Click here for the recipe.
Baked Potato Salad
by Joyce Lowery from Sterlington, LA
Everything you love in a loaded baked potato, but in potato salad form. The dressing is made from sour cream, mayonnaise, ranch dressing, shredded cheese, and hot sauce. You taste the hot sauce that adds a kick of spice which we enjoyed alongside the tangy dressing. Crispy bacon is added to give a smoky flavor and add a little crunch. When folded with chunks of cooled baked potatoes, it’s a great summer side dish. Baking instead of boiling the potatoes makes the potatoes very creamy. Here’s the recipe.
Tonna’s Hot Dog Sauce
by Tonna Canfield from Ashland, KY
Tonna’s hot dog sauce recipe is a little different than other sauces we’ve tried. It’s very flavorful – spicy and sweet with a slight tang. Toss the stuff in the can and give this a try for your next cookout. It’s fairly easy to make and tastes so much better. In a little over an hour, you’ll have knock-your-socks-off chili dogs. Get the recipe here.
Pulled Pork with Jack Daniel’s Sauce
by Bruce Hoffman
This pulled pork is sweet, tangy and spicy… all thanks to the great BBQ sauce. The sauce paired well with the juicy pulled pork loin. Click here for the recipe.
Deli Mac Salad
by Helene Mulvihill from Magnolia, TX
It can be hard to replicate the flavor and texture of authentic deli macaroni salad, but this recipe pulls it off beautifully. Sweet and tangy, celery seed adds a ton of flavor. Not only do chopped green peppers add another layer of flavor, but they also add crunch. A delicious side dish for a cookout or potluck. Here’s the recipe.
Chicken Pineapple Kabobs
by Luci Vieira from Cambridge, ON
With a mix of sweet, tangy, and savory, what’s not to love about these chicken kabobs? This is an easy kabob recipe. You can fix the chicken and pineapple ahead of time. Then, slide on the skewers for a quick meal or entree for your next party. You don’t even need a side dish when serving these. They’re very filling. We love the mix of flavors in these kabobs. Click here for the recipe.
Some rubber valve stems have a metal center and some valves are all metal except for a rubber gasket. The metal part of valves is almost always brass. Sometimes they’re nickel plated to look like chrome or to match aluminum wheels.
(Click/tap image to enlarge.)
The two valves pictured on the left are “snap-in” rubber valves. The two on the right are “bolt-in” metal stems. By “snap-in” we mean the valve is installed into the hole in the wheel by pulling on the threaded part of the brass until the small rubber ridge “snaps” through the hole.
The best way to know for sure is to look for a nut that “bolts” the stem to the wheel. I would suggest a TR416 or similar as seen here from AutoZone. O’Reilly’s Auto Parts stores have a similar short stem. You should be able to find similar valves in almost any auto parts store.
These metal stems come in many lengths, from less than an inch to 2″ or longer (different lengths have different TR part numbers). The hole in your passenger, trailer or light truck wheel is most likely 7/16″. Old VW wheels were 5/8″. All 19.5 and 22.5 wheels should have come with metal bolt-in valves, but those use the 5/8″ rubber grommet/O-ring. Many metal stems sold at retail come with two different rubber gaskets, one for each size hole. The gasket is just a snug fit and should just push into the wheel hole.
Note the nut has a torque spec of 25 – 45 inch pounds, so do not over-tighten the nut. I have found that a regular 9/16″ wrench is just fine, and you do not need a big ratchet wrench to tighten the nut.
Keep the stem short
Keep the stem short to lower the chance of the TPMS being knocked off if you get near a curb. There are some unique wheels that may require a bit longer stem to allow you to attach your TPMS sensor. I suggest you have the sensors available when you install the bolt-in stems to confirm sufficient clearance.
“Fatigued” rubber stem
The main reason for metal stems when running TPMS is to prevent vibration of the stem, which can fatigue the rubber stem.
Metal valve caps
While you are at the auto parts store, be sure you have METAL valve caps. Plastic caps are, in my opinion, only good for keeping dirt and small birds out of the valve core area. Metal caps should have rubber “O” rings in them and can retain air if you are not running TPMS. Look in the thread end and you should see the gasket.
Damaged tire
Each fall, when I remove my TPMS for the winter, I place metal caps on my stems. I will admit that one year I didn’t do that and the valve core had a very slow leak, but I ended up with a tire being damaged because it lost air over the 7 months between when I parked and when I was getting ready to go traveling.
I have a couple of posts that focus on the valve cores, including one on why they leak.
How tight should the valve core be
One detail is knowing how tight is tight enough for your valve cores. Over-tight can cause the small gasket to deform and even split. Under-tight will result in a slow leak. After 40 years of installing valve cores, I consider my fingers to be close to “calibration,” but it would be better if you followed a specific procedure.
I did a test that may help. The spec for valve core torque is 1.5 to 5.0 inch pounds MAX, but I don’t expect you to run out and buy a special inch-pound torque wrench, as seen here.
To help you, I devised this test. Using the test fixture I made when running my TPMS comparison, I loosened a core until it leaked as seen here (below).
Then, using my torque wrench, I tightened the core until the leak just stopped. I then continued to tighten the core until I reached about 1.5 inch pounds (this was 1/4 turn after the leak stopped). I then continued to tighten the core until I reached 5 inch pounds. (This was 3/4 turn after the leak stopped.)
So, I would suggest that you can simply tighten a core until the leak stops then rotate 1/2 turn more.
Here are sample core tools.
The one on the left is a “professional” tool, but I have also used my homemade core tool for many years. This is just an old scrap rubber valve stem with a cap that has the cut-out to fit a core.
Slime sells a “clicker” valve core tool. I have tested and can confirm this tool limits the core torque to the spec.
I hope this helps you understand a bit more about valves and valve cores.
Roger Marble
*****
If you want more details or posts on valves, you can check Roger’s blogand enter the word “valve” in the small search box in the upper right to see all of his posts that mention tire valves.
If you have more tire questions, also check out Roger’s Blog as well as his posts on RVtravel.com. There are hundreds of posts covering everything to do with tires.
If you still have a question for Roger after searching the above posts, send your inquiries to him using the form below.
I recently published another article about RVers’ favorite state parks. At the bottom of that article, I asked you to share your favorite state parks, and you did not disappoint! Wow, what a variety—from riverfront campgrounds in Washington to desert oases in Arizona and mountain escapes in North Carolina.
I’m excited to share these state park recommendations with you. I’ve organized them by region, added practical tips on amenities, provided reservation considerations, and even suggested must-see nearby attractions. Whether you crave water views, wildlife encounters, or star‑filled skies, these parks promise memorable RV adventures.
Pacific Northwest
Photo: beautifulwashington.com
Wanapum State Park (Washington)
Reader “John the Road Again” writes: “Wanapum State Park is our go‑to when traveling along I‑90 to and from the coast. Beautiful, well‑maintained campground with beautiful views of the Columbia River. Just be forewarned that it can get windy during the day or night.”
Located on the banks of the Columbia River just off Exit 149, Wanapum offers more than 27,000 feet of shoreline, paved sites with water and electric hookups, restrooms and showers, and a boat launch—perfect for river fishing or boating. Windy afternoons are common, so secure awnings and plan early morning hikes along the sandy beaches.
South
Poverty Point State Park (Louisiana)
Steve: “If you find yourself traveling on I‑20 in Louisiana, don’t miss Poverty Point State Park. It’s a few miles south of Poverty Point World Heritage Park. Both are well worth your time.”
Just south of the UNESCO World Heritage site, Poverty Point SP features 33 full‑hookup RV pads, nature trails, a campground store, and picnic shelters. Be sure to tour the ancient earthworks at the adjacent Archaeological State Historic Site.
Desert Southwest
Usery Mountain Regional Park (Arizona)
Chris O: “Usery Mountain Regional Park near Mesa, Arizona. Part of the Maricopa County Parks system (so not really a state park). Electric and water; has a dump station. Beautiful campground in a mountain desert environment.”
While technically a county park, Usery Mountain offers 73 RV sites with water, electric, and a central dump station. Hike the Wind Cave Trail for sunsets over the Valley of the Sun and enjoy nearby Salt River tubing and Saguaro-fringed desert vistas.
Book is a must-have for state park campers!
This book, “50 States: 500 State Parks,” is a must-have for all state park campers and explorers. The book is a beautiful visual journey through America’s best state parks. Whether you’re looking for stunning vistas, rare wildlife, a dose of history, or an enjoyable hike, the state parks offer an array of experiences. Learn more or order.
Midwest and Plains
Custer State Park (South Dakota)
Richard: “Custer State Park in South Dakota. Great wildlife, but tough to get a reservation.”
Renowned for its bison herds along the Wildlife Loop Road, CSP offers several campgrounds with water/electric, showers, and laundry. Reservations open six months out—book early or try for cancellations. Nearby Needles Highway and Crazy Horse Memorial add cultural interest.
Itasca State Park (Minnesota)
PerryB: “Itasca State Park in Minnesota is our favorite. We’ve easily spent 30 weekends when working, and now spend a week there since we’re retired. Great hiking, biking, and fishing. Plus, the campgrounds are not near noisy highways.”
As Minnesota’s oldest state park at the headwaters of the Mississippi River, Itasca features 168 campsites (water/electric), miles of bike trails, paddling routes, and fishing along the Big and Little Itasca lakes. Don’t miss the iconic “headwaters” marker.
Southeast
Stone Mountain State Park (North Carolina)
Riley: “Stone Mountain State Park, 3042 Frank Parkway, Roaring Gap, NC 28668, offers camping, with 41 sites on one loop with electricity and water, a heated bathhouse, dump station, a stream running through the loop, and great hiking on a huge 600‑feet high granite dome, plus in various trails and streams. Several notable waterfalls are close to the campground within the park, which is close to the Blue Ridge Parkway.”
Stone Mountain State Park offers visitors a variety of activities. There’s something fun for everyone with hiking, horseback riding, photography, birdwatching, fishing, and more!
Ozarks and Heartland
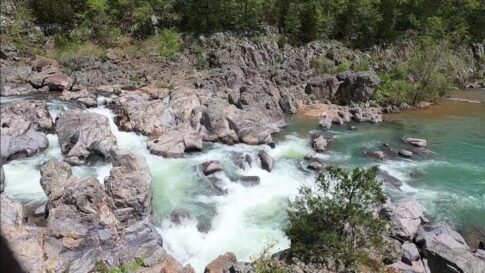
Johnson’s Shut‑Ins State Park (Missouri)
Bruce Tanner: “Johnson’s Shut-Ins State Park in Missouri is one of our favorites. So much so that we have been camp hosts there for the past seven years. Beautiful, clear rivers and streams, and loads of hiking trails all within the park and short drives. Awesome campground with very spacious sites with varying amenities.”
Carved by ancient volcanic eruptions, the “shut‑ins” (rock‑churned rapids) offer natural water slides and swimming holes. The park has RV sites (water/electric), modern bathhouses, and an interpretive center detailing the 2005 Taum Sauk Dam breach.
North
Denali State Park (Alaska)
Neal Davis: “Our favorite state park is Denali State Park in Trapper Creek (not really, but is nearest town) and its K’esugi Ken Campground. The sites have power but no water or sewer. There are vault toilets but no dump station.”
K’esugi Ken Campground sits 30 miles south of Denali National Park, offering 106 RV sites with electric only. Panoramic views of Denali itself reward clear‑weather campers. Bring extra water and enjoy miles of multi‑use trails alongside the Susitna River.
Rocky Mountains and Red Rocks
Dead Horse Point and Goblin Valley State Parks (Utah)
Jim R: “Custer State Park in SD is amazing, but you need a car to drive through the tunnels. I have also been to Dead Horse and Goblin Valley in Utah. Hard to get a campsite there, but the views are wonderful. I think both are dark sky parks.”
Dead Horse Point SP: Overlooks 2,000‑ft. canyon drops. RV sites have water/electric. Star‑gazers flock here for the International Dark Sky Park status.
Goblin Valley SP: Lunar‑like hoodoo formations make this a desert playground. Campsites are primitive—plan ahead.
Atlantic Coast
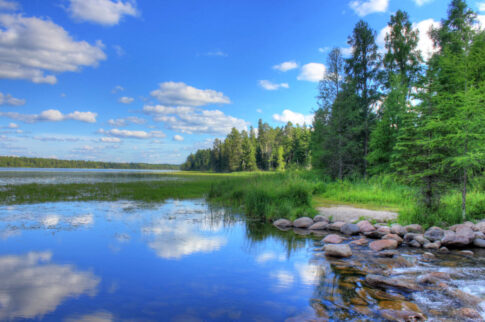
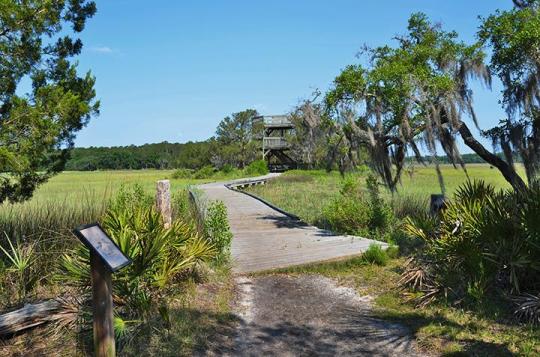
Skidaway Island State Park (Georgia)
Photo: gastateparks.reserveamerica.com
Christine: “We love Skidaway Island State Park near Savannah, GA. It is full of live oaks draped with Spanish Moss. A beautiful park.”
Located on a tidal island, Skidaway SP offers 87 wooded RV sites (water/electric), biking trails through salt marshes, and interpretive programs. Watch for fiddler crabs and herons along the creekside boardwalk.
Southwest
Kodachrome State Park (Utah)
Christine: “Kodachrome State Park near Bryce Canyon is a very picturesque park.”
Named after the camera film that captured its colorful hoodoos, Kodachrome SP has 21 RV sites with water/electric and flush toilets. Explore the Panorama Trail’s scenic overlooks and star‑studded night skies.
Tips for RVers
If any of these state parks pique your interest, here are some suggestions:
• Book early: Busy parks (Custer , Goblin Valley, Denali) often fill 6 months in advance. Set reservation reminders.
• Know amenities: Check hookups (water, electric, sewer) and dump station availability—especially in remote parks.
• Plan for seasons: Desert parks can be searing in summer; northern parks may lock gates early in winter.
• Embrace mini‑road trips: Many parks sit near historical or scenic sites (Poverty Point, Elephant Rocks, Blue Ridge Parkway).
Now it’s time to hit the road, park your RV, and make memories in these reader‑recommended state parks. Each one offers its own slice of America’s great outdoors!
Let’s keep the conversation going. If you haven’t already chimed in with your favorite state park recommendation (or thought of another you really enjoyed), let me know in the comments below.
We use cookies to ensure that we give you the best experience on our website. By continuing to use our site, you consent to accepting cookies. We NEVER have or will sell reader's data. For more info, please see our privacy policy page.


 out of the valve core area. Metal caps should have rubber “O” rings in them and can retain air if you are not running TPMS. Look in the thread end and you should see the gasket.