Nestled in the northern Escondido, California, hills, this special place is worth a stop. Deer Park Winery and Auto Museum combines a small family winery and tasting room with what’s often described as a world-class collection of convertible cars.
Deer Park Winery and Auto Museum is located near Old Highway 395 at 29013 Champagne Boulevard in Escondido. The venue is open from 10 a.m. – 5 p.m., Thursday through Monday.
How it began
Robert Knapp started his winery in 1979. His collection of convertibles soon began to fill what is now contained within three very large buildings. Knapp was a real estate millionaire and loved to collect convertibles, antique radios, typewriters, kitchen appliances, televisions, neon signs, and more.
What you’ll see
Deer Park sits on roughly 15 acres of vineyards, orchards, and picnic lawns. The massive auto displays occupy three large buildings. They are best known for the collection of American convertibles from the mid-20th century.
More than 100 vehicles are displayed across multiple buildings. But that’s not all. You’ll also see kitschy collections from the past: neon signs, mid-century household items, and other memorabilia.
The winery produces small-batch estate wines and runs weekend tastings. It also has a marketplace where you can buy bottles, charcuterie-style snacks, and seasonal items.
What travelers mention
Visitors report that the car collection is genuinely impressive and often the highlight of a Southern California road trip. Opinions about the wine and maintenance of some displays vary.
If wine is your primary reason for your stop, consider calling ahead about current tastings. If cars and a pleasant picnic are your goal, you’re likely to be very pleased.
Practical tips
The museum posts current hours, admission, and tasting info on its official site. You can also call before arriving if you have questions (760-749-1666).
Typical public hours and ticket prices are available through the Deer Park Winery and Auto Museum site and local museum listings. Currently, general admission tickets are $14, and military and 60+ seniors are $12. Children 9 and under are free.
Tips for your visit
• Call the museum’s phone listed on their site to confirm RV parking or event closures (760-749-1666).
• The museum is easy to reach from I-15 and sits close to the Lawrence Welk Resort area of Escondido. If you’re touring north San Diego County, add the winery/museum to your itinerary.
• On-site parking exists for cars. If you’re driving a large motorhome or towing a long trailer, call ahead to confirm where to park.
• Allow 60–120 minutes to wander the cars, museum rooms, and patio.
• Bring a folding chair and a small cooler if you plan to picnic on the grounds. You may also want to bring a jacket if you plan to stay after sunset. The shady oak lawns are one of the nicest parts of the visit.
• If you’re mapping an afternoon, pair Deer Park with a tasting at neighboring vineyards or a stroll around old-town Escondido.
You should go!
For RVers who appreciate picturesque detours off the interstate, Deer Park Winery and Auto Museum is exactly the sort of quirky, photo-friendly stop to visit. Still need convincing? Check out the video below.
Have you visited Deer Park Winery and Auto Museum? Share your thoughts using the comments below.
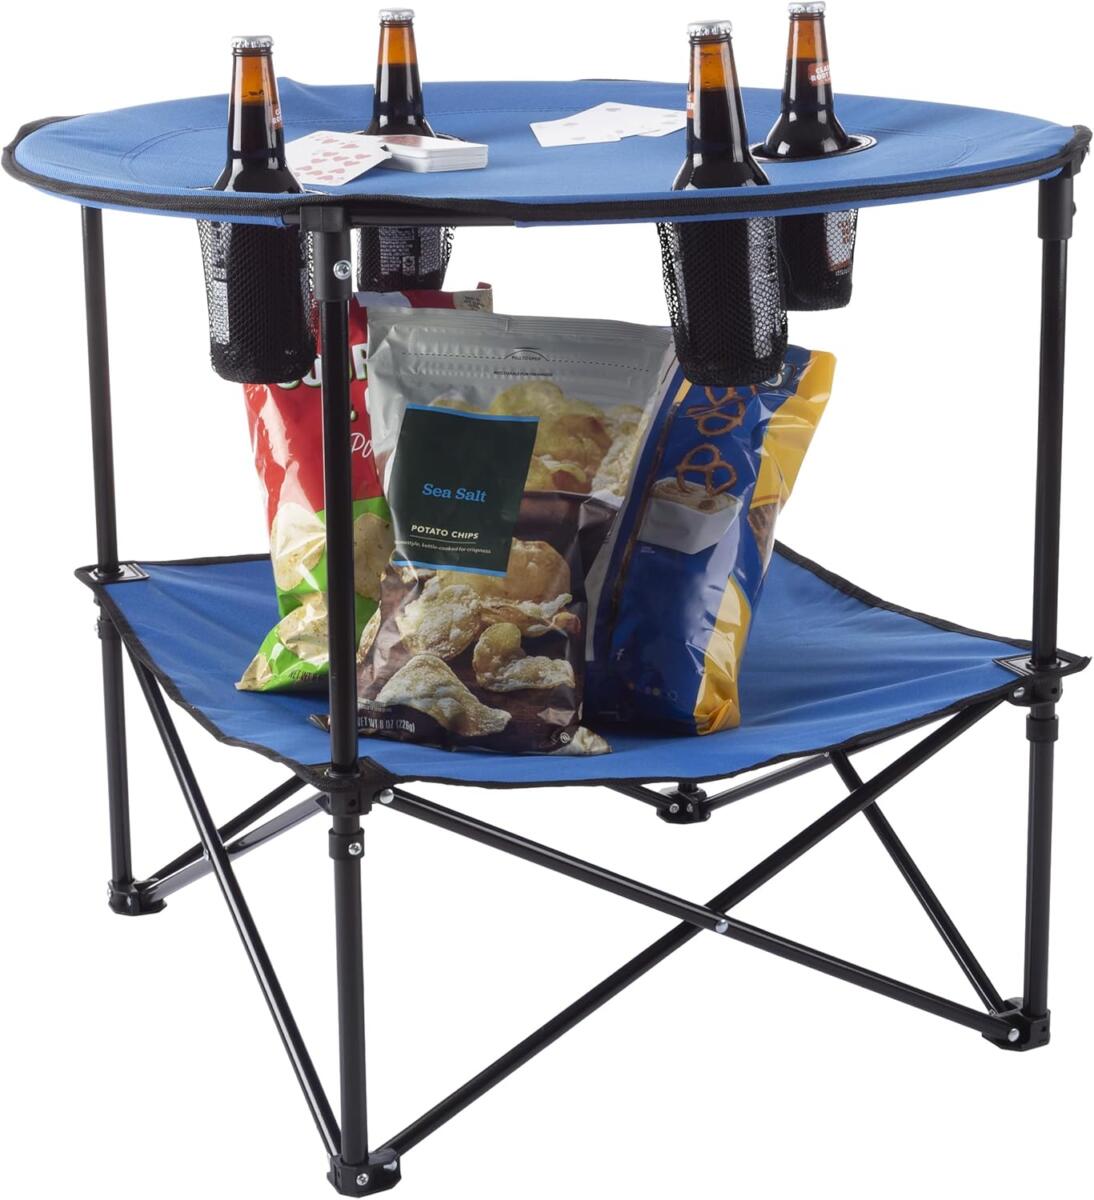
I was gifted this folding camp table, and it has become one of my favorite and most used camping accessories. It adds HUGE functionality to life outside the RV and around the campfire. It keeps snacks nearby and drinks securely in place until needed.
When not in use, it folds small and flat, making it perfect for RVers or even tent and car campers.
What I especially like about the Wake folding camp table
• The two tiers provide lots of space! Equipped with a tabletop as well as a lower shelf for additional storage, the table offers plenty of room to set snacks, plates, phones, sunglasses, or anything else you like!
• The four mesh cup holders securely hold drinks. No spills, even on unstable surfaces.
• Each tier holds up to 20 lbs.
• Easy to clean—just hose it off.
• When not in use, the table folds flat and hardly takes up any space.
• Weighs just 6.48 lbs. (or 5.5 lbs., depending on where you’re reading it).
• Carrying bag included.
• If you have a small dog, like me, that bottom shelf makes a terrific off-the-ground dog bed.
What can be improved?
It’s quick and easy to put together… once you get used to it. But it does take some practice the first time. I almost gave up as I could not get the two pieces—base and tabletop—to securely clip together. A neighbor more patient than I gave it a go and got it to work. The trick is that you must fully spread out the base, more than you think you do. Once in the maximum extended position, the top will clip on.
But be warned: The first time you try you will think, no way this is going to work. Stick it out and get the knack of it, because once you do, you will find this handy table to be invaluable around the campsite.
Stats
• Materials: 600D Oxford and Steel Tube
• Table dimensions: (diameter) 28″x (height) 24″
• Carrying bag dimensions: (width) 29″x (height) 16″
By Chuck Woodbury I have one significant addiction. It’s coffee. So far, in all the scientific articles I have ever read, nobody has said, flat out, that drinking a lot of coffee is bad. Or nobody has convinced me of it. So why stop, is what I say.
I am so ridiculously addicted to it that I can now drink two or three cups and still fall quickly asleep. Go figure.
But the point of this article: I like my coffee with milk. I like cream, but my cardiologist doesn’t agree. I do not like my coffee black. Tried it: Nope, no can do.
So, whenever I travel, whether in my RV, or by plane or car, I must have milk. Most of the time, at least when traveling with my RV, I have a quart or half-gallon of it handy. But I can run out, which happens. And that is when this little 8-ounce miracle of ultra-pasteurization saves my day.
It also comes in handy for cereal, for when the main milk supply runs out or goes bad.
An eight-ounce container
It’s called Horizon Organic Milk. It comes in different flavors as well as in 1 percent, 2 percent and whole. But unlike regular milk, it does not need to be refrigerated until after you open it. The shelf life is a few months. So I always keep a couple of 8-ounce containers handy for when I run out of the regular stuff. It tastes just like regular milk.
The milk is “ultra” pasteurized by heating it to a very high temperature for a few seconds, which destroys bacteria for a longer shelf life than normal milk. It comes from the same cows that produce Horizon’s traditional organic milk.
And here, for other coffee fanatics like me, is what else I carry in my coffee emergency kit. I have provided Amazon links for your convenience.
• Single cup water heater: When hot water isn’t available, heat your own with this small, inexpensive device.
• Starbucks instant coffee: Comes in many blends and quantities.
• Individual coffee creamers: These ultra-pasteurized packets will also work for your coffee.
• Sugar packets: I don’t sweeten my coffee, but for those who do, here are a number of products, natural and artificial.
By Cheri Sicard
Like a lot of RVers, Joe of RVing with Joe has watched a lot of RVing YouTube videos over the years. He also admits to watching a lot of videos of RV crashes.
No, Joe is not just being voyeuristic. He says that you can learn a whole lot about RV safety by watching RV crashes and figuring out what went wrong. He demonstrates this in the video below.
Joe also says that keeping images of RV crashes, no matter how horrific, in the back of your mind can help you stay mindful while on the road.
I have to agree with him. Especially when I see inexperienced or irresponsible RVers whizzing past me at top speeds on windy, winding mountain roads.
In the video, he focuses on seven particular crashes that help him keep important RV driving safety practices in mind. Be sure to watch the video for the visuals.
RV crashes #1 and #2: Pay attention to height!
The RV crashes in the first two videos, fortunately, do not put anyone’s life in danger, but they most assuredly cost the RV owners a whole lot of money. In the first, the driver ignores signs and warning lights and plows forward under a low bridge at regular speeds, and shears off his RV’s air conditioner in the process.
In the second video, a fifth wheel owner drives smack into the shelter of a bank ATM drive-up lane.
RV crash #3: Don’t drive distracted or drowsy
In this video, we see a truck and travel trailer serpentining all over the road. It culminates with the trailer flipper entirely over! The cause? A drowsy driver. Luckily, no one was hurt in this particular incident, but it could have easily been a deadly head-on collision had it happened in another location.
RV crashes #4 and #5: Driving in high winds
If you see too much sway going on in your rearview mirrors as a result of high winds, it’s a good idea to pull over and stop as soon as you can safely do so, even if you are driving at slow speeds. The driver in this video did not do that and, as a result, flipped his travel trailer over.
If you see trucks and RVs pulling over in windy conditions, you should probably do the same. Don’t be the last person on the road in a windy situation.
In video #5, the tow vehicle was lighter than the trailer, and the high winds flipped the trailer, which in turn flipped the tow vehicle.
RV Crash #6: Don’t drive too fast!
This driver ignored speed warning signs on a winding and icy mountain road during a snowstorm and ended up wrecking his RV. Luckily, he slid into the mountainside and not over the cliff. Also luckily, he did not hit the semi-truck coming at him in the other lane.
RV Crash #7: Avoid trailer sway
A trailer that is not properly loaded can result in severe trailer sway, as this video demonstrates. If this happens, Joe says you should lightly hit the trailer brakes, not the vehicle brakes. In the video, both the trailer and the vehicle end up flipping due to trailer sway.
This video is especially important for those whose tow vehicles are lighter than their trailers, a less-than-ideal situation to begin with.
A routine RV exterior check revealed several rusty bolts on our rig. Rusty bolts can show up in all the places where your RV meets the weather.
You might discover them in undercarriage suspension and frame hardware, slide-out rails, awning brackets, roof mounts, jacks, and more.
Why worry?
Rusty bolts are a bigger deal on RVs than on a lot of other vehicles because they can affect safety, reliability, and repair costs all at once. Here are several reasons why rusty bolts should be addressed.
First, rust weakens the bolt itself. Corrosion eats away at the metal, reducing its strength and making it more likely to snap under load. On an RV, bolts often secure critical components like suspension parts, stabilizer jacks, slide mechanisms, hitch hardware, and awnings. If a corroded bolt fails while driving or during setup, it can lead to component damage or even a safety hazard.
Second, rust can lock parts together. When corrosion forms between the threads of a bolt and the nut or frame, the bolt can seize in place. That turns simple maintenance jobs—like adjusting slide-out components—into time-consuming repairs. Seized bolts often break when you try to remove them, which means drilling, cutting, or extracting what’s left, adding labor and cost.
Third, RVs live in harsher conditions than most cars. They sit for long periods, get exposed to rain, snow, road salt, coastal air, and campground moisture, and then vibrate constantly when traveling. That combination accelerates corrosion. Because RV frames and mounts often use thinner metal than heavy trucks, a broken or rusted bolt can damage the surrounding material, not just the fastener.
Why does it rust?
Salt air, road spray, trapped moisture, and contact between dissimilar metals speed corrosion. The constant vibration of travel can let a bit of surface rust lock metal together over time. These are common trouble spots for RVers because water + metal + time = seized fasteners.
Avoid this!
If you reach for a breaker bar or an oversized wrench without preparation, you risk snapping the bolt or rounding or stripping the head. What’s more, you may damage the surrounding area (thin RV skin, fiberglass, or a threaded mount).
Once a bolt breaks or the head is ruined, you’re a lot closer to cutting, drilling, or rebuilding. All of these are harder and costlier than a patient removal. Many pros and how-to guides warn that slow, controlled methods prevent turning a simple job into a big one.
The patient method
Start with cleaning and inspection. Brush loose rust and grit away so treatments can reach metal-to-metal contact.
Spray a quality penetrating oil at the bolt/nut interface and let it soak. Long soak times can really help. (This can be minutes to overnight.) The soak time is important because the fluid needs to wick into the joint.
Try gentle mechanical persuasion next. Use the correctly sized socket or wrench and apply steady torque. Use controlled leverage rather than sudden jerks. If the bolt still won’t budge, an impact driver or an impact wrench can break the corrosion by applying short, percussive force while turning. That vibration is what often frees stuck fasteners.
For bolts with rounded heads, bolt-grip extractors or tapered extractor sockets grab onto the metal and let you turn them without destroying the surrounding area.
If the bolt head is gone or the shank is seized, try soaking with the penetrating oil once more. Then gently tap the bolt. Sometimes that gentle tap can dislodge problematic bits of rust. Still stuck? You can cut off the head and remove the remaining stud. Or carefully drill and use an extractor.
When to change tactics
If the torque is rounding the head, stop and switch to an extractor or cutting method. More force will often break the bolt and multiply your work.
If you’re near fiberglass, wiring, or gas lines, or if you’re unsure about cutting into a structural area, step back and consider hiring a professional shop to handle the problem.
Guides and pros recommend escalation: soak, tap/vibrate, apply steady torque, use impact, use extractors/cutting, then drill/extract. Don’t skip safety or start off with the most destructive option.
Quick tips
Always wear eye protection and gloves. Use the correct socket size. (A loose fit rounds heads.) Support nearby components so heat or leverage doesn’t bend or break mounts. Keep a spare bolt, nut, and a matching replacement on hand so you can finish the repair cleanly when you’ve removed the old hardware.
Preventing rusted bolts
When you reassemble, do what you can to stop future corrosion. Swap in stainless or hot-dip galvanized fasteners where strength and thread fit allow. Or use a high-quality anti-seize compound on threads before tightening to prevent metal bonding.
Seal joints and fastener heads with sealant or a bead of marine-grade silicone around roof penetrations and exposed hardware. Keep drainage paths clear so water doesn’t pool, and inspect vulnerable areas often. A quick clean and a dab of anti-seize or corrosion inhibitor will save time later.
Can you add to these tips? Please do. Use the comments below to weigh in.
By Russ and Tiña De Maris
How Americans love their propane-fired equipment. We take cookstoves and lanterns camping. We step into the shop and fire up our propane torches to do plumbing, other repairs, and even hobby heating.
But sadly, those colorful little cylinders don’t love us back. They are, by their nature, disposable. Once used, now dead, they head to landfills. While some do refill them, they do so at their own physical and legal peril. Is there a way to have these great mini-tanks and avoid the problems?
Disposable propane cylinders a major problem for parks
National park visitors often just leave LP cylinders at the campground dumpster. Ten years ago, Yosemite National Park officials say 23,000 of these “orphans” were left in the park. At that time, it cost the park $1 each to properly dispose of them. Who knows how many more of these cylinders are dumped in the nation’s parks each year. And a buck a cylinder for disposal a decade ago has gone up. For example, disposing of a “disposable” one-pound cylinder in Lake County, Illinois, can be up to $4.25.
Just how many of these little gas containers are used in the U.S.? The Propane Education & Research Council (PERC) and other industry sources that track the sales and usage of propane in the U.S. put it at around 40 million per year. Put another way, 40 million disposable propane cylinders—all tossed into the standard 4-yard dumpsters typically seen in campgrounds—would require 825,000 dumpsters. That’s a lot of waste!
It’s no wonder that those with a consciousness of caring for the planet figure there’s got to be a better way. Why not refill disposable cylinders, reducing the amount of waste, and save a bit of money, as well?
How much does this gas really cost?
The average price of a disposable isn’t cheap. Big box stores like Walmart, Home Depot, and Lowe’s typically sell disposable propane cylinders in packs (e.g., a 2-pack or 4-pack). A 2-pack might cost around $6 to $8. If we average it, your $7 disposable is ringing up at more than 43 cents per ounce. If you paid that price to fill your smaller RV cylinder, it would cost you $137 per fill-up. Wow!
There are plenty of adapters that make it possible to fill a disposable from a refillable propane container. Doing the math says even if you paid $3 a gallon for propane, your refilled cost per disposable would amount to a piddling 71 cents.
But then there’s safety
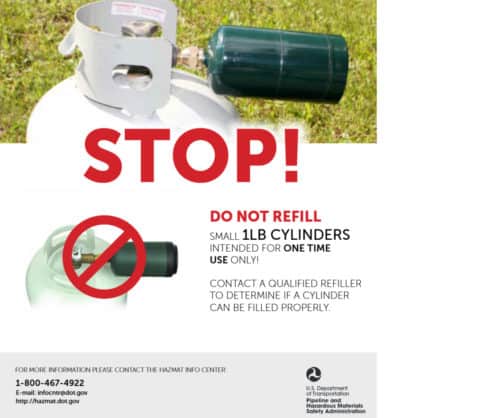
But there’s another side to the equation: How much is your safety worth? Disposable propane cylinders are built far differently than their larger, refillable brothers. The metal walls of the disposable type are thin, and repeated contraction and expansion of those thin walls can lead to metal fatigue and eventual rupture.
Likewise, a disposable’s valve is not designed for repeated use. Also, unlike an LP cylinder designed to be refilled, there’s no “bleeder” valve to indicate when the disposable is filled to the safe point, making over-filling a real problem. And while plenty of people refill their disposable cylinders without trouble, how much are you willing to gamble that you can get away with it?
Then there’s another financial consideration. While it is technically legal to refill a disposable cylinder, transporting it on a public highway is a very different matter. Federal regulations (administered by the U.S. Department of Transportation) prohibit transport of refilled “DOT 39” cylinders (of which classification small cylinders fall under). Violate that regulation, you’re liable for a fine of up to $250,000 as an individual, and up to five years in prison.
If something bad were to happen, say an explosion or accident, things get uglier. The violator may be held liable for the damages, which can include personal injury, property damage, and environmental cleanup costs. In such cases, penalties can far exceed the maximum fines listed above.
Disposable propane cylinder alternative
Give up on using those handy one-pound cylinders in favor of the environment? Run the risk of life and limb and refill the disposables? Enter an alternative: Safe and legally refillable one-pound cylinders.Flame King offers cylinders designed for refill, along with a refill kit to pump your own. The cylinders themselves are heavy-duty and equipped with an “80% valve” that indicates when the safe “full” point has been reached.
How does it work? The refill system includes a stand on which you can safely place an inverted 20-pound cylinder. That cylinder is connected to an adapter, and it to the refillable cylinder. Using an included Allen wrench (hex key), you crack open the bleeder valve and press a dispensing lever on the adapter. When liquid propane begins to spit out of the bleeder valve, let up on the fill lever, close the bleeder valve, and disconnect the refilled cylinder. Users happily report that, unlike refills of disposable cylinders, it’s easy to get a full cylinder, with no need to stick it in a freezer to encourage a full fill.
You’ll need to run your figures to determine your break-even point. The whole kit, including the refill system and a single, one-pound refillable cylinder, usually runs about $67; additional cylinders are about $17. Yes, the up-front cost may look a little imposing, but on the other hand, if you’re paying $7 per disposable, it doesn’t take much to figure the savings both financially and environmentally. And as opposed to the inherent dangers of refilling disposables, this Flame King system looks like a winner.
In two years, you won’t be able to buy a disposable propane cylinder in California. Under a new law, disposable cylinders will be a thing of the past. Considering the issues of what to do with 40 million throw-away cylinders sold each year, other states may follow suit.
When it comes to choosing the perfect campsite, we often have different priorities, shaped by our lifestyle, travel goals, and even the sizes of our RVs. For some of us, the beauty of a site’s location and scenery is paramount. Mountain vistas, lakeside views, or a private forest hideaway can turn a simple campsite into a memorable destination. These RVers see their campsite as part of the experience itself.
Others RVers focus on amenities, prioritizing hookups, clean restrooms, and perhaps even pools, gyms, or laundry facilities. Especially for full-timers or those staying for a longer period, these comforts make a big difference. Families with kids or pets often look for campsites with playgrounds, dog parks, or kid-friendly activities. These RVers choose spots that offer a balance between the comforts of home and the adventure of being on the road.
Then there are those who prioritize privacy and space, valuing peace and quiet over convenience. For them, a crowded campground with lots of neighboring campers can detract from the experience, making it feel less like an escape and more like a busy neighborhood. These RVers may seek out campgrounds that offer larger, more spaced-out sites or even dispersed camping options where they can fully unwind, embracing solitude and nature.
Finally, budget-conscious travelers often have to weigh location, amenities, and privacy against affordability. With some popular campgrounds charging steep nightly rates, they’re left deciding what features are worth the splurge and what’s okay to compromise on.
In today’s poll, you can select up to two options. Please answer which ones are generally most important to you when reserving a campsite. And if you answer “Other”, please leave a comment and explain your answer. Thank you!
Is it just me, or are headlights too bright? Some nights it feels like everyone else’s headlights are trying to blind me!
Turns out, modern LED and HID lights are whiter and more intense than old halogens. When those beams hit your eyes at the wrong angle (or bounce off a dirty windshield), they don’t just annoy, they make night driving genuinely risky.
Changed for the worse
Headlight technology has changed since I first learned to drive. Lights have moved from yellowish halogens to HID and now LEDs. LEDs are much more efficient and can put a lot more light where manufacturers want it. However, that concentrated, blue-white light also produces stronger discomfort glare for many drivers—like me.
Think about this: A typical halogen low beam might be roughly 1,000 lumens. OEM LED systems commonly push 3–4 times that. Some aftermarket retrofit bulbs advertise far higher numbers, which can overwhelm other drivers.
Worrisome
You are not imagining the problem. In the U.K., a large RAC (Royal Automobile Club) survey found 89 percent of drivers say at least some car headlights are too bright. Many reported that they have to slow down until their vision recovers from the intense glare.
In the U.S., public comments and earlier NHTSA (National Highway Traffic Safety Administration) surveys show a longstanding pattern of complaints about headlight glare going back decades. Survey numbers show that glare causes drivers to avert their eyes or lose contrast sensitivity for several seconds. That’s a long time at highway speed.
What manufacturers and safety groups say
Auto groups and many auto makers point out that better illumination can reduce crashes by improving visibility. Programs that combine visibility with glare control (IIHS headlight ratings, or the newer adaptive systems) show real safety benefits when done right. (IIHS is the Insurance Institute for Highway Safety.)
AAA and IIHS have both studied advanced systems and noted big potential gains from “smart” or adaptive driving beam (ADB) headlights. They illuminate the road without blinding other road users.
Meanwhile, regulators in the U.S. updated rules to allow certified adaptive driving-beam systems, but wide adoption takes time. So, you get the tension: Brighter light helps you see, but if the distribution, height, or aftermarket tinkering is wrong, it can blind others.
Aftermarket bulbs, recalls, and legality
A big part of the headlights’ problem comes from retrofit bulbs and assemblies that weren’t designed for the vehicle’s optics. Federal standards focus on whole-headlamp assemblies, not just raw lumen claims.
The NHTSA has said many aftermarket LED retrofit bulbs don’t meet the rules for replaceable light sources. There have been recalls where retrofit LED bulbs exceeded flux limits and increased glare. That’s why many safety experts and regulators warn against swapping LEDs into housings meant for halogen bulbs.
Grassroots groups and petitions calling for limits on blue/bright headlights have gathered tens of thousands of signatures. Advocates are pressing federal agencies for tighter controls and more study.
Regulators have moved a little bit (for example, permitting ADB technology). Still, lawmakers, safety advocates, automakers, and consumer groups continue to hash out the balance between visibility and glare.
Practical techniques for RVers
RVers have both advantages and disadvantages when it comes to headlight over-brightness and glare. Special advantages may include bigger rigs and higher seating. Special vulnerabilities include long travel days and fatigue.
Here are practical tips you can use tonight—and every time you’re behind the wheel after dark.
• Choose your driving windows and routes with light in mind. If you can, pick routes with consistent street lighting, and avoid long, unlit stretches late at night when glare recovery matters most. Minimize long nighttime driving stretches if you don’t feel comfortable with heavy glare. (We plan our travel days to arrive well before sundown.)
• Slow down and give yourself space. Bright glare temporarily reduces contrast and slows focus recovery. Dropping speed when you see a glaring oncoming vehicle or when glare is frequent gives you the distance you need to react safely. (This is especially important in an RV because your stopping distance is longer.)
• Use the “look-right” trick and keep your eyes moving. Don’t stare at oncoming beams. Train yourself to focus on the right edge of the lane or the fog line when a blinding vehicle approaches. Glance back when the glare passes. That steady, peripheral reference helps maintain lane position without being pulled into the light.
• Keep windshields, mirrors, and visor areas clean and defect-free. Smudges, film, or micro-scratches scatter light and multiply glare. If your RV has a large windshield, clean the inside and outside regularly. Replace worn wipers and scratched mirror glass. Anti-reflective coatings on your eyeglasses and mirror anti-glare treatments can help, too.
• Use your lights deliberately. On back roads or in the country, use your RV’s high beams when safe. The extra distance enables you to see animals or other road hazards. Switch to low beams early when you detect oncoming cars. If your coach has auxiliary lights, make sure they’re aimed correctly and legal for road use.
• Avoid retrofitting high-lumen LED bulbs into housings not designed for them. They’re often illegal and increase glare for others.
• Adjust mirrors and seating to reduce direct glare into your eyes. Small changes in seat height or mirror tilt can make a big difference in how oncoming beams hit your line of sight. If your RV has an adjustable driver seat height, try a small change and test it at night in low-traffic areas.
• Know when to stop. If glare leaves you disoriented, pull off at a safe, well-lit rest area and wait until the effect passes. Fatigue multiplies the danger from glare. If you’re tired, don’t push through long nighttime conditions.
• Consider eyewear carefully. Some drivers use yellow-tinted “night” glasses and swear they work. But the safer step is a current eye exam and glasses with anti-reflective coating if recommended by your optometrist. If you have trouble with glare recovery, mention it at your eye visit. There are clinical steps that may help.
• If you’re an RV owner who maintains your own rig, aim and test your lights. Properly aimed low beams light the road without blinding oncoming drivers. Have a shop check aim and alignment after major suspension work, changes in load, or tire changes.
• When other drivers are the problem, document and report dangerous retrofits, if possible. If you repeatedly encounter vehicles with illegal, glaring retrofit bulbs or dangerously aimed assemblies, note the plate and location. Then report the info to local enforcement or NHTSA. Recalls and enforcement actions have followed complaints in the past.
What about you?
Have you observed a change in headlight brightness over the years? Do very bright or improperly aimed headlights bother you? Tell me in the comments below.
You could easily miss the town of Tecopa, California. It’s one of those tiny dots on the map in the middle of nowhere that makes you wonder who lives there and why. Located not far from Death Valley, with Pahrump, Nevada, as the closest “big” town, Tecopa isn’t exactly on most travelers’ radar.
I ended up going there as it was part of the snowbird itinerary, with hot springs, that ChatGPT created for me. (Read more about that here.) What I found was a tiny town with some surprisingly big experiences. I spent a week there, and it was anything but boring.
Why go to Tecopa?
Natural and commercial hot springs
A lush, oasis-like date farm
Excellent hiking
A secret (and seriously impressive) dining experience
Soak your cares away
Tecopa Hot Springs campground
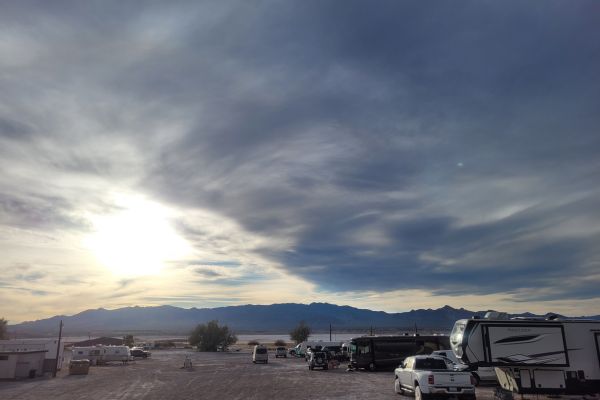
Hot springs are the main attraction here. Several campgrounds offer soaking pools, but if you prefer something more natural, you can head out to the free public springs (picture at the top of this page).
To find them, drive about a mile north of town and look for the trail on the right side of the road. The spring is about 1/4 mile or less in. Despite what it says at the following link, there are not a lot of signs posted, so it can be easy to miss. Check with folks at your campgrounds for more details, or check out the video on this page.
Be aware: The natural hot spring is clothing-optional, and you’ll encounter visitors who take full advantage of that. Others, more modest soakers, wear bathing suits. Either is acceptable here.
The mineral-rich waters are the real deal, leaving your skin noticeably soft and smooth after a soak.
Hot springs campgrounds
During my stay, I tried two of the more affordable hot springs campgrounds. Let’s just say the term “resort” is used loosely. Both were small, a bit worn, and definitely funky—but the pools were clean, the water was hot, and the weekly rates were hard to beat.
Campground and bath house at Amy’s Tecopa Springs Resort
Amy’s Tecopa Hot Springs Resort
Guests share two private four-person soaking rooms. It might sound limited, but I never had to wait and always had a room all to myself. The pools close daily from 11 a.m. to 3 p.m. for cleaning, but otherwise are open day and night. As of this writing, weekly full-hookup rates were around $250. Bathing suits are optional, and the private rooms make it easy to soak solo or with your group.
Tecopa Hot Springs and Campground(next door)
Right next door to Amy’s, this campground is part of Harvest Hosts, so you get a free night’s stay. It’s a little more scenic than Amy’s and easier to park in, but no less in need of a facelift. It is supposedly under new management, so we shall see. In talking to some regulars, they say they have seen the quality go down over the years. The pools here are larger than Amy’s and separated into men’s and women’s. No options, bathing suits are NOT allowed.
I enjoyed both. As an RVer, any long soak feels like a luxury. If I returned, though, I’d likely choose Amy’s for the ability to soak with everyone in the group—but I did love the larger, natural-bottom pools next door. After a week of twice-daily soaks, my skin hasn’t felt this good in years.
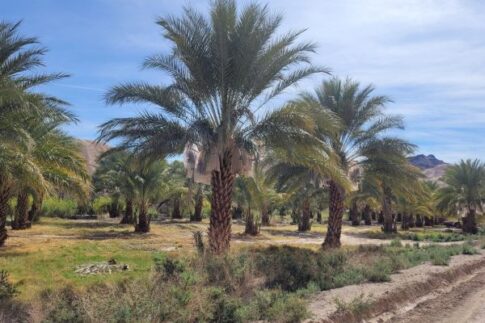
China Ranch Date Farm: A desert oasis
Just a 15-minute drive from the hot springs you’ll find the historic China Ranch Date Farm—a true oasis in the Mojave Desert.
Wander the property, browse the gift shop (don’t skip the baked goods), and treat yourself to a date shake. The setting is unexpectedly lush, with cottonwoods, willows, and date palms thriving along a small stream.
Nearby, you’ll find remnants of the Old Spanish Trail and the Tonopah & Tidewater Railroad, along with scattered mining ruins that hint at the area’s past.
Several great hikes originate here, too.
Note: Parts of the road to the date farm are narrow and windy, not to mention unpaved. Do NOT tow a trailer here, and do NOT take a large motorhome. You don’t need four wheel drive, as the unpaved parts of the road are graded, but with big rigs it would be tough.
Take a hike
Hiking trail at China Ranch Date Farm
The area offers excellent hiking, especially around the date farm. I tackled the 4-mile Slot Canyon Trail, which winds through desert landscapes, riverbeds, and historic ruins. A side trip leading to a beautiful seasonal waterfall was an unexpected bonus.
There are trails throughout the Tecopa area, but this is serious desert country. Go prepared, bring plenty of water, and avoid hiking during extreme heat. I visited in February, and the conditions were almost perfect. Even then, though, it got plenty hot on the unshaded parts of the trail.
Super-secret restaurant find
Chef Eric, Steaks and Beer, Tecopa, CA
How secret is this restaurant find? The chef/owner did not want me to write about it (but I am going to anyway).
Tecopa is in the middle of nowhere. There are no real services, no cell service, no gas stations, no grocery stores—yet there is this amazing restaurant. Located in the parking lot of Amy’s Tecopa Springs Resort, Steaks and Beer does not look or sound like a fine dining restaurant, but it is, albeit in a dive setting. (It’s pricey, like a fine dining restaurant though.)
They serve excellent food, craft beers, and wines. (The wine was not pricey, only the food.) Even though “steak” is in the name and what they specialize in, there is enough creative vegetarian fare to keep the vegetarians happy (not vegans, though). They even serve a 5-course prix fixe meal for two.
I asked Eric, the chef/owner, what possessed him to open such a restaurant in such a place. His reply was, “It’s where poor people come to open a restaurant.”
Brilliant concept
Honestly, for a talented chef, it is the most brilliant concept ever. The place has tables for 16 and 3 at the bar. They are open for only 2 hours a day, 5 days a week; they do no promotion; and it takes just two people to run it, the chef and a single waiter.
Heck, when I visited, they did not even have a sign as the wind had blown it down during a recent storm. Yet, every night, those tables fill up, mostly with repeat customers who never miss this place when in the area.
When I asked if I could interview him for an article, Chef Eric politely declined, saying, “I don’t do interviews, and I really don’t want press. I am busy enough. Tell your friends, don’t tell the world.”
Well, the RVtravel.com audience, much as I love you guys, is hardly the world—so I don’t feel bad.
If you visit Tecopa, you need to know about Steaks and Beer. As to Chef Eric, this is a man who has his head and his priorities straight. He is totally making it in the restaurant business, on his own terms. I am impressed. And the food was outstanding!
Who goes to Tecopa?
I met plenty of visitors from Las Vegas—it’s only about 90 minutes away, as well as travelers passing through Death Valley National Park—which is roughly 50 miles away.
If you’re anywhere near the area, Tecopa makes a perfect side trip. Come for a soak, stay for a hike, grab a date shake, and treat yourself to an unforgettable meal.
You just might be surprised by how much this little dot on the map has to offer.
By Dustin Simpson
A lot of people are always asking me: What do you use to wash or wax your RV? I’ve used Meguiar’s products for as long as I’ve been driving, and they’re always what I recommend to my fellow RVers and customers.
I’ve tried just about every wax out there, and I can’t find anything as easy to apply, or that lasts as long and protects the way this does.
I use it on all my vehicles, including my RV. I only use two other products: 303 on all the decals, vinyl, and plastics; and if I have a stubborn streak that won’t come off, I use Gabe’s Pride black streak remover.
Here’s a picture of the products I like and use to wash and wax RVs. (Please note: I have zero affiliation with any of these. This is just my opinion on products I like and use.)
Scroll down to see all my favorite products. Hope this info helps you get your RV sparkling new! Happy cleaning!
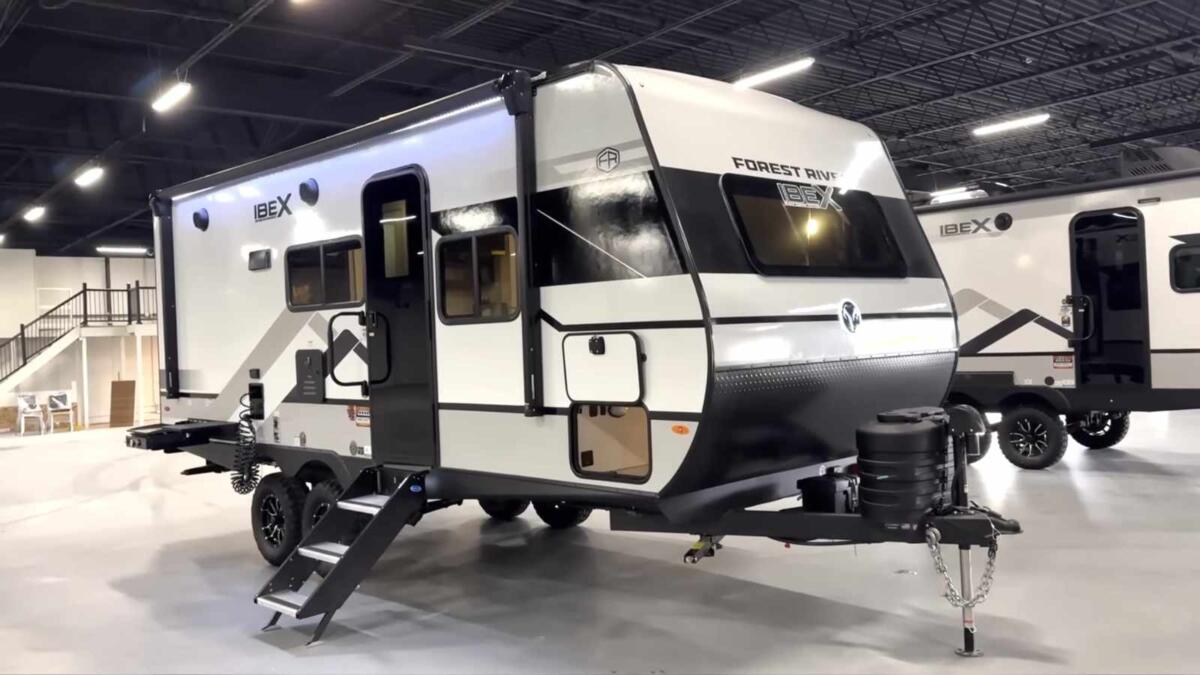
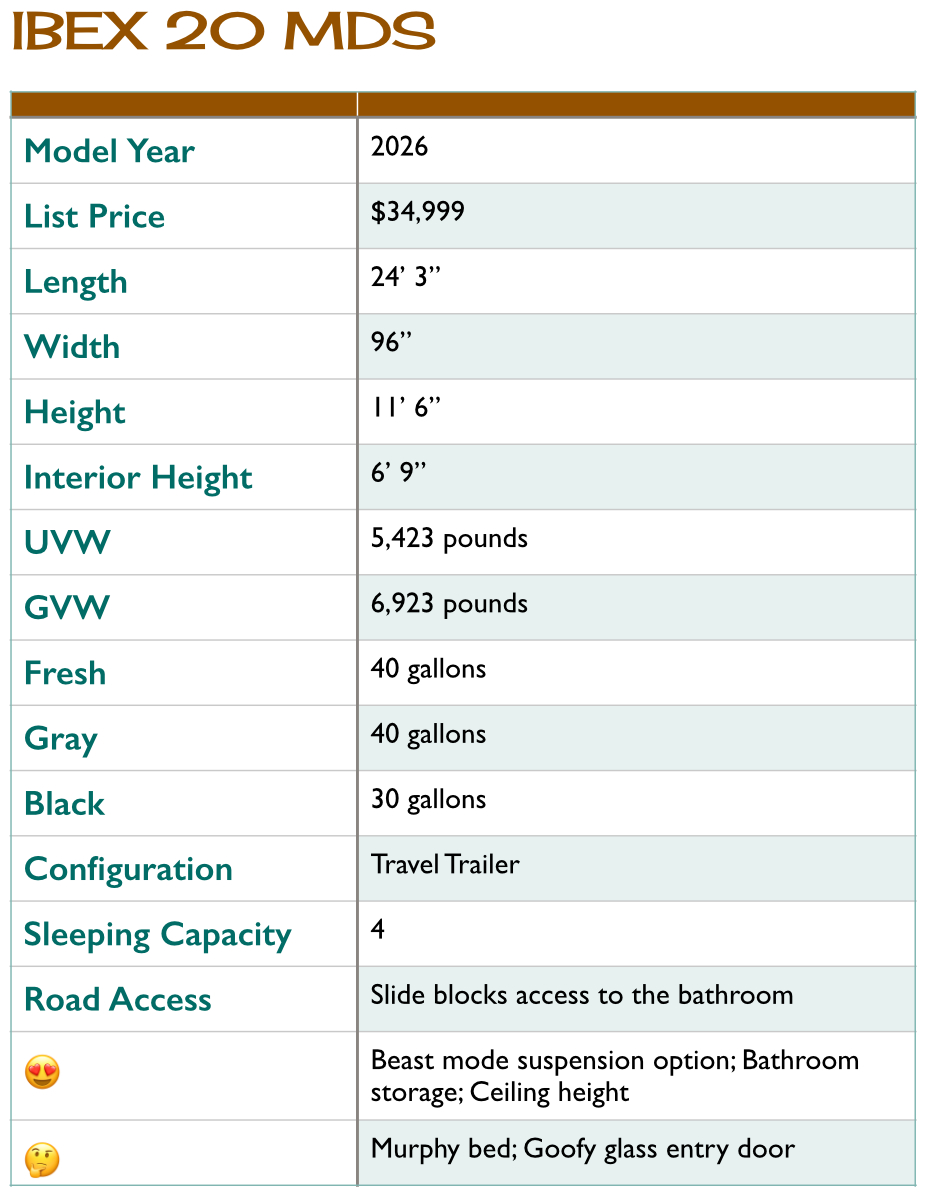
Today’s RV review looks at the Forest River IBEX 20MDS travel trailer with the Black Canyon “Beast Mode” option. In many ways, the trailer is a very different—er—beast depending on whether this option is included, and it makes a big difference in how I’d evaluate it. That said, I’d also bet that if you have an IBEX dealer nearby, you won’t see many units equipped this way.
As regular readers will know, I urge you to shop for your RV from the road up and to look at the decisions made in the chassis of the RV before you ever even step inside. Doing this can save you a lot of time, particularly when looking at travel trailers.
The Beast Mode option swaps out the low-grade leaf spring suspension that you’ll normally find on this trailer for CURT’s fully independent coil spring suspension system. Now, the common thinking might be that this is for off-grid camping, and, yes, it will certainly help with that.
But think of how many times you’ve towed a trailer on even normal roads where cattle guards, those crater-sized potholes, railroad grade crossings, and other poor road conditions made you make a mental note to see if the cabinets inside the RV were still hanging in place when you got to wherever you were going.
On our caravan along Route 66 with several other RVers, we were all comparing how the RVs withstood some of the absolutely awful road conditions in New Mexico.
So I think this much, much better suspension system is absolutely worth the money, no matter where you plan to go. It exemplifies why I suggest shopping from the ground up.
Start at the road with the IBEX 20MDS
In addition to the better suspension in the Black Canyon Beast Mode option, there are other things to look at under this trailer, including the fact that there is one connection for all the sewer functions—nice.
But the underbelly on this is fully enclosed, and there is a duct from the furnace to heat the enclosed space. Further, there are 12-volt heating pads so you can camp in colder climates with this rig.
Something else worth noting: The spare tire on the back of this RV is the same aggressive type of tire as on the four wheels, rather than being some low-grade spare. Nice touch.
In order to accommodate the suspension travel, IBEX has chosen a Schwintek slide mechanism, which is unfortunate only in that you need to open the slide to access the bathroom in this trailer. You never, ever, ever want to partially extend a Schwintek slide. No, never.
But the Schwintek system does have the advantage of none of the components being under the floor of the slide room. If you actually maintain and operate a Schwintek system properly, they actually aren’t unreliable.
As with so many other RVs, this now comes with a tankless water heater, which means you only have the option of propane. These can be fiddly, so basically, the best course of action here is to set the water temperature to one you’re comfortable with and just use the hot tap. Don’t invite the cold tap to the party in the shower.
IBEX 20MDS - 2026
1 of 10
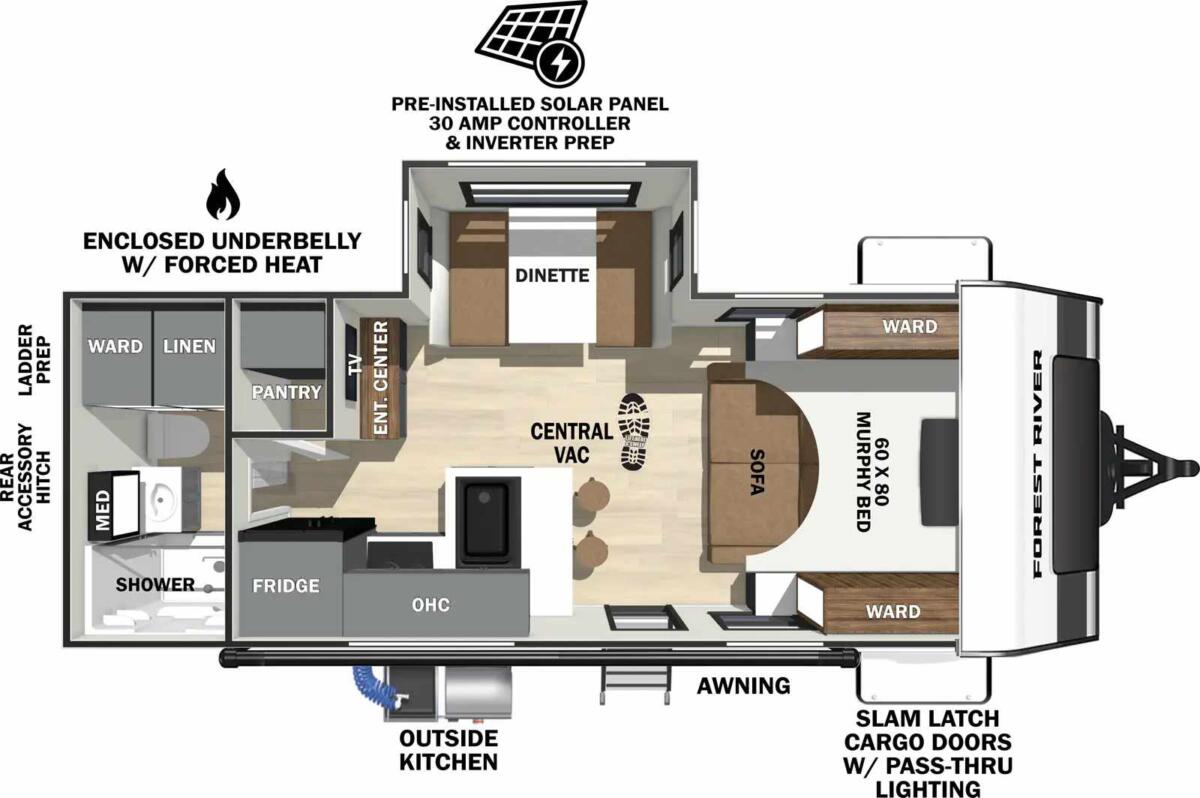
Forest River IBEX 20MDS floor plan
The CURT independent suspension is part of the Beast Mode option
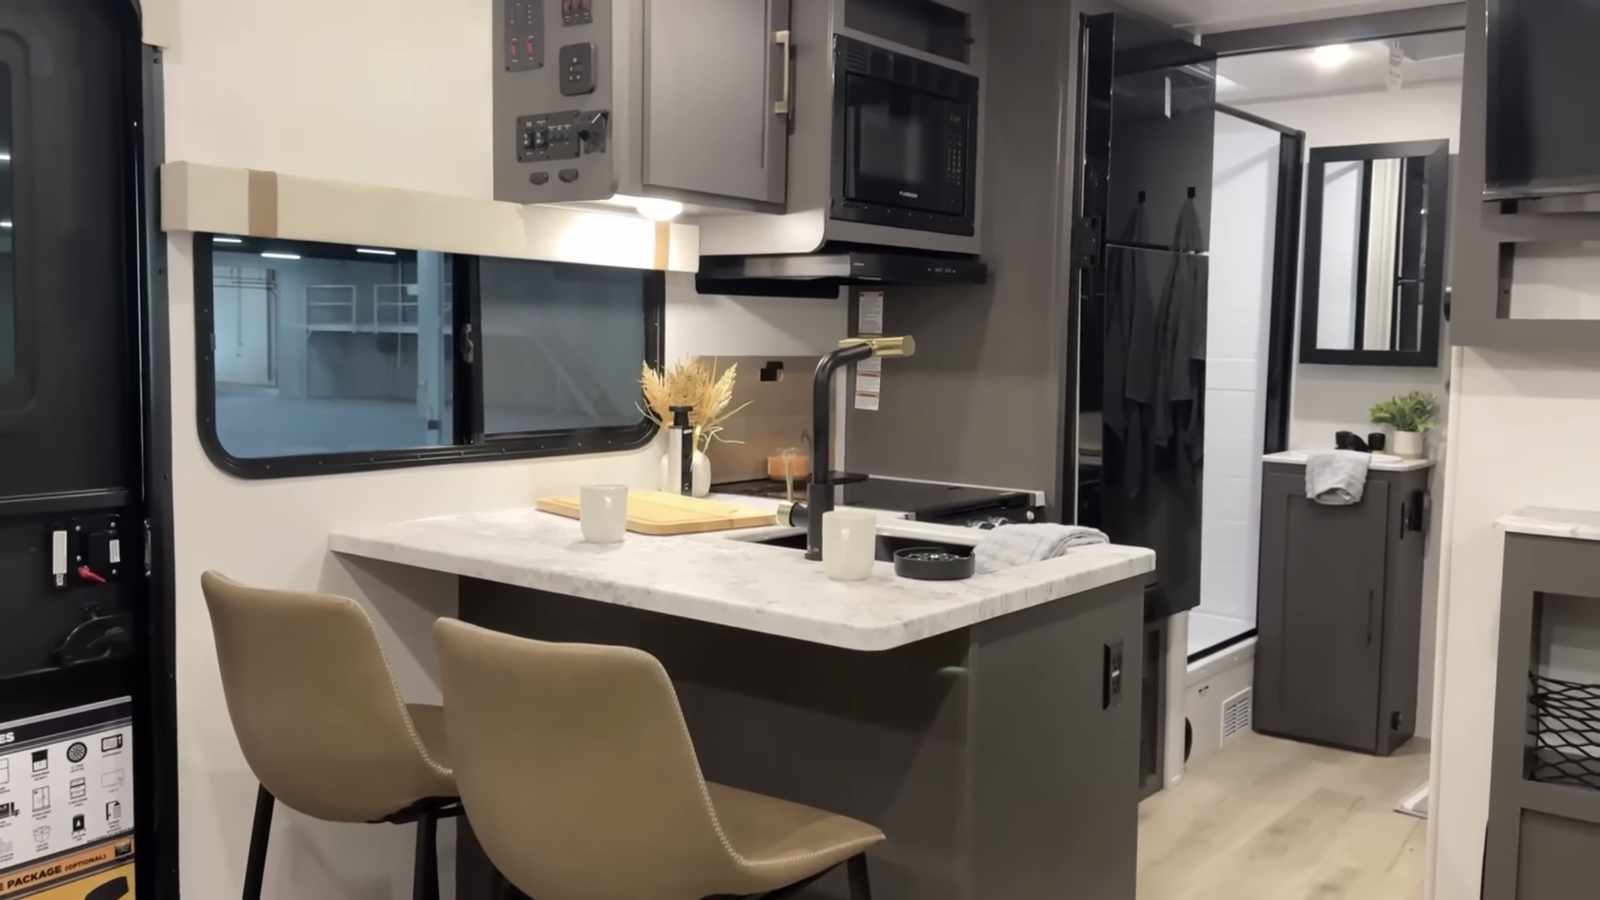
A breakfast bar and L-shaped kitchen
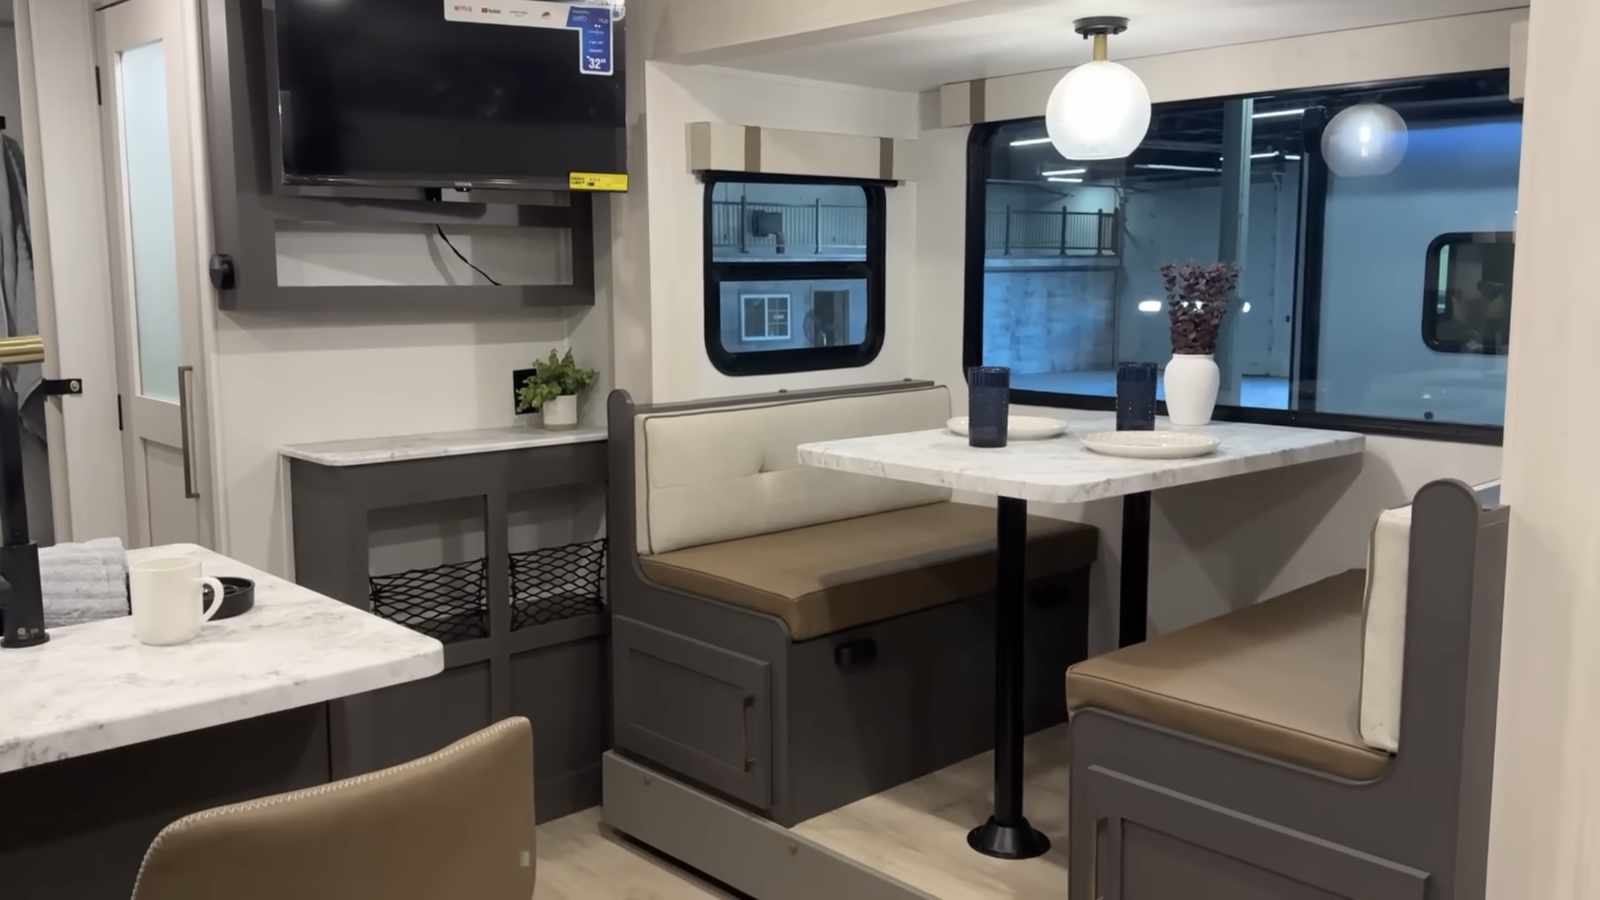
A four-place dinette but with knee-knocker poles
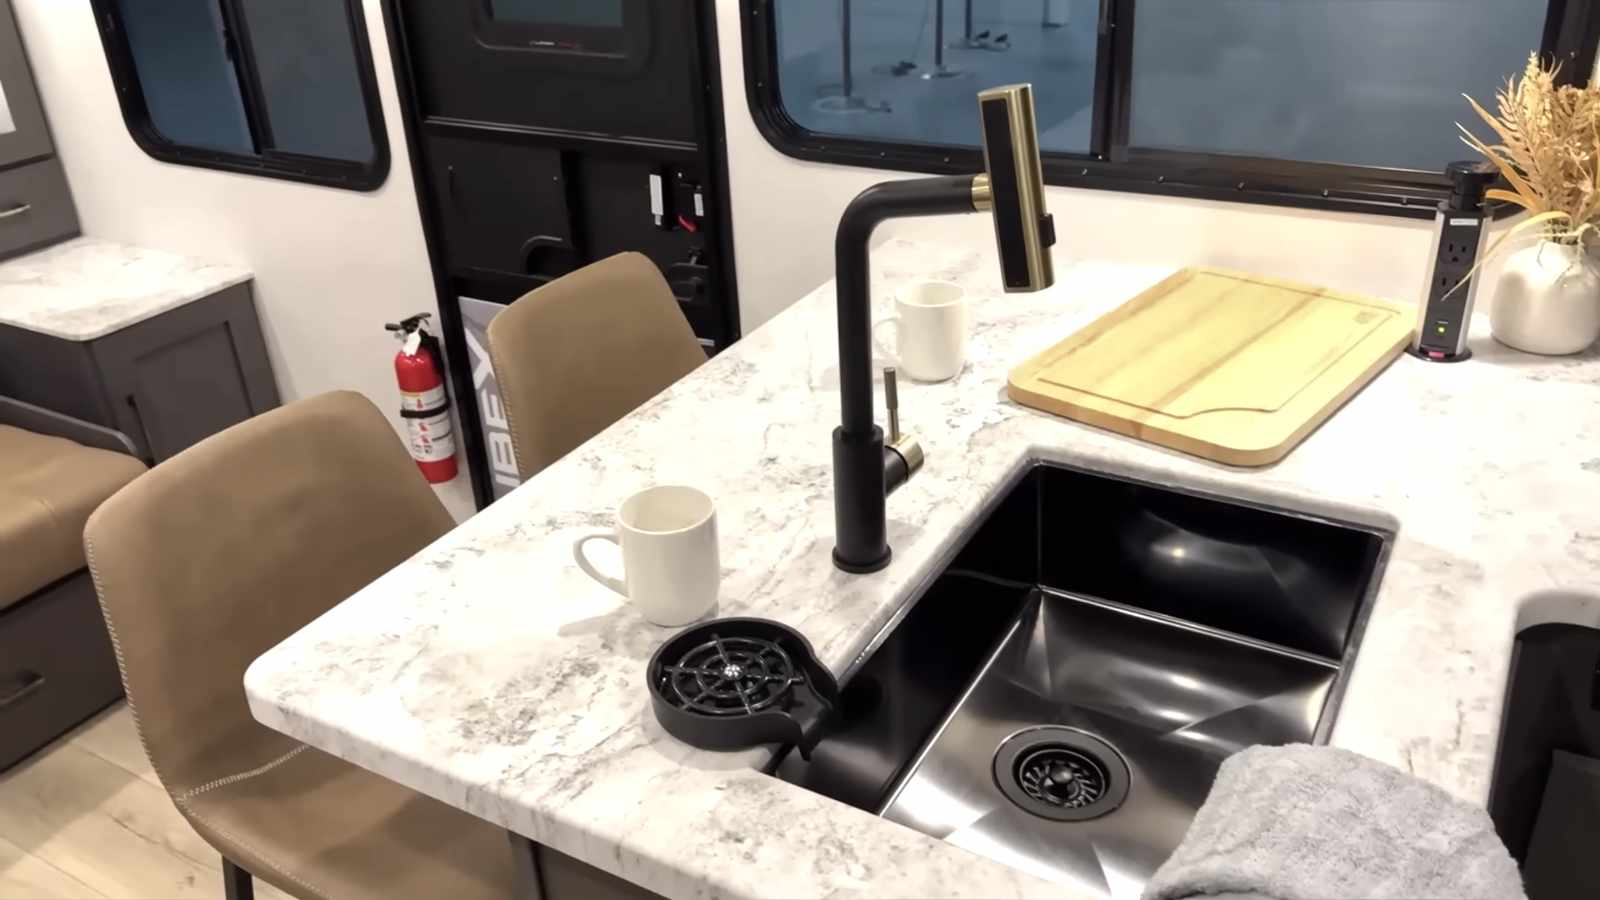
A multifunction faucet and glass washer in the IBEX 20MDS
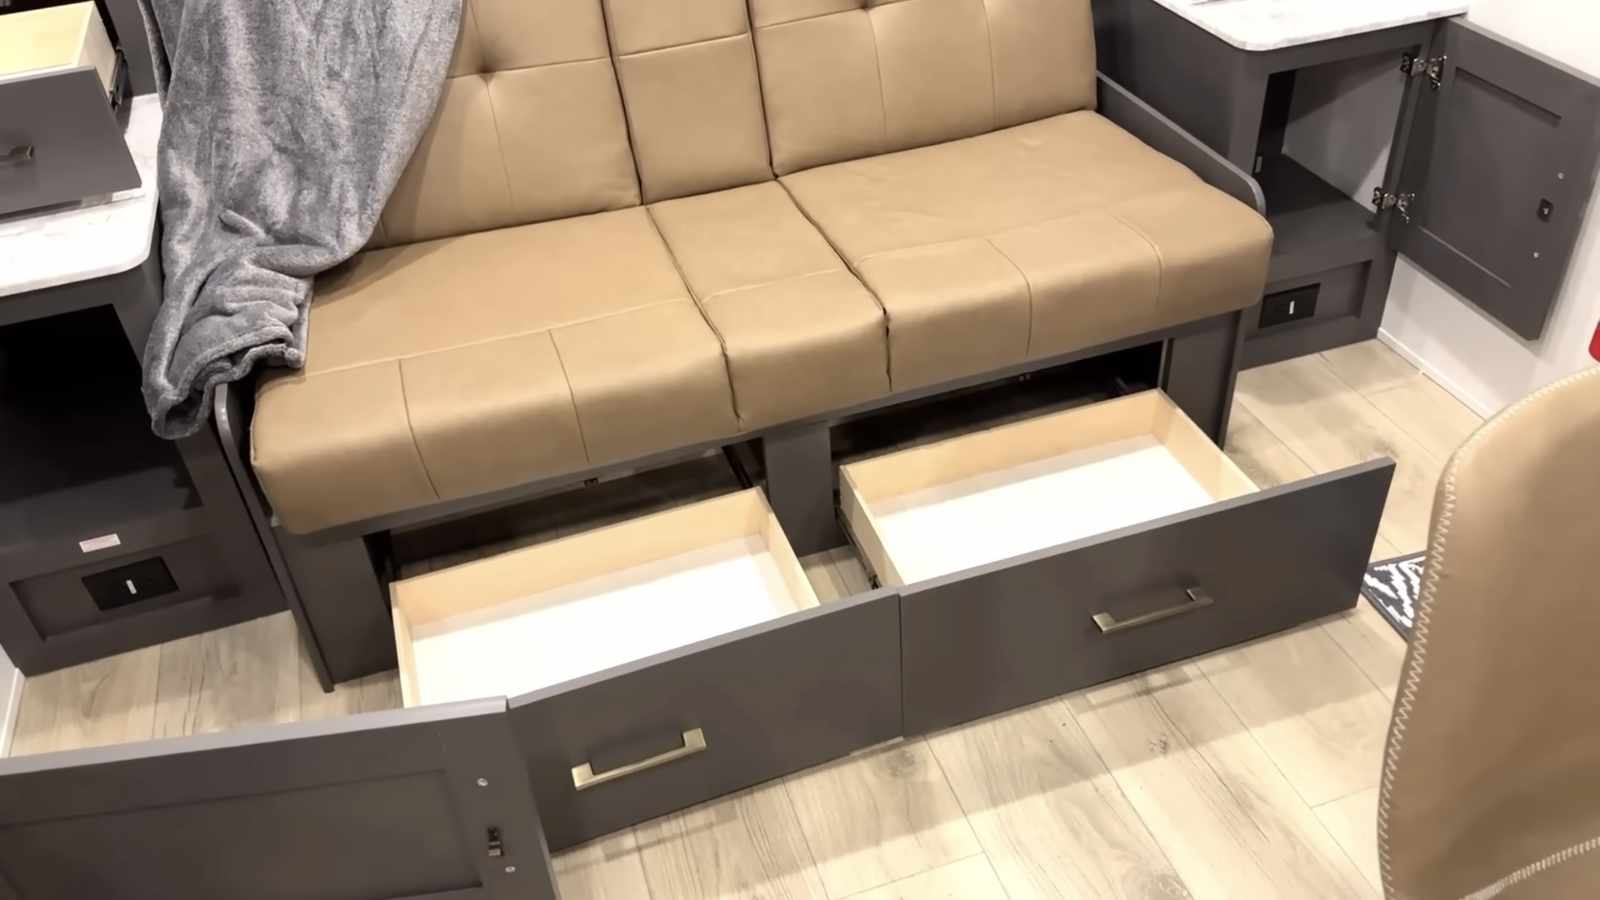
Drawers under the couch of the IBEX 20MDS
Forest River IBEX 20MDS offers a better suspension option
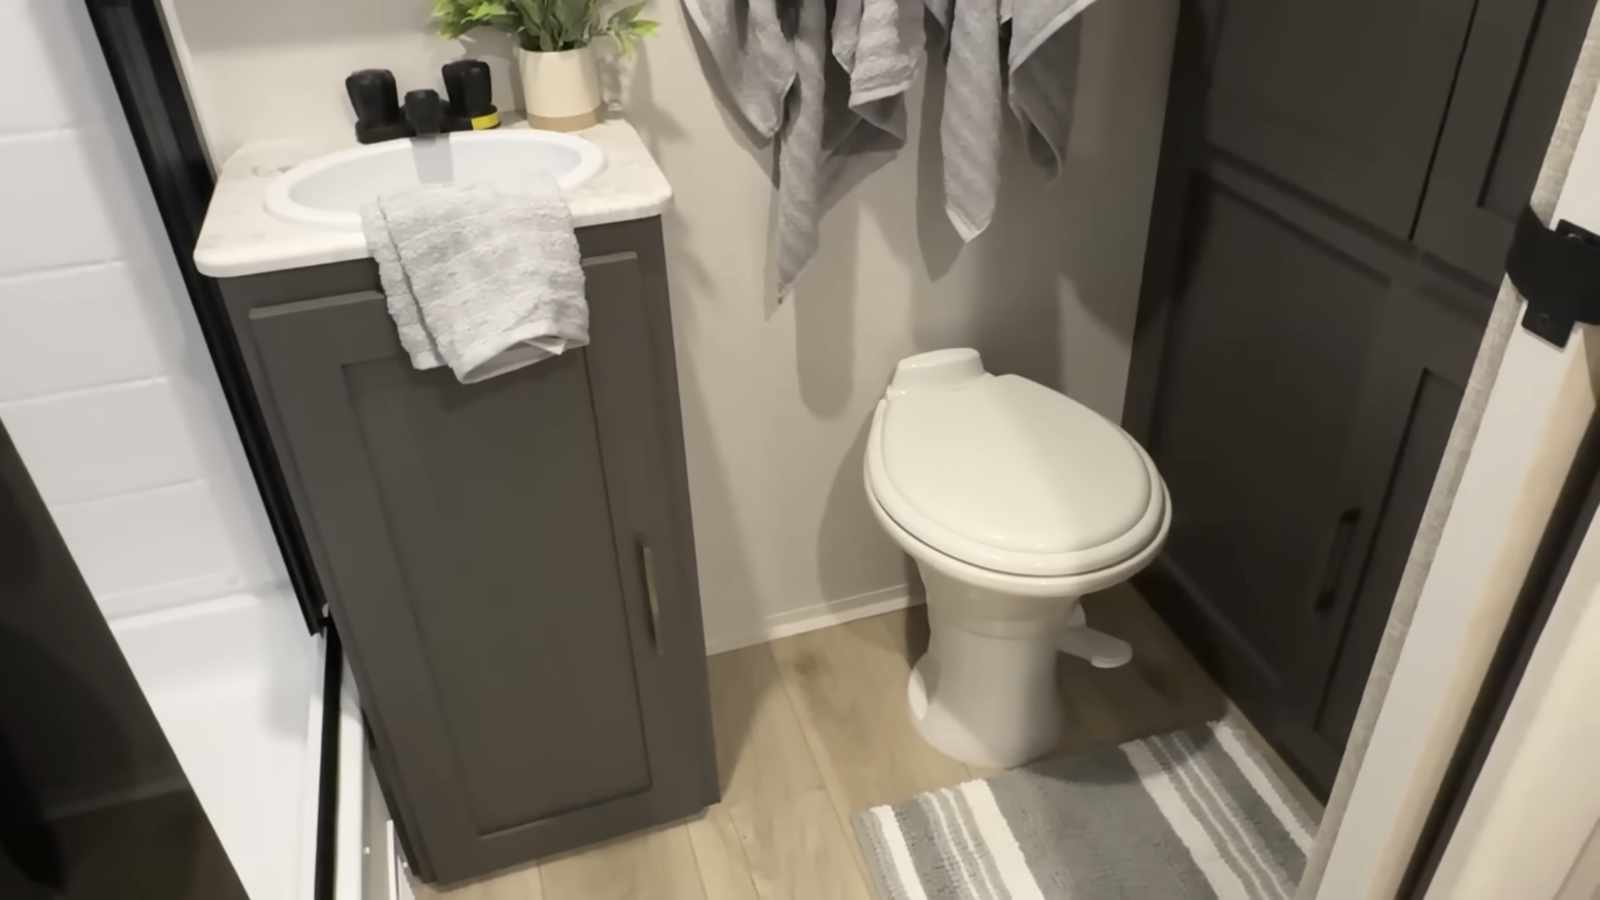
Good space in the bathroom plus a large storage compartment
The Murphy bed forces the mattress to bend in the IBEX 20MDS
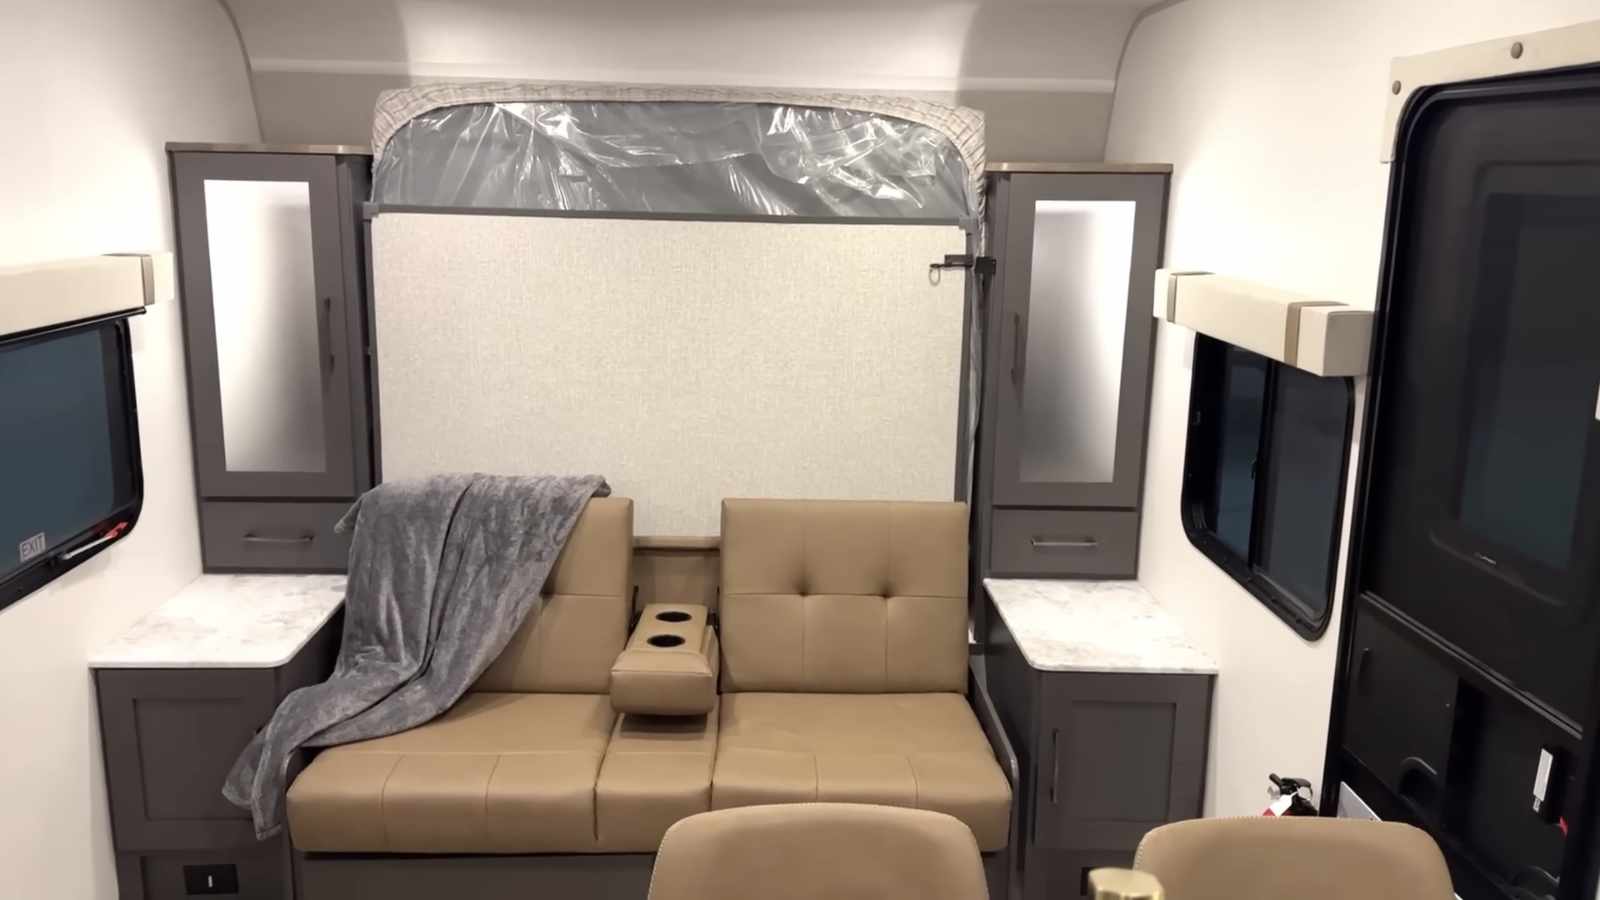
Inside the Forest River IBEX 20MDS
This is a relatively short trailer, but having a Murphy bed means you get a couch as well as a four-person dinette (in the slide). There’s also a dining bar incorporated into the kitchen design, so there are a number of choices to sit and have a meal.
The dinette in here features a two-pole knee-knocker table design—bummer. I’d prefer a free-standing table, but that can be facilitated easily enough with a trip to the hardware store.
Murphy bed
Okay, since I wrote that there’s a Murphy bed, let’s talk about that for those of you who are still with me. This type of bed design forces the mattress to bend to accommodate the Murphy function, so the mattress itself has to be rather thin. Bleh.
But this is a 60” x 80” mattress and, surprisingly, doesn’t interfere with the slide mechanism even if the mattress is down. So you could replace this mattress with one that actually won’t make your chiropractor’s yacht payment easier and just leave the thing down all the time.
Granted, that means that you lose the functionality of the couch, but some sacrifices may be worth making to some buyers. At least you have the choice.
I do like the cubbies behind the closet adjacent to the bed. They feature 12-volt and household power outlets.
Of course, there’s a windshield here with a Murphy bed, which is the dumbest thing in RVing. There’s a windshield when you don’t want it, at night, and then one you can’t take advantage of when the bed is up. So, again, another reason to just never fold the Murphy bed up.
I would have loved to have been in any planning meeting where someone said, “Hey, let’s have a windshield and a Murphy bed.” That’s when the person with that idea and I would go outside and have a little talk.
Kitchen in the Forest River IBEX 20MDS
I like the kitchen design in this rig, where the extension of the counter incorporates the kitchen sink but also a breakfast bar. Or margarita bar… your choice.
The sink incorporates one of those silly glass washing devices, and the faucet has both a sprayer and a shower/rain type function. There’s a three-burner propane cooktop and a convection air fryer microwave.
But what you won’t find here are any drawers whatsoever. Nope, not a one.
Well, okay. There are drawers under the couch that you’ve now buried under the Murphy bed, but that’s it.
There are cabinets here that are of decent size, and there are more under the dinette benches, again, decently large. You could find some drawer/organizer type of thingamajig that would solve your drawer desires.
One thing I’d like to see is a provision that makes it easy for an owner to add a propane oven. For those who don’t want one, the space could instead be used for a cabinet or drawer. It looks like the cabinet below the propane cooktop could accommodate an oven. But it would be even better if there were a factory-designed option that dealers could install.
I think the majority of RVers wouldn’t go for the oven, But for those who want it, it would be available, and it would be an easy thing for a dealership to keep one of them in stock.
While there are no drawers, there is a huge pantry, and that may be sufficient for some travelers. I like that the shelves in the pantry don’t extend all the way to the door. So, you could also hang a broom or small vacuum or your archery equipment (hey, I don’t know you) in here in addition to utilizing the shelves.
Bathroom in the Forest River IBEX 20MDS
By virtue of a taller ceiling in this rig, you also get more headroom in the shower, which will be appreciated by many RVers. This is my favorite RV bathroom type: one that spans the width of the RV. That means you can actually be in this space and change clothes without that “ta-da” moment of surprising the rest of the people traveling with you.
Although the shocked look on their faces is pretty priceless.
There is also quite a bit of storage in the bathroom, as well as a closet on the road side wall.
Boondocking in the Forest River IBEX 20MDS
As mentioned earlier, I think this suspension might scream “boondocking,” but that’s not necessarily why I would buy this. In fact, I don’t believe I’ve ever gone to a place where a real off-road suspension was necessary. But this better suspension will treat the RV more gently as the sucky roads in this country feel more like off-roads than smooth pavement.
The Black Canyon Beast Mode package also includes a second solar panel and a 2,000-watt inverter, so those might also make the package well worth considering.
Something else interesting: The Black Canyon Beast Mode package also includes a whole-house water filtration system. I’m not always a big fan of these, mostly because they add more plumbing, and there are already some excellent external water filters available. That said, a whole-house system does filter the water coming from the holding tank, which is a definite plus. I also like that the filter is located in the front pass-through, and the plumbing setup looks solid.
As for travel access, again, no can do with the slide in. You had better remember to extend that slide all the way, no matter how bad you have to pay the rent on all that coffee you drank on the road, or you’ll be sad.
IBEX 20MDS specifications
Final thoughts on the Forest River IBEX 20MDS
I like that Forest River makes this top-notch suspension available, although I wonder how many people actually choose this? It is absolutely the best travel trailer suspension system on the market, in my opinion.
One more comment: This does feature that goofy entry door with the black glass exterior. It does nothing to add additional window space but offers more weight and cost for zero benefit. Who thinks of this stuff?
Otherwise, this is a decent little trailer with a few head scratchers but a lot of positive aspects to it.
My thanks to Josh from Bish’s RV for the video and photos in this article.
More about these RV reviews
These RV reviews are written based on information provided by the manufacturers along with our writer’s own research. They are based on information from a single unit and may not reflect your actual experience. Shop your RV and dealership carefully before making a buying decision. They are intended only as a brief overview of the vehicle, not a comprehensive critique, which would require a thorough inspection and/or test drive.
Tony comes to RVtravel.com having worked at an RV dealership and been a lifelong RV enthusiast. He also has written the syndicated Curbside column about cars.
You can also check out Tony and Peggy’s RV podcast.
I have previously strongly suggested that when people experience a tire failure, they should file a complaint with the National Highway Traffic Safety Administration (NHTSA). That is the part of the Department of Transportation that is responsible for vehicle safety regulations, including tires. Here is a link to the form.
I received this question on this topic: “Thanks, Tireman. My next question is, when is it appropriate to report to the NHTSA? After any flat? Or are there specific indicators?”
Excellent question, as we don’t need to be “crying wolf.”
Reporting process
If we look at the process, I think it will help us understand when and why we would want to contribute to the database of tire failures.
I think we can sum up the primary objective for NHTSA is to decrease the number and severity of injuries or accident costs due to a failure of an automotive system or component. One way to achieve that goal would be to hold the manufacturer responsible for providing parts that deliver reliable service for normal and expected operating conditions.
One way to hold a manufacturer accountable and maybe “hold their feet to the fire” is to order and require a manufacturer to replace a part that has been found to have an abnormally high failure rate due to either design or manufacturing problems.
Deciding if investigation is justified
Based on data submitted to NHTSA, that agency decides if an investigation should be started. The investigation could be limited to a review of test and manufacturing data, or it could involve NHTSA conducting its own tests.
So what data does NHTSA use to decide if an investigation is justified? There is supposed to be a combination of warranty data from the part manufacturer, plus a review of complaints filed by individuals.
This presents a problem for NHTSA. How should they judge consumer complaints when they know that consumers seldom have the technical knowledge to do a proper or thorough evaluation of a product failure?
So, the question really is… Should the tire manufacturer be held responsible for a tire losing air due to a puncture or a leaking valve? It may be difficult or nearly impossible for the consumer to do the proper investigation to learn the root cause of the failure.
It is well-documented that more than half of RVs on the road have one or more tires in an overload and or under-inflated condition. Should the tire company be held accountable for an overload or low inflation?
Bottom line
If you believe the RV company or the tire manufacturer should be held responsible for the tire failure, then you probably should file a complaint.
If you take a few minutes, you might even decide the failure was not the fault of the tire company but of the RV company that selected a tire with no margin for any loss of air or load variation.
You still need to provide complete tire information. However, in the case of poor tire selection, I would be sure to include a statement with actual measured loads and the small reserve load the tire selected provided. Roger Marble
We use cookies to ensure that we give you the best experience on our website. By continuing to use our site, you consent to accepting cookies. We NEVER have or will sell reader's data. For more info, please see our privacy policy page.


 Then there’s another financial consideration. While it is technically legal to refill a disposable cylinder, transporting it on a public highway is a very different matter. Federal regulations (administered by the U.S. Department of Transportation) prohibit transport of refilled “DOT 39” cylinders (of which classification small cylinders fall under). Violate that regulation, you’re liable for a fine of up to $250,000 as an individual, and up to five years in prison.


 Just a 15-minute drive from the hot springs you’ll find the historic