By Gail Marsh
While doing some research for an extended RV trip, I Googled “Grand Canyon.” I’d hoped to find information about the Grand Canyon in Arizona. (The only Grand Canyon I thought existed!) Imagine my surprise when I found a map of the U.S. dotted with more Grand Canyons than I could count!
Suddenly, I wasn’t just planning a trip for then, I was working on mapping out a route that includes many of the lesser-known “other Grand Canyons.” And we plan to see them soon!
Each canyon has its own special features. You might just have one in your home state ‘cause these beauties are in places from Maine to California and Louisiana to North Dakota! They’re (almost) everywhere!
Let’s look at just a few of the “other Grand Canyons” in the Midwest:
The Little Grand Canyon
Located in my current state of residence, Missouri! Grand Gulf State Park’s canyon was formed by a system of collapsed caves in the Ozark mountains. Located near the Missouri/Arkansas state line, this canyon extends for almost a mile in length and features walls as high as 130 feet. I’m hoping to hike the trails at the top, but Hubby (the more adventurous of our dynamic duo) may want to trek to the bottom.
Little Grand Canyon, Illinois
Located right smack dab in the middle of the Mississippi River’s floodplain is this Grand Canyon. A 365-foot climb will take you from the canyon floor to the top of this unexpected sight, and you’ll see sandstone cliffs all along the way. Looks good to me!
Arkansas’ Grand Canyon
Hoping to visit this one via motorcycle! Located in the northwestern part of Arkansas, this gem is in the heart of the Ozark National Forest. Formed by the Buffalo River, the canyon ranges from 3,500 to 6,000 feet from the rim to the bottom. The distance across the gorge is as wide as 15.5 miles in some spots, so there’s a lot to explore. I can’t wait!
Check out this Google Map to find even more Grand Canyons. You just might find one near you! Happy exploring!
Assuming you confirm your RV load every year or so, I suggest you do the following.
While getting scale readings, with the RV loaded to the heaviest you expect to be (and hooked up if it is a towable), get each axle of the RV weighed individually. This will help you when confirming the MINIMUM cold inflation required for the tires.
Learn the heaviest axle weight for each axle. If you have two or more axles on a “towable” RV trailer, be sure to weigh each axle by itself and use the heaviest loaded axle as the reference. If you have a motorhome, you need to get each axle weight by itself. This might require a couple of readings.
If you have tandem or even triple axles, as seen on some large 5th wheel trailers, add 10% to the heaviest axle weight. Since there is a 0% chance that both ends of an axle are supporting exactly 50% of the total on that axle, we need to build in some “fudge factor” to compensate for the variation.
If you are able to get individual tire position weights, i.e., “4-corner weights,” you do not need to add this 10% “fudge factor”.
Use the heaviest weight number when consulting the Load & Inflation tables to learn the MINIMUM Cold Inflation you should use. Some people like to add 5 PSI to avoid having to add air when the weather changes.
Set the Low Pressure warning level on your tire pressure monitoring system (TPMS) to the table MINIMUM Cold Inflation.
Test the TPMS
Once a year, test each sensor by partially unscrewing to confirm the warning level the driver can hear from the TPMS.
Be sure to reinflate the tires after running the test!
We are trying to ensure we are providing enough pressure to support the heaviest loaded tires. It is recommended that you add some margin in PSI so you do not need to check your inflation every day.
On my Class C, I got a “4-corner” weight from RVSAFETY.com (RV Safety & Education Foundation) while at an RV convention. Using the heaviest loaded tire on each axle, I consulted the Load & Inflation tables for my size tires. I used that number as my “Low Pressure Warning Level” on my TPMS. I then added 5 PSI to the table number to learn my “Morning Cold Inflation PSI”.
My driving (warm tire) PSI runs about +8 to +12 PSI above my “Morning Cold Inflation PSI,” which is just fine. Following this has meant that I only need to “top off” my tire pressure each spring before I start traveling.
It is just that easy and has worked for me since 2007. I think this should also work for you unless you are traveling between Phoenix in August and Alaska in November, when you change your “Morning Cold Inflation PSI” twice a year.
If you have tire questions, check out Roger’s Blog as well as his posts on RVtravel.com. There are hundreds of posts covering everything to do with tires.
If you still have a question for Roger after searching the above posts, send your inquiries to him using the form below.
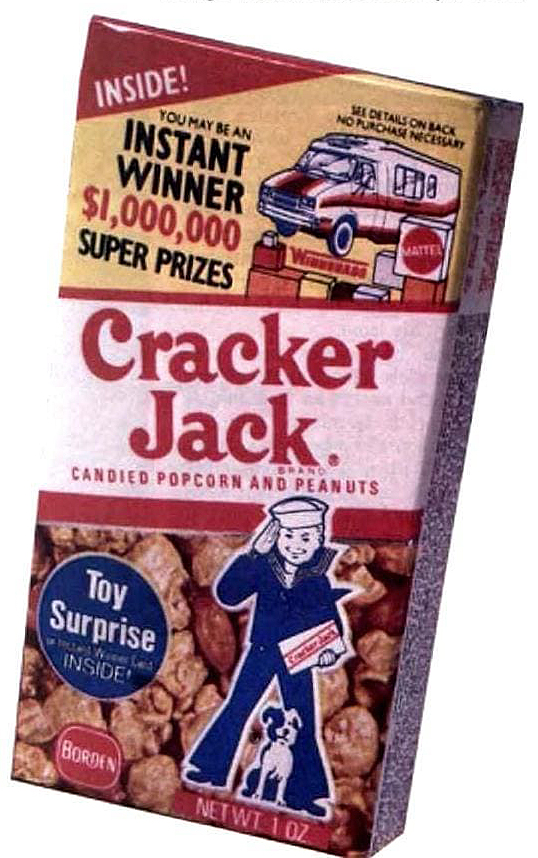
“Candy-coated popcorn, peanuts, and a prize!” But, whoa, what a prize. If you were ever a fan of Cracker Jack, you might have had the chance for one of the biggest prizes ever stuffed into that little box: a Winnebago.
From tin whistles to the Cracker Jack prize Winnebago
When Cracker Jack first started rolling out prizes in those little boxes in 1912, kids might get something like tin or metal toys. Whistles. Puzzles. Charms. Through the 1930s, metal, paper, and wood were the giveaways. From the 1940s to the 1960s, plastic was king. Whistles, tops, rings. World War II saw a surge of patriotism in the box—prizes with military motifs, and the occasional pitch to buy War Bonds.
Courtesy Alex Jaramillo (click to enlarge)
When the ’70s arrived, hey, collectibles! Cracker Jack baseball cards! Tattoos, puzzles, and magnets came packed with the popcorn. This ran on into the 1980s. But at the leading edge of the ’80s—the really big stuff. The Cracker Jack grand prizes: Two Winnebagos!
Enter the Cracker Jack expert
So how do you get a Winnie in a Cracker Jack box? We turned to Cracker Jack collecting expert Alex Jaramillo, who’s been a Cracker Jack collector since the 1950s. Alex was so intense on the subject that, in 1980, Borden—the company that owned Cracker Jack at the time—had an invitation for him.
“The Cracker Jack company invited four of the top collectors at the end of 1980 to have a ‘first annual reunion’ in the plant in Cicero, near Chicago, Illinois,” Alex related to us. “We had a contest and I happened to be lucky enough to win, answering questions on the history, and also based on enthusiasm and knowledge of Cracker Jack.”
After winning the contest, Alex thought life would grow quiet again. Not so fast. In early 1981, the folks from Cracker Jack invited him to go on tour as a spokesman promoting Cracker Jack’s Million Dollar Super Prize promotion. Included in the prizes were two Winnebago Warriors—loaded up with “Barbie” and other Mattel-produced toys.
Putting a Winnie in a Cracker Jack box
How do you put a motorhome in a Cracker Jack box? Our research indicates this could violate the rules of physics. Alex confessed that the actual machine never got in the box. So? A winning certificate “in the shape and size of a minor Cracker Jack prize—which was stickers” went into the box. “If you did not win the Winnebago or any of the other larger toy prizes, a Barbie or other toys, you would receive a normal Cracker Jack prize.”
Alex clearly remembers one of the two Grand Prize winners. No, not a kid with a runny nose somewhere in the Midwest. Rather, a U.S. military serviceman cracked the winning Cracker Jack box. One can only imagine the consternation of Cracker Jack officials when they learned their winner was stationed, not in the U.S., but in Germany. Guess if you can afford to put up two Winnebagos as prizes, you can afford to pack one of them up and ship it to Germany, which is what the company did.
Alex gets his own “prize”
After nearly two months of touring the U.S., promoting the big Cracker Jack prize Winnebagos, life went back to normal for Alex. Well, almost. In his “other life,” before the big contest promotion, Alex was a research technician for a major California hospital. He took time off from his regular job for the promotion, but was a bit conflicted. It had something to do with an even bigger prize than would come from a Cracker Jack box.
It seems Alex’s wife had a prize of her own waiting. While Alex was out on the road, his wife was waiting at home, heavy with child. As it was, their second child, a daughter, waited until mid-February to make her debut on the world scene—after Alex got back from the Cracker Jack tour.
Did we misspeak about that other Winnie?
So, a Winnebago Warrior off to Germany. And the other one? Well, hang on, maybe we misspoke a few paragraphs back. Alex told us, “I vaguely recall that a family from the Midwest won the other Winnebago.” No, he didn’t mention if the family had a child with a runny nose.
What does the man with 5,000+ Cracker Jack prizes do?
As for Alex? He’s long since retired from his hospital job. It’s given him plenty of time to pursue his bigger interest in all things Cracker Jack. Particularly the things inside the box. One source describes him as “A serious collector with around 5,000 Cracker Jack prizes.”
Alex Jaramillo’s book
With that kind of background, what else could someone do, other than publish a book on the subject? Alex Jaramillo’s Cracker Jack Prizes categorizes them decade by decade—from the early 1910s into the 1980s—spotlighting tin toys, paper novelties, plastic trinkets, and more.”
And today?
Before QR codes and points systems, brands went big, and Cracker Jack went full throttle. Giving away a motorhome wasn’t just a publicity stunt—it was a nod to the American dream of getting away. For RVers chasing sunsets and scenic pull-throughs, it’s a reminder that adventure has always come with a prize.
When it comes to RV stabilizers, there’s a common thread among many RVers: The less you crank them down, the more stable they are. You’ve probably driven through campgrounds and seen how much blocking people stuff under their stabilizers—only to crank them down an inch or two. Good idea? Not according to physics. RV stabilizers have a sweet spot: Crank them down too little, or too much, and they don’t do their job.
Get those RV stabilizers down in a hurry?
When you pull into your campsite and start setting up, it’s tempting to get the stabilizer jacks down quickly and call it good. But how far you extend your jacks can make a big difference in how stable—and comfortable—your RV will be. Go too short, and the rig may still wobble. Go too far, it can be the same or worse: You might damage the jacks or your frame.
While it might seem like a minor detail, several manufacturers and RV experts suggest there’s a “sweet spot” for stabilizer jack extension. And it turns out that extending the jacks to around 60% to 70% of their full range can offer the most effective support.
What the manufacturers say
Let’s start with what’s actually written in the manuals—when it’s written at all.
Lippert™ Components
Lippert, one of the largest suppliers of RV jacks and chassis components, doesn’t provide a specific extension percentage. However, its manuals stress one key point: Stabilizer jacks are not meant for lifting or leveling, only for minimizing movement once your RV is already level. They also warn against overextending or using the jacks on unlevel ground without proper support, which can twist the frame or cause jack failure.
BAL® (Norco Industries)
BAL’s stabilizer products, like the popular “C-Jack” and telescoping models, similarly don’t cite an ideal extension percentage. But user experience and aftermarket support strongly suggest that more extension equals more stability, so long as you’re not exceeding the jack’s designed range. Their triangular geometry becomes more effective as they extend, especially for side-to-side stability.
Hubbell (and generic scissor jacks)
We found this warning in a “generic” stabilizer owner manual.
Some aftermarket jack models sold under Hubbell or white-label brands have clearer guidance. One scissor jack model rated for 5,000 pounds clearly states that it reaches full rated strength only when extended between 13 3/4″ and 23 1/2″—a range that represents roughly 60% to 98% of its full stroke. Any less than that, and the strength (and stability) is “drastically reduced.” (pdf)
Why 60–70% extension works
The geometry of most stabilizer jacks—especially scissor or telescoping types—means they become more rigid and better at resisting motion the farther they extend. At minimal extension, the angle of support is too shallow to be effective, and the jacks can flex more easily.
Click to enlarge
By extending into the 60–70% range:
You get better triangulation for side-to-side and front-to-back support.
The jacks engage more of their structural strength.
Movement inside the RV—walking or bouncing—and wind translates into less visible shake.
Triangulation? What’s that all about?
In this context, triangulation refers to how the stabilizer jack forms a triangle-like support structure with the RV frame and the ground. The more effective the triangle, the more rigid the support — which minimizes wobble.
Think of your RV as the top side of a triangle. The stabilizer jack acts as the angled leg. The ground is the base. When a stabilizer jack is extended properly—say, 60–70% of its travel—it creates a longer diagonal and a wider angle with the ground. This forms a broad, supportive triangle that resists lateral and vertical forces.
Check out this illustration showing a “stab jack” and you can see the difference in too little, too much, and “just right.”
But what about scissor jacks? Is the triangulation business important here?
Scissor jack stabilizers operate on the same fundamental principles of triangulation as other stabilizer types and, in fact, these mechanics are especially critical to their performance. As the jack extends, its arms form an angled, X-shaped brace between the RV and the ground. This diagonal configuration creates a triangle-like structure that resists movement and provides support.
The farther the jack is extended—within a safe operating range—the more effective this triangulated structure becomes. Most scissor jacks perform best when extended to approximately 60 to 70 percent of their total travel. At this range, the angle between the RV frame and the ground is wide enough to offer real resistance to lateral movement caused by walking, wind, or shifting weight.
If the jack is barely extended, it remains nearly vertical and lacks the side-to-side bracing necessary for stability. Conversely, if it’s extended too far, the arms flatten, the triangle becomes too shallow, and the jack can lose strength or even buckle under pressure.
Many manufacturers warn that full weight capacity is only available within a certain mid-range of extension, and going outside of that—either too short or too long—reduces structural integrity. To stay within the ideal range, it’s best practice to use base blocks or jack pads beneath each foot. This reduces the amount of crank-down needed and helps the jack remain in its strongest position. But don’t go overboard! Keep the blocking to the point where you can still crank down the stabilizer to that 60–70% sweet spot.
With any stabilizer jack, be sure not to extend all the way out unless absolutely necessary, as the final 10% of travel can be less stable and more vulnerable to bending or damage, especially on uneven ground.
Best practices for RV stabilizers
To get the most out of your stabilizers (and avoid damage), follow these field-tested tips:
Level first, stabilize second
Stabilizer jacks are not leveling tools. Use leveling blocks to get the RV level before lowering your stabilizers.
Extend to the right height
Aim to extend your stabilizer jacks to about 60–70% of their full travel. If your jacks max out at 24″, shoot for at least 14″ of extension. This puts you in the “strong zone.”
Use jack pads or blocks properly
If the ground is uneven or too low, place blocks or jack pads under each foot. This lets you reach that ideal extension range without maxing out the jack.
Tighten evenly—but not too hard
Crank each jack until it’s snug and firm. Don’t keep cranking in an attempt to lift the RV—that’s a job for your leveling gear.
Final thoughts
While your owner’s manual might not give a specific number, field data and at least one scissor jack manufacturer clearly show that stabilizers perform best when extended 60–70% of their range. Less than that, and you’re just touching the ground; more than that, and you may be stressing the equipment.
A little math and a few blocks can go a long way toward a shake–free RV setup. Your feet—and your coffee cup—will thank you.
It should have been a pleasant week. My neighbor and her family secured a prime RV lakeside site. Everyone happily looked forward to fishing, hiking, and relaxing. Even Chip, the family’s 2-year-old Labrador, sensed the excitement!
Just one day into their trip, the family packed up everything and headed home. Why? Their great RV campsite was infested with fleas!
Fleas?
Fleas are tiny, fast-moving parasites about 1–2 mm long. They are easy to miss without a close, careful inspection. However, you won’t miss your dog’s intense scratching and licking behaviors! Here’s what you can do:
If you part your dog’s coat and see tiny black “sand” particles that turn reddish when wet, you’ve likely found flea droppings—known as flea dirt—which is digested blood mixed with feces.
Most adult dogs with a flea problem show small red bumps or scabs on common bite sites such as the neck, back, and base of the tail. There may also be increased scratching and licking at the skin.
In dogs with flea allergy dermatitis, even a single flea bite can trigger intense itching, hair loss, and hot spots that require prompt veterinary care.
Behavioral clues
Watch for your dog scratching at its hind end or excessively biting its fur—behaviors that often lead to self-inflicted wounds around the tail and groin area.
Restlessness and an inability to settle may indicate fleas are making your dog uncomfortable, especially in shaded or grassy parts of the campsite where fleas thrive.
Contact management
If you observe fleas (or your pup’s uncomfortable reaction), you need to contact the campground manager. Why? Here are some reasons:
Campground managers are responsible for guest satisfaction and property maintenance, which includes keeping the grounds clean, safe, and pest-free.
A well-trained staff understands that a timely response to pest reports can prevent small flea problems from becoming large-scale infestations that affect other guests.
What to say
Take clear photos of the affected areas and your dog’s symptoms. Note dates and times to support your request and comply with any campground policies.
Politely request that the campground manager arrange for targeted treatment of areas where your dog rests or plays—such as grassy patches, shady spots, and under picnic tables—using approved insecticidal soaps or pyrethrin sprays that kill adult fleas and larvae on contact.
Suggest applying diatomaceous earth in dry, shaded areas to dehydrate and eliminate flea eggs and larvae without harmful chemicals.
You can also ask for increased mowing and removal of leaf litter to reduce moist habitats that support the flea life cycle.
He wears a flea collar! So, how…
Chip, our neighbor’s dog, was first to alert the family about the fleas. Even though Chip wore a flea collar, he still contracted fleas.
How can this happen? Flea collars primarily work against adult fleas that live on your pet. They don’t tackle the immature fleas lurking in your dog’s environment—in this case, the RV campground. As those hidden eggs and larvae grow and hatch, new fleas can appear and hop right back onto your dog—making it seem like the collar isn’t working, even though it’s doing its job.
Pet–level treatment
If your pup (or other pet) shows signs of fleas, here’s what you can do:
Begin by giving your dog a thorough flea combing. Focus on the neck, tail base, and belly. Wipe any debris onto a damp white paper towel to confirm flea dirt—watch for reddish staining.
Bathe your dog with a flea shampoo or gentle dish soap to remove any remaining fleas and soothe irritated skin.
Follow up with a veterinarian-approved topical or oral flea treatment to kill adult fleas and disrupt the life cycle. Using a fast-acting oral tablet like Nitenpyram (Capstar) can quickly kill existing fleas on your pet. (Choose products labeled specifically for dogs to avoid toxicity. Always check with your vet before administering any meds.)
Environment–level control
Launder all pet bedding, blankets, and your own RV linens in hot water. This kills fleas in all life stages on fabrics.
Use a hand-held vacuum or brush to remove debris from picnic tables, outdoor rugs, and RV steps. Dispose of the vacuum bag or empty the container away from your living area to prevent reinfestation.
Apply diatomaceous earth around your RV’s exterior perimeter. Focus on cracks and shaded areas. This will help to dry out flea eggs and larvae without harsh chemicals.
Don’t let fleas interrupt your RV adventures! Know what to look for and what to do if you discover fleas on your pup or other pets.
“I want to stay as close to the edge as I can without going over. Out on the edge, you see all kinds of things you can’t see from the center.” —Kurt Vonnegut, Jr.
Need an excuse to celebrate? Today is National Graham Cracker Day! Time for a s’more, perhaps?
On this day in history: 1937 – Spam, the luncheon meat, is introduced into the market by the Hormel Foods Corporation.
Featured news
A few weeks ago, we mentioned a possible change to national park fees. That idea is now official: President Trump has signed an executive order to raise entrance and recreation fees for foreign visitors. U.S. guests won’t see a change. The move, announced at a campaign rally in Iowa, is part of Trump’s “America First” policy and aims to boost funding for park improvements. Here’s more info.
On July 1, California increased its gas tax from 59.6 cents to 61.2 cents per gallon. That’s a two-cent jump. For RVers, who often keep a close eye on fuel costs, that might sound concerning, especially with some headlines warning of $8-a-gallon gas or price hikes of 65 cents per gallon. But fuel experts say those warnings are overblown… for now.
SPEAKING OF GAS… Amazon Prime Day doesn’t officially kick off until July 8, but members can still enjoy early deals such as discounted gas. For those traveling on the Fourth of July holiday weekend, Amazon Prime is offering $1 off per gallon, eligible for up to 35 gallons, at thousands of gas stations across the U.S. Here’s how to save.
Well, if you’re a-standin’ on a corner in Winslow, Arizona (thanks, Eagles), Love’s is making it easier to have the RV nearby. Love’s RV hookups in Winslow, Arizona, are a reality at a brand-new travel stop—and it’s built with road trippers and RVers in mind. This is Love’s 16th location in Arizona, and it brings with it everything from RV hookups to a dog park, fresh food options, and reliable services you can count on. Learn more.
It began with a shocking sight: a man squatting near his SUV in plain view. By summer 2024, human waste was turning up all over—a growing issue in Colorado towns, on trails, and even on private walking paths. The problem? Too many visitors, too few toilets, and a reluctance to properly dispose of waste. Land managers now call it one of the top backcountry concerns nationwide.
Just last week, we told you about Starlink’s new $750 “demand fee”, but if you thought that was high, get ready. The $1,000 Starlink demand fee is a reality in certain areas of the Pacific Northwest. That fee is being added to new residential Starlink subscriptions, not mobile or RV plans. A Reddit user first spotted the change while trying to sign up from Washington state, where Starlink now shows a $1,000 surcharge on top of the usual $349 equipment cost.
Americans’ interest in electric vehicles seems to be waning. Despite more than 75 new EV models launched in the past four years, AAA’s latest survey shows waning interest. Just 16% of U.S. adults say they’re likely to buy an EV next—the lowest since 2019—while 63% say they’re unlikely, the highest since 2022. Here are the details. (And what about you?)
In the market for an RV? Now might be your moment, especially if you’re shopping used. With more late-model rigs hitting the market and brand-new motorhomes facing sluggish sales, manufacturers like Winnebago are being forced to rethink their lineups. The shift toward gently used and budget-friendly options is reshaping the RV landscape, giving buyers more leverage—and putting pressure on companies to adapt fast. More info here.
If you find it hard to believe how fast an RV can go up in flames, the video evidence may be hard to take. RVers were traveling in their motorhome near Joe Rich, British Columbia, on Wednesday when the unthinkable happened—their rig caught fire. A passerby, Marlon Bartram, happened on the scene with a drone. The drone footage is hard to watch.
If you’re RVing through West Texas, local sheriffs have a heads-up for you—trailer thefts are on the rise. Over the past few weeks, both Midland and Reagan Counties have reported a jump in stolen RVs and oil field equipment. While theft from oil operations is nothing new in this region, RV thefts have become more common, especially during the month of June. That has local law enforcement asking RVers to stay alert and take extra precautions.
TAKE A GUESS: Would RVtravel.com readers remove laundry from a washer or dryer in an RV park laundry room if the cycle was finished and they needed to use it? See if your guess is right.
Fix roof leaks and extend your RV roof another 18-20 years with the ONLY liquid butyl rubber in the world
RV Roof Magic’s unique solvent-based drying process allows for a chemical bond not found in other RV sealants. That is why it never needs a primer and only one coat. We offer a 10-year warranty. Apply RV Roof Magic to all roofs except silicone and PVC. Over 30 years of history of success. Visit our site for our monthly special!
More RVing news
A tourist recently visiting Grand Teton National Park narrowly escaped a charging grizzly bear by diving headfirst into his car’s open window. A split-second decision no doubt saved his life! Here’s what happened. Yikes!
A long-running debate over the use of speed limiters on commercial trucks has highlighted a growing divide among federal regulators, public safety advocates, and professional drivers. At the heart of the issue is a simple question: Should big rigs be required by law to drive slower than the rest of highway traffic? Well, should they?
FORTUNE COOKIE FORTUNE! A Kentucky woman won $50,000 in the lottery using numbers from a fortune cookie. Kathy Bailey of Lexington said she used the numbers from her daughter’s cookie to buy a Powerball ticket.
Manhattan Project National Historical Park and ORAU will host a free public program, “Beyond the Bomb: Stories of the Atomic Age,” on Thursday, July 24 at 2 p.m. ET in Oak Ridge, Tennessee. The event will explore atomic culture and medical innovations sparked by the Manhattan Project, with rare access to the ORAU Museum of Radiation and Radioactivity, not usually open to the public. Learn more here.
The National Park Service has found high levels of toxic algae—called cyanotoxins—in the water at the mouth of Antelope Canyon, a popular spot on Lake Powell on the Utah/Arizona border. The levels are close to the upper limit of what’s considered safe for people and animals.
Thanks, RVers! RVers helped in a mass casualty accident after a deadly crash shut down I-20 in Kaufman County, Texas. When a multi-vehicle collision killed five people and injured another, residents and staff from the nearby TR3 RV Resort sprang into action. Hearing the impact from just across the field, they rushed to the scene to assist victims, while others opened facilities and provided relief to stranded drivers stuck in the heat for hours.
After three years of construction, Yosemite National Park is reopening Tuolumne Meadows, one of the park’s biggest and most popular campgrounds, on August 1. RVers and other campers are able to book reservations now on Recreation.gov, and the campground is expected to fill quickly. Learn more or book here.
Speaking of California campgrounds… California is getting its first new state park campground in a decade. Fort Ord Dunes State Park, a quiet coastal spot near Monterey, was once part of an Army base and now protects 800+ acres of dunes and four miles of beach. Soon, it’ll welcome a new state campground built for RVers and outdoor lovers.
RECALL: General Motors is recalling certain 2018 GMC Sierra 1500, 2019 Sierra 2500, 3500, Chevrolet Silverado 3500, and Chevrolet Silverado 2500 and 2018 Chevrolet Silverado 1500 Crew Cab vehicles. The left- or right-side roof-rail air bag inflator end cap may detach from the inflator, or the inflator sidewall may rupture. Details here.
ANOTHER RECALL: If you’re rolling down the highway in a Newmar and hear a strange whoosh, it might not be the wind—it could be your baggage door skin making a break for it. Newmar is recalling some luxury motorhomes after reports that some cargo doors are detaching mid-drive, potentially turning into unexpected road hazards.
On Friday, June 27, Chimney Rock State Park reopened. It had been exactly nine months since Hurricane Helene’s devastating floodwaters washed away the park’s historic entrance bridge and shuttered one of Western North Carolina’s most beloved attractions. Details here.
?? MYSTERY PRODUCT OF THE DAY ?? Most people have a preference: the small ones or the big ones. Now, we don’t know which you prefer, but if you like the small ones, you’ll love this, especially during the summer.
Latest fuel prices
The latest U.S. average prices per gallon of regular unleaded gasoline on June 30, 2025, was $3.16, down 5 cents from last week, down 32 cents from last year. Diesel was $3.73, down 5 cents from last week, down 9 cents from a year ago. Most expensive gas: California ($4.57); least expensive: Mississippi ($2.71).
In the 18th century, human alarm clocks were known as “Knocker-Uppers.” Clocks were expensive back then, so workers across the British Isles relied on human alarm clocks called knocker-uppers. The knocker-uppers would work in the early hours of the morning, knocking on doors and windows to wake up their sleepy clients. The role was usually filled by people already up that early, such as police constables and lamp lighters, or early-rising elderly people who wanted a little extra income.
RANDOM RV THOUGHT: The next best thing to being on an RV trip is studying a road map or atlas before going and dreaming of what’s to come.
Laugh of the week
My husband was water skiing when he fell into the river. As the boat circled to pick him up, he noticed a hunter sitting in a duck boat in the reeds. My husband put his hands in the air and joked, “Don’t shoot!” The hunter responded, “Don’t quack!” —Katie O’Connell, Warrenville, Illinois
The perfect scam How AI is Making “Pump and Dump” Investment Scams Easy for Criminals
Karen is experienced in investing, but she hopes to boost her retirement savings by joining an investors group on WhatsApp. After a few months of receiving positive trading tips, she follows the advice to invest in several stocks in Asian markets. Her portfolio plummets, losing tens of thousands of dollars. Karen is the victim of a classic “pump and dump” scam: scammers buy a very cheap stock, persuade investors to buy by spreading deceptive claims, and then sell their shares once the price rises, leaving investors with a loss. Learn how AI and an army of bots are making this age-old scam easier for criminals.
Today in history
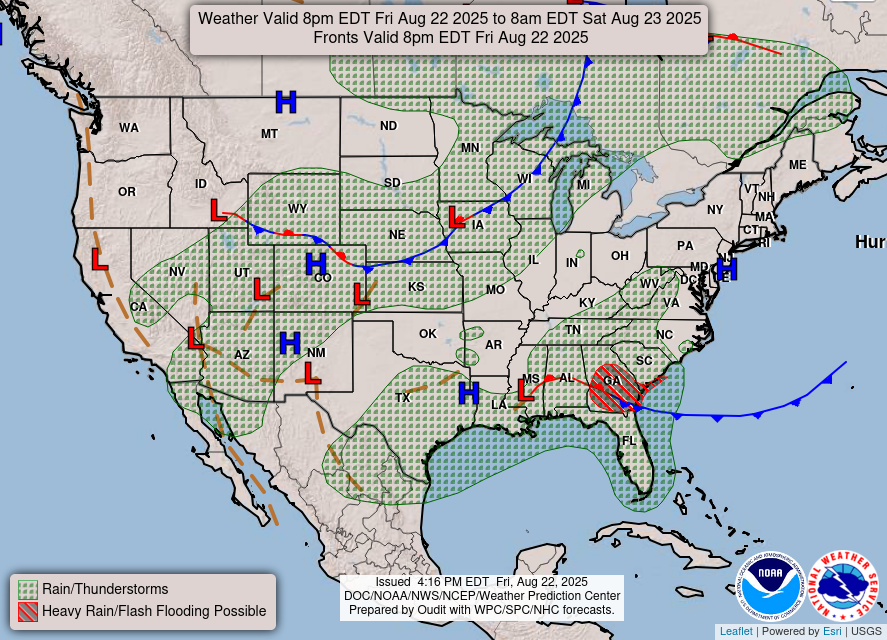
Today’s weather forecast across the nation THIS MAP UPDATES TWICE A DAY
This is a tricky question, we know. If you had the chance to go back in time to the day you bought your RV, would you still buy it or would you buy another RV?
In simpler terms, as the poll states, we’re asking if you’re happy with the RV you bought. Do you regret your purchase and wish you had either waited or bought another RV? Do you wish you had bought another brand? Another style? Another length? Would you have rather bought it from a different dealership or seller?
Maybe your RV has been everything you hoped for—a reliable travel companion with the right layout, enough storage, and just the right size for your needs. Or maybe you’ve run into frustrating issues with repairs or warranty problems, or discovered that it’s not quite the right fit for how you actually camp.
Even small details can make a big difference over time. Maybe now you’d go for more solar, a bigger kitchen, or a different floorplan entirely. Looking back, your priorities might have shifted—and hindsight, as they say, is 20/20.
If you could go back to that moment right now, what would you do?
Please tell us in the poll below. Remember, it may take a moment to load.
If you enjoyed this RVtravel.com reader poll, keep in mind that we have polled our readers at least 5,000 times through the years. It’s fascinating to see how they have responded, sometimes very surprisingly. You’ll find an archive of some of the polls here. So what are you waiting for? Check ’em out.
A few weeks back we wrote that the government was considering a change in park visitation fees. While U.S. guests would see no change, the thought was proposed that foreign visitors pay higher park fees. It’s now past the “thought” stage. President Donald Trump has signed a new executive order that would raise entrance and recreation fees for foreign visitors to national parks. The move, announced Thursday during a rally in Iowa, is part of Trump’s broader “America First” policy—and it’s aimed at generating new revenue for park upgrades.
“To fund improvements and enhanced experiences across the park system, I’ve just signed an executive order to raise entrance fees for foreign tourists while keeping prices low for Americans,” Trump told the crowd. “The national parks will be about America first.”
Foreign visitors pay higher park fees—when and how remains unclear
The order directs Interior Secretary Doug Burgum to create a plan to raise entrance and recreation pass fees for non-U.S. residents at parks that currently charge for entry. No specific timeline or dollar amounts were announced, but the Interior Department’s 2026 budget proposal estimates such a surcharge could bring in more than $90 million annually.
For RV travelers and other domestic parkgoers, this could mean fewer crowds—particularly during peak seasons when international tourism is usually high. While the order is likely to stir debate, especially among gateway communities that depend on international visitors, many U.S.–based campers may welcome the added space and improved facilities.
Current park fee arrangement
Out of the 400-plus units in the National Park System, about 100 charge entrance fees. Most visitors either pay a daily or weekly entrance fee (many $20 per person or $35 per vehicle), or purchase a longer–term pass. The best deal for regular park visitors is the $80 America the Beautiful annual pass, which grants access to every park in the country that charges admission. None of these rates are expected to change for U.S. citizens under the new directive.
For full-timers, snowbirds, or road-tripping families towing trailers, that annual pass can save hundreds of dollars a year—and it will likely become an even better bargain if foreign rates rise.
U.S. visitors to get “preferential treatment”
In addition to fee changes, the executive order also instructs the Interior Department to give U.S. residents “preferential treatment” when it comes to rules around recreational access. That includes things like permit lotteries and reservation systems, which are already in place at many parks for backcountry access, timed entry, or even campsite reservations.
So far, no details have been released on what “preferential treatment” would mean in practice, but it could potentially improve odds for U.S. campers and RVers trying to land spots in places like Yosemite, Zion, Glacier, and Arches—where demand often far exceeds supply.
Diversity programs see rollback
The new order also revokes a 2017 policy signed at the end of President Obama’s term that aimed to promote diversity and inclusion within the National Park Service. That policy focused on outreach efforts to underserved communities, as well as hiring practices within the agency.
Critics of the rollback say it’s part of a broader trend of dismantling federal diversity initiatives. Supporters say the administration is trying to refocus the Park Service on its core mission: recreation and conservation.
Park Service could see bigger budget cuts
The fee changes come at a time when the Trump administration is pushing steep budget cuts to the Park Service. In February, about 1,000 park staff were laid off. In its latest budget proposal, the Interior Department called for more than $1 billion in cuts to the Park Service—potentially the largest reduction in the agency’s history.
An analysis by the National Parks Conservation Association found that since 2017, the Park Service has lost about 24% of its permanent workforce. For travelers, especially RVers who depend on camp hosts, visitor centers, and maintenance crews, these cuts could be felt in the form of longer lines, fewer open restrooms, or reduced campground services.
A New Conservation Commission launches
In a separate executive order also signed Thursday, the President created the “Make America Beautiful Again” Commission. The group’s job is to expand access to public lands and promote voluntary conservation efforts. It will be chaired by Secretary Burgum and staffed with members of the Trump administration.
Benji Backer, founder of the nonprofit group Nature Is Nonpartisan, played a key role in pushing the initiative and will be part of the commission. “Today is a great victory for the environment, but this is just the beginning,” he said in a statement.
Backer has also voiced concerns about other land-use policies under Trump. In a recent interview referenced by CBS News, he criticized a proposal that would have allowed the sale of public lands for development. That language was later removed from the final version of a bill that passed the House and now heads to the president’s desk.
For RVers: Fewer crowds, more uncertainty
For now, RVers can expect that their current passes, fees, and reservation systems will stay the same. But foreign visitors could soon face higher costs—and possibly lower odds in lotteries and reservation queues. That may open up more access for U.S. campers and boondockers, especially during peak seasons.
At the same time, ongoing budget cuts and reduced staffing could affect park operations. RVers relying on dump stations, campground hosts, or interpretive rangers may want to keep a close eye on how park services change in the months ahead.
If you find it hard to believe how fast an RV can go up in flames, the video evidence may be hard to take. RVers were traveling in their motorhome near Joe Rich, British Columbia, on Wednesday when the unthinkable happened—their rig caught fire. A passerby, Marlon Bartram, happened on the scene. His motorhome fire drone footage is hard to watch.
Total loss seen in motorhome fire drone footage
Bartram told Castanet, “I just turned onto Goudie Road from Highway 33 and I saw this big plume of black smoke… when I got close enough, I could see that it was a motorhome on fire,” he said.
After finding out that the RV travelers were out of the rig, he recalled he had his drone with him. He launched the flying machine, equipped with a camera, and caught the dramatic footage you can see for yourself.
Before fire crews knocked down the RV flames, fire was already spreading to grass at the roadside. While the rig is presumably a total loss, none of those in the rig were hurt.
Fire officials declared the blaze was the result of “mechanical issues.”
“May we think of freedom not as the right to do as we please, but as the opportunity to do what is right.” —Peter Marshall
Thank you for joining us on Independence Day, when we celebrate the birthday of the United States of America!
Before we go on, a word from Miss Kate Smith
(from Nov. 11, 1956)
Tip of the day Unusual uses for cat litter when RVing
By Gail Marsh
Kitty litter does so much more than its intended use. That’s why many RVers (even those without cats) pack along kitty litter for their travels.
Check out these unusual uses for kitty litter when RVing!
First, moisture control: Depending on where you roam, humidity can quickly cause your rig to smell damp or musty. Non-clumping litters (like silica or crystal styles) work wonders as passive desiccants. All you do is open a container of litter and place it in the back of wardrobes, under sinks, or inside cabinets to absorb moisture. Continue reading.
REMEMBER: Fireworks of all kinds are illegal on BLM public lands. Dry summer conditions mean fire hazards are extremely high. One spark can lead to devastating wildfires.
Ask Dave No-heat furnace fixed!
Recently I posted a question from RVtravel.com reader, Rick, who had little or no heat coming out of his RV’s furnace. In the original post I suggested checking the ductwork, sail switch, or burner assembly. I very seldom get a follow-up; however, Rick did send back this initial response. Read the updates from Rick and Dave.
Listen now: 8 hours of patriotic music for July 4th, plus history of our national anthem
By Gail Marsh
Want to get inspired as you shape your hamburger patties and mix up the ‘tater salad for your 4th of July celebration? Maybe you want some inspiration while getting ready to attend the fireworks celebration? If you answered “yes” to either question, I have the ultimate 4th of July music playlist for you. It’s eight hours of continuous patriotic music. (Plus, the history of our national anthem!) Click here to listen.
Article and video How to install a skylight in your RV or camper
By Cheri Sicard
Letting in more natural light can make a small camper or RV feel twice as big. That’s exactly what Nailgun Nelly achieved by installing a Specialty Skylight 14×14 from etrailer.com into her 1959 Kencraft camper. If you’ve ever felt your home-on-wheels was a little dark or cramped, adding a skylight might just be the trick to open things up.
Featured article Visit the Independence, Montana, ghost town—(almost) in time for the 4th of July
By Dave Helgeson
In honor of Independence Day, I thought a visit to Independence, Montana, was an appropriate entry for today’s edition of Ghost Town Trails. Click to read.
Too late to order these for today, but, hey… who doesn’t always want a hot dog?? Order them here.
Happy Birthday, Caesar Salad! There’s another birthday celebration today: The Caesar salad was created for the very first time 101 years ago on July 4, 1924, in Tijuana, Mexico. Caesar Cardini, the salad’s inventor, was an Italian immigrant, one of many in Mexico at the time.
Quick tip Easy tip to help back up the trailer
Trouble backing up your fifth wheel or travel trailer? You know that you need to turn the wheel the opposite direction of where you want the trailer tail to go, but training yourself is the hard part. Hold the steering wheel at the bottom with your hand—whichever way you move your hand when there, the trailer tail will follow.
Camping evolution: As told by hot dogs
We saw this post by Rick Redner on our RVing Over 70 Facebook group, and it brought a smile to our face. We love this and think you will, too. Rick writes, “Last night after dinner I reflected on the changes and phases of my four decades of camping experiences by examining how I cooked hot dogs over the years and decades.” Continue reading.
Don’t make these 9 cooler packing mistakes
By Cheri Sicard
Do you make these 9 cooler packing mistakes? Many of us do. These tips will work regardless if you are packing a high-end cooler, such as a Yeti, or your ordinary run-of-the-mill cooler. Using these tips and techniques can significantly extend the life of your ice. At least a day longer and probably longer than that. These tips promise an end to ice runs, soggy foods, and unorganized coolers.
? MYSTERY PRODUCT OF THE DAY ? ‘Tis the season (and the day!) to be _____, yum yum yum yum yum… yum yum yum yum! Hint: It WILL make you jolly. Click here.
Trivia
Americans spend about $1.5 billion dollars each year on fireworks to celebrate the 4th of July. They also spend about $1.4 billion dollars on alcohol.
Readers’ pet of the day
“Although this tiny munchkin, Grayson (12 weeks), is just getting acclimated to our home, we will be introducing him to the RV life soon. If he is anything like his Tonkinese predecessor, Chloe, he will enjoy the change and walking on a leash around the campgrounds.” —Sally Weigand
Send us a photo of your pet with a short description. No blurry photos and please do not submit your photo more than once. Thanks!
If you shop at Amazon.com we’d appreciate you using this link. We get an itty bitty commission if you buy something, but they add up and help us pay our bills (most importantly our hard-working writers!).
Recently I posted a question from RVtravel.com reader, Rick, who had little or no heat coming out of his RV’s furnace. In the original post I suggested checking the ductwork, sail switch, or burner assembly. I very seldom get a follow-up; however, Rick did send back this initial response.
Rick’s initial response
Dave, thanks for this troubleshooting procedure.
I’ve checked that all the ducts/hoses are connected and free of kinks/obstructions.
Can the sail switch be checked without removing the entire furnace assembly from the motorhome? Not sure if I want to tackle that; we’re on the road now and I don’t have a shop with a bench, nor a bunch of tools with me!
If the sail switch is indeed dirty and not “sailing” to the correct position to keep the burner ignited, would the heat output when the burner first ignites at least be hot, then cool down to just warm air as the sail switch sinks?
As I said in the description of the problem, it doesn’t even start out hot.
The furnace is 15 years old; never been serviced. I’ve seen a few YouTube videos where the problem was that the burner was completely rusted out, with holes in the mesh portion.
Maybe it’s this? Replacing the burner looks fairly simple with the tools that I have onboard.
Thanks for your quick response to my issue. —Rick
My response
If it is not getting hot initially, then I would replace the burner assembly as it most likely is rusted, as you indicated. Plus it seems to be more accessible for you. —Dave
Then, today, the fix!
Hello David,
Replacing the burner was fairly straightforward; I also replaced the igniter probes. The spade terminal connector was fairly rusty and there was a slight, small crack in the insulator at the base. Fired it up and it is hot again… Yay!
I certainly appreciate what you and others do to help us RVers keep our rigs running! Your channel is especially good; clear and easy to follow tips. Fingers crossed I won’t have to look you up again in the near future, but, with a 15-year-old rig with quite a few of the original systems still working, one never knows!
Thanks again for your help with this. I’ll pay it forward next time I see another RVer out there staring at their non-working furnace.
I attached a photo of the burner; it didn’t look that bad. —Rick
Kitty litter does so much more than its intended use. That’s why many RVers (even those without cats) pack along kitty litter for their travels.
Check out these unusual uses for kitty litter when RVing!
Moisture control
Depending on where you roam, humidity can quickly cause your rig to smell damp or musty. Non-clumping litters (like silica or crystal styles) work wonders as passive desiccants. All you do is open a container of litter and place it in the back of wardrobes, under sinks, or inside cabinets to absorb moisture.
Keep odors in check
Baking-soda-infused or crystal litters are excellent odor-control agents. Sprinkle kitty litter in the bottom of your RV trash cans. Not only will it absorb any liquid that leaks out of the bin liner, but it will also neutralize odors!
If hiking boots or pickleball sneakers develop funky smells, it’s kitty litter “sachets” to the rescue.
Make a “kitty litter sachet” like this: Put a cup of the litter inside a clean, old sock. Tie securely closed. Then put a “sachet” inside each stinky shoe or boot. The kitty litter will absorb odors in time for tomorrow’s hike.
If you’re a full-time RVer, you can put a “sachet” of litter inside the box of off-season clothing. When you retrieve the clothes months later, they will smell fresh instead of musty.
Emergency cleanup
Kitty litter is a fast and effective absorbent. Sprinkle it over a mess, like spilled sports drinks, vomit, or even cooking oil spills. Let the litter absorb the spill and then sweep it up. This trick helps prevent stains and minimizes slippery surfaces.
In this same way, if water spills on your RV carpet and you can’t seem to completely blot out the water using a towel, sprinkle kitty litter over the area. Within a few hours, the litter will absorb the moisture. Vacuum up the litter and you’re done.
Extra traction
Snow, ice, or even slick grass has the potential to stall your RV. Shovel non-clumping litter around tires, and the litter will provide enough grip to get moving.
Dry out wet gear
Camping boots, gloves, and towels can get damp from dew or rain. Toss them in a sealed bin along with a couple of cups of kitty litter to absorb moisture overnight. Then, air them out in the morning.
Oil cleanup
If your RV develops an oil or fluid leak, kitty litter can absorb fresh oil drips before they spread. Sprinkle litter under the engine bay or leak point. The kitty litter will wick up fluids quickly and then you can simply sweep it away. More on that here.
Fridge freshener
Place a small container of no odor, clay-based kitty litter inside your RV refrigerator. The litter will absorb smells.
Bakeware cleanser
Use dry, clumping litter as a non-toxic abrasive. Add a scoop into a greasy pan and fill it with warm water. Let it soak for a few hours. The litter can help loosen baked-on residue safely without harsh chemicals or scrubbing.
Tool sharpener
The fine grit in non-clumping, hard clay litter can help buff and sharpen metal tools and axes. Run each blade through the litter several times, then wipe clean.
Plant helper
If you like to decorate your RV’s outdoor space with potted plants, you’ll love how kitty litter can help. You can add kitty litter to soil, and it will assist with moisture retention. You can also sprinkle kitty litter on top of the soil to keep snails and slugs away from your flowers.
Smoker’s solution
Sprinkle non-flammable (clay-based) kitty litter in the bottom of a container. Then use the container like an ashtray. The litter will absorb smells and keep them away, too.
Antiquer’s dream
If you love to collect old books or vintage clothing, you need kitty litter! It can remove any moldy or musty smell. Pour kitty litter into a sealable container. Place your antique treasure inside the box and seal it closed. After a day or so, your books or items will smell much fresher.
What litter is best?
Kitty litter comes in different forms. Many RVers prefer the unscented or fragrance-free litter type. This is because the smell of others can trigger sensitive noses in a confined RV space.
You can also purchase low-dust kitty litter. This litter is usually heat-treated and will keep the air inside your RV cleaner.
Some litter comes in granule form. This is the best litter to use for absorbency, and it leaves minimal tracking inside your rig.
The cost of kitty litter varies. Talk to other RVers who travel with their cats. Ask them for recommendations, if needed.
Final tips
Kitty litter can be a versatile helper when RVing. It won’t take up much space if you empty kitty litter into gallon zip-type plastic bags. Remove excess air and store the bags flat in the bottom of a cupboard or basement area. That way, the kitty litter will be nearby when you need it.
Remember to clearly label your bag (“Not for kitty use!”) and swap it out every few months for peak effectiveness.
We use cookies to ensure that we give you the best experience on our website. By continuing to use our site, you consent to accepting cookies. We NEVER have or will sell reader's data. For more info, please see our privacy policy page.


 The order directs Interior Secretary Doug Burgum to create a plan to raise entrance and recreation pass fees for non-U.S. residents at parks that currently charge for entry. No specific timeline or dollar amounts were announced, but the Interior Department’s 2026 budget proposal estimates such a surcharge could bring in more than $90 million annually.