I LOVE the new Secondz collapsible food containers from Drip EZ. Locking food containers are something I use all the time in my RV as I like to prep ingredients such as chopped veggies in advance for snack and meal prep. My problem used to be where to put all those containers when they weren’t full.
While lightweight, traditional locking food containers take up a lot of kitchen cabinet space, something that’s usually in short supply in RVs.
With the Secondz collapsible food containers, I get all of the function of containers that lock foods inside, but I save 70 percent of the cabinet space that the old containers used to occupy. That’s because they collapse down to pack flat when not in use.
You’ll never lose the lids either, as these lock on during storage, keeping everything together in a space-efficient manner.
What I especially like about Secondz collapsible food containers
• The lids lock tightly, preventing spillage and odor leaks.
• Save a lot of cabinet space.
• Lids stay locked onto the containers even during storage, so that you never have to search for a lid.
• Made from high-quality, food-safe silicone that’s durable, flexible, and built to last.
• Microwave- and dishwasher-safe. Designed for convenience, Secondz transitions effortlessly from freezer to microwave to dishwasher.
• Available in a variety of colors.
• Comes in a set of three containers: one 32-ounce and two 16-ounce.
What can be improved?
It’s more the nature of the beast than a flaw that needs improvement, but putting the lids on collapsible food containers requires some care. It’s different than regular containers that don’t collapse, but once you get the hang of it, it’s not a big deal. Take care not to use too much downward pressure, or you will end up with a collapsed container and food everywhere. This learning curve adjustment is well worth the reward of the saved storage space, so it is not a product flaw, just something to be aware of.
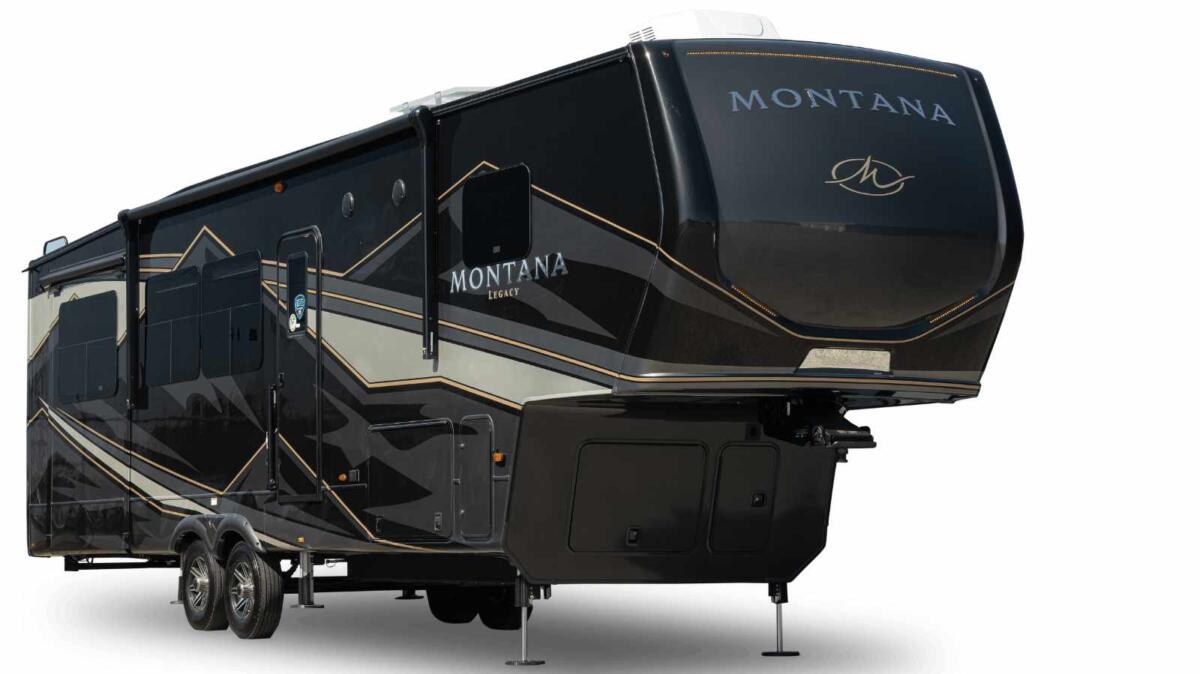
Today’s RV review is of the 2025 Keystone Montana 3123RL fifth wheel. In my virtual travels around social media, I see a lot of people bemoaning the fact that RVs today seem cheaply made. Then they point to their vintage fifth wheel and brag about the cabinetry and some other components.
I get that. And there is validity to that point. But let’s take a look at this Montana and see if that’s universally true.
First, know that there are several iterations of the Keystone Montana based on the options you choose when placing your order.
There is the regular Montana, which ain’t half bad anyway. But then you can get this Legacy Edition package that takes it up several notches.
Built like the old days, but better
Let’s first talk about some of the build methodology in this trailer. The first thing that is apparent is that all the cabinetry is good-old-fashioned sawed-out-of-a-forest wood. Not “lumber core,” which is a wood-like product that gets wrapped with a wood sticker like a 1970s station wagon. Nope. It’s the real deal.
And they pocket screw it all together and then use magnetic catches and soft-close hinges and drawer slides.
Something else inside that really caught my attention is that the furnishings come from La-Z-Boy. For real, actually brand-name furniture. And you can absolutely tell the difference, too. In fact, La-Z-Boy provides a five-year warranty on the fabric of the recliner and folding couch in the back.
But I love using my X-ray vision and looking underneath and behind things, and one of the areas that’s almost always an issue in RVs is the plumbing. I don’t know who thought it was okay to use PEX clamps on flexible lines, but they should be set out to sea and have a plug in their boat made like this. It’ll leak and they’ll sink.
Here, you just find PEX plumbing. Most RVs have PEX plumbing nowadays, but not entirely. There are still some of those incorrectly plumbed flex lines with PEX clamps. The issue is that that combination almost always fails. No real plumber would do that, but RV companies do. But not here.
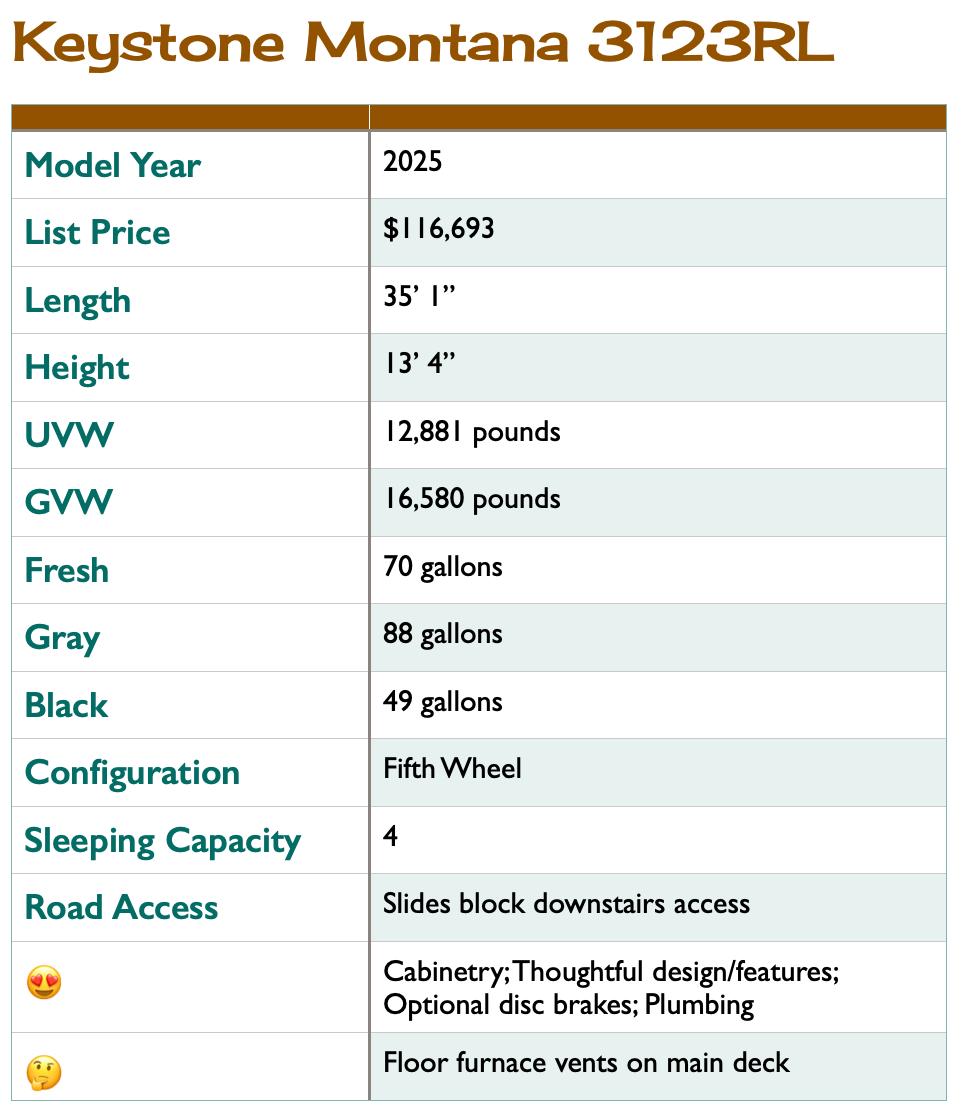
Montana 3123RL - 2025
1 of 11
Keystone Montana fifth wheel in the optional Volcano paint package
Keystone Montana fifth wheel in the optional Sterling paint package
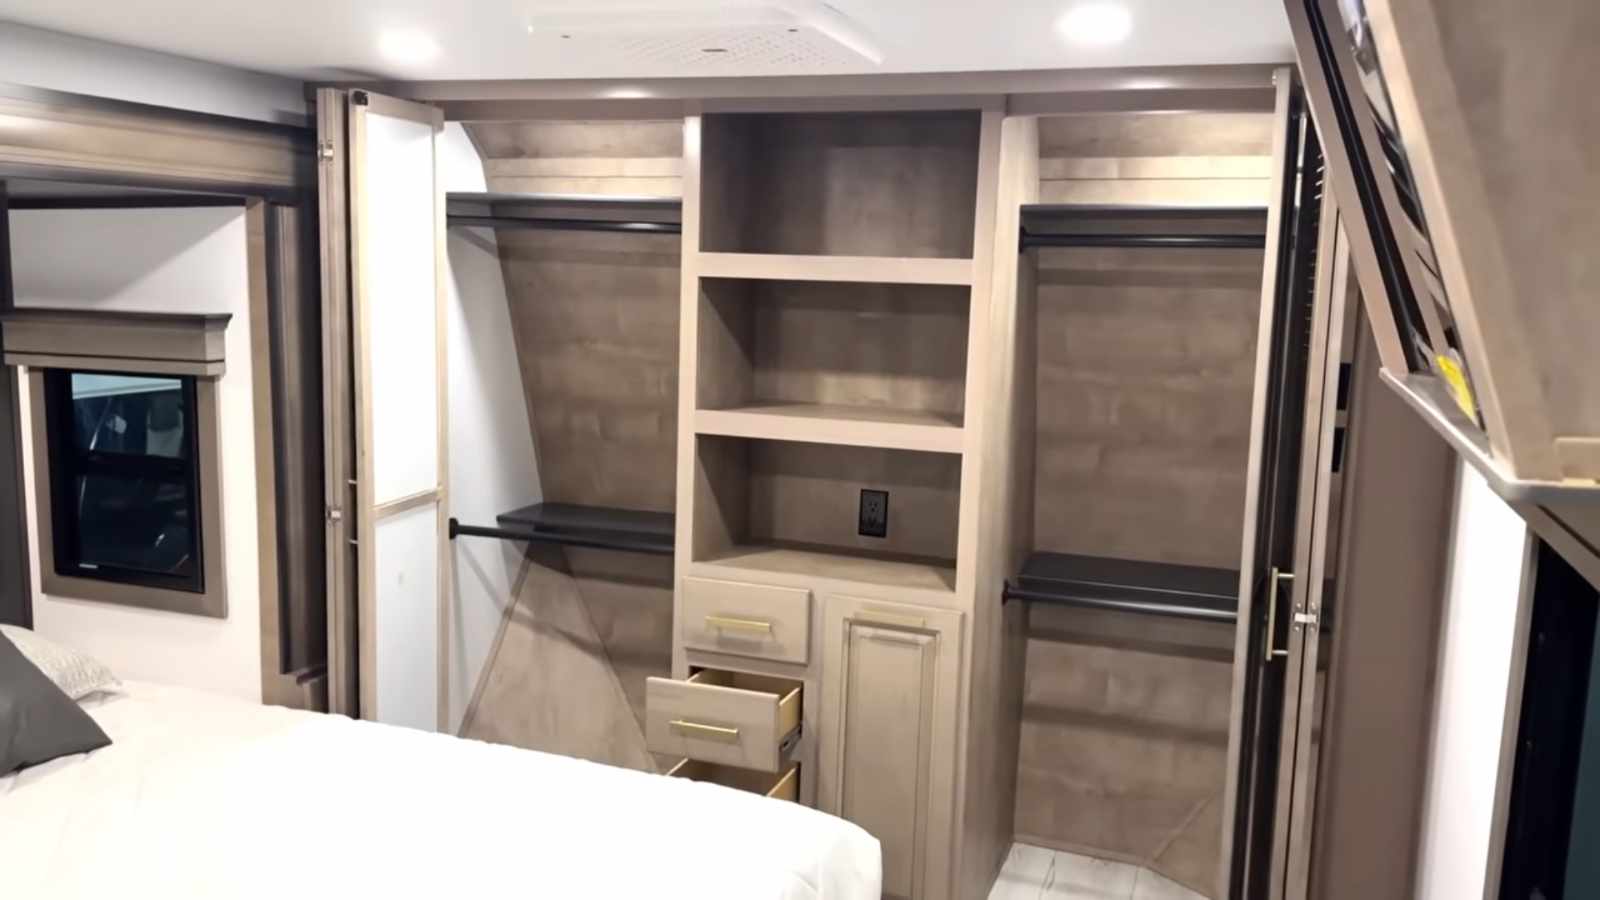
The closet in the nose cap of the Keystone Montana features doors that provide full access to the space
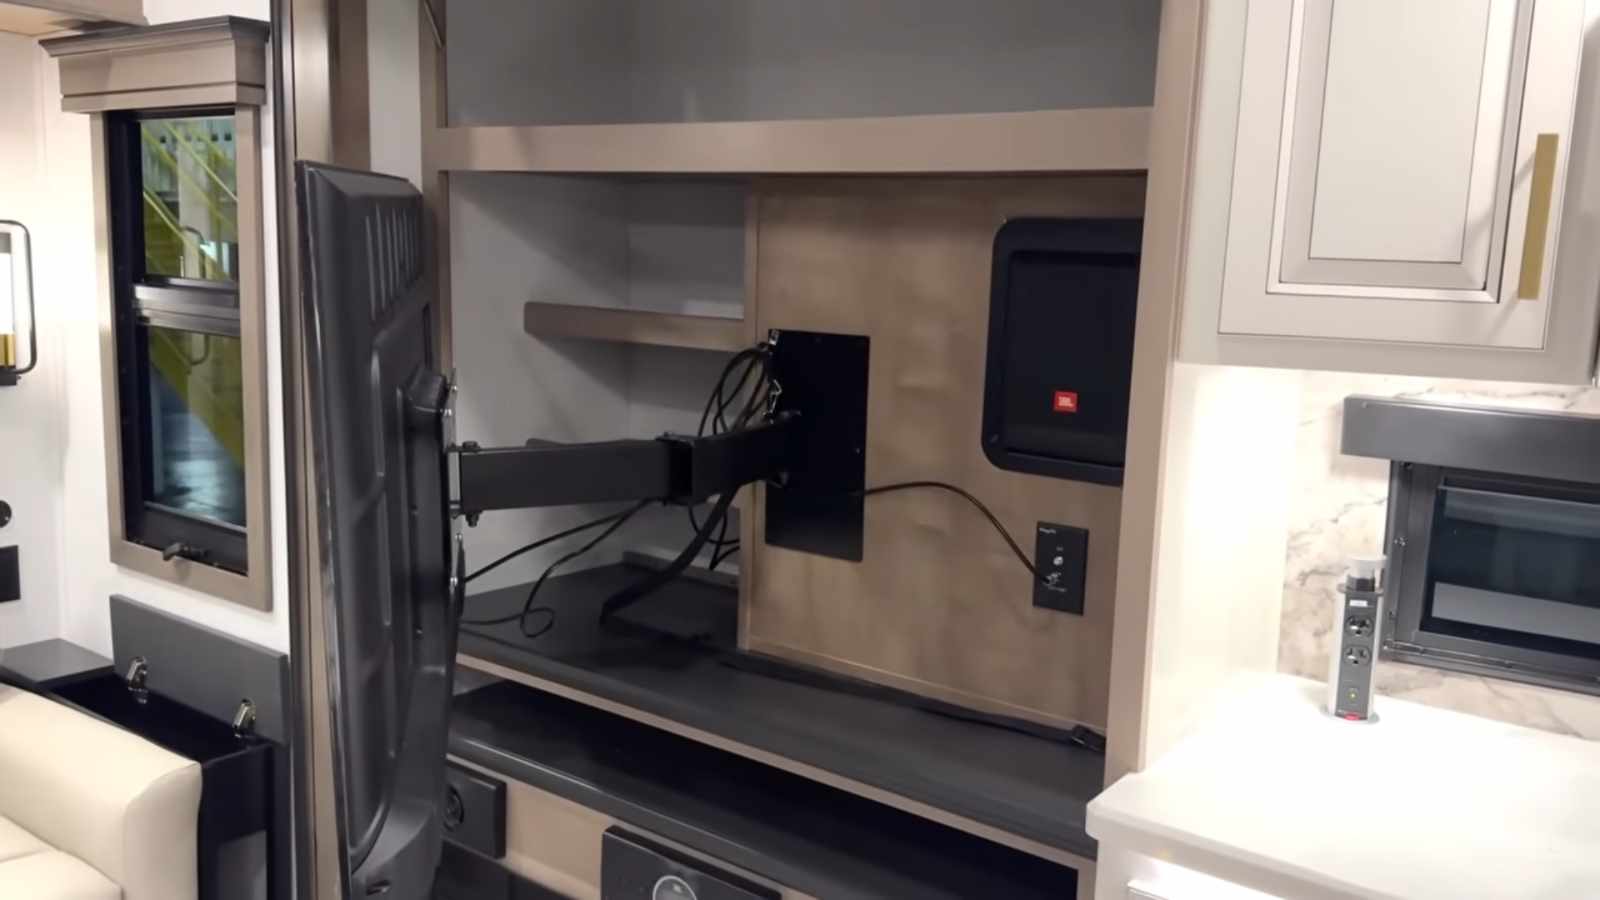
The TV in the Montana 3123RL swings away to reveal a bit more storage
Cabinets on either side of the large stove and oven in the Montana 3123RL feature flexible pantry storage and multiple drawers
Honest review of the Keystone Montana 3123RL fifth wheel
Genuine La-Z-Boy recliners and upscale upholstery
A very usable kitchen with a pantry in the bulkhead of the Keystone Montana 3123RL
A multi-function sink features a variety of inserts plus a glass washer
A surprise under the table - a utensil drawer right where you need it
Examples of good/bad RV plumbing connections
Some options that matter
You know I usually start by looking underneath an RV, but there are some variables here depending on the options chosen.
These Montana models have a package called the Legacy package that is more about technology than looking back, but whatevs.
That Legacy package includes disc brakes. Ohbabyohbabyoh.
Now, many big fifth wheels don’t get much road time in—I see quite a few of them go from the dealer to a seasonal or even permanent site, and, in that case, this upgraded braking system isn’t worth the money.
But if you’re someone who does a lot of traveling, then having better brakes is always a better thing. So the disc brake portion of the Legacy package is worth the price of admission all by itself.
But then you also get side and rear observation cameras, which can make pulling a beast like this through cities an easier task.
Also in that package are electric dump valves and a power-operated cord reel. That’s pretty cool. And there’s also a surge protector included. That package ain’t cheap, but it’s got lots of things many of us add.
Lastly, it comes with the iN-Command® control system. This is a touch control-based system that operates and monitors much of what’s in this trailer. Seems funny that the package is called Legacy, but it includes some of the more advanced features. Perhaps the dictionary had the day off—I don’t know.
Kitchen in the Montana 3123RL
If you’re going to be full-timing in a fifth wheel, this is one nice place to cook up some vittles. The storage and appliances in here are all pretty first-rate.
There’s a three-burner propane stove with a large oven, which is flanked by drawers on one side and a pull-out storage compartment on the other that has adjustable shelving in it. There’s also a large pantry on the bulkhead of the space and more storage in the island.
On the island, you won’t find Gilligan, but you will find a multi-function sink that incorporates a glass rinser. Counter space overall is good, both beside the stove and here on the island.
There are two options for keeping things cool here. The standard is a residential 20-cubic-foot refrigerator, which also includes a 2,000-watt inverter so you can use it on battery power. But you can also get an 18-cubic-foot, 12-volt refrigerator. I’ll admit that I’m biased. Modern appliances in general aren’t all that great, but I feel that the 12-volt models are better suited to the RV environment.
Another appliance in here is a central vacuum system that includes a kick-on dust pan feature.
One of the unusual things in the storage compartment at the front of the living space is a drop-down storage bin over the main pantry area. This metal drop-down storage is nifty and all, but I wonder if just a step ladder might make more sense? I don’t know.
Something else I like is the utensil drawer that’s underneath the dining table. Makes sense—this is where you’re going to use these utensils and, bam, there they are.
More living spaces
The bathroom upstairs has decent storage, and there’s a good sink and a porcelain toilet—as it should be. There’s also a high-performance vent fan, of course. That features a rain-sensing component so you could leave it running fumes even if there might be some rain.
The bedroom features a king bed as standard equipment, which is located in a slide room.
Up front, the closet is something you might expect, but the doors open such that you can fully access the entire closet rather than shuffling sliding doors.
And that closet door design is just a very good example of some of the attention to detail in this fifth wheel. Over and over, it’s clear that the folks at Keystone were really paying attention to usability features and also build quality features.
For example, the central air conditioning system uses standard filters, so you can just go to your local hardware store when it’s time to replace them. Considering that many of us go to dusty places or places with a lot of pollen, yet most RV A/C systems don’t have much filtration, this is refreshing.
A few more things
This fifth wheel starts out at a higher price tag, which makes sense. You get a lot of value, in my opinion, and that value is represented in things that make a difference.
But then you can go nuts with options. For example, you can get full body paint, but that’s going to add $9,750 to the price. I like the idea of full-body paint, but why, why, why, why do all RV companies that do this not offer one choice that isn’t carnival float swishy swirls? Who among us is asking for this? We want the nice paint, but why does it have to look like a float in Mardi Gras? And then we’re paying almost ten grand for this!
I had written that the Legacy package comes with a lot of useful things, and it’s not cheap at $8,800, but it’ll cost you a lot to have just the disc brakes added in the aftermarket. The price for that package seems worth it, but that’s to me.
Lastly, you can outfit this with some legitimate solar power features. At the top is a system with 1,320 watts of solar, but which also includes 540 amp hours of battery storage along with soft starts on the air conditioners and a lot of premium components overall. This is not significantly different than the system I put in my own trailer, and the MSRP of their SolarFlex Outlast Extreme 1320I-L package of $18,930 is not out of line considering what it comes with. There are also many less capable and significantly less expensive solar packages.
Conclusions about the Keystone Montana 3123RL fifth wheel
Is this fifth wheel perfect? Nope. Nothing is. And something that annoyed me was the furnace ducts cut into the floor of the trailer. Bleh. I wish they were up on the cabinets.
But there is so much right with this trailer, starting with the materials being used and just the thinking that went into the design of the interior.
Keystone also certifies and tests this trailer by using a climate chamber for 48 hours at 0°F. Cool.
So while lots of newer kids on the block are making a lot of noise about their offerings, I think that there are still a lot of reasons to consider a Montana if you’re looking for an upscale fifth wheel that might even become something you live in full time.
My thanks to Josh from Bish’s RV for the video in this article.
These RV reviews are written based on information provided by the manufacturers along with our writer’s own research. They are based on information from a single unit and may not reflect your actual experience. Shop your RV and dealership carefully before making a buying decision. They are intended only as a brief overview of the vehicle, not a comprehensive critique, which would require a thorough inspection and/or test drive.
Tony comes to RVtravel.com having worked at an RV dealership and been a lifelong RV enthusiast. He also has written the syndicated Curbside column about cars.
You can also check out Tony and Peggy’s RV podcast.
By Cheri Sicard
Ever dreamed of van life without the obvious camper look? The team from Love Sundays offers a unique approach with their stealth camper van, disguised as a typical construction vehicle. This video explores the ingenious conversion, taking a detailed tour of the van’s interior and highlighting its many space-saving features.
The exterior of the Love Sundays van is all about blending in. The goal is simple: to park in more places without drawing unwanted attention or facing restrictions. Several modifications help achieve this disguise.
• Construction company signage is magnetically attached, making it easily removable when needed.
• A ladder adds to the builder’s van aesthetic.
• Cameras are strategically hidden.
• The dashboard features “stuff,” including a high-vis jacket and hard hat.
• The van has no windows.
• Even the wheel trims have been removed to give it a more rundown appearance.
• A 200W solar panel is installed, but it is carefully positioned to remain hidden from view, maintaining the stealthy look.
Unlike most camper vans, the entry point is through the front. This leads directly into the cab, and then through a partition door. The partition door is key. It completely separates the living space from the front cab and the outside world. This adds an extra layer of security and privacy. Once inside, it’s easy to forget that you’re in a stealth camper van.
The van is equipped with a BLUETTI AC240 power station. It is located behind the partition and powers the diesel heater, 240V sockets, and 12V sockets.
Inside the van
The kitchen setup is compact but functional. A sink with a cold water tap is provided, and a kettle is available for hot water. The pull-out cooker uses gas. A 12V fridge is compact and efficient. Creative storage solutions maximize every inch of space. Chopping boards, plates, bowls, and even a dustpan have dedicated spots. Wedges keep items from sliding while driving, and trays hold food items. There is also a spot for bin bags. Grill plates can be put on top of the cooker. An air fryer was initially included, but it might be removed due to its high power consumption.
The TV uses a personal hotspot from a mobile phone for internet access, allowing viewing of Netflix, Amazon Prime, and YouTube. Internet connectivity can vary depending on the location. A PlayStation 4 is hidden away for entertainment in areas with no internet. The reading light has a convenient switch for nighttime use.
The cushions double as pillows, and they also have sleeping bags in them. Both single and double bed configurations are possible.
More storage is hidden beneath the seating area. You can access it through the side door or from the top by lifting the bench.
The storage for outdoor equipment is accessible from the back doors. Mesh netting holds storage bags. Gear includes a sleeping bag, a camp chair, a two-man tent, towels, a collapsible table, an air bed, and a camp pillow. A portable shower can be used.
The goal is to park in more places without restrictions. The stealth camper van offers the ability to blend in. I think they certainly accomplished this.
Be sure to leave your thoughts in the comments below. Would you camp out of a “construction van?”
All aboard! If you love trains, you’ll love these railroad destinations! They are four of the best in the Eastern United States. Plan your RV railroad trip today.
Nestled between Buffalo and Rochester, this museum boasts one of New York’s largest model-train layouts (204 ft. x 14 ft.). You’ll also see full-size locomotives and passenger cars. You can take a train ride Wednesday through Sunday for just $9 adults and $7 youth.
The museum’s living history excursions depart from 530 West Avenue, offering a hands-on glimpse of 19th- and 20th-century railroading in Western New York.
Celebrating America’s oldest common-carrier railroad, the B&O houses more than 250 historic objects. Among them is the inaugural “Tom Thumb” locomotive replica, located within its landmark 1884 roundhouse.
Highlights include the “Rebuilding the Cathedral of American Railroading” tour, chronicling the museum’s own 2003 roof collapse and restoration.
Operated by the Adirondack Railway Preservation Society, this year-round scenic line winds through the Adirondack Park. It offers four-hour Polar Express rides in winter and spring excursions past the Black River Valley.
Departures from historic Union Station in Utica include narrated tours that blend history and wilderness vistas.
As the nation’s oldest continuously operating railroad (since 1832), Strasburg delights with authentic steam-train journeys. Visitors will ride through Amish farmlands, with first-class dining and open-air coach options.
On-site exhibits showcase restored cabooses, passenger cars, and working shops where craftsmen maintain live-steam engines.
By Andrew Herrick
Alphabet soup is hard to choke down, I know. But if you can stomach the acronyms for a few minutes, I think you’ll learn something important about your RV’s weight capacity—and maybe save yourself a tire blowout along the way.
Today’s question: Why does yourRV’s GVWR not match its GAWR?In other words, why is your RV allowed to weigh more or less than what the axles can carry alone?
Definitions of GVWR and GAWR for RVs
As you probably know, Gross Vehicle Weight Rating (GVWR)—also known as Gross Trailer Weight Rating (GTWR) for towables—is the maximum allowable weight of your RV with all cargo and passengers. This number is determined by the RV and/or chassis manufacturer. Your actual weight can never, ever exceed the GVWR.
Example: Your 2023 Winnebago Travato 59G has a GVWR of 9,350 lbs. No matter what, your Travato plus all cargo and passengers can never weigh more than 9,350 lbs.
Helpful Hint: GVWR is also equal to Unloaded Vehicle Weight + Cargo Capacity. You can find the GVWR and GAWR on your VIN sticker, usually located on your driver’s door jamb or front exterior roadside wall.
As you also probably know, Gross Axle Weight Rating (GAWR) is the maximum allowable weight placed on an axle, including all cargo and passengers. Each axle has its own GAWR. This is determined by the axle manufacturer, and it doesn’t include unsprung weight like tires and brakes.
Example: Your 2023 Winnebago Travato has two axles: a front and a rear. The front axle has a GAWR of 4,629 lbs. The rear axle has a GAWR of 5,291 lbs.
Helpful Hint: In motorhomes, the front axle’s GAWR is normally referred to as the FGAWR. The rear axle’s GAWR is the RGAWR. In travel trailers and 5th wheels with multiple axles, the multiple axles’ GAWRs can be summed into a Combined GAWR—as long as the axles are properly equalized!
Why RV GVWR is greater than GAWR?
If you’re quick at math, you probably noticed that the Travato’s GVWR of 9,350 lbs. is less than the sum of its axles: 4,629 + 5,291 = 9,920, not 9,350! What happened to the missing 570 lbs.?
Don’t be exiting the room if you have a travel trailer or 5th wheel. You probably have the opposite conundrum. Your GVWR is probably more than your combined GAWR, not less! (Unless you’re towing a triple-axle 5th wheel, in which case it’s probably less. Confused yet?)
Click to enlarge.
Example: Check out this information from a dual-axle 2023 Brinkley 5th wheel (see below). Each axle has a 7,000 lb. GAWR, for a combined GAWR of 14,000 lbs. But, then why is the GVWR 14,495? Where did the extra 495 lbs. capacity come from?
It’s not magic. It’s math.
What Uncle Sam has to say about GVWR
Federal law restricts how GVWR should be calculated. Per CFR 49 571.120 and 571.110 in the FMVSS (Federal Motor Vehicle Safety Standards):
S9.1 On motor homes, the sum of the gross axle weight ratings (GAWR) of all axles on the vehicle must not be less than the gross vehicle weight rating (GVWR).
S9.2 On RV trailers, the sum of the GAWRs of all axles on the vehicle plus the vehicle manufacturer’s recommended tongue weight must not be less than the GVWR.
Translation: For motorhomes, GVWR cannot be greater than the combined weight ratings of the axles! For trailers, however, GVWR can be greater than combined GAWR. That’s why RV GVWR is greater than GAWR.
So, if federal law allows the GVWR of a motorhome to be equal to the combined GAWR, why did Winnebago specify a smaller GVWR?
Well, I don’t work for Winnebago, so I don’t know. But it could be a number of reasons. The GVWR is the maximum allowable weight an RV can safely weigh. Maybe the brakes were maxed out at 9,350 lbs. instead of 9,920 lbs.? Maybe it was the strength of the chassis rails or the durability of the transmission? I haven’t a clue. But the limiting factor came before the GAWRs, whatever it was.
Next question: Why does the Brinkley 5th wheel get an extra 495 lbs. of GVWR?
Well, if you read the FMVSS regulation carefully, it says the GVWR can include the manufacturer’s recommended tongue weight. If we pause and think, this makes intuitive sense. The tongue weight of a camper is on the hitch or tongue jack, not the axles! So it doesn’t count toward GAWR.
But the code goes on to say this: “If tongue weight is specified as a range, the minimum value must be used.”
In other words, Uncle Sam will only allow RV manufacturers to use the most conservative estimate. As a rule of thumb, for travel trailers, we assume ranges of 10-15% tongue weight, and for 5th wheels, we usually assume 15-25%. So you’ll rarely see a GVWR greater than 110% GAWR for a travel trailer or 115% GAWR for a 5th wheel.
But again, if you’re quick at math, you probably noticed that 449 lbs. isn’t anywhere close to 15% of the total weight of the Brinkley fifth-wheel RV. Why did Brinkley err on the conservative side? Maybe they were concerned about the strength of the frame? Maybe they wanted to limit cargo capacity because of weight distribution? Again, I haven’t a clue. But the limiting factor came before the combined GAWR, whatever it was.
Key takeaways about GAWR
Now that you’re armed with all this new information about why RV GVWR is greater than GAWR, what should you do with it?
• You can gut-check the factory numbers. For instance, if a 5th wheel manufacturer says GVWR is equal to 135% of GAWR, that should raise a red flag. That’s well outside of normal.
• You should double-check your side-to-side weight distribution. The math doesn’t check this for you. It’s not uncommon, particularly for motorhomes, to have one tire overloaded, even if you’re within your GVWR.
• You should load your tongue correctly. If you underload your tongue, you could max out your axle capacity before your GVWR.
• You should avoid traveling at your maximum GVWR because that may mean you’re also maxing out your axles. Leave yourself a buffer, if possible.
It’s also worth pointing that politics, not just engineering, may play a role. In some states, 3,000 lbs. GVWR is the cutoff for brake requirements, so many utility trailers are sold with a 2,990 lb. GVWR. Also, in some states, any trailer over 10,000 lb. GVWR requires additional taxes, regulations, or driver’s licensing.
The Tin Can Tourists (TCT) club holds a special place in the history of RV culture. I was eager to learn more about it!
The formation of the Tin Can Tourists club in 1919 marked the beginning of a communal spirit among auto campers. What started as a way for folks to band together for safer, cleaner, and friendlier camping experiences quickly evolved into a movement that helped shape the modern RV culture.
Origin of America’s first RV club?
Photo: tincantourists.com
I love the name: Tin Can Tourists. RVers love a good road story, and the tale behind the name “Tin Can Tourists” is as quirky and charming as a vintage trailer itself.
Over a hundred years, details can blur into folklore, so I was determined to find out where the “tin can” in Tin Can Tourists originated.
Truth or tall tale?
There have been plenty of stories tossed around over the decades. Some say that early campers were dubbed “tin can tourists” because they relied on canned food during long journeys. Remember, back then, refrigeration was not all that common. Many foods that travelers packed for their journeys were routinely stored inside tin cans.
Another rumor about the group’s name said that Tin Can Tourists came from a clever marketing idea. Members of the Tin Can Tourists were said to attach an actual tin can to their radiators as a recognizable sign of club membership. Certain fuel stations recognized the tin can and rewarded group members with discounts on gasoline.
Photo: flhistoriccapitol.gov
Some say the ‘tin can’ in Tin Can Tourists was a reference to the travel trailers themselves. Because they were fashioned from metal and looked somewhat similar to a tin can, the name was an obvious choice!
If these are only rumors or legendary stories, where did the name Tin Can Tourists actually originate?
The verified story
A 1919 diary entry from an original club member, Ms. William Austin, clears up much of the mystery. According to her diary, TCT founders chose the name “Tin Can Tourists” to pay tribute to the only vehicle dependable enough for those long, adventurous trips. That would be the Ford Model T, affectionately known as the “Tin Lizzie.”
This account not only explains the “tin can” part of the club’s name but also reflects the pioneering mindset of America’s earliest RV enthusiasts.
Core principles and activities
The Tin Can Tourists’ primary objectives were to provide safe and clean camping areas, offer wholesome entertainment, and uphold high moral values.
The TCT organized regular gatherings, known as homecomings or conventions. At these gatherings, members participated in social activities, shared travel stories, and fostered relationships with one another. To me, the group’s gatherings seem like a foreshadowing of today’s RV rallies or meetups.
Meeting locations and significance
Florida, with its favorable climate, became a popular destination for TCT’s winter conventions. Cities like Tampa, Sarasota, and Gainesville hosted these events. In the summertime, Tin Can Tourists gathered in Michigan because of its cooler, more pleasant temperatures.
These larger gatherings helped unite TCT members. Nonmembers took notice, of course, and club membership grew. Meetups also boosted the local host economies by attracting tourists and promoting infrastructure development.
Legacy and modern-day TCT
After a years-long period of dormancy, the Tin Can Tourists was revitalized. The modern TCT welcomes all vintage trailer and motorhome enthusiasts, organizing rallies and events across the country. These gatherings celebrate the rich history of the RV culture. They allow members to showcase their restored vehicles and share their passion with others.
For anyone who lives for the freedom of the open highway, the story of the Tin Can Tourists is more than just historical trivia—it’s an inspiration. It shows us that even when resources were limited and the roads were rugged, a community could emerge by embracing creativity and resilience. The legacy of those early road warriors continues to fuel today’s culture of exploration, making every modern RV trip a nod to the past.
Not all that different
While our rigs now boast all the comforts of home—from high-tech navigation to luxurious interiors—the spirit of hitting the open road, embracing community, and overcoming challenges remains unchanged. It’s a reminder that sometimes, a little bit of tin (and a lot of heart) can set you on the road to unforgettable adventures.
So, the next time you set off on an RV road trip, take a moment to appreciate the Tin Can Tourists. These pioneers relied on nothing more than a trusty Model T to chase down their dreams. Their legacy is still alive in every mile of open road and every campfire shared under a starry sky.
Where do you prefer to stay with your RV, in a scenic, primitive (no hookups) public campground, like those offered on BLM lands or by the U.S. Forest Service, or in a nondescript but clean RV park with full hookups?
Do you like to get away from the crowds in a beautiful out-of-the-way campground, maybe by a lake or along a river, even if you have to drive a few miles on a dirt road to get there? Or is your cup of tea a full-hookup RV park with all the amenities—maybe even swimming pool, or a hot tub or golf course in a fancy place?
Or do you prefer to get away from crowds entirely by squatting for a few days or longer on public lands—like in the sparsely populated deserts of the Southwest?
Or, heck, maybe you’re on a tight budget and holing up overnight in a quiet corner of a Walmart parking lot will do just fine.
Please let us know. And, as always, your civil, respectful comments are invited.
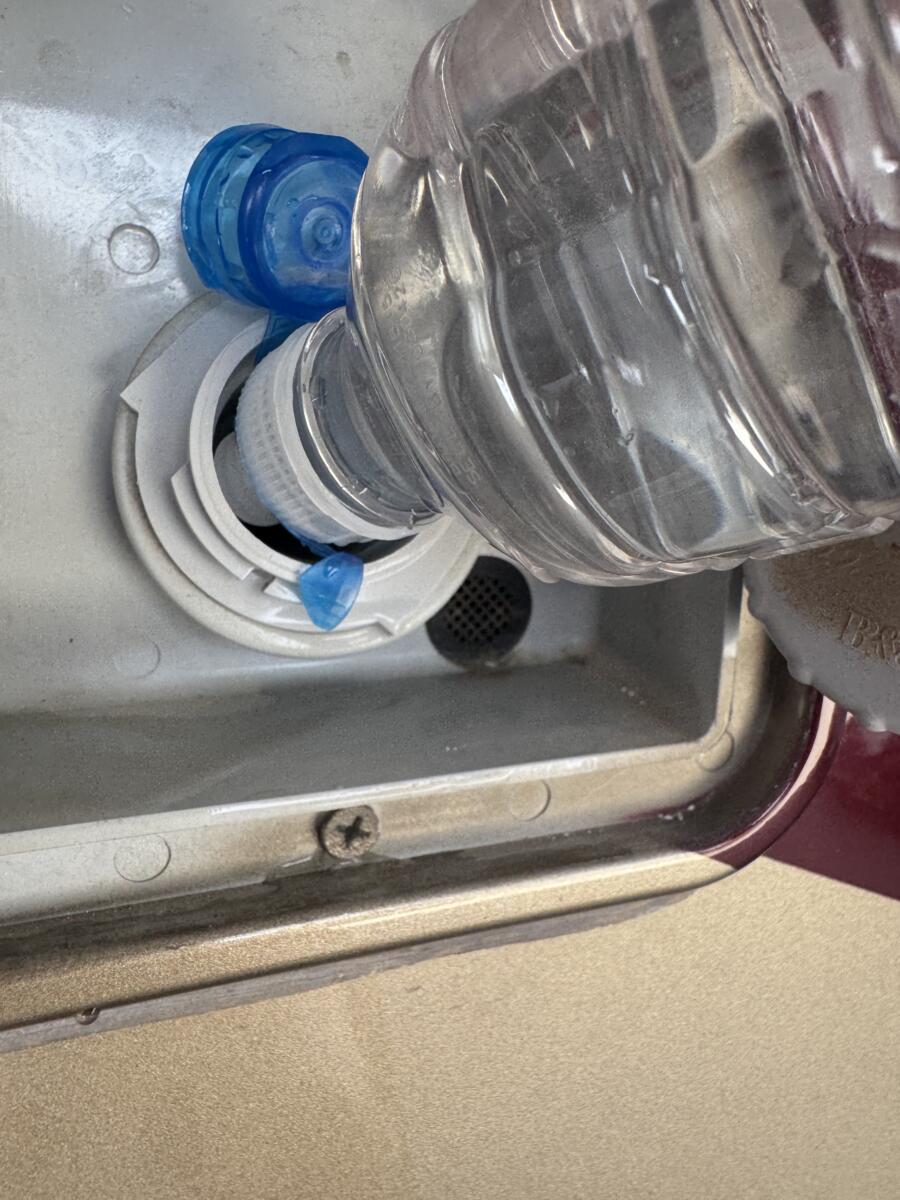
After more than 20 years of sanitizing our various RVs, I have a set of “bleaching clothes”—clothes I have destroyed while trying to pour bleach into the RV’s fresh water tank. Every time I think I will be extra careful and won’t spill a few deadly drips of bleach, I add another outfit to the pile.
While there are some great gadgets on the market to add bleach, I have finally hit upon a simple, no-mess solution. I found that a small water bottle with a drink top works perfectly.
I put a marker line with the right amount of bleach for our RV on it, then fill to the line with bleach, add water, and shake.
I can simply squeeze the soft water bottle and add the solution to the RV. No mess. No dripping bleach down my hands, clothes, and feet! I do, however, still wear my bleach clothes.
Everyone knows the harmful effects of UV rays on the skin, but not many people realize that those same UV sunlight rays are causing damage and degrading your RV, too.
When you love something, it shows. That’s why I recommend that you use 303 UV treatment on all items on the roof.
For example, you use the 303 RV Care Kit to wash and seal, along with the roof clean and black streak remover, and apply it to the roof air conditioning covers, vent lids, vent lid seals, vent covers, skylights, antennas’ domes, satellites’ domes, awning motor covers, awning fabrics, slide out topper fabrics, plumbing vents, attic vents, rain gutters, and insert moldings, i.e., anything that’s vinyl, plastic or rubber and more.
Anything on the roof surface that’s plastic, vinyl or rubber.
Other areas on the RV that we recommend using the care kit on is on the slide out corner caps, molding transitions and corners, window seals, light lens, refrigerator exterior covers, stove vents, decals, compartment door seals, fender skirts and anything else that’s vinyl, plastic or rubber.
It should be applied to the awning vinyl fabrics on a regular basis to prevent damage.
Using these products will help preserve the color and protect the plastic from sun damage. At the end of the day, protecting your RV means protecting its resale value, because we all know that functionality and appearance are everything.
Every now and then, we like to venture off the beaten path (aka interstates) to take a road less traveled. Often, these intentional detours bring whimsy and delight to an otherwise ho-hum RV trip. Why? Roadside attractions and oddities, of course!
Offbeat pit-stops are everywhere, but here are some unusual sights you can see in the Northeast U.S.
Note: Before heading out, note that many of these sites welcome RV parking, but it’s best to check ahead. Plan to enjoy each stop with 30–60 minutes carved into your itinerary.
Now, let’s dive in!
Sit on Einstein’s lap (Washington, D.C.)
Just off the National Mall at the National Academy of Sciences sits a 12-foot bronze Einstein beckoning visitors to climb up and perch on his bench for the ultimate nerd selfie.
Cost and hours
• Free—outdoor memorial open daily, dawn to dusk.
• Visitor ID or appointment only required for building access; the statue itself is freely accessible.
What you’ll see
• A larger-than-life Einstein with engraved quotes on the granite bench.
• Surrounding grove of elm and holly trees—a peaceful hideaway amid the city bustle.
Tour time
Plan 15–30 minutes for photos, reading inscriptions, and a quick stroll.
Nearby must-dos
• Smithsonian National Museum of Natural History (a 5-minute walk to get there)—explore gems, dinosaur fossils, and more.
• Lunch at the Pavilion Café on the National Gallery terrace—light bites with a Mall view.
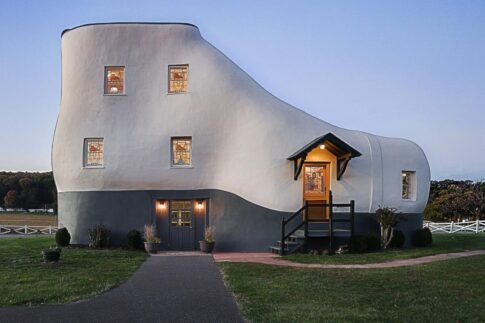
The Haines Shoe House (York, PA)
Photo: The Haines Shoe House
Channel your inner nursery-rhyme character at this 1948 “work boot”.
UPDATE: The Haines Shoe House is no longer open for tours, but you can rent it through Airbnb.
Nearby must-dos
• Prospect Hill Cemetery and Picket Statue (5 mi. northeast)—Civil War monument walk.
• The First Post Restaurant (2 mi.)—classic Pennsylvania diner fare.
PEZ Visitor Center (Orange, CT)
Get your sugar fix at the world’s largest PEZ dispenser and peek into the history of this popular candy.
Cost and hours
• Self-guided admission: $5 adults; $4 (ages 3–12, 60 and +); under 3 free.
• Open daily 10 a.m.–5 p.m.
What you’ll see
• More than 4,000 sq. ft. of PEZ memorabilia, from classic dispensers to a motorcycle made of PEZ heads.
• Viewing windows into the production floor and trivia kiosks.
Tour time
• 30–45 minutes for the exhibits, interactive games, and shopping.
• Hammonasset Beach State Park (15 mi. south)—coastal boardwalk and salt-marsh hikes.
Wild Blueberry Land (Columbia Falls, ME)
Embrace all things berry at this family-run farm, where you can taste pies and shop Maine–made goods.
Cost and hours
Free admission to gift shop, mini-museum, and farm grounds; purchases extra.
Seasonal hours: Thurs.–Mon., 10 a.m.–3 p.m. (mid-summer only; check site before visiting).
What you’ll see
• Gift shop with syrups, truffles, and blueberry tea.
• On-site bakery café serving blueberry pie and scones.
Tour time
Plan for 45–60 minutes to browse, snack, and photograph the Pleasant River views.
Nearby must-dos
• Downeast Sunrise Trail—scenic riverside walk (0.5 mi. north).
• Ruggles House Museum (2 mi.)—local heritage site with guided tours.
The Fantastic Umbrella Factory (Charlestown, RI)
Step into a hippy-bazaar on a former dairy farm, complete with statuary, a petting zoo, and artisan stalls. (Note: Not just umbrellas!)
Cost and hours
• Free to wander gardens and shops; pay only for feed or crafts you buy.
• Open year-round, daily 10 a.m.–5 p.m.
What you’ll see
• Eclectic boutiques selling vintage-style clothing, candles, and pottery.
• Bamboo forest paths, emus, chickens, and local artwork.
Tour time
Allow 1–2 hours to meander through gardens, browse vendors, and snap quirky sights.
Nearby must-dos
• Matunuck Oyster Bar (5 mi. north)—fresh Rhode Island oysters and waterfront dining. [UPDATE: Closed temporarily due to devastating fire on May 20, 2025.)
• Ninigret Conservation Area (3 mi. west)—salt-pond wildlife refuge with easy trails.
Bottom line
These five roadside attractions and oddities promise pocket-change fees, unbeatable photo ops, and detours that are anything but dull.
Do you know of any more odd roadside attractions in the Northeast? Tell me about your favorites in the comments below.
Should you “plug” your tire to repair it? This question is an oldie but a goody. I was just asked again about plugging tires.
This is a very important post. Improper repair can lead to a false sense of security and even to a tire failure, which can cause damage or even injury. Please read this entire post.
I recently read a statement that could be misleading, as the actions suggested are not supported by any of the major tire manufacturers or the National Highway Traffic Safety Administration aka NHTSA.
The writer said that “plugging a tire can work well.” This is just as true as making a statement that you can play “Russian Roulette” and survive, or you can beat the odds in Vegas, or you can survive jumping out of a plane without a parachute.
Guidelines for the proper repair of a tire for highway use are available from a number of sources.
Guidelines from NHTSA
Your well-being may depend on following these guidelines from NHTSA.
The proper repair of a punctured tire requires a plug for the hole and a patch for the area inside the tire that surrounds the puncture hole. Punctures through the tread can be repaired if they are not too large, but punctures to the sidewall should not be repaired. Tires must be removed from the rim to be properly inspected before being plugged and patched.
Goodyear’s guidelines
If you don’t trust NHTSA, how about Goodyear?
It is crucial to know when it is okay to have a tire repaired and when a tire should be replaced. If a tire loses its air pressure, it must be removed from the wheel for a complete internal inspection to be sure it is not damaged. Tires that are run even a short distance while flat are often damaged beyond repair.
Most punctures, nail holes, or cuts up to 1/4 inch can be repaired by trained technicians as long as the damage is confined to the tread. DO NOT repair any sidewall puncture. Most tire repairs should be handled by trained professionals.
Guidelines from Michelin
If you don’t like Goodyear, maybe Michelin?
There is a good chance that your tire can be repaired if:
1. The tire has not been driven on when flat
2. The damage is only on the tread section of your tire
3. The puncture is less than ¼”
However, you need to have an authorized tire retailer or technician remove the tire from the wheel and inspect the tire from the inside. This inspection is absolutely necessary because internal damage is not visible while the tire is mounted.
The proper way to have a tire repaired is to patch the tire from the inside and fill the puncture hole. If someone offers you a plug repair, refuse! Plug repairs do not involve taking the tire off the wheel for a proper inspection. A plug is simply inserted into the puncture area. Plug repairs are not reliable and can lead to tire failure. Insist on a full inspection and patch and fill repair on the inside of the tire.
NOTE: “Flat” in this context means when the tire has lost 20% or more of the inflation required to support the actual load on the tire.
Bridgestone/Firestone guidelines
OK, not Michelin? Then maybe Bridgestone/Firestone?
Tread punctures or penetrations left unrepaired may cause irreversible tire damage.
An improper repair can damage the tire and will void the warranty.
Combination patch/stem repair. Steel cord damage must be repaired immediately to prevent rusting of the steel. Using plugs or patches alone on any type of tire is not a safe repair.
Examples of “repairs”
Here is an example of a tire with three plugs. The owner also used a sealant that goes through the valve, all in an effort to save a couple of bucks.
NOTE: “Fix-A-Flat” is used as a generic term for material injected into a tire through the puncture hole or through the valve stem.
In this example, you can see the cracks (black lines that I highlighted with a silver ink marker) through the interior rubber of the tire from driving hundreds of miles on an under-inflated tire.
Click to enlarge.
This tire below had a piece of wire sticking into the air chamber. You can see where it was wearing through the interior. You can also see the stuff from the “string” repair that was applied from the outside of the tire.
Click to enlarge.
None of these “repaired” tires were dismounted as instructed by tire manufacturers. Each had a cheap, improper plug repair made by someone who thought they knew something about tires. I will leave it up to you to judge the quality of the suggestion that a plug is an acceptable repair and “can work well”.
As you can tell, this topic is a “Hot Button” for me as I have seen entirely too many improper repairs done by the uninformed in the name of saving a couple of bucks.
Roger Marble
If you still have a question for Roger after searching the above posts, send your inquiries to him using the form below.
“She’s really a great companion,” one campground neighbor explained. “I just can’t stand the smell! She’s been bathed and groomed. I’ve washed her bed and replaced all of her toys with new ones. Why do I still have a stinky, smelly dog?”
Why indeed? If your RV traveling pup is odiferous—and not in a good way—maybe you need to investigate some of the common causes of dog odor; find practical tips to treat and prevent smells; and discover some RV‐specific advice to help keep your pup—and your living space—smelling great.
Why do dogs smell?
Dogs naturally produce odors that arise from their skin’s oils and the normal bacteria and yeast that live on their coats, ears, and paws. However, when you notice an unusually strong or unpleasant smell, it may be due to one (or more) of the following factors:
• Skin infections and allergies: An excess of bacterial or yeast growth on inflamed skin can lead to a “funky” odor. Allergies, often triggered by environmental or dietary factors, can worsen this condition, causing your dog’s skin to produce more oils than normal.
• Ear infections: Bacteria or yeast can accumulate in your dog’s ear canals. This can cause a pronounced yeasty or “sewage-like” smell. This is more common in breeds with floppy ears where moisture gets trapped.
• Dental disease: Poor oral hygiene can cause the buildup of plaque and tartar. This can lead to bad breath that might carry into your dog’s overall scent.
• Anal gland issues: Dogs have two anal glands that naturally secrete a smelly fluid to mark territory. If these glands become impacted or infected, they can produce an overpowering, fishy odor.
• Environmental factors: Dogs love to explore—rolling in mud, water, or even less-pleasant substances like decaying matter. Ugh! For RVers, dust, pollen, and even the confined space of your mobile home can sometimes contribute to the buildup of odor.
Experts agree that bathing is the key to controlling most doggy odor. If your dog still smells after a bath, it may signal an underlying condition. Contact your (or a local) vet and have your pup checked out.
Treat and prevent odors
So, the bad news is that your doggo is stinky. The good news is that there are treatments to address the odor and prevent it in the future, too.
• Bathing: Bathe your dog with a gentle, dog‐specific shampoo. For breeds prone to skin allergies, therapeutic shampoos with oatmeal or aloe vera can help soothe irritation and reduce bacterial overgrowth. Be careful not to over-bathe, as this can strip natural oils and lead to further dryness or irritation.
• Brushing: Regular brushing not only helps distribute natural oils but also removes loose fur and dirt that might trap odors. This is particularly helpful for long-haired breeds.
• Dry thoroughly: After any exposure to water—whether from bathing, rain, or stops by a lake—use a towel or a pet-safe blow dryer to ensure your dog is completely dry. Damp fur creates an ideal environment for bacteria and yeast.
Pay attention to specific areas
• Ears and teeth: Keep your dog’s ears clean with a veterinarian-approved cleanser if you notice excess wax or debris. Likewise, brushing your dog’s teeth or using dental treats helps prevent bad breath caused by plaque buildup.
• Anal glands: Monitor your dog for signs like scooting or persistent licking near the rear. If these occur, it might be time to have your vet or groomer express (empty) the glands or check for infection.
Maintain a clean RV
RV living means limited space and frequent travel. It’s essential to:
• Wash bedding and soft furnishings regularly: Dog odor can cling to fabrics. Use pet-safe detergents and wash blankets, cushion covers, and dog beds at least weekly.
• Cleanup on the road: Keep a supply of dog wipes or damp cloths handy for spot cleaning, especially after outdoor adventures. This is a great way to manage odors before they set in.
• Ventilation: Ensure your RV is well-ventilated. Open windows or use an air purifier to help reduce lingering smells.
• Watch diet and overall health: A balanced, high-quality diet contributes to a healthy coat and skin. If you notice persistent odor problems, consult with your veterinarian. She can rule out food allergies or metabolic issues that might be contributing to the smell.
Extra tips
As an RVer, you face unique challenges when it comes to pet care. Here are a few additional ideas tailored for RV travelers:
• Pack a grooming kit: Include a brush and pet wipes. These can make impromptu cleanups easy at rest stops.
• Schedule regular vet checkups: Even while traveling, don’t skip routine wellness exams. Many veterinarians offer mobile services. They come right to your RV.
• Create a designated pet area: If space allows, set aside a small area in your RV for your dog’s bed and toys. Keeping this area and all of your pup’s items clean can help contain odors and keep your RV smelling fresh.
How do you deal with stinky dog odors? Tell me in the comments below.
We use cookies to ensure that we give you the best experience on our website. By continuing to use our site, you consent to accepting cookies. We NEVER have or will sell reader's data. For more info, please see our privacy policy page.


")