A few years ago I was researching a battery company that supplied flooded lead acid (FLA) batteries to the locomotive (train) industry and for solar panel systems. Everything I found indicated they were an outstanding company with a quality product, so I called and talked to an engineer and asked why they were not in the RV industry. He stated that every time they discussed their product with an RV manufacturer all they wanted was to cut the price $30 less than what they were currently using. He came up with the phrase: “It’s a race to the bottom!”
Unfortunately, it’s too often true in this industry, as many people shopping for an RV shop by price rather than by value. Therefore, manufacturers race to find ways to cut costs rather than educating customers on value, so that the unit sits next to the competition with a lower price tag.
Electrical outlets in RVs
One such item is the electrical outlets used in many RVs. The RV Industry Association (RVIA) uses codes and specifications set by the National Fire Prevention Association (NFPA) and other safety organizations such as Underwriters Laboratories (UL) for RV safety. NFPA has specific wiring and outlet codes such as NFPA 1192 standard for safety. That requires the National Electric Code (NEC) Article 551, which dictates wiring size for RVs.
From what I have found over the years, RV manufacturers are using the correct size 120-volt wiring commonly referred to as Romex, which is actually a brand name. However, the “race to the bottom” comes with the outlet, in my opinion. Code requires a UL-listed outlet capable of handling the amp rating of the circuit breaker, which is typically 10-15 amps in a traditional outlet.
Not all outlets are the same quality
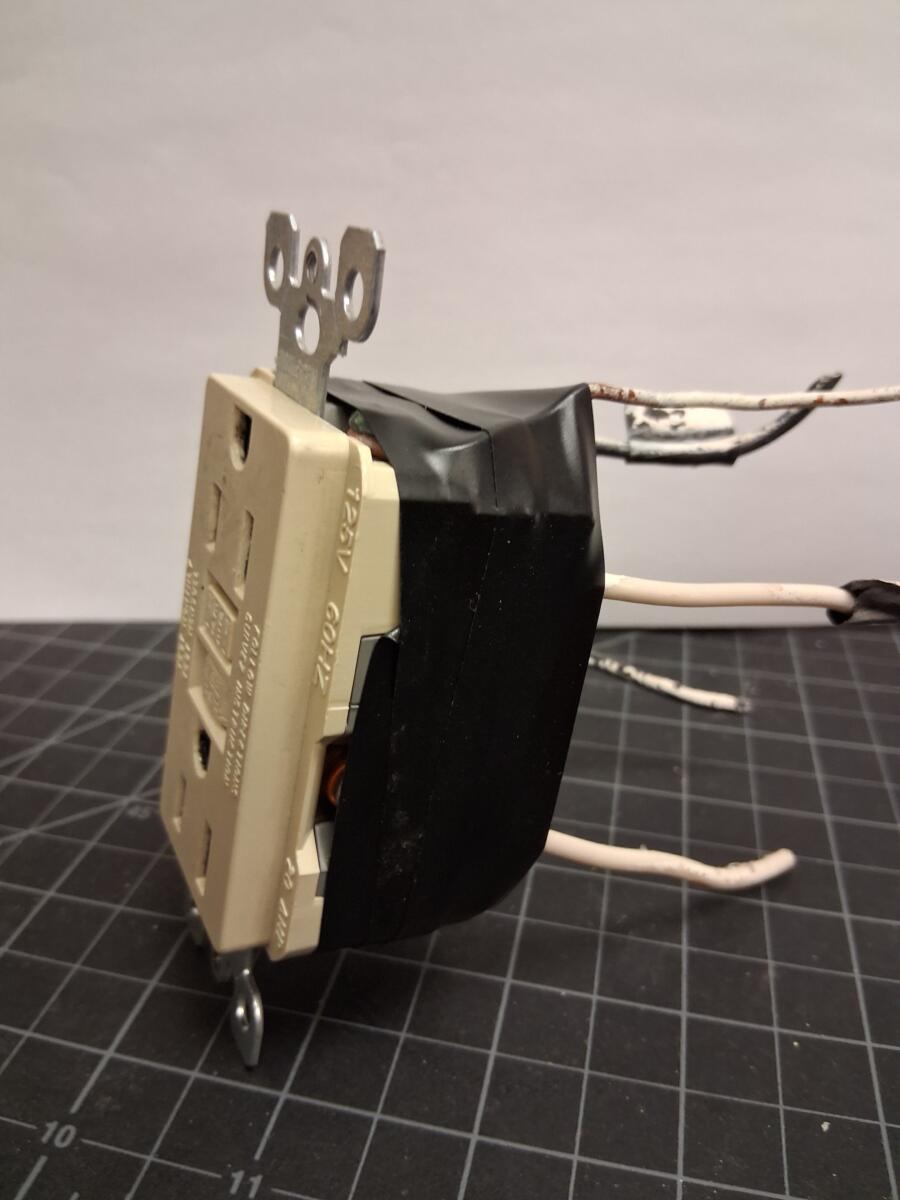
There are several types of outlet that have the amp capacity and are UL rated. However, not all are the same quality, in my opinion. The traditional residential outlet has an outlet box mounted in the wall and an outlet with either side mount screws or push-in slots in the back.
When I built my house, my certified/bonded electrician stated that he NEVER used the push-in slots in the back. He explained they are not a good contact and the wire can slip out or break off from the slot. Keep in mind, this is in a house that is not traveling 60+ mph down the road. He always connected the wires to the side posts and wrapped electrical tape around the entire outlet.
Outlet taped
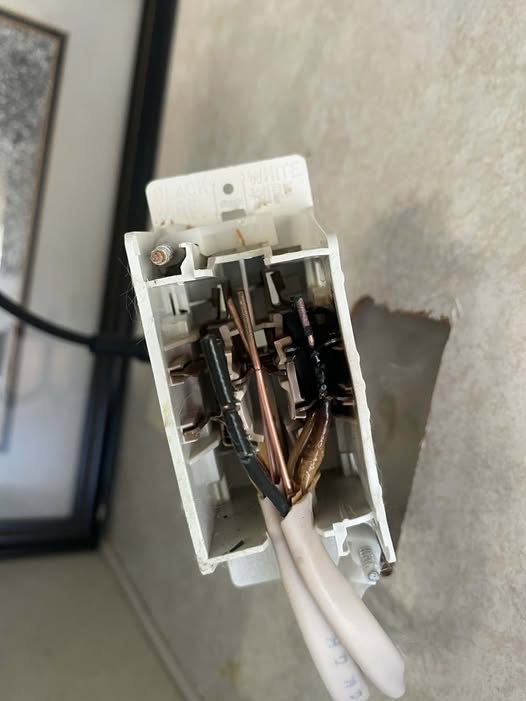
“Fast install” aka “self contained dual outlet”
I have received several questions from readers regarding the “fast install”-type outlet called “self contained dual outlet.” This is an outlet that can be installed without a gang box and with the wires pushed into spades on the back side. It is thinner than a traditional outlet so it can be installed on a side wall that is only 2” thick, as it does not require the box. It is faster to install so there is less labor, and it does not require a gang box. So, putting several of these in an RV is a cost savings.
They are UL listed and rated for 15 amps, so they should be fine for an RV, right? To properly install these outlets, you need a specific tool such as the Wirecon WT900M, which costs $700. Snap-on makes a cheaper device that looks like a golf shoe spike wrench. Even if they use the proper tool and get the wires “seated” correctly, I have had dozens of readers sending pictures of this type of outlet failing due to road vibration.
Self contained outlet GFCI
Here is another one:
Self contained outlet
Traditional outlets recommended
It’s not like you have a choice of outlets. However, I would replace any of the fast install outlets with a traditional one with side posts. For outlets that are in the 2″ sidewalls, you can get a shallow outlet box on Amazon here.
Shallow outlet box
Winnebago designed a wooden extension that matched the perimeter of the box and extended the outlet further out so they did not have to route the 2″ sidewall deeper.
Perhaps you’ve been there: a darting deer with a death wish forces you to brake suddenly, and crash! All of your kitchen utensils jump, tip, or fly into the air and flop off the counter onto who-knows-where on the floor.
We all need and use kitchen utensils. The trouble is that many RV kitchens offer very little storage space for them. Let’s look at ways to solve this common problem.
First things first
It doesn’t take long before RV drawers become jammed with random kitchen tools and gadgets. This can turn simple meal prep into a veritable scavenger hunt.
Many RVers eventually realize they do not need nearly as many utensils as they originally packed. A few well-chosen cooking utensils often outperform drawers full of gadgets that rarely get used.
Take a few minutes to check your RV’s arsenal of kitchen utensils. Ask yourself questions like these:
How many spatulas do I really use at a time?
Could we do without two ice cream scoops?
Would a fork scramble breakfast eggs just as well as that whisk?
Pare down the utensils by removing duplicates. Also consider what kinds of food you actually prepare when RVing. (For example: Our muffin tins noisily toured much of the country over the past several years. They banged and clattered together, irritating us for mile after noisy mile. Care to guess how many times I’ve made muffins? Zero. It’s safe to say that the muffin tins will return to our stix-n-brix home.)
Organize by purpose
Once you’ve pared down your RV’s kitchen utensils, you’re ready to organize them. Function matters more than size when organizing utensils in an RV. Instead of grouping items by length or shape, it’s usually easier to organize by activity.
Keep grilling tools together (perhaps stored with the grill). Check out these storage bags, boxes, and containers. They come in a variety of sizes and will keep all of your grilling utensils clean and together.
All of your baking supplies and utensils should be stored together when possible. Be realistic. If you and your travel buddy really enjoy visiting local bakeries, perhaps baking utensils aren’t necessary at all!
Everyday cooking utensils are best placed closest to the stovetop. This system makes cooking faster and helps avoid digging through crowded drawers.
Utensil holder
A countertop utensil holder can work well for the tools you use every day. Containers keep spatulas, tongs, and wooden spoons upright and easy to grab while cooking. Choosing a divided container helps prevent everything from becoming tangled together.
Matte finishes and weighted bottoms are especially useful in RVs because they help minimize sliding during travel. A bit of museum putty will also help the container stay in place. (I usually move the countertop utensil container to a lower cabinet on RV travel days.)
Mesh storage
Many RVers quickly discover that anything left loose on the counter can become airborne on rough roads. That is where flexible mesh storage netscome in handy. Stretchable cargo-style mesh organizers can be mounted on the wall next to the stove or inside a nearby cabinet door. These nets help keep lightweight utensils contained while freeing up valuable drawer space.
Staying organized
Keeping drawers organized without creating a “junk drawer” is another important tip for utensil organization. In a small RV kitchen, every item needs a dedicated location. Drawer dividersand small baskets can create storage zones for different utensils.
Some of the best RV storage systems cost very little. Many RVers repurpose household items they already own rather than buy expensive organizers. Empty food containers can separate utensils inside drawers, while cut-to-fit shoeboxes work surprisingly well as custom dividers.
One of the most important habits for long-term organization success is simply putting things back where they belong immediately after washing them. In a small RV, clutter builds quickly. When every utensil has a designated home, cleanup becomes easier, and the kitchen stays functional even during extended trips. Periodically removing duplicate gadgets and rarely used tools also helps prevent overcrowding.
Hint: Make sure everyone traveling with you knows and understands how you’ve organized so they can put things back into their proper space, as well.
Travel days
Travel days require an entirely different mindset. Even well-organized RV kitchens can turn into disasters if items are not secured before driving. Unsecured utensils can become projectiles on bumpy roads. At the very least, metal utensils (like my muffin tins) can rattle during travel and irritate even the calmest motorhome driver.
Use dishcloths, potholders, or kitchen towels to dampen the clattering noise. Or simply remove the utensil container and place it in a lower cabinet on travel days.
Bottom line
With the right storage containers, a few clever organizing tricks, and a travel-day routine, even the smallest RV kitchen can stay tidy, functional, and ready for life on the road.
By Cheri Sicard
Tucked along Northern California’s rugged coast, Trinidad is a peaceful, almost mystical place where towering redwoods meet the crashing Pacific. The wild is never far away here, and neither are the bears. California’s obsession with these creatures even landed one on the state flag. Life feels calm, but sometimes nature blurs the lines, as explained in the video from RVingWithJoe.
In the video (at the bottom of this post), we meet Tim, who called the Seawood Cape Preserve home, deep in the forest and far from city noise. He looked after the land, shared simple days with a handful of co-workers, and lived in a cozy fifth wheel parked among the trees. Each day, Tim settled into a routine:
• Caring for the preserve’s wild spaces
• Sleeping amid rustling branches and starlit skies
• Sharing the woods with neighbors—human and animal alike
It was quiet, satisfying, and full of nature’s little surprises.
One early summer weekend in 2023, Tim took a much-needed break to San Francisco with friends. The first night offered laughter and music. But while they danced in the Bay Area, something was stirring back in his Trinidad clearing. He received a vague but worrying message: “Hey, not sure but it looks like something’s wrong with your roof.” That brief note hid much bigger problems.
Bear versus RV—the break-in
It wasn’t a towering grizzly but instead a determined and agile small black bear, driven by the lure of food, that managed to get on top of Tim’s trailer. The scent of snacks inside—trail mix, maybe even beef jerky—drew it in.
Next came full structural destruction. The bear didn’t just scratch; it tore open the trailer roof like peeling the lid off a giant can, shredding insulation and layers with surprising strength. It crawled inside, turning Tim’s trailer into a personal buffet.
By morning, the scene was a disaster. The trailer’s roof gaped open, insulation trailed down, and every scrap of food had vanished. What did the bear leave behind? Ruin, mess, and a home completely trashed.
“It’s hard not to feel helpless when nature shows up hungry and uninvited.”
Neighbors step up
Tim’s co-workers proved themselves lifesavers:
They rounded up his unspoiled valuables.
They ringed the trailer in electric fencing.
They installed a motion-triggered game camera, hoping to spot a return visitor.
Support and teamwork helped protect what could be saved.
Maybe the scent lingered. Maybe the bear just wanted more. An hour after the helpers left, the game camera caught the bear sniffing and pawing at the clearing. It skipped the front, heading straight for the back of the trailer—where the new electric fence waited. The camera didn’t capture what happened next, but it’s easy to imagine the bear got zapped and thought twice.
Tim didn’t have to do it alone. Good insurance, some emergency savings, helpful friends, and a supportive boss pulled him through.
• He replaced the trailer with a newer, better model.
• He stayed close to nature, a bit wiser about “bear proofing.”
• He settled nearby after retiring.
The wild brought loss, but community and good planning helped him rebuild.
Bear lessons: Nature never knocks
Bears don’t respect doors or rules. They follow their noses, and if a trailer stands in the way, it’s fair game. Tim’s adventure is a sharp reminder: The wild doesn’t ask permission. Prepare, respect, and never underestimate your furry neighbors.
Wind chimes—You either love ’em or ya hate ’em. What’s your stance?
If you pulled into your campsite, got all set up, and finally sat down to relax with a book and a nice beverage only to suddenly hear the sound of your neighbor’s wind chimes, would you be okay with it or would you be upset about it?
Some folks find the gentle tinkling sound peaceful and calming—like a background soundtrack to their outdoor time.
But for others, especially after a long day of driving, the repetitive sound can quickly become grating. Not everyone wants their quiet retreat to come with a constant chime. Some people say wind chimes drive them absolutely nuts!
If you were one of those people who hated wind chimes, would you ever say something to your neighbor? Or would you just try to tune it out, cross your fingers for a windless night, and hope they pack up in the morning?
If you do love the sound of wind chimes, we highly recommend you take a look at this. Even if you don’t like wind chimes you’ll still find it cute, we just know it.
By Dustin Simpson
You often do not realize how important your RV toilet is until it’s not available. Let’s assume the toilet is non-repairable or that it’s just too old. Now it’s time to update the toilet. In most cases, a replacement is a relatively simple process. The hardest step of RV toilet replacement is deciding on the replacement and determining if it works in your RV.
(click/tap image to enlarge)
Things to note when replacing an RV toilet
When contacting a repair shop or dealership in regards to purchasing a new toilet, here is some information you should provide. In some cases, sending pictures of the toilet or the part you’re looking for helps track down the replacements needed.
• High or low profile – Please measure height in inches
• Water consumption/flow rate – Does it have a water saver?
• Attached spray unit – Is it equipped with a hand sprayer?
• Bowl size – Standard round or elongated residential?
• Plastic or porcelain bowl?
• Seat and lid design – Standard/slow close; plastic or wood?
• Color
• Overall width
• Brand name – Model and serial number are typically located behind the backside of the toilet
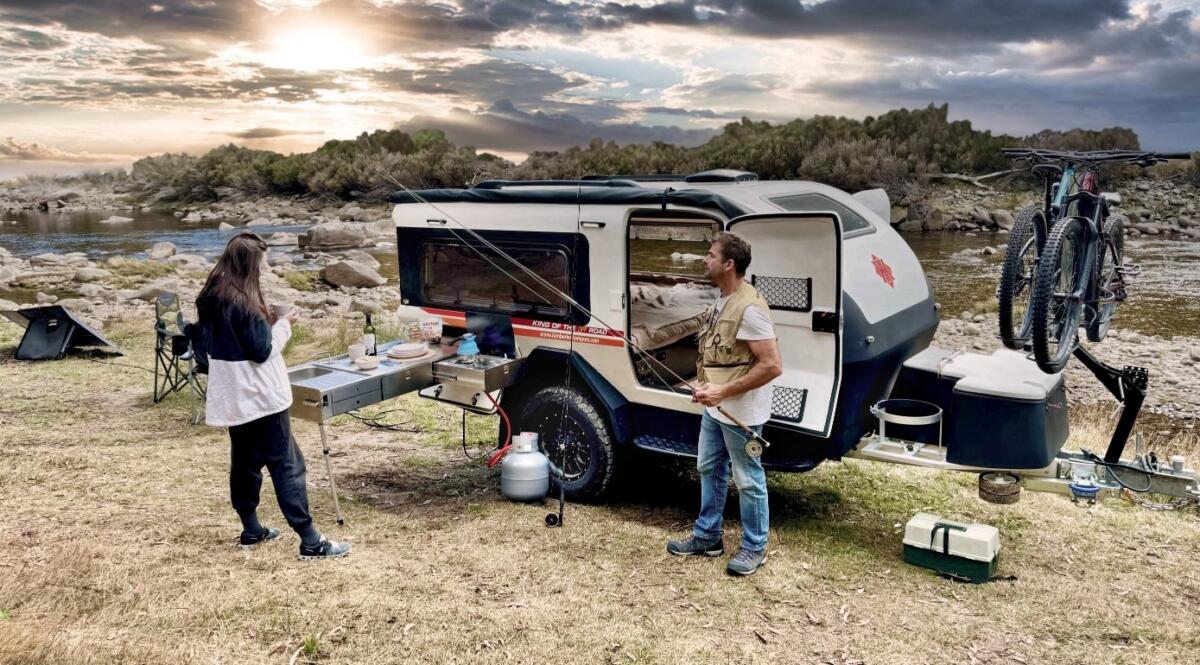
For a lightweight, basic, hard-sided camper, let’s take a look at the Kimberley Kube. In the video at the end of this post, we get a tour from the team at ROA Off-Road, accompanied by Kimberley Kampers’ owner, James.
The Kimberley Kube is built for campers moving up from roof tents and small tent trailers, but who still want real off-road gear. The result is a compact camper that feels much bigger than its footprint.
Why Kimberley built the Kube
Kimberley Kampers spent 32 years building canvas campers, but the Kube moves away from fabric. James said that shift came from changing weather demands, especially in the U.S., and from younger buyers who want comfort without towing a big caravan/trailer.
It also lands in a smart middle ground. At 17’4″ long and a little over 6′ wide, the Kimberley Kube stays compact, easy to tow, and easy to store, while still giving campers a place to sit inside when the weather turns.
A lighter trailer with real off-road hardware
At about 2,500 pounds, the Kimberley Kube is built to tow easily. Its tapered nose and tail, shaped with help from an American aeronautical engineer, cut drag by up to 20 percent compared with a square trailer. Kimberley says that can trim fuel use by 7 to 8 percent, which matters even more for EV towing.
Underneath, it keeps classic Kimberley hardware: a hot-dip galvanized laser-cut chassis, independent trailing arm suspension, and vented disc brakes with electronic-over-hydraulic control. The pod is a single-mold fiberglass body bolted to the chassis. Outside, sliders double as steps and quick side seats.
Inside, it feels bigger than its footprint
The cabin is where the Kimberley Kube separates itself from most teardrops. Big wraparound windows, privacy shades, and bug screens bring in light and airflow, while the low-clutter layout keeps sight lines open.
A king bed converts into a futon-style lounge, and the bed can be made from outside through the side windows.
Storage is better than expected, too. There is a 130-liter front-loading fridge that opens from inside, a slide-out table for meals or work, overhead aluminum cabinets, and a large drawer under the bed.
Power, four-season use, and a kitchen that works
The front box starts with a 460Ah heated lithium battery and can grow to 920Ah. It also gets DC and AC charging, solar input, and a 2,000-watt inverter.
Diesel heat and hot water come standard, and a 12V air conditioner is an option.
Kimberley also paid close attention to U.S. weather. Most plumbing stays inside the cabin, the tanks are insulated, and heater elements help stop freezing. Inside, aluminum cabinetry, acrylic tops, and recycled PET insulation help hold temperature with less power use.
The U.S. version is wired for 110V at the factory, and buyers can choose natural or gray interior finishes.
Outside, the long slide-out galley is one of the Kimberley Kube’s best ideas. It includes a stainless worktop, hot and cold sink, filtered water, drawer storage, and a raised breakfast bar that opens up the whole cooking area.
Final thoughts
The Kimberley Kube feels closer to a compact hard-sided overland camper than a basic teardrop. It keeps the tough chassis, adds real insulation, and makes camp life easier.
For singles or couples who want off-road range without towing a large trailer, that mix is the point. The Kimberley Kube stays small, but it does not force campers to live small.
America’s Original RV Newsletter. Since 2001 Issue 1264
Today’s thought
“I’ll gladly pay you Tuesday for a hamburger today.” ―J. Wellington Wimpy (Popeye’s sidekick)
Need an excuse to celebrate? Today is National Cancer Survivor’s Day!
On this day in history: 1946 – The United Kingdom’s BBC returns to broadcasting its television service, which had been off-air for seven years because of World War II.
How to visualize an RV makeover or renovation using AI
One of the best things about RV ownership is making your rig feel like home. Perhaps you’ve purchased an older motorhome that needs updating, inherited a travel trailer with outdated décor, or simply grown tired of looking at the same cabinets and furniture every day. Renovating an RV interior can make life on the road more enjoyable. Here’s how to use artificial intelligence (AI) to help you visualize those makeovers or renovations. This is fun!
How to keep ants out of your RV, and what to do if they get in
A few weeks ago, we had a lively discussion about mice and rats getting into your RV. On that same topic, a few of you mentioned you’ve had issues with ants. Yep. RVers are familiar with those issues, too, but we don’t talk about those tiny pests as often. Ants may be tiny, but they can become one of the biggest annoyances an RVer faces.
Preventing roof leaks in a way you may not have considered
Just about everyone who owns any type of RV has been told that they must periodically reseal all the areas on or near their roof to protect against potential leaks. There’s another potential leak source that is just as likely to cause problem leaks as those seams and vents. What is it? Find out here.
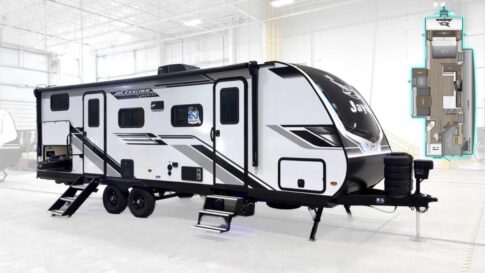
Today’s RV review… 2027 Jayco Jay Feather 25BH—Is the “Premier” really premier?
By Tony Barthel
Today’s RV review is of the 2027 Jayco Jay Feather 25BH. For those of you in the advanced class, you’ll know right away this is a bunkhouse trailer by the “BH” designation. While this rig fits the bill of a mid-sized bunkhouse with the ability to sleep eight people, it also does so slightly differently. This is the “premier” package, which isn’t so “premier.” Check it out.
An unwritten RV rule: (Almost) never knock on an RV door
Have you heard about this unwritten RV rule? It doesn’t come up very often. However, you should know and follow this unwritten rule: (Almost) never knock on an RV door. Folks new to RVing may not realize that knocking on another person’s RV door is almost always considered taboo. Here’s why.
What to do if you forget your RV keys at home
While reading through some recent comments, we noticed a trend: forgotten trailer keys at home. Yikes. It’s an easy mistake to make. You’re focused on packing clothes, stocking the fridge, hooking up the trailer, checking tire pressures, and making sure the dog made it into the truck. Then you arrive at your campsite, reach for the keys… and realize they’re sitting on the kitchen counter several hundred miles away. What to do?
Quick tip: Try this! Labeling your supplies will save you lots of time
By Nanci Dixon
We store a lot of our cleaning supplies, spray lubricants, fluids, etc., in a large plastic container in one of the storage bays of our motorhome. Before, every time I wanted to get one of these products, I was lifting each bottle or can out of the bin to read the label. It was frustrating and time-consuming! Don’t do that!
Missed Connections are personal messages posted in a paper or online by someone who had a brief encounter with a stranger and wishes they had spoken up, exchanged contact information, or met again. The posts typically describe where the encounter happened, what the person looked like, and what made the moment memorable, in hopes that the other person will see the message and respond. RVtravel.com has more than one million readers each month, and we’re all RVers! Chances are we could bring you together, so what’s your missed connection?
Reader poll (and article) Does today’s technology enhance or detract from the RV experience?
RVing has changed a lot, and the biggest shift may be how much technology is now woven into our RV trips from start to finish. Is technology a good thing or bad? We’ll get to the poll in a moment. First, let’s take a quick rundown of the technology impacting RVing today. Continue reading and respond here.
Need an RV home base or mail forwarding?
Americas Mailbox helps RVers manage mail, licenses, and registrations from anywhere in America. Learn more here or call (605) 718-1234. Ask about tax savings.
Tanner Toons With Tanner Woods
You may share this Tanner Toon, unaltered, on your website, blog or social media with our compliments. The musings from Tanner Woods’ creative mind appear in this newsletter every Saturday and Sunday and in many RV Daily Tips newsletters through the week. Sign up for our RV Daily Tips Newsletter so you don’t miss them.
Remember this? From the archives: The process of selling your RV, from start to finish
So, you’ve decided it’s time to part ways with your trusty RV and pass the adventure torch onto someone else. Whether you’re upgrading, downsizing, or just ready for a change, getting your RV ready for sale is a bit like prepping it for one last epic road trip. Here’s your roadmap to make sure it’s in top-notch condition and ready to wow potential buyers.
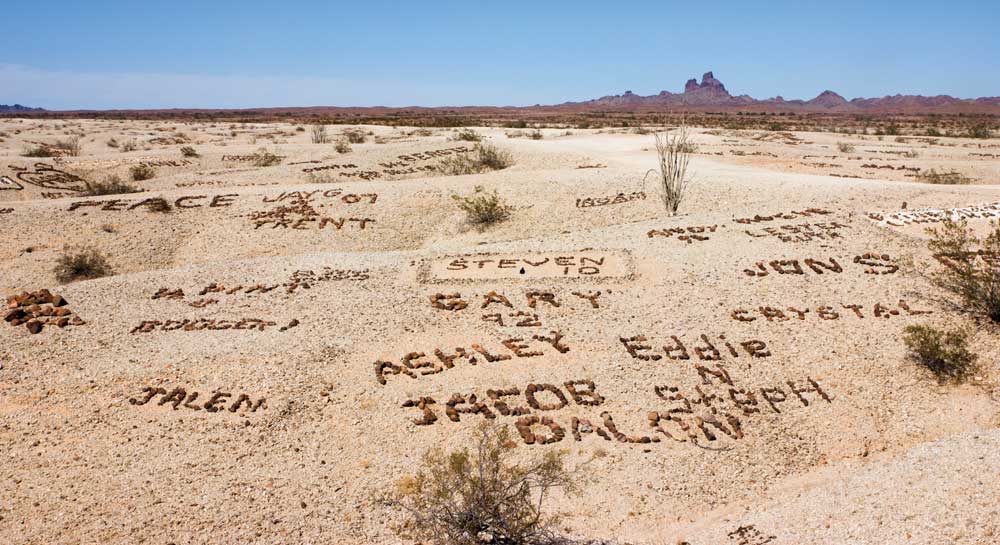
A forgotten piece of military history hides in the California desert
The Valley of the Names sits in the stark and unforgiving desert near Winterhaven, California, just west of Yuma, Arizona. In this vast stretch of desert sand, you’ll discover a bit of history along with memorable nostalgia. During World War II, the area now known as the Valley of the Names took on new importance as part of the Army’s Desert Training Center. Learn more.
Bayernhof Music Museum: A quirky “must-see” near Pittsburgh
If you like eccentric houses, antique music machines, and hidden passageways that make you feel like you’ve wandered into a storybook, you’ll love the Bayernhof Museum. It’s the former Bavarian-style mansion of collector Charles B. “Chuck” Brown III. His massive 19,000-square-foot home was built to house Brown’s huge collection of self-playing instruments and unique architecture. This place is amazing!
BORED??Well, there is no excuse! Read back issues of our RV Daily Tips Newsletters! More than 2,000 to choose from!
In the RV shop with Dustin The RV cheater vent is a simple fix for plumbing issues
In this article and video, we’ll introduce you to the RV cheater vent, a clever and easy solution that can save you time and money on plumbing repairs in your RV. Learn why this simple fix can help you avoid complicated and costly repairs, and how you can DIY to keep your RV’s plumbing system running smoothly.
RV tire safety Why did tire fail while on a dolly?
RANDOM RV THOUGHT: If your RV has ever developed a mysterious squeak that disappears the moment you try to show someone, congratulations—you own a perfectly normal RV.
You’d have everyone at the campground laughing at this one! Order one here—under $10!
RV gadgets and gizmos
We’ve got lots of new gadgets for you in this week’s Great RV Accessories newsletter! Read the issue here.
Live cam
Puffin Loafing Ledge: Maine Seabird Colony at Seal Island National Wildlife Refuge
(If it’s dark, scroll back to see all of the activity, including towards sunset.)
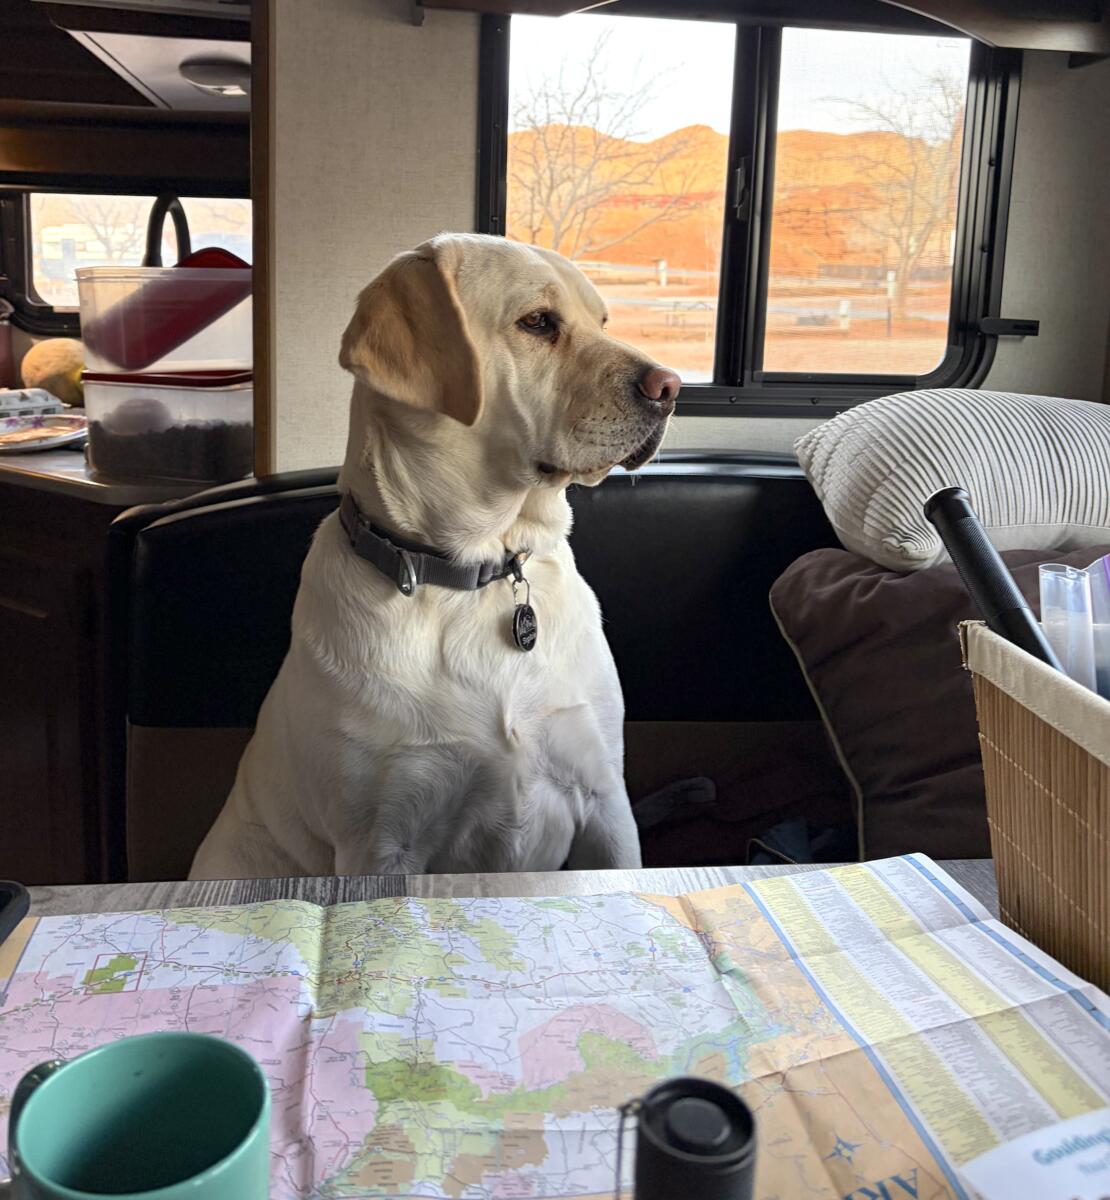
Readers’ pet of the day
“Ever since we picked her up in our Lance camper as a tiny puppy, Sophie (Lab, age 3) has loved to travel! Here she is consulting the map to see where we’re headed next.” —Maggie Grantham
HELP! WE’RE RUNNING LOW ON PET PHOTOS!Want to see your pet in this newsletter? Please send us a photo of your pet with a short description. No blurry photos and please do not submit your photo more than once.
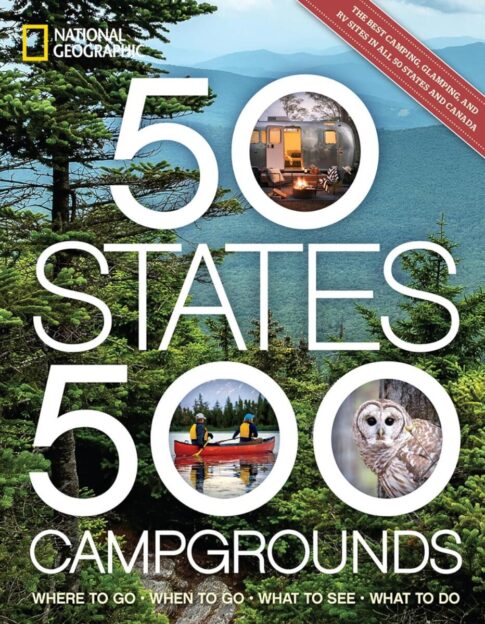
500 campgrounds worth the drive
In this comprehensive sequel to National Geographic’s best-selling 50 States, 5,000 Ideas, you’ll discover the 500 best camping destinations across the United States and Canada. You’ll find 10 featured campgrounds in every state, plus tips on what to do, where to eat, and must-see attractions nearby—from national parks to local gems. Learn more or order.
Trivia
The United States Federal Government is the largest overall employer in the country, with a federal civilian workforce of nearly 3 million people, not including active-duty military. Among private companies, Walmart is the largest U.S. employer, employing approximately 1.6 million workers domestically. Amazon follows with about 1 million U.S. workers.
FREE IS GOOD! Planning a trip to the “Sportsman’s Paradise”? Get the 2026 Louisiana Official Travel Guide and learn about unforgettable places to stay, where to eat, and what to see, including music festivals. By mail or online.
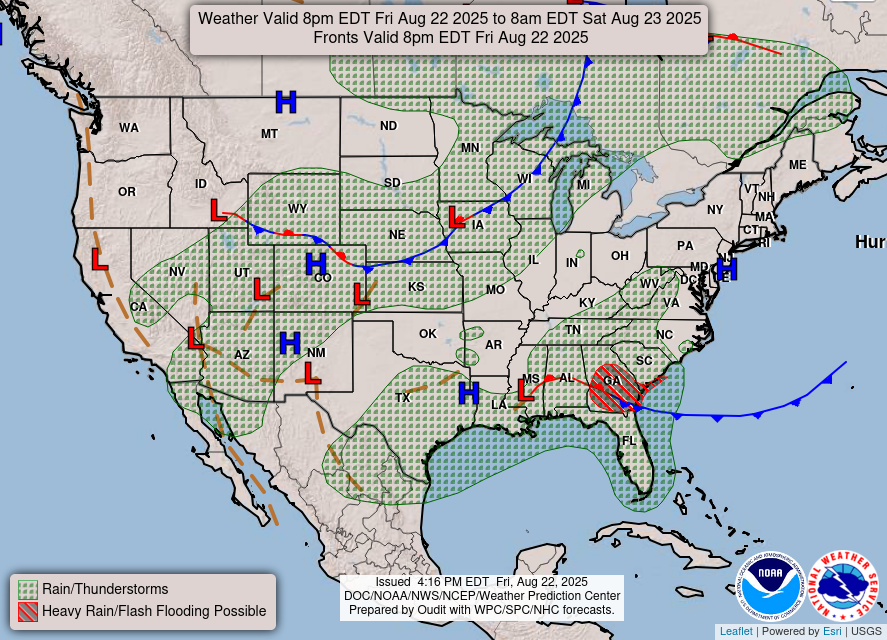
Today’s weather forecast across the nation THIS MAP UPDATES TWICE A DAY
Just about everyone who owns any type of RV has been told that they must periodically reseal all the areas on or near their roof to protect against potential leaks. There’s another potential leak source that is just as likely to cause problem leaks as those seams and vents. What is it?
It’s the seal of roof-mounted air conditioners. Those air conditioners sit on top of the RV but between them and the roof is a 14-inch by 14-inch gasket or seal. That seal is very thick—up to 4 inches—and the unit actually sits on top of the seal.
Over time, the seal compresses under the air conditioner’s weight. With time and constant movement, the cooling unit can become loose in its mounting hole through the roof and voila! – a potential leak.
(click to enlarge)
It’s usually very easy to access the bolts that snug the air conditioner to the roof. This is done by opening or removing the interior return grille on each unit, thus exposing three or four through-bolts and nuts. In turn, this hardware can then be snugged down with a socket, ratchet and extension – tools that almost everyone owns.
A leak created by a loose air conditioner can easily traverse the interior of the roof and drip out in areas far from the leak, complicating efforts to determine the source. Checking the tightness of your air conditioner should be on your list of maintenance items to be checked yearly. It could save you lots of dollars.
The Valley of the Names sits in the stark and unforgiving desert near Winterhaven, California, just west of Yuma, Arizona.
In this vast stretch of desert sand, you’ll discover a bit of history along with memorable nostalgia. If you listen closely, you can almost hear echoes from the past.
A bit of history
During World War II, the area now known as the Valley of the Names took on new importance as part of the Army’s Desert Training Center. General George S. Patton Jr., the first commanding general, ordered camps and airfields built here in the early 1940s. “Young Camp,” as it was called, readied U.S. troops for fighting in North Africa.
Photo credit: Mary and Jim Zalmanek
Camp conditions were less than optimal. Reports say that troops were allowed only one canteen of water each day. That water had to suffice for drinking, cooking, and washing. Daytime temperatures caused blistering conditions inside the Army tents, so many soldiers preferred the surrounding desert as the nighttime cooled. In the evening, with little else to do, soldiers arranged dark rocks to form names, symbols, and messages to reflect their thoughts, hopes, and feelings. These incredible images still remain today, some more than 80 years old.
Today
Today, there’s little evidence that these 1.4 million acres of stark desert were once home to the world’s largest military installation. After the war ended, the military relinquished the area to the Department of the Interior. Now the Bureau of Land Management (BLM) manages the large desert region, now known as The Valley of the Names.
If you visit The Valley of the Names today, you’ll find that many visitors have continued to arrange dark rocks into names, dates, initials, and little memorials.
Volunteers periodically clear storm debris and reset rocks that get displaced.
The Valley of the Names lies on a stretch of public land in the BLM Yuma Field Office recreation corridor.
To get to the valley, take Picacho Road from Winterhaven and bear left at the fork onto Barney Oldfield Road.
Remember that the route is mostly dirt and gravel with loose sand. Four-wheel-drive vehicles are recommended. Also keep in mind that summer temperatures can be brutal. Plan your visit to avoid the heat.
Nearby things to see and do
If you want to turn the Valley of the Names into part of a bigger desert loop, there is plenty nearby. The Picacho Trailis a 14-mile ride with rocky terrain and loose sand, which makes it a good match for off-road explorers.
Mittry Lake adds camping, birding, boating, fishing, kayaking, and wildlife viewing, whileSenator Wash South Shore offers gravel beach access, drinking water, showers, and camping beside the reservoir.
Where to stay
For RVers looking for a base camp, three solid spots stand out.
Imperial Dam Long Term Visitor Area is the classic boondocking-style option north of Yuma on the California side of the Colorado River. Long-term permit options and RV use are allowed.
Senator Wash North Shore is another good fit if you want a quieter reservoir setting with secluded camping areas, gravel beaches, and nearby dump station access.
You should go!
Visiting The Valley of the Names takes a bit of effort and desert common sense. Follow route directions carefully and use a reliable vehicle that’s equipped to take on the desert terrain. Bring plenty of water and be ready for heat with sun-protective clothing and sunscreen.
Treat the rock displays like fragile public-land art. Do not move, remove, or rebuild the stones already in place. The BLM recommends that you not bring your own rocks into the area. In addition, do not disturb the existing rocks along the route in order to preserve the habitat for native animals and plants.
Have you visited The Valley of the Names? Tell us in the comments below.
By Chuck Woodbury PUBLISHER SINCE 2001 Many RVers are explorers at heart. I am. When I set out on my first extended RV trip (many decades ago), it was to explore. As an aspiring professional writer, it was to search for stories to write — people, places, things. I just expected they would show up as I traveled the backroads, which, eventually, they did.
I have since explored places farther away — Europe, Asia and even down under in New Zealand. What wonders I have beheld. What fascinating people I have met. What beauty I have seen.
But now, I want so badly to explore beyond our “pale blue dot.” I see the photos from the Mars rovers and it makes me crazy. I want to go there, but I know I never will. I was born too soon.
But I still deceive myself just enough that I can hope that while I can never make it to Mars, perhaps I could make it to the moon. I realize the probability is a tiny, tiny, tiny fraction of one percent. Still, that’s enough to maintain hope (especially after a few glasses of wine).
Now, from NASA, comes word that work is underway on the first permanent base on the moon. Scroll up to see the rendering. Seeing such an image drives me wild with desire, like a starving man being shown a photo of a cheeseburger, fries and a chocolate shake.
Photo: NASA via SWNS
And look at the illustration of the two astronauts out for a ride in their rover, that looks sort of like a dune buggy. In a very broad sense, it could be said they are recreational vehicles. They are definitely made for off-road, which we call “overlanding,” which is obvious considering the moon has no roads.
That illustration was my inspiration for the headline of this article, which you may call click-bait if you wish. I maintain, though, that there is truth in it. The moon settlers who will travel with those vehicles may do it for science, but there is no way they will not be doing what you and I do when we explore unknown places, enjoying the scenery.
If I lived back at the turn of the 19th century, I would have volunteered to join the Lewis and Clark expedition. What was out there in those vast unexplored lands? If I were born 40 years later, I would have been on the first covered wagons headed to the promised lands of the West.
RVing and wanderlust go hand and hand. I’ve had my fill of both. But there is never enough, and I want more. I sometimes get angry at myself that I am too damn old to ever make it to anywhere beyond our itty bitty corner of the universe here on Earth.
I want to be the first RVer on Mars.
Chuck Woodbury has written in his Roadside Journal for more than three decades. His earliest work is available in his book “The Best From Out West,” available at Amazon.
A few weeks ago, we had a lively discussion about mice and rats getting into your RV. On that same topic, a few of you mentioned you’ve had issues with ants. Yep. RVers are familiar with those issues, too, but we don’t talk about those tiny pests as often.
Ants may be tiny, but they can become one of the biggest annoyances an RVer faces. It often starts with just a few scouts on the counter. A day later, there’s an ant highway leading to a single forgotten crumb behind the coffee maker. Sound familiar?
Ants are most common during warm weather, especially in spring and summer. Campgrounds with lots of trees, grass, and irrigation systems are prime ant habitat. They’re also more likely to show up after rain, when colonies are disturbed, and ants go searching for food and dry shelter.
How to prevent ants from entering your RV
The best way to deal with ants is to prevent them from getting inside in the first place. Keep food sealed in airtight containers, wipe down counters regularly, and sweep up crumbs before heading to bed. Don’t forget pet food, which can be a major ant magnet. Even a few pieces of kibble left in a bowl overnight can attract scouting ants looking for an easy meal.
Many RVers are surprised by how little food it takes to start an invasion. A sticky soda spill, a few crumbs under the dinette, or a trash can that hasn’t been emptied can be enough to attract an entire colony. The cleaner your RV stays, the less likely ants are to stick around once they find their way inside.
It’s also worth checking where utilities enter your RV. Ants can use power cords, water hoses, sewer hoses, stabilizer jacks, and even tire treads as bridges into your rig. If you’re parked directly over or near an ant colony, they may discover these pathways within hours.
Some RVers place ant barriers around jack pads or use food-grade Diatomaceous Earth around common entry points. Others spray the ground around utility connections or place bait stations outside the RV to intercept ants before they reach the door. Whatever method you choose, it’s a good idea to inspect hoses, cords, and jacks periodically, especially if you’re staying in one location for several days or longer.
If you frequently camp in the South, Southwest, or other warm climates where ants are active year-round, a quick exterior inspection when setting up camp can save a lot of frustration later. Avoid parking directly next to visible ant hills, and take a moment to look around picnic tables, utility pedestals, and landscaped areas where colonies often hide.
What to do if you find ants inside
One of the biggest mistakes people make is immediately reaching for an insecticide spray bottle. While sprays may kill dozens of ants on contact, they often do nothing to address the thousands more hidden in the colony. In some cases, spraying can even cause the colony to split and relocate, making the problem worse. Baits work more slowly, but they are designed to attack the colony itself.
Instead, find the trail and use ant bait stations (these are the best). Worker ants carry the bait back to the colony, helping eliminate the source of the problem rather than just killing the ants you can see.
As tempting as it may be, don’t wipe away every ant as soon as you see them. If you’ve placed bait, allow the ants to continue following their trail for a day or two so they can carry the bait back to the nest. You may actually see more ants at first, which is often a sign that the bait is working.
Before leaving a campsite, take a quick walk around your RV. Ant colonies are often hidden beneath picnic tables, landscaping timbers, rocks, tree roots, utility boxes, and electrical pedestals. It’s also worth checking your power cord, water hose, and storage compartments before packing up, especially after an extended stay. Spotting a nearby nest—or a few hitchhiking ants—can help prevent you from bringing unwanted guests to your next campground.
A few ants may seem harmless, but if they’re ignored, they can quickly turn a relaxing camping trip into a frustrating battle. The good news is that ants are usually easier to prevent than they are to eliminate. Keeping food sealed, cleaning up crumbs promptly, watching for entry points, and using bait stations when needed can go a long way toward keeping your RV ant-free.
By Cheri Sicard
Sometimes, when you’re on the road and in a hurry, fast food is the only option. But did you know that regional fast food chains often offer better options than the big national chains?
In the video down below by Mashed [5.46M subscribers, 2.16B views], you can see their picks of each state’s best regional fast food chain.
I agree that, in many cases, regional fast food chains are better than the big ones, but only sometimes. For example, I recently stopped at a Taco John’s during a drive through Wyoming and found it to be simply awful in every way. On the other hand, New Mexico’s Blake’s Lotaburger received an honorable mention in my Best Green Chile Cheeseburgers of New Mexico article.
I haven’t tried all these regional fast food chains, but I have tried many.
Also, please note that each regional fast food chain is located by the state where it started, but some now operate in multiple states. As these regional chains improve, they tend to expand their reach. For example, I’ve noticed that two favorites of mine, Wisconsin’s Culver’s and Kansas’s Freddy’s Frozen Custard and Steakburgers, are now found far beyond their home states; New Jersey’s Jersey Mike’s can now be found on the opposite coast, and many places in between; and Georgia’s Waffle Houses are in MANY states throughout the South and beyond.
In my opinion, if you catch these rising star regional fast food chains on the way up, you’ll have a better chance of getting outstanding food. For example, I used to love Waffle House breakfasts, but a recent visit showed me that they are not what they were when I lived in the South 40 years ago.
According to Mashed, the best regional fast food chains in every state are listed below. Watch the video to learn more about the food served at each establishment and see some mouth-watering eye candy of the food, too.
How many have you tried? What are your favorites? Do you have other chains to add to the list? Feel free to leave your suggestions in the comments below.
We use cookies to ensure that we give you the best experience on our website. By continuing to use our site, you consent to accepting cookies. We NEVER have or will sell reader's data. For more info, please see our privacy policy page.