By Russ and Tiña De Maris
We recently traveled out of the Arizona desert country looking for cool air. We found it in the Nevada high country. What a relief! But a couple of hours after setting up camp, we thought we had a weird gray water problem. It seemed like the sink drains smelled terrible!
But some logic set us straight. P-traps would prevent gray tank odors from coming into the coach. The outside tap water smelled fine. It hit us—we had “RV stink hose”! That’s RV scientific shorthand for bad odors emanating from the freshwater hose.
Cause of our stinky RV freshwater hose
R & T De Maris photo
It should have been obvious from the start. Some unnamed person had left water in the freshwater hose several weeks back at the last fill-up. Remounted on the RV’s spare tire carrier, that hose had plenty of sunlight and plenty of heat.
This same unnamed individual (whose initials are RD) had run a few seconds of water through the hose before hooking up the discharge end, but that was it.
Now that good old stinky water was chugging into the RV. The smell? A little hellacious—call it really, really bad sulfur. With a side of something else. In any event, the smell was enough to knock you over. We won’t even mention what the taste was like.
How to prevent a stinky freshwater RV hose
What do you do about stinky freshwater RV hoses? Prevention will save you time and a whole lot of badmouthing. When you’ve disconnected your RV freshwater hose from the rig, get the water out of it. If you work for a health department, please turn your eyes off for the next sentence. Yes, it may require actually putting your mouth to one end to pressurize the water out of the line.
Or get a helper, and while one of you holds one end of the hose up in the air, the other lifts the hose up from that end, up and down, until the water is out of the hose. Store the hose away.
A mild case of RV stink hose is an easy fix. Hook the tap end of the hose up to a freshwater tap, and blast water through for a couple of minutes. Don’t do this during daylight hours in Arizona. People get really, really touchy about “wasting water.” After a short flushing, the stink will usually be gone.
In seriously bad cases of stinky freshwater hoses, here’s the way to clear it up:
1. Disconnect and drain your hose.
2. Whip up a sanitizing solution of 1.5 – 2 teaspoons of bleach in 2.5 gallons of water. Refer to the manufacturer’s directions.
3. Pour the sanitizing solution into the hose until it fills up the entire hose. You may need a funnel, depending on your mixing container.
4. Connect the ends of the hose together to make a closed loop. Leave the solution in the hose for 12-24 hours.
5. Disconnect the hose ends, and drain the solution.
6. Connect the hose to a clean water tap.
7. Run clear, clean water through the hose until it’s thoroughly rinsed. You’ll know it when there’s no more strong bleach smell.
Again, RV stink hose is better prevented than cured. Take it from the culprit who left water in the hose. No amount of Crystal Light will cover up that awful taste and smell!
By Cheri Sicard
Kristy Michael from the Long Long Honeymoon is here to share her top five RV propane oven tips. This appliance, perhaps more than any other, is much maligned among RVers. Some people never bother to use their RV’s oven at all. But you are missing out on some great functionality by doing so. Not to mention, cooking in the oven can help warm up your RV in colder weather (not that you should ever use your oven as a heat source alone).
It doesn’t have to be that way and you can get good results from your RV propane oven. Kristy’s tips provide a great place to start.
The propane oven tips start with how to properly light your RV oven. This step alone keeps a lot of folks away. But it isn’t difficult at all. Kristy shows you how and she shares some nifty little RV oven tips while doing it.
Home ovens are notoriously inaccurate as to temperatures, and RV ovens can be worse. That’s why an inexpensive oven thermometer like this one can be the RV cook’s best friend.
More propane oven tips from Kristy
• Try to use cookware that evenly distributes heat. Cast iron is a great option. Personally, I use my large cast iron skillet as much to bake in the oven as I do on the stovetop for this very reason.
• Use a pizza stone. I concur with this one and I always have a pizza stone in my RV oven to help evenly distribute the heat. (You can also use it to bake pizzas and breads.) Kristy’s is round, but I prefer this small square one that fits in my RV oven.
• Check dishes in the RV more frequently than you would at home. Heat is often more unevenly distributed so check your food, make sure the bottom is not burning, and rotate things around every 10 to 15 minutes.
• On that same line of thought, turn and flip food more often than you would at home to prevent hot spots and burning.
• Don’t forget you can adjust and move your RV oven racks as you need.
• Likewise, there are different areas of the RV oven you can use to bake on, some you may not have thought about, such as directly over or under the flames. Yes, your RV oven has a broiler!
Do you have other RV propane oven tips? Please share them in the comments below.
Even if you’re not really into trains, riding a scenic railroad is a lot of fun, especially if it really is, well, scenic.
Here are the 10 Best Scenic Train Rides, as voted by readers of USA Today (in 2025). Once you see the photos and read the descriptions, you’ll want to ride these.
After you vote in the poll below, leave us a comment and tell us about your favorite tourist train or scenic railroad that you’ve ever been on. We’re looking forward to reading your comments. Thanks!
By Dustin Simpson
Join me in the video below as I explain more about RV air conditioners and the maintenance they require and why it is very important.
Inspecting RV air conditioners
There are several steps for inspecting RV air conditioners, some of which are best undertaken by a technician. You (or that technician) always want to make sure to inspect the RV roof air conditioner unit for debris and damage, wash inner coils (including the condenser and evaporator), clean drain tubes, replace gaskets and filters, perform amp-draw tests and so much more!
Watch the video and I’ll walk you through it all.
More about our Facebook groups
These Facebook groups were created to help educate owners about parts, problems, repairs, fixes, and upgrades on RV units. We will be sharing videos that include WHAT’S IN THE SHOP? and SHOP TALK episodes with information on accessories and products that we use and install on the units from the shop.
We try and help as time allows to answer questions and problems. We encourage others to share their experience so we can build a resource page to help everyone.
“Sometimes the most scenic roads in life are the detours you didn’t mean to take.” —Angela N. Blount
Essays and opinions
Forest River slammed by Wall Street Journal; RV media stick heads in sand
In yesterday’s newsletter, our cover story was about a major article last week in which the Wall Street Journal reported on deep-rooted quality control issues within the RV industry—especially at Forest River, the second largest RV manufacturer. The major mainstream media (what remains of it) has historically ignored the RV industry. Now, finally, a major national newspaper has stepped up with an article that should have then resulted in headlines in RV industry publications and in newspapers all over Indiana, where 85 percent of all RVs are made. But guess what? None has written a single thing! Read more, and why this is important.
Are quick-release hose connectors worth having? Oh, yeah!
By Gail Marsh
Setting up in an unexpected downpour of rain was all it took for quick-release hose connectors to become one of hubby’s favorite RV gadgets. Do you use them? We’ve put them on our drinking water hose and black water rinse hose, and they really live up to their name! If you don’t have these, you’ll want them after reading this.
RV awnings are reminiscent of a simpler time in America
By Chuck Woodbury
When RVers think of awnings, most think of a sheltered area outside their RV’s front door. It’s a place to enjoy fresh air without getting soaked from the rain or burned by the sun. For many RVers, it’s also an extra room in an otherwise small living space. Some RVers go to great lengths to furnish their “awning room” with chairs, tables, a rug — all to make the space more inviting. What this area is — if you boil it down — is the equivalent of the old front porch. Continue reading.
How to keep your home safe while you are away
By Dave Helgeson
We all take steps to keep ourselves and our RV safe while on the road. But how many take extra steps to deter burglars from our homes while on the road? Pages have been written about staying safe from crime while RVing. However, little has been written about how to deter burglars from burglarizing your home in your absence while RVing. Full-timers no longer have to worry about a sticks-and-bricks house, but what about the rest of us?
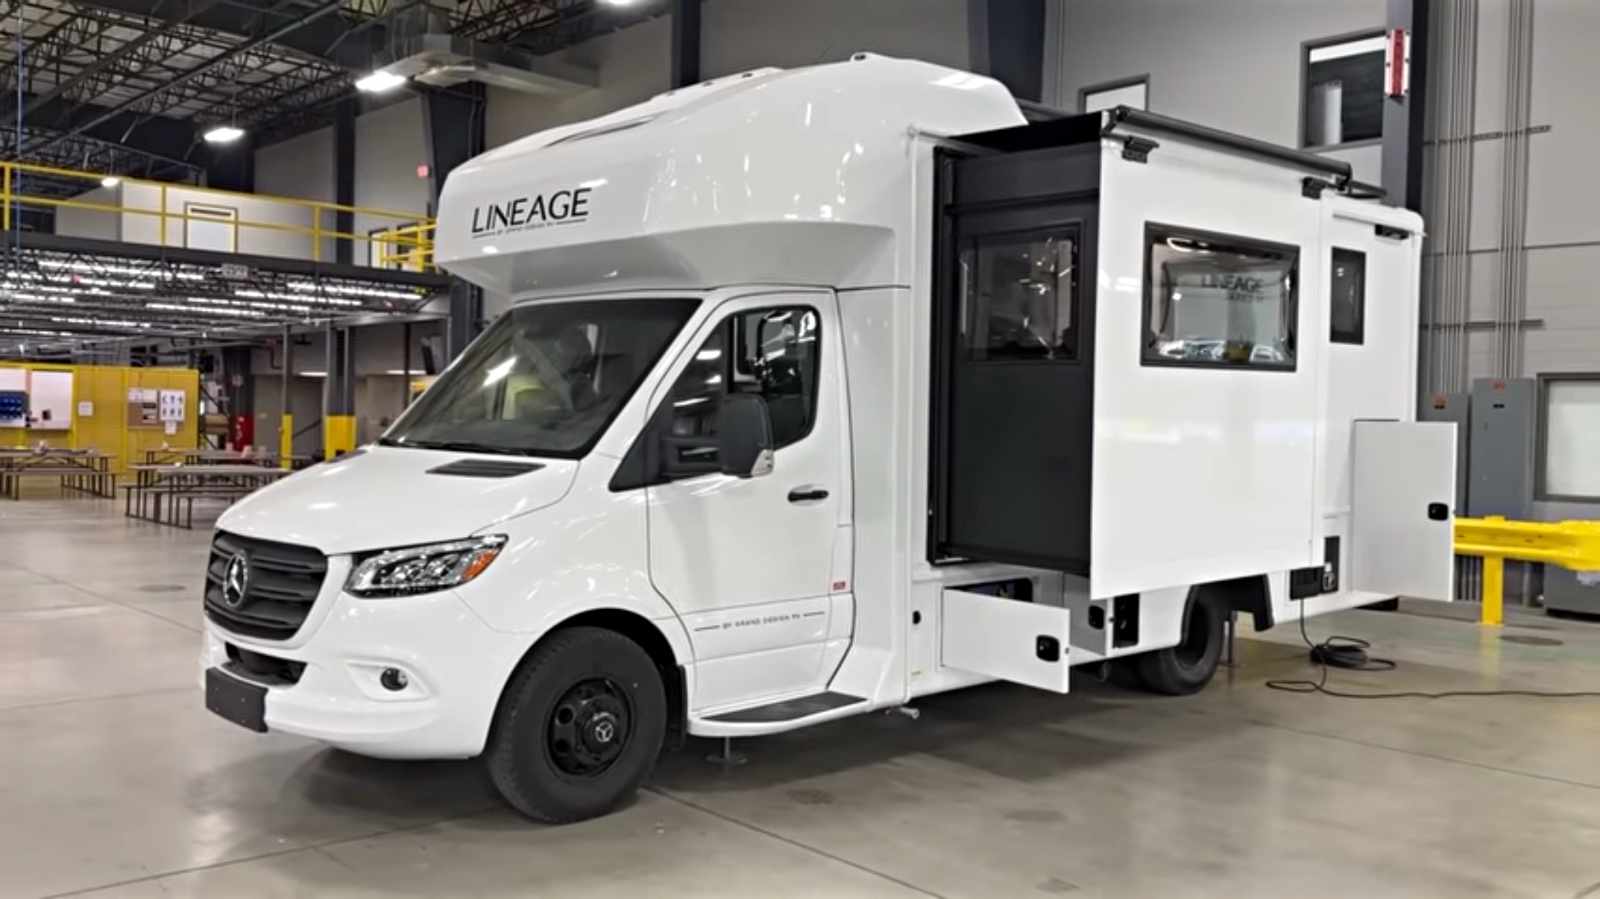
Today’s RV review… Grand Design Lineage Series M 25TK—A very impressive Class C
By Tony Barthel
Today’s RV review is of the Grand Design Lineage Series M 25TK Class C motorhome. Wait, motorhome? Yep. Grand Design has heretofore only made towable RVs, but the company recently announced that they will be shipping motorhomes. In fact, this is the first example of what the company promises will be a larger line of motorhomes, including Class C and Class B (vans). Continue reading.
RANDOM RV THOUGHT: A flashlight is like magic—a beam of light from your hand. There are plenty of neat devices in this world, but, really, how cool is it that you can hold a small cylinder in your hand and with the flip of a switch or the push of a button it will light up the night? If you were lost in a dark forest, what would you rather have—$1,000 in your wallet or a flashlight in your hand?
Avoid disaster and tighten those valve stems correctly!
By Nanci Dixon
I was adding air to the motorhome tires and was turning and turning the valve stem cap when I realized the cap wasn’t coming off. The stem itself was unscrewing! I figured it out just in the nick of time before I unscrewed the stem all the way. Having had a valve stem come out while on the road, I knew just how bad it could get… Continue reading.
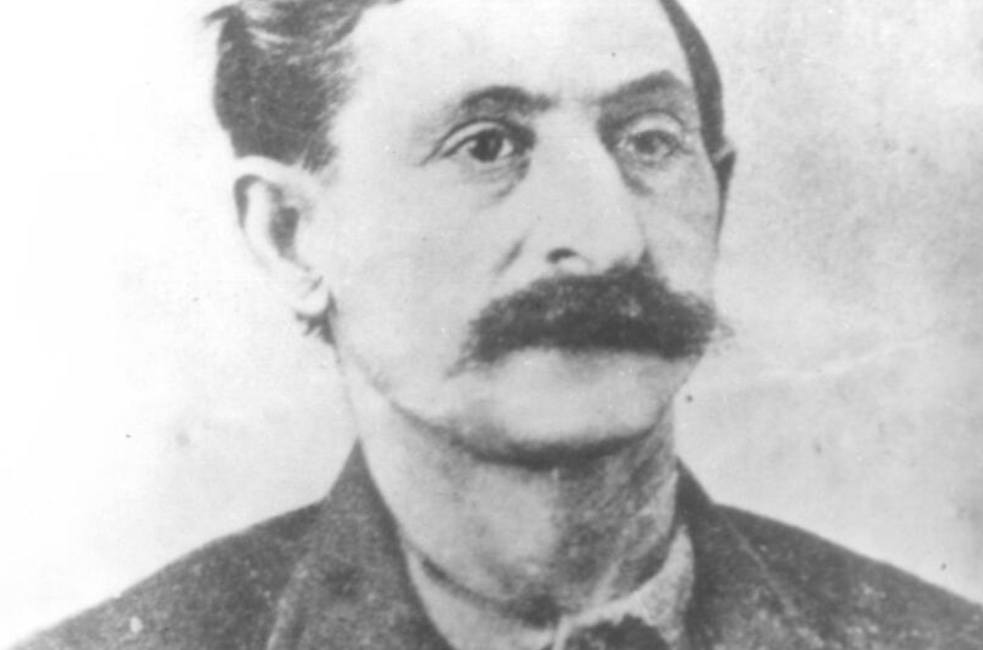
Publisher’s Roadside Journal The crook who grew up to be a shoe
Big Nose George’s skull and the shoes made from his skin. See them yourself in Rawlings, Wyoming.
By Chuck Woodbury
A while ago, at the Carbon County Museum in Rawlings, Wyo., I checked out the display of Big Nose George Parrot, the only man in American history to be turned into a pair of shoes. George was a rustler with a big nose. Somewhere along the line, he met up with the James Brothers, Jesse and Frank. Along with a guy named Dutch Charley, they decided to rob a train. Wait until you read the rest of this story which reads like a tall tale, but which is true!
Pilot turns Southwest Airlines catering truck into incredible RV
By Gail Marsh
Mark Pankey is a Southwest Airlines pilot. He’s also the owner of an RV he built out of (wait for it!) a decommissioned Southwest Airlines catering truck! His may be the only RV in existence equipped with a scissors lift, generally used by airlines to load snacks and beverages into its airplanes. It’s a fascinating story and a truly unique RV, so let’s get into it.
LETTERS TO THE EDITOR
Reader learns about dog CPR from RV Travel. Then revives a dog that’s stopped breathing
Dear editor,
I have been a reader of your newsletters for many years now. I have learned so much about RVs! This morning [June 28], thanks to watching your video the other day about doing CPR on a dog, I saved my friend’s dog! Where I live, they have a dock diving pool for the dogs. My friend was swimming her dogs, and the next thing I know she was hollering for me. I went running to the pool and pulled her dog up out of the pool and onto the dock. She was unresponsive and not breathing and I immediately went into CPR on her. She eventually came around and started breathing and seems to be fine! If you could, please direct me to that video again. I would like to share it with my friends! —Mary Masters
Mary, thank you! What a good thing you did!! If that were my little Archie I would have already taken you out to a fine dinner to thank you for being my hero. Our article, as pointed out by reader Warren G, is here. — Chuck
RV electricity Don’t pay for more solar than you need, part two
By Ken Arnold
This is the second in a series of articles on RV solar system sizing. Before you continue, make sure you read part one to discover just how much power and energy you need. The right answer is “it depends.” How much solar (and battery) capacity you need in an RV varies widely depending on how and where you use your rig, which is very difficult to estimate accurately, but relatively easy to measure… Continue reading.
Why RVers need a truckers’ road atlas
These atlases feature large-scale maps for every state, clearly marked truck and RV-friendly routes, and critical details like low clearances, restricted roads, and weigh station locations. A 22-page mileage directory includes more than 40,000 truck-route-specific, city-to-city distances—perfect for planning fuel stops and overnight stays. Rand McNally’s Motor Carriers’ Road Atlas, America’s best-selling trucking atlas, delivers the most complete highway and routing information available for large vehicles. Learn more here.
By Gail Marsh
It’s been unseasonably hot and still getting hotter at our current campground in Colorado. Our two air conditioners struggle to keep up. I was cleaning the return air filters (make sure you’re cleaning yours, too) when I noticed something rather odd. The RV’s A/C vent looked different somehow… Continue reading.
Reader poll (and article) The RV laundry conundrum: Do you/would you remove unattended clothes from washer/dryer?
By Gail Marsh Perhaps it’s happened to you. You arrive at the campground “wash house” only to find all three washing machines and dryers sitting idle. Before you pat yourself on the back for getting to the machines ahead of your fellow campers, take a look inside the machines. Every washer is full of clean, wet clothes. This is the RV laundry conundrum! What’s an RVer to do?
How to win We’ll select a winner at random out of all entries we receive today by 7 p.m. Pacific time. You can only enter once and after we notify you by email that you won, you have 24 hours to respond.
RV gadgets and gizmos Six new RV accessories everyone will want in 2025
By Cheri Sicard
For RV owners, the new model year always brings plenty of gear upgrades and accessories. This season, the focus is on smarter tech, stronger protection, and more convenience inside and out. Here, Ross from RV Tips & Travels shares six innovative RV accessories that promise to solve real-world pain points—no fluff, just practical value.
Travel destinations Home run destinations: Visiting MLB stadiums and where to camp nearby
By Gail Marsh Touring America’s iconic baseball stadiums as you travel is a grand slam for baseball-loving RVers. Plan to tailgate, attend a game, or take a stadium tour at your favorite parks. Major League Ballparks are well worth your visit. Or, if you’re a diehard fan, plan a road trip to visit several parks. Excellent parks are located throughout the U.S. Here’s to home run travel!
?? MYSTERY PRODUCT OF THE DAY ?? Have you ever just wanted to curl up in a Campbell’s soup can and take a nap? Yeah, same. What about your cat? They ask you all the time if they can take a nap in a can, don’t they? Well, now they can!
Highlights from this week’s RV Daily Tips Newsletter
In the RV shop with Dustin How do I prevent an RV LP gas leak?
In this video, we talk about a Facebook post that went viral involving an LP gas leak. Two campers were not aware that their RV had an LP gas leak. One of them lit the propane stove to cook breakfast, and it caused the RV to explode and catch on fire. Read and watch this!
RV tire safety Sidewall bulge equals bad tire? Probably not
Roger Marble discusses the difference between tire sidewall bulges and depressions, including possible causes, how to get them checked, and when tires need replacing. All that and more here.
BUMPER SNICKER: Spotted on the rear of a honey wagon tank: “Do you smell bacon? I smell bacon!”
RVing with dogs Yes, dogs can get sunburned!
By Gail Marsh
Now that warmer (hotter!) weather is here, you and your furry RV companion are undoubtedly eager to begin this year’s camping adventures, if you haven’t already. Here are some ways to protect your dog from sunburn. Yes, dogs can get sunburned like we do.
Readers’ pet of the day
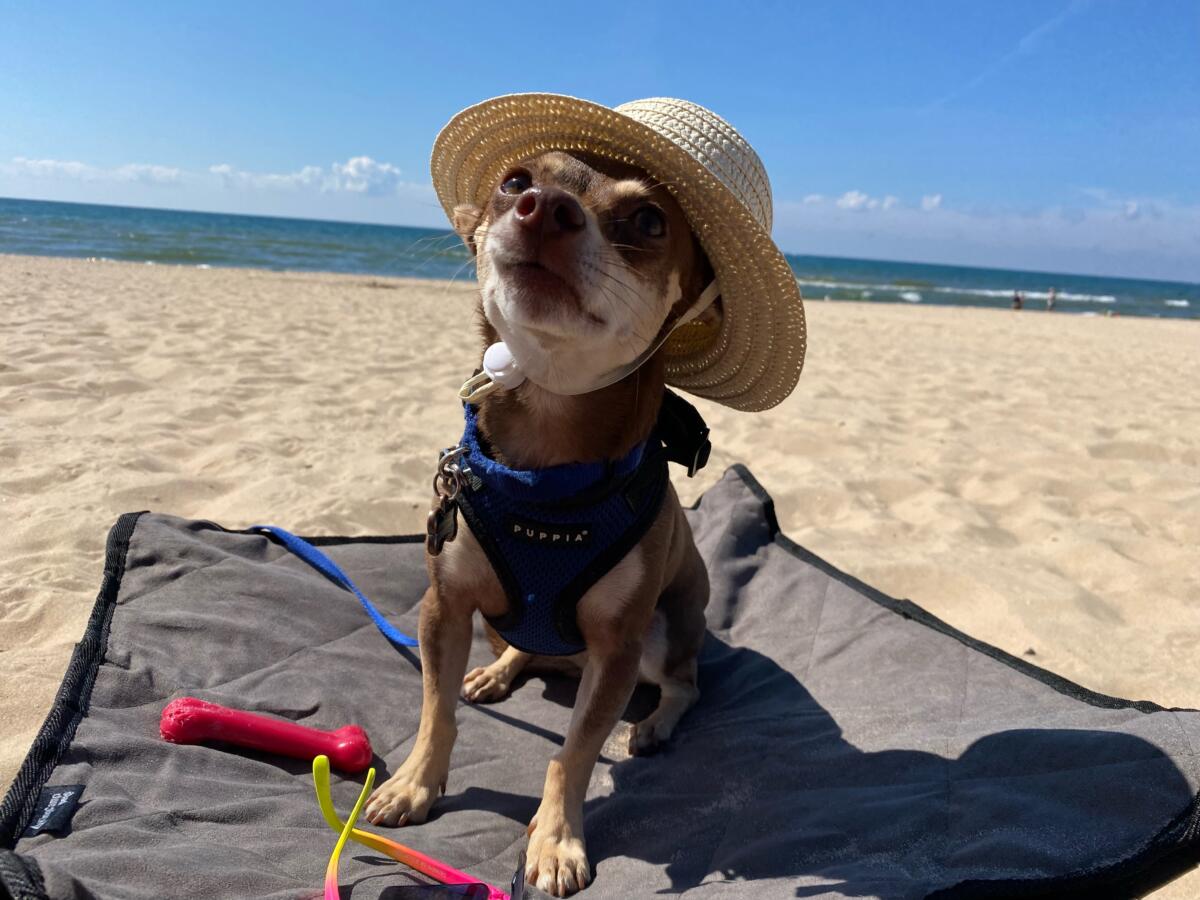
“Kismet (Chihuahua mix, age 4) has been RVing for three years now since joining our family. Her favorite activity is hiking and jumping on boulders. She loves traversing city streets as well as relaxing on the beach.” —Carol Seithel
Want to see your pet in this newsletter? Please send us a photo of your pet with a short description. No blurry photos and please do not submit your photo more than once.
ESCAPEES: The best club for RVers, hands down. Join for the perks, stay for the community. Learn more.
buttercup. Centuries ago, English dairy farmers believed that if their cows ate the little yellow flowers that commonly grew in the meadows the butter they yielded would be colored the same rich yellow. Experience seemed to prove that this was true and so the flowers were named buttercups. Actually, the field buttercup (Ranunculus acris) did improve the quality of Bossy’s output because the flower grows only on good pasture and thus provides good feed.
In yesterday’s newsletter, our cover story was about a major article last week in which The Wall Street Journal criticized Forest River for a history of defective manufacturing practices.
Of all automotive and RV manufacturers, Forest River is fourth in recalls, shown in dark blue on the chart. Source: National Highway Traffic Safety Administration (NHTSA)
The major mainstream media (what remains of it) has historically ignored the RV industry. Now, finally, a major national newspaper has stepped up with an article that should have then resulted in headlines raising alarm in RV industry publications and in newspapers all over Indiana, where 85 percent of all RVs are made.
But guess what? None that I can find has written a single thing! None. Zero. At the very least, I think, they might have written an editorial that presented another side of the story about the second largest RV manufacturer in the state (actually, in the world). If, in fact, there is another side of the alarming story.
Three years ago, the Indianapolis Star ran a damning four-part series of articles on the same subject—focusing on the Big Three manufacturers: Thor, Forest River and Winnebago. The RV industry media stonewalled it. We told you about this when it happened. The Star article never went anywhere.
Do you know why I care? Because I know the pain that those shoddy products have cost the people who bought them. Granted, most of the company’s RVs are fine. But way too many are riddled with defects that sometimes can never be fixed or cost a bundle to do so.
You better believe that if this Wall Street Journal article reflected positively on Forest River, the RV industry media would have gloated and run banner headlines. They would have asked their own reporters to follow up. As is, they’d prefer to bury it.
I know most of the major RV industry writers, editors and publishers, and I’m friends with many even though I’m a pain in their sides sometimes. But it’s sort of like right after the end of an NFL game where the players from both sides, fighting only moments before on the field, hug each other like best buddies.
The RV industry publications have an inherent problem that we at RVtravel.com do not have. They are funded almost entirely by advertising. Without it, they’re out of business. How much might it cost them if they published something that acknowledged the Wall Street Journal article? They’d risk losing advertisers and their dollars. Maybe lots of dollars.
What would you do if you were them? Keep your mouth shut and watch the ad dollars continue to roll in, or post a news item or editorial about a problem that you know to be true, but then face losing a whole bunch of money as punishment from angry industry leaders?
And, yes, RVtravel.com runs advertising, too much of it (for reasons I plan to write about ASAP). But it’s sold by an agency based on demographics, not our editorial policy.
Thankfully, a (way too) small number of our readers realize we have bills to pay and support us with voluntary subscriptions, which provides a lifeline should our advertising disappear.
By Gail Marsh
Setting up in an unexpected downpour of rain was all it took for quick-release hose connectors to become one of hubby’s favorite RV gadgets. Do you use them?
We’ve put them on our drinking water hose and black water rinse hose, and they really live up to their name! Now it takes no time at all to snap hoses into place without the hassle of getting the threading lined up and tightened so that no water leaks. The quick-release hose connectors are also great when we camp in cold weather. It’s so much easier to snap hoses on than fumble with threaded fittings when your fingers are frozen!
We’ve learned a few important things about them that may be helpful to you:
• Many quick-release hose connectors have a water stop feature. Nice idea and useful, but it can be difficult to connect to it if the hose is pressurized.
• The best quick-release connectors are made of solid brass – not brass-colored aluminum or other brass lookalikes. It pays to get high-quality connectors. (The first ones we bought from our local home store lasted less than six months before they corroded and developed leaks.) These are the highly-rated ones pictured above.
• You can get quick-release connectors that are made from plastic. Some people have had good luck with these because they will not corrode. However, the sun can degrade the plastic and cause the connectors to fail.
• A water pressure regulator is a must. Water pressure can vary greatly from campground to campground. Many quick-release connectors are rated for water pressure under 60 psi. If your water pressure exceeds 60 psi you may damage the connector or worse – your RV plumbing lines. This is the one RVtravel.com recommends.
• Quick-release connectors come in varying sizes. Be sure to check the size your hoses require before you make a purchase.
• Make sure your quick-release hose connector is solid brass and lead-free, or labeled for drinking water use.
By Chuck Woodbury Founder, publisher, and shoe historian
RAWLINS, Wyoming— A while ago, at the Carbon County Museum, I checked out the display of Big Nose George Parrot, the only man in American history to be turned into a pair of shoes. His name was actually George Manuse. He was lynched in 1881.
Big nose in his pre-shoe life
George was a rustler with a big nose, hence his name. Somewhere along the line, he met up with the James Brothers, Jesse and Frank. Along with a guy named Dutch Charley, they decided to rob a train. They probably would have robbed a bank, but back then Wyoming had more trains than banks. Today, of course, they would have robbed a mini-mart.
So, they hopped on their horses and headed off for a lonely stretch of train tracks, where Big Nose convinced the others they should mess with the tracks to derail the train. “Then it will be a breeze to stick ’em up,” he probably said, or something like that. And the other guys probably said, “Good idea, Big Nose.”
Well, as they were fidgeting around with the track, lo and behold, a Union Pacific foreman in a hand car came pumping around the bend. The outlaws hid. The eagle-eyed railroad man, however, noticed that someone had been fooling with the track.
“Suspicious,” he probably mumbled, because he knew something was definitely up. So he rode ahead like crazy, where he instructed the approaching train to hit the skids. The railroad guys informed the law, who rode out to apprehend the would-be train robbers.
Bad idea, because Big Nose and his boys blew away two of the lawmen.
The James Brothers, of whom only Frank was reportedly involved in the attempted heist, decided the heck with Wyoming, and off they rode.
Dutch Charley and Big Nose split up. Charley was apprehended first, in Montana, and brought back to Wyoming where he fessed up to his deeds, figuring honesty was the best policy. Bad decision, because the locals were so mad they strung him up on a telegraph pole. Bye bye, Charley.
Big Nose George got caught next. He, too, confessed—but it didn’t do him any good either because he was sentenced to hang. In jail, however, he tried to escape, failing, but beating up a guard in the process. The local boys got wind of this and stormed the jail, hauling Big Nose over to the telegraph pole in front of Fred Wolfe’s Saloon, where they lynched him, probably getting stiff drunk while George just got stiff.
BUT THAT’S NOT THE END to George’s story. A young doctor named J.E. Osborne took possession of George’s body. The first thing he did was make a death mask of his face, which you can see in the museum. Second, he sawed open his skull to check out his brain to see if it was different than a good person’s brain. It wasn’t.
Next, he had George skinned, and sent the skin to a Denver tannery. “Make me a pair of shoes, and leave on the nipples” he instructed. Well, he got the shoes, but not the nipples. The shoes are also in the museum.
Then he took what remained of George and put him in a whiskey barrel, which he buried. In the 1950s, construction workers digging for a new building found the barrel and the bones of Big Nose George.
Dr. Osborne wore his George shoes all the time, especially to special occasions. He eventually became a state big shot and was even elected governor. Some people say he wore George to the inauguration ball.
The top of George’s skull, meanwhile, became a “brain bowl” for Dr. Lillian Nelson, Wyoming’s first female doctor. For years she used it as a doorstop.
Dr. Osborne’s shoes and George’s sawed-off skull are in the Carbon County Museum, which is in downtown Rawlins in an old Mormon church.
I was incredibly lucky to visit the day that two photographers were photographing George for the archives of the Wyoming State Museum. After they were done, they put the shoes and skull back in the normally closed-up glass case. When they weren’t looking, I managed to cop a feel of the shoes, which are two-toned. They’re skin color on the front and brown in back—kinda like saddle shoes. Only the soles are made of cow leather. And they are very worn, proving that the doctor wore his George shoes a lot.
Big Nose George’s skull and the shoes made from his skin.
I rubbed the shoes. I figured they’d be flimsy. I was shocked that they were very sturdy like they were made of cow leather. George’s skull, meanwhile, felt like bone, no surprise there.
That’s the story of Big Nose George. If you are in Rawlins, check him out a the Carbon County Museum.
I’m proud to be an Iowa farm girl! That said, I still have a difficult time picking out sweet corn from the grocery store.
Recently, I came across this video. It shows specific steps you can take to find, test, and purchase the very best sweet corn. These tips really work!
But wait!
If at all possible, purchase sweet corn directly from a farm or local independent vendor. When traveling back to my home state during the summer, I’ll often see vegetable stands along the highway. Take advantage of this opportunity. Not only is the corn likely fresher than you’ll find at the grocers, but your purchase may also help support a family farm.
Video synopsis
Before you watch the video, here’s a brief overview:
• Step one: Avoid the urge to “open” the husk and peek at the kernels! This allows air inside, which will dry out the corn kernels. Instead, use your fingers to test for plump kernels. Choose an ear of corn. Gently rub the husk covering the ear with the tips of your thumbs. If you detect full, straight rows of corn with full kernels, you have a potential keeper.
• Step two: Look at the tassels (silk) at the top of the ear. If the silk is a bit sticky and a light brown color, it’s fresh. Dark brown, dry silk usually means the corn is less fresh and not as juicy.
• Step three: Look at the bottom of the ear where it was picked from the cornstalk. The stem should be white, not brown.
Sweet corn can be shucked and cooked all in the same day for optimal freshness. In that case, you can leave the corn on your kitchen countertop.
If you plan to eat the corn tomorrow or later, leave the husks on. Then, tightly wrap the corn in plastic and place it in your refrigerator. Shuck, cook, and enjoy the sweet corn within a few days for the optimal taste.
Here’s the video
A representative from the Arizona Department of Agriculture leads the video. She clearly explains the best ways to pick the right sweet corn from the grocery store.
If you follow her advice, you and your travel buddies will enjoy the sweetest, best summer veggie of all—sweet corn on the cob!
Sweet corn ice cream?
For a yummy (and unique) treat, try sweet corn ice cream. It’s summer in a cone! Here’s the recipe.
Today’s RV review is of the Grand Design Lineage Series M 25TK Class C motorhome. Wait, motorhome? Yep. Grand Design has heretofore only made towable RVs, but the company recently announced that they will be shipping motorhomes. In fact, this is the first example of what the company promises will be a larger line of motorhomes, including Class C and Class B (vans).
To be quite honest, when Grand Design announced that they would be building motorhomes, I wasn’t very excited. The company has done an okay job building towables, but many of their offerings are really entry-level in structural features, in my opinion. Further, the company has really come under fire lately for issues with their frames, and they were very slow to respond to the issues.
But we’re here to look at the new Class C, and I have to say that, after learning more, I am very impressed with what they’re doing. In fact, I’m so impressed that I feel that if you are in the market for a new Class C motorhome, you’re doing yourself a disservice by not waiting to check this out.
Grand Design Lineage
The Lineage brand is going to be applied to all of Grand Design’s motorized units.
From a business standpoint, this makes a lot of sense because a dealership can sign up for Lineage and get the Class C and Class B and whatever else comes down the pike from Grand Design. Sometimes the RV industry so convolutes these brands that it makes it confusing for customers and difficult for dealers.
For example, do you know the difference between a Reflection, a Transcend and an Imagine? That’s just Grand Design’s current major brand of towables. Think of the rest of the RV industry doing the same thing. I follow the RV industry, and it’s confusing for me—so I think a great deal of consolidation would not be a bad thing.
Start at the chassis
While the company will offer more chassis options in the future, this one is built on the Mercedes-Benz Sprinter cutaway chassis. They specifically chose the 4500 series chassis, which is significant. Like with pickups, the numbers used to brand the chassis from companies bears relevance to their ability to carry cargo.
When an RV maker builds a motorized RV, essentially, that RV is cargo on the back of the chassis. So, having greater cargo carrying capacity means that there’s additional capacity for you and your stuff. Many Class C RVs are built so close to the capacity of the chassis that there are only a few hundred pounds of remaining capacity for your stuff.
So the objective, as described by Mike Hums at Grand Design, is that you get at least half a ton of cargo carrying capacity in your Lineage, which is respectable.
Impressive build features in the Grand Design Lineage
Part of the way the company has worked on this is to frame interior walls and things like the dinette in welded aluminum as opposed to wood. This offers greater strength and lighter weight.
Other weight-saving measures include the European door and the aluminum power-operated step. Little bits here and there add up, and not all of these measures are inexpensive.
Something that really impressed me is the aluminum structure under the skin of this rig, which is an extruded aluminum channeled piece to which the walls and roof slot in. This is a really impressive way of doing this build.
The front and rear caps on all models will be painted with automotive paint, and you can also get a fully painted exterior as an option.
But two other things just really made me happy.
Mike Hums described a partnership with the folks who make SharkBite plumbing fittings, which are used in this RV. Leaky, cheap plumbing fixtures are a common problem in the RV industry, so the fact that they’re using these metal fittings says a lot.
They also have a 25-year guarantee on the plumbing of this unit. That says even more.
Grand Design Lineage Series M 25TK - 2026
1 of 15
A variety of very tasteful paint jobs on the Grand Design Lineage Series M 25TK
Floor plan of the Grand Design Lineage Series M 25TK
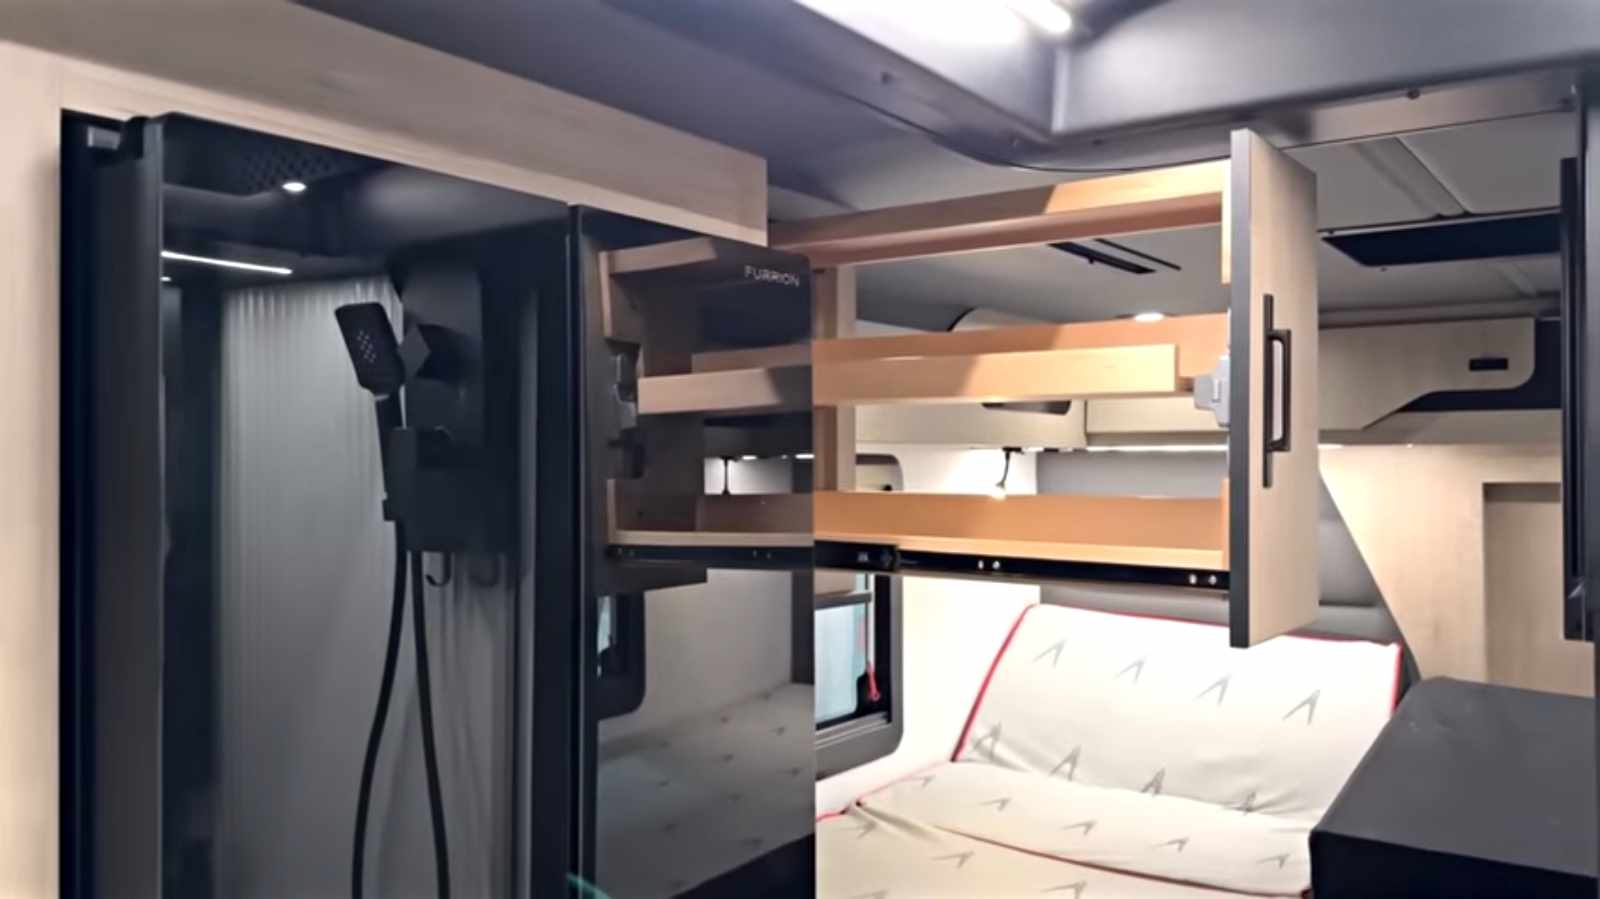
A central shower and bathroom are very unusual features
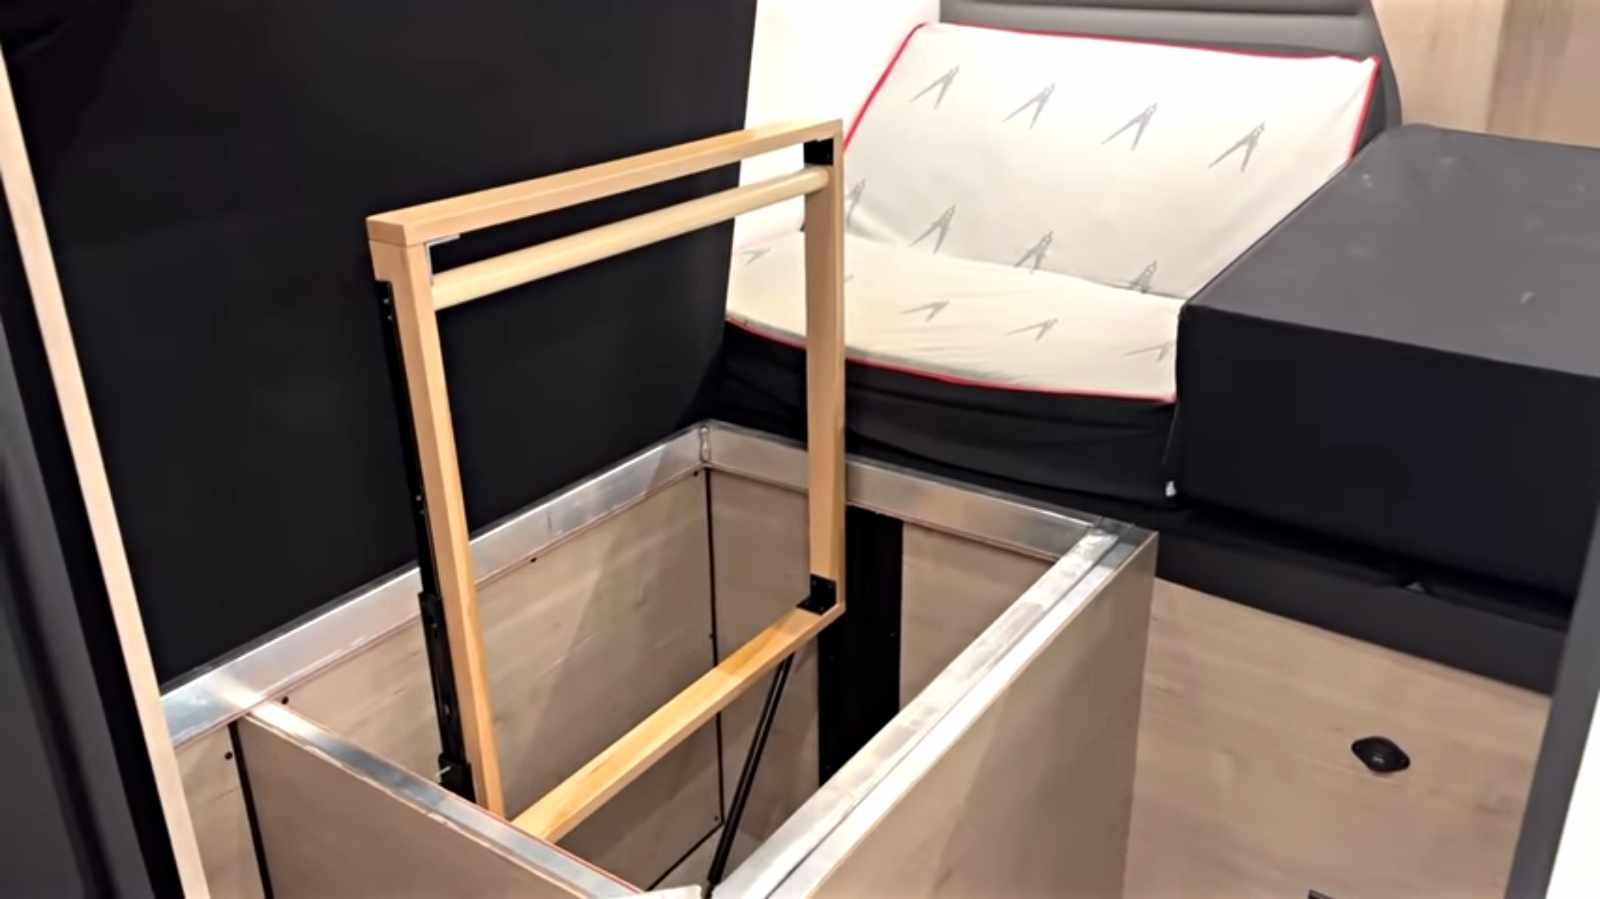
A pop-up clothes hanger under the camp-side bed
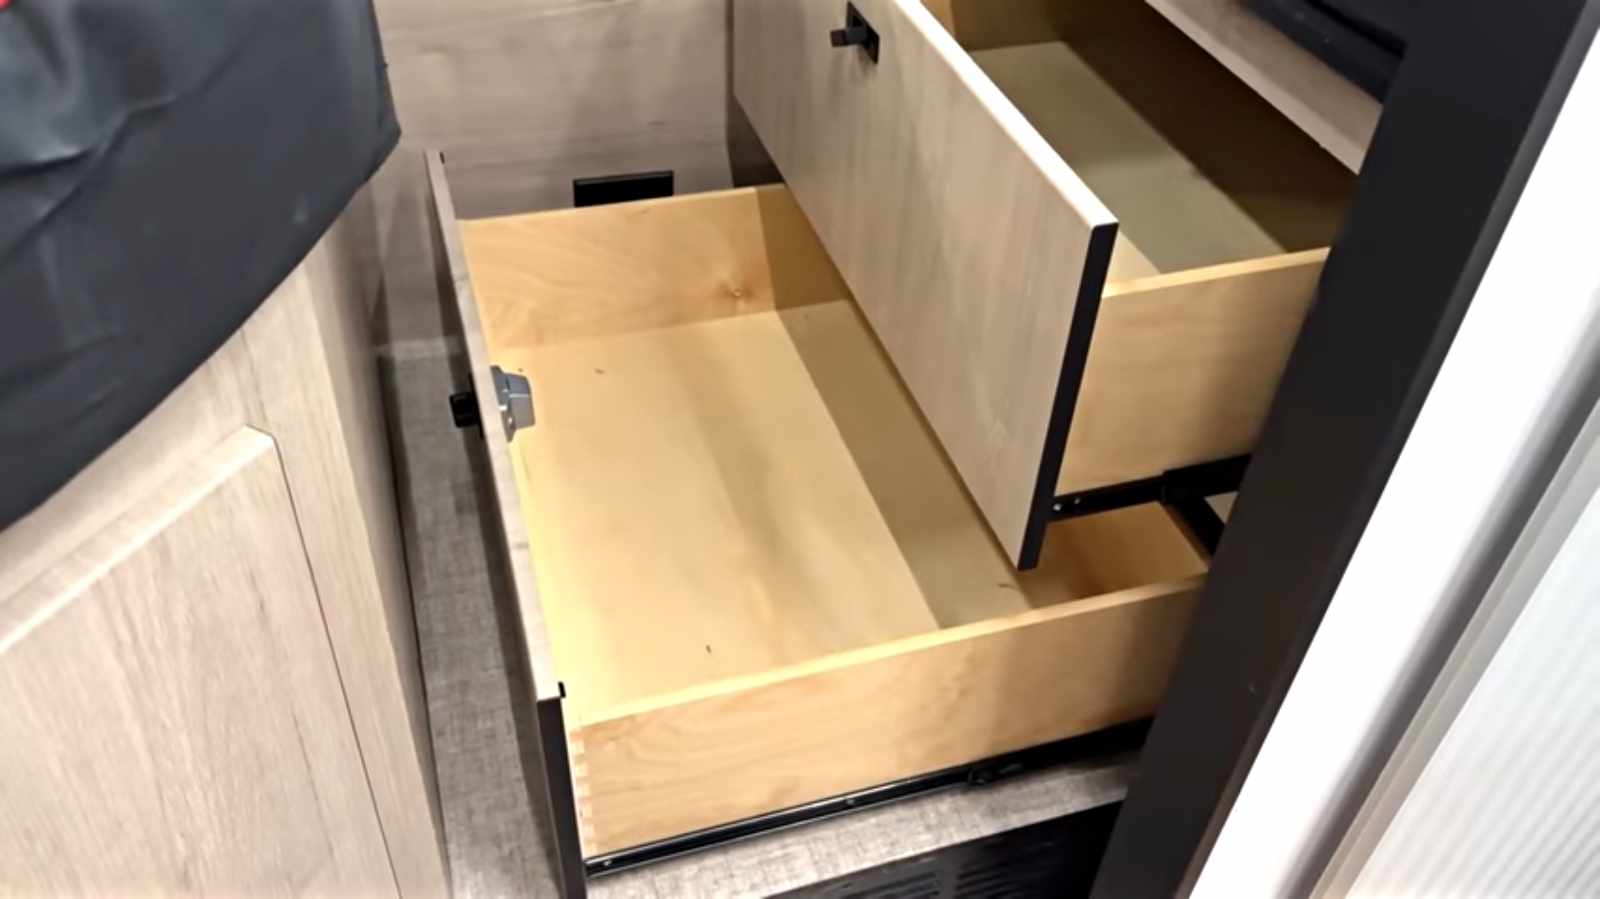
Under-bed drawers with dovetail construction are a big plus
A nifty pull-out pantry and 10-cubic-foot fridge
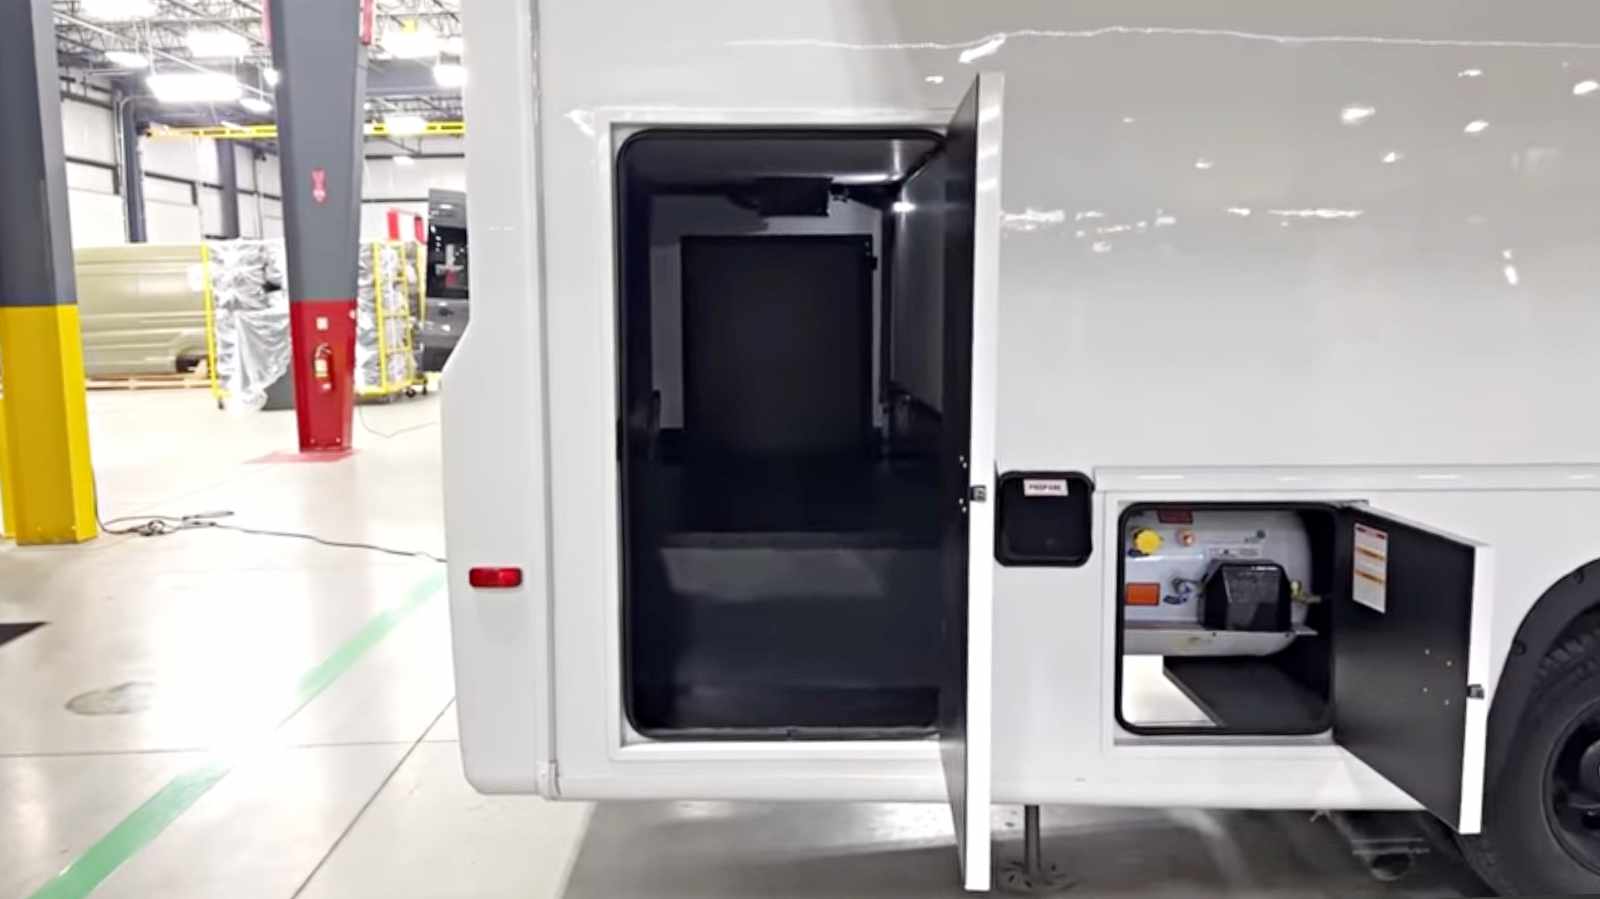
A large cargo hold is a big plus in the Grand Design Lineage Series M 25TK
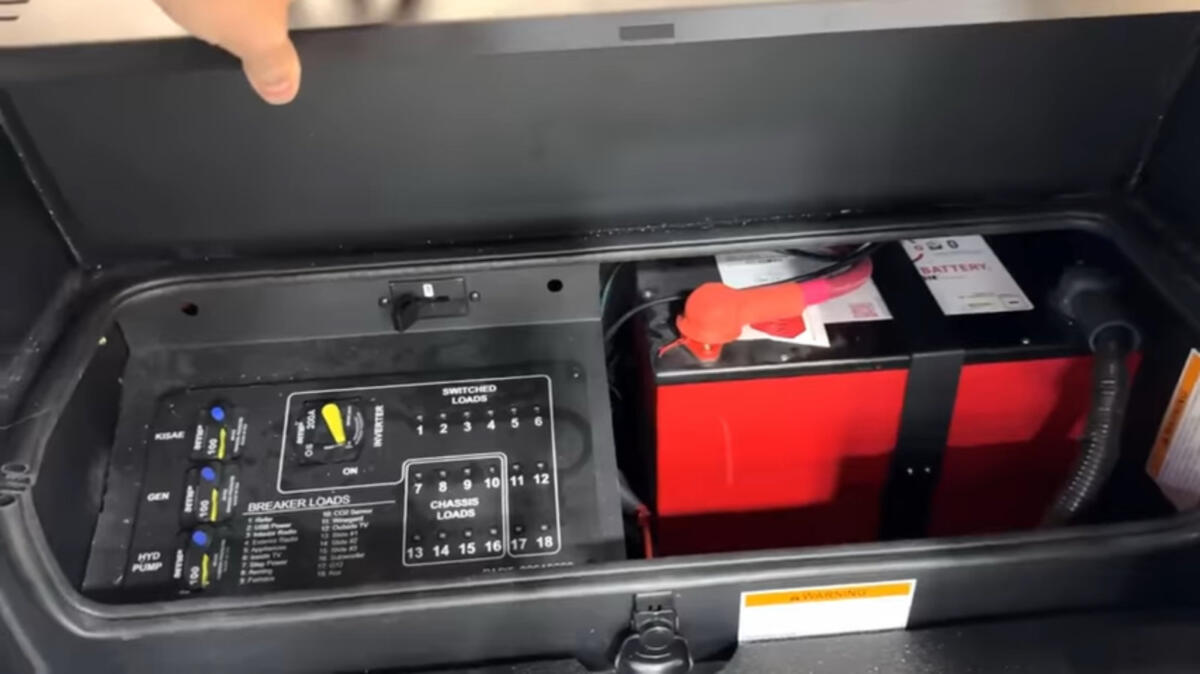
A standard large lithium battery and breakers for power are big pluses
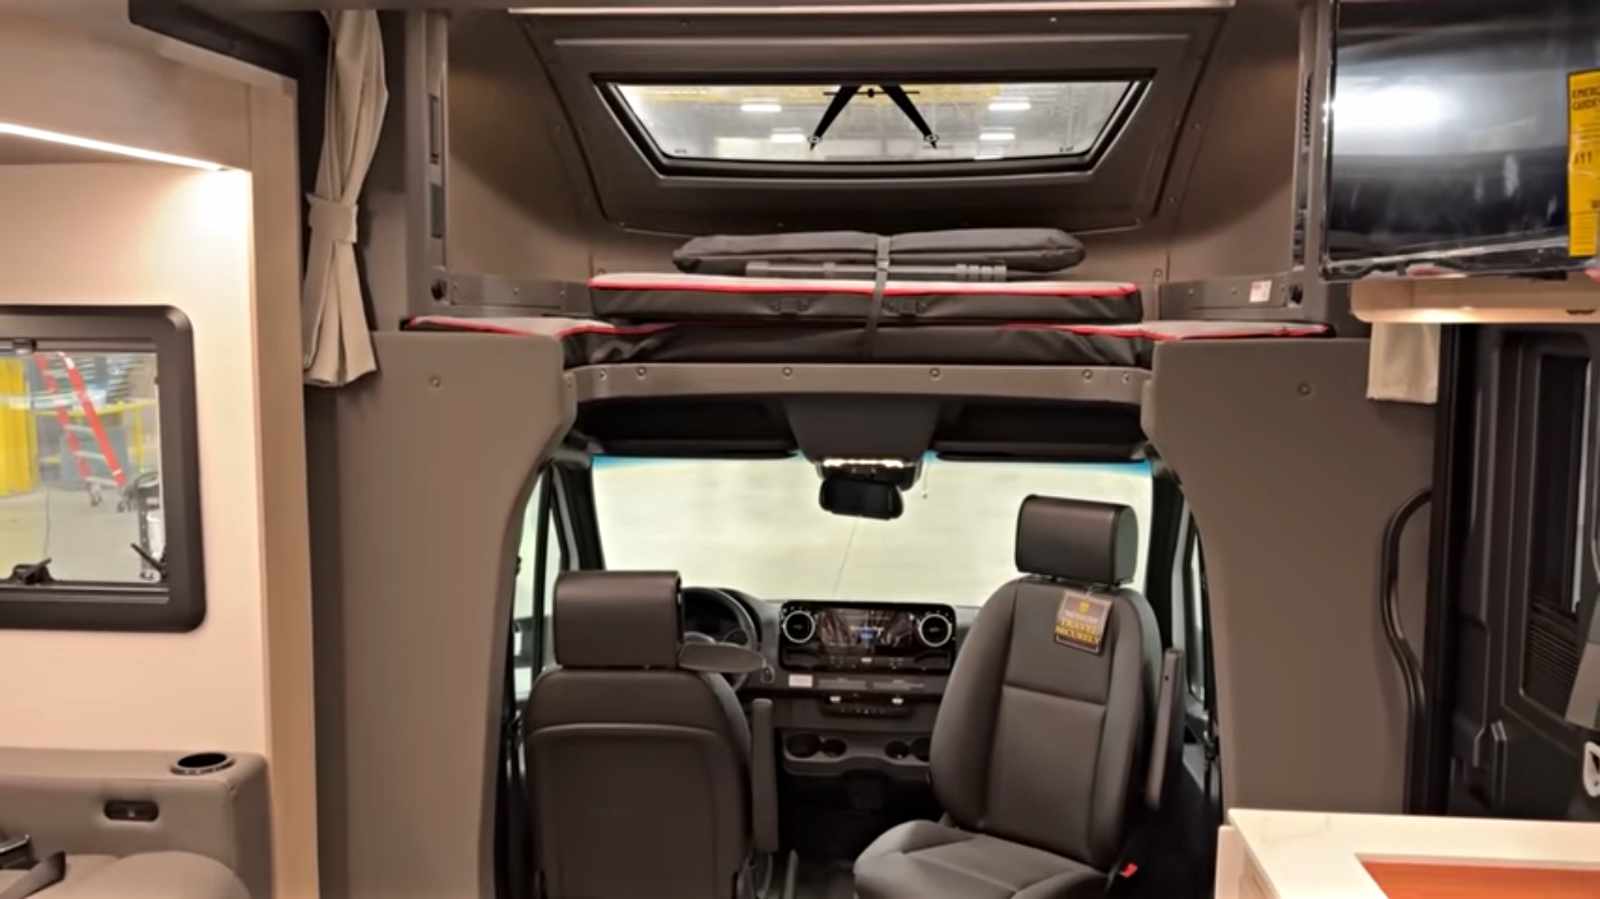
The cab of the Mercedes-Benz Sprinter 4500 series
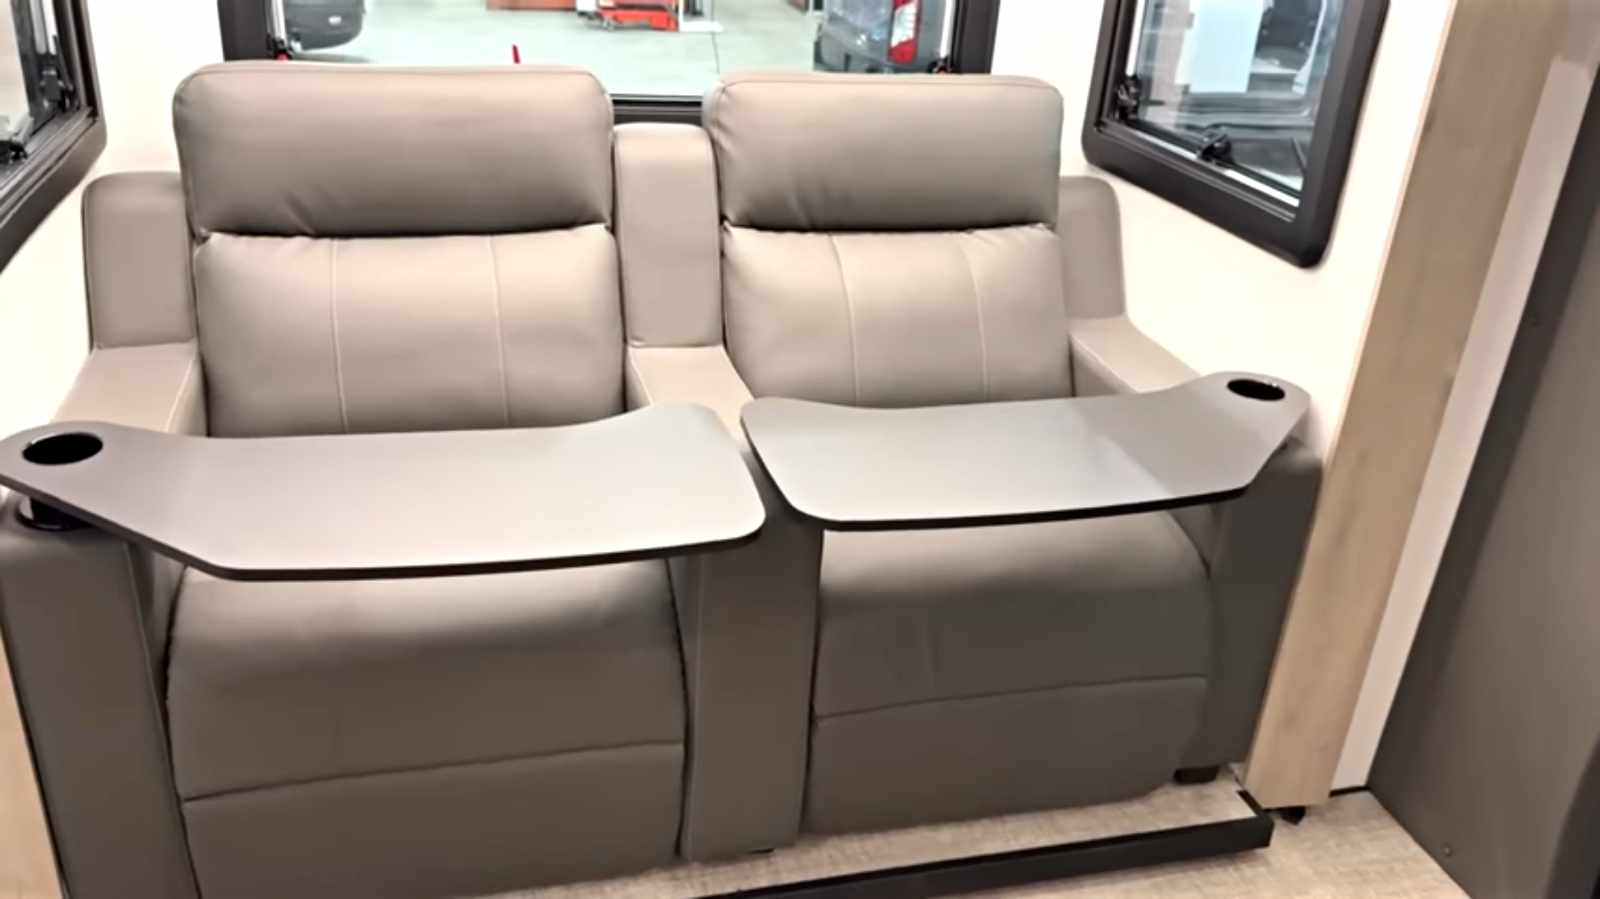
Available theater seats have good table space
An over-cab bunk can support up to 350 pounds
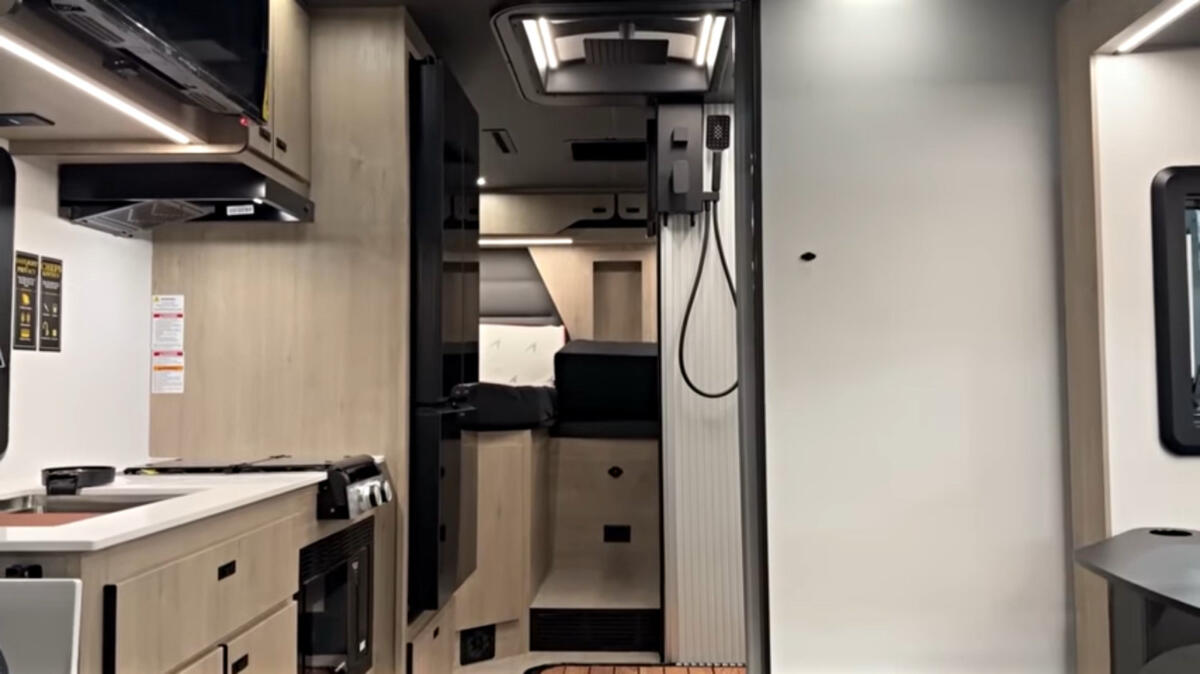
Kitchen in the Grand Design Lineage Series M 25TK
Decent storage in the kitchen of the Grand Design Lineage Series M 25TK
Twin beds with a raisable head in the Grand Design Lineage Series M 25TK
Electrical system on the Grand Design Lineage 25TK
The electrical, too, is impressive. The standard system in this rig includes 540 watts of solar and Lithionics lithium batteries rated at 310 amp-hours. Further, there’s a 1,000-watt inverter standard. This is all backed up by a 4.5Kwh propane-fueled generator. [Note: There are different figures in Josh’s video (below) and on the Lineage Series M 25TK website, so we went with the website in case it’s been updated since the video. There… now you don’t have to report the discrepancy to us.😉]
There are also upgraded systems available, including one that uses a second alternator on the diesel engine in this coach to charge the batteries.
But what truly blew me away is the electrical system in this rig, which uses breakers instead of fuses. So, should you experience an issue, the breaker will trip as it would in your home, but this will also illuminate a red light by the breaker. No more having to carry a bunch of spare fuses.
“We’re spending a lot of money where people can’t see it,” said Hums.
What’s inside the Grand Design Lineage 25TK
This is a relatively common floor plan for a smaller Class C, but the devil is always in the details on these.
Over the cab is a bunk room that has its own A/C ducts. There is a windshield on the bunk area with a bunch of Easter eggs that someone might enjoy, including a vintage motorhome and some other things.
The kitchen in this is exactly how trends are going with a linear two-burner propane cooktop and a convection microwave.
The sink here is what’s referred to as a smart sink, where there are various drop-in inserts to accommodate dish washing or cleaning veggies. There’s also a glass washer where you press a glass down on the thing and it sprays water up into the glass.
There is a good amount of cabinet space here with drawers inside the pantry, but also two huge drawers under the dinette if you choose that option. You can also get theater seats. The drawers are nicely built with dovetailed plywood construction.
I also like that all the latches on all the doors are positive mechanical latches instead of just magnets, and the drawers feature dovetail edges. Nice.
Magical bathroom in the Grand Design Lineage 25TK
The mid-ship bathroom is truly unique in this rig. There is a porcelain toilet and then a powder-coated aluminum cabinet with the sink and medicine cabinet. There is a segmented door on a track where you can close-off the rest of the RV.
But then there’s a teak floor and you have a second set of segmented doors on tracks. Now you can close off the toilet and sink and, essentially, the hallway becomes the shower. Or you can leave that inner door open and have a really big shower. It’s unusual and rather impressive.
Lastly, the A/C in this is a ducted unit that features a residential filtration system. Oh, and every light in this rig is dimmable. Plus, there are motion-sensing lights in the pantry, the rear closet and in the bathroom.
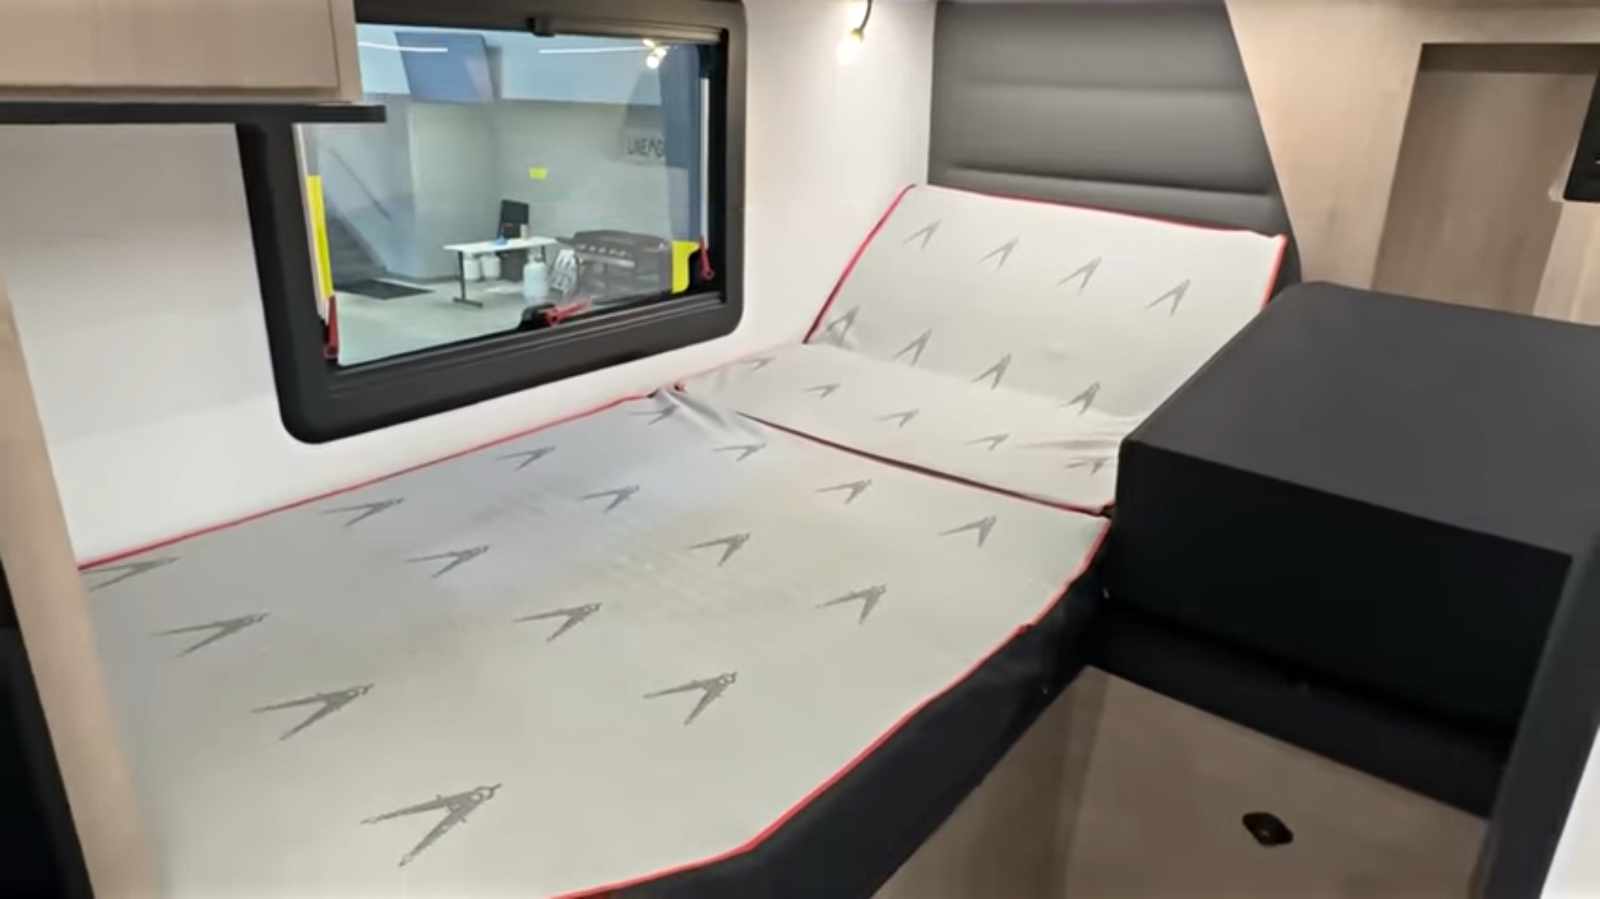
Bedroom in the Grand Design Lineage 25TK
This RV features twin beds in the back. There is a center cushion to transform the whole bedroom into a single large king-sized bed. Each of the 36 X 80 twin beds has a power-operated adjustment for the head of the bed, which is nice.
On the camp side of this rig you can move the mattress and reveal hanging storage. Over on the road side there are larger drawers under the bed.
Grand Design Lineage Series M 25TK specifications
Conclusions
I have to say I was ho-hum about Grand Design bringing out a Class C to the market but, after looking into this, I am very impressed. The decisions made by the company seem to point to building a very high-quality product at a competitive price.
Oh, how much? The base model is presently slated to carry a $228,776 MSRP.
Something else worth noting: The headrests in the front seats of this rig actually have little safes in them. Talk about finding space that everybody else just ignores.
Overall, this is one of the best Class C designs I’ve come across. I got to visit a local dealership when Grand Design was parading the Lineage around. I have to say it’s a really, really well-built and nicely designed RV. Let’s hope some of that focus on quality rubs off on the travel trailer people at Grand Design.
My thanks to Josh from Bish’s RV for the photos and video in this story.
These RV reviews are written based on information provided by the manufacturers along with our writer’s own research. They are based on information from a single unit and may not reflect your actual experience. Shop your RV and dealership carefully before making a buying decision. They are intended only as a brief overview of the vehicle, not a comprehensive critique, which would require a thorough inspection and/or test drive.
Tony comes to RVtravel.com having worked at an RV dealership and been a lifelong RV enthusiast. He also has written the syndicated Curbside column about cars.
You can also check out Tony and Peggy’s RV podcast.
By J.R. Montigel STAFF WRITER If I told you that you will spend close to half a year of your life waiting at traffic lights, would you believe me? Well, believe it. Assuming you spend 10 minutes a day on average for 60 years, that’s more than 150 days of your life—about five months—waiting for red lights to turn green. Again: FIVE MONTHS! The video directly below explains further. Or continue reading.
If you commute in a big city for most of your career, you can double or triple that. For most people that’s a monumental waste of time.
At times I’ve thought of myself as a slave to traffic lights. They order us to do something, and we obey. If not, we risk punishment—costly traffic tickets, or worse.
Alas, traffic lights and the countless stop signs we encounter with our cars or RVs are necessary. Traffic lights guide travel, prevent chaos at intersections, and keep people safe.
Traffic lights have a fascinating history and more thought goes into their design than most of us realize. Here’s a short tutorial on how they work.
Origins of traffic lights
In 1868, near the Houses of Parliament in London, the first traffic light appeared. It was gas-powered and had to be lit and extinguished by hand. While the idea was clever, the early signals were notorious for exploding, definitely not a good thing. The hazards of using gas made people think twice about widespread adoption, and the “stoplight” experiment lost steam for several decades.
Electric power changed everything. In 1914, Cleveland, Ohio, installed the world’s first electric traffic light. They were still human-operated, with a control booth nearby. Early electric lights featured a variety of signaling methods. Red and green lenses were the primary signals, but a third signal that was either white or an audible buzzer warned of a change. This basic format laid the foundation for our lights of today.
Railroad origins
Traffic engineers didn’t choose their colors randomly. They borrowed from railroad signals, which had used the hues for decades. On the tracks, red signaled danger and halt, while green meant proceed with caution. For drivers, these meanings became even simpler over time: red = stop and green = go. This color system stuck, thanks to its clear, universal logic.
When cities started adding more traffic lights, collisions and roadway deaths at intersections reduced sharply. The improvement in safety made traffic lights popular, and towns everywhere soon asked for their own.
The basics: structure and function
A typical traffic light uses three colors to manage traffic, red, green and yellow (the latter to warn of an impending red light).
Road type and its role in timing
Highways, busy city streets, and quiet residential roads all need different timing. Traffic engineers look at road size, how many lanes there are, and traffic flow before setting up signals. For big or complex intersections, they often conduct traffic studies to decide how long each light phase should be for every direction.
The logic of yellow lights
Yellow lights must last longer on faster roads. This gives drivers time to see the warning, make a choice, and stop if needed. If a yellow light is too short, drivers run the risk of entering intersections on red, causing crashes. It’s critical to get this timing right—especially for bigger, heavier vehicles like RVs.
Modern traffic light control comes in a few forms
Fixed timer controls: Lights follow a preset schedule, changing at set intervals.
Actuated controls: The system reacts to real-time conditions. To do this, traffic lights use several sensor types:
Cameras above the lights
Radar units that detect moving vehicles
Pressure or weight sensors installed in the road beds
How sensors help
Sensors communicate with computers to tweak traffic lights for busy or empty roads. For example, if one direction builds up with lots of cars while the other side is empty, the green time can extend for the busy side. Emergency vehicles also benefit: If an ambulance approaches, sensors will clear the intersection quickly so it can pass through with minimal delay.
Coordinated signals
Many big city roads have traffic lights set to change in sequence along a corridor. This setup lets a large group of vehicles—like a line of RVs—make it through several intersections in a row without stopping. This coordination means fewer stops, less idling, and better flow on busy routes.
Traffic light timing
Traffic engineers juggle many variables: how many directions traffic can move, the speed limits, and local quirks at each intersection. They use traffic studies to map out real driver habits and figure out exactly how long each green, yellow, or red phase should last to balance safety and efficiency.
Volume changes throughout the day challenge engineers. Morning rush hour looks different from midafternoon. Signals need to adapt, but safety always comes first. Getting yellow signal duration right is one of the hardest parts because vehicles travel at different speeds on different roads.
Autonomous vehicles are on the rise. These smart vehicles may someday “talk” to each other and manage intersections without the need for lights. That future is still decades away, so traffic lights remain a must for RVers and all road users for now.
By Nanci Dixon
I was adding air to the motorhome tires (I love my VIAIR air compressor!) and was turning and turning the valve stem cap when I realized the cap wasn’t coming off. The stem itself was unscrewing! I figured it out just in the nick of time before I unscrewed the stem all the way. I hurriedly turned it back in, held the stem and got the cap off and added air.
Having had a valve stem come out while on the road, I knew just how bad it could get. It was lucky that when the valve stem blew off it was on an inside dually and not the front steer tire.
We didn’t have a tire pressure monitoring system (TPMS) at the time and the six-month-old tire was completely destroyed. About $800 later, we had a new tire and a battle getting the money back for the defective mounting. Once our persistence on our claim got high enough in the pecking order, Freightliner sent us a check.
The valve stem unscrewing incident made me think about articles I had seen by tire expert Roger Marble on RVtravel.com about valve stems and a valve stem tightening tool. I checked with Roger, and he told me that over-tightening a valve core can cause it to fail, so it’s best to use the little valve core tool. The nut on bolt-in metal stems only needs 25 to 45 inch-pounds, so a basic “snug” with a regular hand wrench is fine.
Here’s a link on Amazon to a valve core tool that Roger recommends. It’s also available at auto parts stores.
We use cookies to ensure that we give you the best experience on our website. By continuing to use our site, you consent to accepting cookies. We NEVER have or will sell reader's data. For more info, please see our privacy policy page.