Home Blog Page 318

Save-A-Step stabilizes RV steps; no more bouncing!

By Gail Marsh
Boing! Boiiing! That’s the sound we used to hear when stepping on our RV’s steps. Well, maybe we didn’t exactly hear it, but the entire trailer bounced whenever anyone used our entry steps. It certainly felt like Boing! Boiiing! The flimsy two steps had way too much “give” in them, even if a child used the steps! Then I found Camco’s Save-A-Step.

What is it?

The Save-A-Step is an adjustable step brace that fits directly under your RV steps. It’s portable and adjustable. What’s more, it works to banish the “boiiing” feeling entirely! Made from heavy-gauge steel and rated to handle 1,000 pounds, it features a 3/4-inch solid metal screw that adjusts to the exact height you need to stabilize the bottom step. Once that step is secure, it firms up the entire step system no matter how many steps your RV has.

Save-A-Step has been a great addition to our RVing experience. Its simple yet effective design helps stabilize the camper steps and provides a solid surface for our feet—whether we’re going out or coming in. It also saves wear and tear on the step.

Because the Sav-a-Step weighs less than two pounds, it doesn’t add significantly to the overall rig weight. Its design also allows for easy storage on moving day.

How the Save-A-Step works

It’s a simple, but brilliant concept. The Save-A-Step slips under the bottom RV step. Then you work the screw to raise or lower the device until it just touches the bottom of the step. With the bottom of the Save-A-Step sitting on the ground and the top part touching the underside of the step, your steps are secure. No more “boing” or trailer tilt when using the stairs!

You can check it out here and order for a great price.

Have you added any product(s) to make your RV steps function better? Please tell us about it/them in the comments below. Thanks!

RELATED

RVT1207

An RVer’s guide to using the Seek app by iNaturalist

3

If you’re an RVer, you already know that every roadside stop is a chance to connect with nature and perhaps learn something new.

Whether you’re parked at a scenic overlook or exploring a new campground trail, the Seek app by iNaturalist can transform your RV adventures. Even though I’m retired from teaching, I still love to learn! iNaturalist’s Seek app makes learning fun and easy!

Note: There is another app, also named Seek, that’s an app for finding employment. When you download the nature app, make sure you get the iNaturalist Seek app. (Unless you’re looking for a job, that is.)

What is the Seek app?

Developed by iNaturalist, the Seek app is a free, family-friendly tool for your cell phone. It uses image recognition technology to identify plants, animals, and more in real time.

Seek is designed for users of all ages who want to learn about the world around them. The app’s intuitive nature makes it perfect for RVers who appreciate quick, on-the-go insights into the natural wonders you see as you travel.

Give Seek a try

Life on the road is all about exploration, and your RV trips often lead you to unexpected natural treasures. Here’s why the Seek app is a must-have companion on your journey:

Instant identification: Simply point your smartphone camera at an intriguing plant or animal and let Seek do the rest. You won’t need to carry bulky field guides. Instead, you’ll get answers in seconds.

Family-friendly and kid-safe: With no account setup required (unless you want to share your observations), it’s a perfect tool for family trips, encouraging everyone to explore safely. (Our grandkids love using this app!)

Enhanced nature journaling: Use Seek to quickly record natural species during your adventures. Whether you’re a seasoned nature journal keeper or just starting out, the app helps you build a daily log of the wildlife you encounter.

Step-by-step guide

Follow these steps to locate, download, and use the Seek app:

1. Download and set up. Download the Seek app from the Apple App Store or Google Play Store. Once installed, you can either use it immediately without creating an account. Or, if you wish, you can link it to an iNaturalist account to share findings with other app users.

2. Enable location services. For Seek to work its magic, you should allow the app to access your location. This ensures that it can narrow down species suggestions based on the local environment. This is crucial when you’re in a new area on your RV travels. I always set this to “only while using the app” to ensure privacy.

3. User-friendly menu. Once you open Seek, you’ll find:

My observations: Quickly review past sightings organized by category.

Challenges: Participate in monthly challenges that test your naturalist skills (a fun way to add some friendly competition to your road trips).

Achievements: Earn badges as you build your collection of identified species.

Exploring these sections can not only boost your confidence but also provide inspiration for your next stop along the way.

4. Hit “Home” and start seeking. The heart of the app lies in its camera feature. When you’re ready to identify something:

Tap the camera icon: This will bring up a reminder to be mindful of your surroundings, important when crossing roads or exploring unfamiliar terrain.

Scan and snap: Point your camera at the object you want to identify. It might take a few tries or different angles (especially with moving subjects like insects) before a confident match appears.

Review the results: Once a species is recognized, Seek will show you details and link to further resources like Wikipedia for more in-depth information.

5. Integrate with a nature journal. Many RVers love to document their trips through a nature journal. Here are a few creative ways to do this with the Seek app:

On-the-spot entries: Identify a plant or animal, then jot down details in your travel journal—note your location, the subject’s habitat, appearance, and any interesting behaviors.

Species lists: Use Seek to compile a daily or trip-specific list of species observed.

Photo documentation: Snap photos with Seek, then print them out or include digital copies in your journal. Over time, you’ll build a personalized guide to the natural world you’ve seen on your travels.

Additional tips for RVers

Plan nature breaks: Schedule short stops as you travel along your planned route. Think: scenic overlooks or park trails. A few minutes with Seek can turn a routine break into a memorable nature encounter.

Pack a small notebook: Even if you rely on your phone for identification, a small journal for quick notes and sketches can enhance each observation.

Stay safe: Always be aware of your environment. Follow the app’s reminders—look both ways, don’t disturb wildlife, and avoid tasting plants.

Share the experience: Whether it’s with family or fellow RVers you meet along the way, sharing your discoveries can spark interesting conversations and inspire more outdoor adventures.

Do you use iNaturalist’s Seek app or another app like it? Tell us about your experience in the comments below.

RELATED

RVT1207

Ever wonder what the inside of a semi-truck sleeper cab looks like? Here you go!

By Cheri Sicard
Have you ever wondered what’s inside those big semi-truck cabs you pass on the highway while RVing? I know I have. Apparently so did the team at Jalopnik. They produced the semi-truck sleeper cab camper tour video below to show what sleeping in a big rig is really like.

Guess what? It’s pretty darn nice and not unlike sleeping in an RV!

These semi-truck sleeper cabs are, in reality, small RVs, giving long-haul truckers the conveniences of home and a comfortable place to rest while on the road.

It begins with blackout shades for all the windows.

The truck in the video has two separate sleeping bunks.

A small but functional galley includes a microwave oven, a refrigerator, and built-in storage with a cutting board.

There’s a television, a sound system and a climate control system built in. Our host reports that the sleeper cab’s heater works almost too well.

Rooftop vents, much like in a traditional RV, move additional air around the truck cab’s living area.

In the video, our host spends the night in a sleeper cab and reports a great experience. Overall, he was impressed with how well the small space was utilized.

So wonder no more. Now you know what’s inside those semi-truck sleeper cabs you pass every day!

RELATED

RVT1207

Plugging your RV into a range outlet: Good idea or recipe for disaster?

An RVer who posted on a social media site wants to know: “Can I use an adapter to plug my 30-amp RV into an electric stove outlet?” The RVer included a photo showing an adapter with the right configuration of pins on the plug, and a 30-amp RV “outlet” on the other end of the dog bone. Is a range outlet to RV adapter a wise idea?

Range outlet to RV adapter—sometimes used in a welder outlet, too

It’s not an uncommon issue. The old-style electric range outlet is designated a NEMA 10-50R. You’ll sometimes find the same outlet in use to fire up portable electric welders. Your 30-amp RV would certainly find enough power to operate, but that’s not the issue.

It boils down to the actual connectors in the range outlet. An electric range needs to “see” 240 volts to operate. Three wires feed these birds. Two hot wires, each with 120 volts, and one neutral wire. The neutral wire in house wiring serves one main purpose: it completes the electrical circuit by carrying current back to the electrical panel and ultimately to the power source (like your utility transformer) for the “return” of the electricity.

Groundless—to a fault!

An RV power plug contains three wires, as well: one hot wire, providing 120 volts to the system, and one neutral to complete the circuit. The third wire here is a ground wire. The ground wire is a safety feature designed to protect people and property if something goes wrong with the electrical system. Say a hot wire comes loose or touches metal (like an appliance casing or electrical box), the ground wire provides a low-resistance path for the electricity to safely travel to the earth.

range outlet to RV adapter
Here’s the wiring for an old-style range plug. NO GROUND. Image: Home Depot.

In the wiring of the dog bone adapter that “allows” you to plug your RV into a range outlet, there is NO GROUND wire between the house wiring and the RV. While it’s true that the neutral wire in home wiring is tied to the house ground system, that doesn’t mean the neutral is a suitable safety feature. Additionally, the neutral wire is a current-carrying conductor. If something were to go wrong, metal parts of your RV could become a current conductor, putting you at risk of electrocution.

Another safety problem here, too

Additionally, your 30-amp RV, when plugged into the appropriate 30-amp circuit breaker-protected circuit, will trip a breaker if power exceeds 30 amps. Not so with this range outlet to RV adapter lash-up. If your rig’s demand exceeded 30 amps, that range breaker won’t trip and keep you safe until 50 amps of demand is exceeded.

One electrician who responded to the poster who asked about these adapters didn’t mince words. “This abomination should not exist. It is creating an ungrounded circuit or at least an improperly bonded one,” they wrote. “It doesn’t have any overcurrent protection built in either so it is relying on the load to protect the cord and adapter.”

Amazon’s “Rufus” says they’re safe!

range outlet to RV adapter
Rufus’ artificial intelligence says this is safe, so it must be! Click to enlarge.

Just how common are these unsafe-but-still-sold adapters? We found four of them on sale on Amazon. We picked one of them out and asked “Rufus,” Amazon’s artificial intelligence customer service feature, “Is it safe? Does it have a ground?” Rufus assured us that the adapter was safe—after all, it was built with copper wire, and “includes a ground connection.” It would have been pointless to ask a ground connection to what? We didn’t buy one and test it to see how it was wired, but it’s possible the manufacturer simply connected the range outlet side neutral to both the RV neutral and its ground. Illegal and unsafe.

Don’t risk your RV—and, more importantly, your life—on a cheap hack with a range outlet to RV adapter.

RELATED:

RVT1207

The Midwest at its best: Visiting Canal Fulton, Ohio

5

If you’re an RV enthusiast who enjoys a blend of history, outdoor adventure, and small-town charm, Canal Fulton, Ohio, should be on your RVing itinerary.

Nestled along the Tuscarawas River and the Ohio & Erie Towpath Trail, this National Heritage Area offers a unique glimpse into America’s canal era. But don’t be fooled! There are plenty of modern attractions and convenient RV accommodations here, too.

Step back in time

One of Canal Fulton’s standout experiences is the St. Helena III. She’s a replica canal boat pulled by two Percheron horses—just like it happened years ago.

Departing from the Canal Fulton Canalway Center, this 55-minute journey covers a two-mile round trip along a restored section of the Ohio & Erie Canal. As you glide through the water, a historian narrates tales of the canal’s significance in the 19th century and offers insights into the area’s rich heritage.

Ohio & Erie Towpath Trail

For those who enjoy history and outdoor activities, the Ohio & Erie Towpath Trail is a must. This scenic trail follows the historic canal route, providing opportunities for hiking, biking, and wildlife observation. Whether you’re seeking a leisurely stroll or an invigorating bike ride, the trail offers a peaceful escape into nature.

Downtown Canal Fulton

Downtown Canal Fulton boasts a variety of unique shops and eateries. From antique stores to local boutiques, there’s something for every shopper. Don’t miss out on local favorites like Almost Heaven Ice Cream and Cherry Street Creamery—perfect spots to indulge your sweet tooth.

Family fun

Traveling with family? Sluggers & Putters Amusement Park offers a range of attractions, including mini-golf, go-karts, and batting cages. It’s an ideal destination for a day of fun and entertainment for all ages.

But wait, there’s more!

Canal Fulton is located near the heart of Ohio’s Amish country. Enjoy touring the farms, gardens, and eateries, or perhaps enjoy an authentic Amish buggy ride!

The area around Canal Fulton offers golf, horseback riding, petting zoos, and more. You can be as busy as you choose. Or simply slow down and enjoy the peace and quiet of this lovely location.

Day trips

Canton: Best known as the home of the Pro Football Hall of Fame, Canton is a must-visit for sports fans. Alternatively, you can stroll through the Canton Arts District, where you’ll find vibrant murals, galleries, coffee shops, and live music. History buffs will enjoy the McKinley Presidential Library and Museum, the National First Ladies’ Library, and fantastic local breweries and diners.

Akron: Another day drive will take you to Akron, OH. There you can tour the historic Stan Hywet Hall & Gardens, visit Akron’s Zoo, and see the Goodyear blimps and air dock. (NPS historical site.)

RV parks nearby

When it comes to RV accommodations, the Canal Fulton area doesn’t disappoint. Here are three nearby RV parks to consider:

Clay’s Resort Jellystone Park: Located just a short drive from Canal Fulton, this resort offers a range of amenities, including full-hookup sites, a water park, and organized family activities. It’s a great choice for those seeking both relaxation and recreation.

Evergreen Park RV Resort: Situated in nearby Dundee, this resort provides full-service RV sites, a heated indoor pool, and proximity to local attractions. It’s known for its clean facilities and friendly staff.

Countryside Campground: Located in Mogadore, this campground offers spacious sites, a fishing pond, and a peaceful rural setting. It’s ideal for RVers looking for a quiet retreat.

You should go!

Small town, history, beautiful scenery—that’s Canal Fulton, Ohio. Put it on your RV itinerary!

If you’ve visited this area in Ohio, use the comments to tell us what you liked best.

MORE MIDWEST TRAVEL:

RVT1207

What condensation damage can do to RVs and how to avoid it

By Dustin Simpson
Join me “In The RV Shop” as I discuss how condensation can lead to various issues in RVs, affecting both the roof and the body.

Watch the video below to learn about potential problems associated with condensation and ways to mitigate damage.

Condensation on RV roofs

Roof damage

Prolonged exposure to condensation can contribute to the deterioration of the roof material. This is particularly true if the roof is made of materials like wood or if there are seams and joints where water can penetrate.

Mold and mildew growth

Excess moisture from condensation provides an ideal environment for mold and mildew growth. This not only damages the roof material but can also lead to health issues and unpleasant odors inside the RV.

Insulation compromise

If the insulation in the roof becomes saturated with moisture due to condensation, it can compromise its effectiveness. Wet insulation is less efficient in providing thermal protection.

Condensation on RV body

Corrosion

Metal components on the RV body, such as the frame or other structural elements, are susceptible to corrosion if exposed to condensation over time. This can weaken the structure and compromise safety.

Wood damage

If the RV body has wooden components, constant exposure to condensation can lead to wood rot. This is a serious issue that can affect the structural integrity of the RV.

Interior damage

Condensation on the RV body can also lead to water infiltration into the interior. This may damage walls, ceilings, and other internal components.

Mitigation strategies

Proper ventilation

Ensure adequate ventilation throughout the RV, especially in areas prone to condensation. Use roof vents, exhaust fans, and open windows to promote air circulation.

Insulation improvement

Upgrade the insulation in the RV to reduce temperature differentials that contribute to condensation. This is particularly important in areas with cold climates.

Use dehumidifiers

Portable dehumidifiers can help control humidity levels inside the RV, reducing the likelihood of condensation.

Regular maintenance

Inspect the roof and body regularly for signs of damage, leaks, or condensation. Address any issues promptly to prevent further damage.

Seal leaks

Ensure that all seams, joints, and roof penetrations are properly sealed to prevent water ingress. Regularly check and reseal as necessary.

Install roof vent covers

Adding vent covers can allow you to keep roof vents open even during inclement weather, promoting better air circulation.

Use moisture-absorbing products

Place moisture-absorbing products or desiccants in areas prone to condensation, such as closets and cabinets.

Protective coatings

Apply protective coatings to the roof and body to enhance water resistance. This includes roof coatings and sealants suitable for your RV’s materials.

Bottom line

By addressing condensation issues promptly and implementing preventive measures, you can minimize the risk of damage to both the roof and body of your RV. Regular maintenance and vigilance are key to preserving the integrity of your recreational vehicle.

More from Dustin

Make sure you check out my website, California RV Specialists, and our YouTube channel for more helpful information, and see our published articles on RVtravel.com and other social media pages.

RELATED

RVT1207

RVing the historic route of the Pony Express

5

On a recent trip back home to eastern Missouri from western Colorado, we stopped at the Interstate 76 – Julesburg, Colorado, rest stop. We were greeted by an amazing Pony Express statue.

Statue of Pony Express rider; Julesburg, CO Image: Gail Marsh

This roadside stop piqued my curiosity. I wanted to know all I could about this bygone era. So… I did a little digging and here’s what I discovered.

The birth of a legend

In the early 1860s, the United States was rapidly expanding westward. Communication across vast distances was a major challenge. Enter the Pony Express—a daring mail service that used a relay of horseback riders to deliver letters and news at record speeds.

Launched in April 1860 by the Central Overland California and Pikes Peak Express Company, I was surprised to learn that the Pony Express operation lasted only about 18 months. Even though it was short-lived, the Pony Express became an enduring symbol of the frontier spirit and the relentless push to connect our young and expanding nation.

Riding the routes

Pony Express riders wanted Image: thepony express.org
theponyexpress.org (click/tap to enlarge)

The Pony Express route was nothing short of epic. The trail began in St. Joseph, Missouri, and stretched all the way to Sacramento, California. Along the way, the route cut through very rugged terrains. Riders and their mounts dealt with a variety of unforgiving weather conditions, as well.

Pony Express riders switched horses at numerous relay stations along the way. These young men braved long hours on the trail, navigated hazardous inclines, and faced dangerous environments—all in an effort to keep the communication lines open.

Each leg of the journey required precision and trust—qualities that defined the service and its riders. The network of stations and carefully planned routes not only allowed for rapid mail delivery but also set the stage for future transportation and communication advancements in America.

Short lived

As I mentioned, the Pony Express was a short-term communication solution, despite its legendary status. The rapid expansion of the telegraph system soon made the horse relay method obsolete. With faster, more reliable, and cost-effective communication technologies emerging almost immediately after its inception, the Pony Express was discontinued by October 1861. The combination of high operational costs, the physical challenges of the route, and the advent of advanced communication technologies all contributed to its brief but historic existence.

Historic stops: Where RVers can learn more

For RV enthusiasts eager to add a historical twist to their travels, several sites and museums offer an immersive peek into the world of the Pony Express:

St. Joseph, Missouri: Recognized as the starting point of the Pony Express, St. Joseph boasts historical markers and exhibits that celebrate its role in this epic journey. The local history museum offers insights into the daily life of riders and the challenges they faced.

Pony Express National Historic Trail: Stretching across multiple states, this trail is dotted with preserved relay stations, markers, and interpretive centers. It provides an excellent route for RVers to explore and learn about the service firsthand.

Sacramento, California: As the end of the Pony Express route, Sacramento’s B.F. Hastings Building features exhibits and historic displays that detail the significance of the Pony Express in California’s history. Here, you can enjoy a mix of local history and Western heritage.

Additional museums: Many small towns along the route host local museums and historical societies that offer personal stories, artifacts, and memorabilia from the Pony Express era. Check local tourism websites on the National Park Service website.

Pony Express facts

Here are some lesser-known and interesting facts that helped me better appreciate the Pony Express system. Perhaps you’ll find them interesting, as well.

• The Pony Express kept 80 riders in the saddle at all times, both night and day. This included 40 westbound riders and 40 riders heading eastbound, regardless of the weather conditions.

• When a rider arrived at the station, he had two minutes to exchange the bag of mail. All mail was wrapped in oiled silk to protect it from the elements and locked in a satchel or saddlebag for security. Keys to the saddlebag were kept in St. Joseph, Salt Lake, and Sacramento.

• Riders were paid $100-$120 per month.

• Relay stations were positioned a minimum of 15 miles apart. Home stations were 75-100 miles apart and provided lodging for the riders.

• Horses for the prairie routes were selected for speed, while specially selected horses were chosen for the mountainous routes.

Pony Express riders’ oath

All newly hired Pony Express riders took the following oath:

(name of rider) do hereby swear, before the great and living God, that during my engagement as a member of the National Pony Express I will under no circumstances use profane language, that I will drink no intoxicating liquors, that I will not quarrel or fight with any other member of the association, and that in every respect, I will conduct myself honestly, be faithful to my duties and so direct all my acts as to win the confidence of my associates. So help me God.

Intrigued?

Wouldn’t you like to learn more about the Pony Express? You can! Plan a dedicated RV trip along the Pony Express route. Check with local historical societies located along the way to help you plan your trip.

Or, if existing RV trips bring you near the Pony Express Trail, consider a brief detour. See for yourself the amazing story of the brave men who played a part in our American history: The Pony Express.

YOU MIGHT ALSO ENJOY:

RVT1207

Lemonade recipes (food and drink) to kick off summer on National Lemonade Day

0

Lemonade Muffins

by Gay Farrar from Gillespie, IL

A sweetly tart pick-me-up perfect for brunch, breakfast, or afternoon tea. These lemon muffins are moist and tender. We love that lemonade concentrate is used because it is sweet and gives this fantastic muffin great lemon flavor. Brushing the tops with lemonade just adds to the flavor and sweetness. Click here for the recipe.

Strawberry Lemonade Cupcakes

by Amanda Brecht from Middle Amana, IA

Strawberry lemonade cupcakes that are perfect for summer! Soft, fluffy, and moist, the cake just melts in your mouth. The bits of fresh strawberries in the cake are bursts of flavor. They have a faint lemon taste. If you want a bit more lemonade flavor in the frosting, add 1/2 – 1 tsp. of lemon juice when adding the vanilla extract. A delicious summertime dessert. Here’s the recipe.

Basil-Infused Watermelon Lemonade

by Kim Campbell from Youngstown, OH

We loved the freshness of this watermelon lemonade. The basil flavor is surprisingly light and adds an earthy lift. It’s a refreshing mix of fresh, sweet, and tart. Make it as-is for the whole family or experiment with it as a cocktail mixer. Perfect for summer! Get the recipe here.

Grilled Lemonade

by Kitchen Crew from Nashville, TN

Sweet, tart, and easy to make at home, lemonade is a delicious way to cool down on a hot summer day. Want to make it even better? Grill and sugar the lemons! Dipping lemons into sugar and grilling them caramelizes the lemons and makes them super juicy. Serve as is with a few slices of grilled lemon or add a little vodka to the lemonade for an adult-only treat. This can be made the day before and refrigerated overnight. After one sip, this grilled lemonade is sure to become a family favorite. Here’s the recipe.

Orange Lemonade

By Cheryl Wu from Kent, WA

Sweet and tart, this lemonade recipe will really quench your thirst on a hot day. The blend of oranges and lemons is a delicious combination. A great summertime cocktail. Click here for the recipe.

Cuban Sangria

by April Alvarez from Dunedin, FL

Who’s ready for a girls’ night in? Be sure to include this super tasty Cuban sangria on your party menu. The combination of lemon and orange juice with the slices of lemon, orange, and lime gives this sangria a tangy kick. Use a dry red wine to offset the sweetness of the triple sec. Brandy brings a warm and slightly sweet undertone to the mix. Get the recipe here.

MORE RECIPES YOU MIGHT LIKE:

RVT1207

The best weather apps for RVers

15

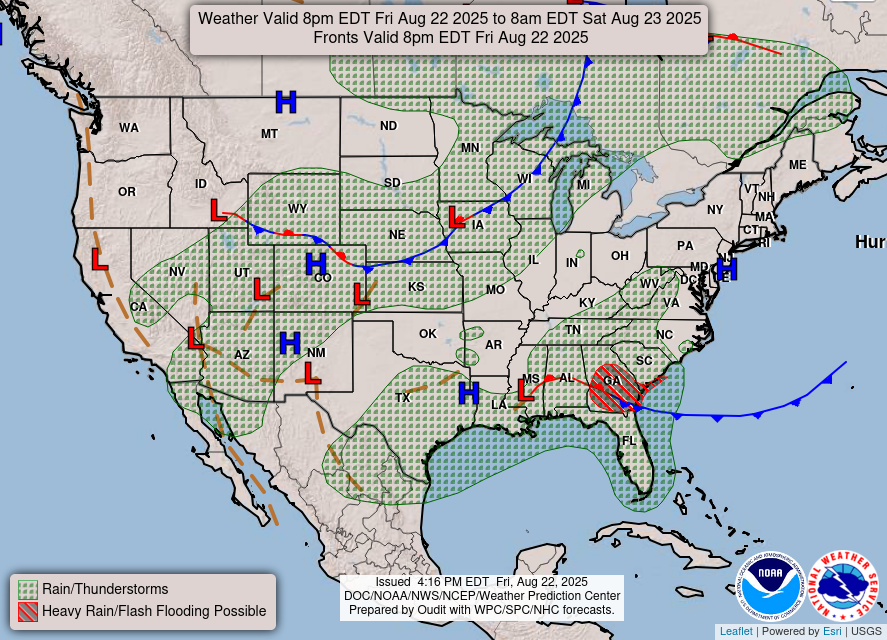
Our weather lately is nothing short of crazy! Tornadoes, unseasonable temperatures, flash floods, 85 mph sustained winds, and damaging lightning strikes! You name a weather condition—we’ve probably seen it!

The unpredictable weather is proof that RVers need to pay attention as they travel. We need the best weather apps possible!

Know before you go!

RV travelers face a unique set of weather-related challenges. Here are just a few:

Route safety. Mountain passes, desert terrain, and coastal highways can be treacherous. A sudden downpour may wash out roads; hail can dent your sidewalls; flash floods can strand you overnight. Real-time radar and storm tracking help you reroute before you’re in danger.

Rig protection. High winds can damage slide-outs and awnings. Ice and snow buildup on roofs create structural risk. Wind speed and direction forecasts let you secure or retract awnings in advance.

Trip planning and comfort. Knowing when to deploy your solar panels for maximum sun or when to hunker down for a cold front improves an RVer’s off-grid experiences. Minute-by-minute precipitation forecasts keep you dry while cooking dinner outside.

Emergency preparedness. Severe-weather alerts from the National Weather Service (NWS) or Environment Canada can mean the difference between a safe stay and a dangerous situation. Push notifications keep you informed of watches, warnings, and advisories in your exact location.

Top three free weather apps for RVers

Before I began to research the best weather apps, I had seven weather apps on my cell phone. Seven! Talk about crazy. That’s when I decided to see what the experts had to say.

Which experts? PCMag, CNET, and other reputable sources. I looked for apps that were ranked “best” or “top ten” and found three weather apps that consistently received top marks with excellent reviews.

Here are the top three, and they’re all free. (You’re welcome!)

AccuWeather

Key features

MinuteCast: Minute-by-minute precipitation forecasts, hyper-local to your GPS coordinates.

Radar and satellite maps: Interactive layers showing rain, snow, cloud cover, and more.

Allergy and air quality forecasts: Track pollen, mold, and pollution for healthier travel.

Why RVers love it

Precision on the go: With forecasts down to the exact minute, you avoid unexpected downpours while boondocking or walking your dog around the campground.

Custom alerts: Tailor severe-weather notifications for your current and saved locations.

Global coverage: Planning a cross-border trip? AccuWeather provides forecasts in more than 200 countries.

Platforms and cost

Android and iOS (Free; in-app upgrades available).

Download it for Apple or Android.

The Weather Channel

Key features

Live radar and storm tracker: View animated radar with storm cells highlighted, complete with wind and hail data.

Video briefings: Local meteorologist-produced videos on approaching systems.

Hourly and 15-day forecasts: Plan your trip with extended weather outlooks, including humidity, UV index, sunrise/sunset times, and “feels like” temperatures.

Why RVers love it

Professional insights: In-app videos break down complex weather patterns, useful when a lineup of thunderstorms looms over your planned campground.

Next-hour rain alerts: A push alert warns you up to an hour before rain starts, so you can retract awnings and stow outdoor furniture.

Customizable widgets: Home-screen widgets show current conditions at a glance without opening the app.

Platforms and cost

Android and iOS (Free; optional ad-free subscription).

Download it for Apple or Android.

Windy

Key features

High-resolution wind maps: Animated global wind-speed and direction overlays based on ECMWF (European Centre for Medium-Range Weather Forecasts) and GFS (Global Forecast System) models.

Multiple data layers: Choose from precipitation, temperature, pressure, wave height (for coastal RVers), and more.

Offline mode: Download map tiles for areas with limited connectivity.

Why RVers love it

Visual clarity: Windy’s interface makes it easy to see wind patterns that could affect boondocking or highway travel.

Model comparison: Flip between forecast models before you travel. This is especially important when forecasting winds in mountain passes.

Community and add-ons: User-generated webcams, weather stations, and air-quality sensors enrich data for out-of-the-way locations.

Platforms and cost

Android and iOS (Free; in-app premium features available). Download either here.

Summing up

It’s worth taking a few minutes to download and explore the weather apps. That way you’ll find the app that’s best for you. Here’s my takeaway from looking at the three top-ranking weather apps:

For precision rain-timing, AccuWeather’s MinuteCast is unmatched.

For professional analysis, The Weather Channel’s videos and local alerts provide peace of mind.

For wind-sensitive travel, Windy’s overlays will help keep your RV slides and awnings safe. You’ll also know when it’s OK to travel and when you’d best stay put until conditions improve.

Important note: An excellent weather app can be a great tool for RVers. However, always pack along a weather radio with you, as well. Together, these weather tools can keep you safe and happy while RVing.

Do you use a weather app? Tell us about it in the comments below.

RELATED

RVT1207

How long can you park an RV without causing ‘flat-spotting’ on the tires?

Ted sent in this question: “How long can a trailer sit and you not have to worry about flat spots developing on the tires? I have seen some units sitting in lots for years.”

Good question and, as with many simple questions about tires, there is NOT a simple answer such as “You can park for up to 83 days with no problems.”

Here are the facts

Rubber has properties similar to “thermal plastics.” These materials can change their level of flexibility based on the temperature, and these materials can take a “set” when cooled off. After taking a “set,” the molecular bonds that make the material stiffer or less flexible will actually break at the molecular level when bent or flexed. These “breaks” or “cracks” do not re-form, but with additional flexing, the cracks will grow.

When you drive on a tire, it warms up and the material can more easily bend. However, as rubber is always “curing,” eventually a “more cured” or older rubber will get to the point of no longer bending and stretching the molecular bonds. Think about how stiff and even brittle a rubber band gets after years of sitting in the back of a desk drawer. Tires are the same. The longer they sit, the stiffer they become. Once they get stiff enough they can form microscopic cracks rather than bending and stretching when flexed. These cracks can grow until they get large enough and the result is a belt separation that can grow until the tire comes apart.

“Heat-set flat-spotting”

When I was designing and testing tires, I did some work on “heat-set flat spotting” in tires when certain compounds or types of rubber got warm and more flexible, and some would get stiffer than others. When driven and warmed up, and if then parked and allowed to cool, the materials in the portion of the tread that was “flat” from being pressed to the ground would take a set so the tire had a “flat spot.”

It was discovered that some types of rubber and some constructions were more susceptible than others to taking a “set” when cooled. In a laboratory setting we could measure this “set” after just a few hours of parking and cooling off.

The above is why I and others recommend that if you are parking your RV for more than a few weeks, you inflate the tires to the “MAX PSI” number on the tire sidewall. This will reduce, but not eliminate, the amount of “flat-spotting” the tire takes.

Suggestions to avoid flat-spotting

While I have not seen any hard data on long-term parking of RVs, I can offer a couple of suggestions:

1. When parking your RV for more than a couple of months, you need to drive the RV for a couple miles and park it with the tires that contact the ground being at a different spot of the tread.

In this case, you should also inflate the tires to the sidewall max, as this will decrease the level of deflection of the tire tread.

2. If you are parking for more than a year, you might want to consider either raising the RV so the tires are not touching the ground, or remove the tires and wheels from the RV to eliminate all deflection by storing the tires so the tread does not touch the ground.

3. If none of the above were done and you are looking at tires that have been parked for more than 3 years with the weight of the RV on the tires, and without being moved, I would suggest the tires be replaced as a precaution.

Roger Marble

MORE HELPFUL POSTS FROM ROGER

*****

If you have tire questions, check out Roger’s Blog as well as his posts on RVtravel.com. There are hundreds of posts covering everything to do with tires.

If you still have a question for Roger after searching the above posts, send your inquiries to him using the form below.

Name
Drag & Drop Files, Choose Files to Upload

##RVT1207

Can you really keep mice out of an RV? Depends on who you ask

We were recently browsing Facebook (did you know we have more than 30 RVtravel.com Facebook groups?) when we came across a post from an RVer struggling with mice in his rig. Poor Jerry F. absolutely hates dealing with mice—and we don’t blame him! Fortunately, 91 fellow RVers jumped in to share their advice on how to keep the critters out for good.

We’ve covered the mouse problem before, but it’s been a while. And with warmer weather on the way—bringing more pests with it—we thought some of those 91 comments were worth sharing in case you’re battling the same issue. Chances are, a few mice are lurking outside your RV right now…

Just keep in mind: What works perfectly for one RVer might not work at all for another. That’s just how mice are, as you’ll quickly learn from the comments below. Read on and see.

Here’s Jerry’s original post: “I hate mice!!!! Two years ago one got in when we had to leave our site for a couple of days, crapped around, chewed up an empty fruit basket, chewed a hole in a water line and left. No thank you, no see-ya later…. nothing! This year, right out of storage, we opened the RV up and found crap around the openings for plumbing in the kitchen and bathroom. So, taking advice from a pest control guy I know, I stuffed those holes and the ones coming up from the belly with a combination of steel wool impregnated with expanding foam. For the next one that wants in, it’s gonna have to eat steel to do it!!”

Peppermint and cloves

Nancy S. was the first to comment. She wrote, “I used Peppermint balls over the winter. First time I never had any mice. I will definitely be using them again.”

Angela S. replied to Nancy, “That’s what I used. Plus, I put them under the sink next to the opening for the hoses in the kitchen and bathroom. I also put it under my furniture and refrigerator. Made sure my cabinet doors were closed if not in use.”

But then… Patty W. responded, “Didn’t work for me at all. They pooped right by them, the dirty buggers!”

What about cloves? Do they work better than peppermint? Karin S. thinks so: “This past winter we used cloves. Sprinkled them everywhere. Bit of a cleanup, but I’d rather clean up cloves than mouse droppings. I got a tip from a friend about the cloves. They store a vintage vehicle and use cloves and never had mice. So we tried it.”

Irish Spring soap and dryer sheets

Andrea R. shares, “I have used Irish Spring soap bars and dryer sheets for years with no mice. We park it by our house for winter out in the country.”

But then… Steve S. says, “Would someone please find a way to kill the false claims about Irish Spring and dryer sheets? Mice eat the soap and nest in the dryer sheets.”

Steel wool

Toni-Maree H. writes, “Steel wool is the only thing that works. The buggers don’t need much of a gap to get in. If you can get a pen through the gap, then that’s big enough for a mouse.”

Dan O. responded to Toni-Maree and said, “Use copper wool instead of steel wool. Steel wool rusts.”

Connie W. says, “I had luck with the steel wool and foam insulation spray around all the holes under the cabinets. Plus, I did peppermint oil-soaked cotton balls and cinnamon sticks.”

Lights

Pony G. commented, “I keep seeing people say they are putting up string lights (like Christmas lights) all along under their campers and RVs, and because mice don’t like light, it keeps them away …. ??”

Kathy S. responded, “The lights have worked wonders for us! We use red rope lights.”

Rodent repellents

Dan L. shares, “I have tried almost everything to keep them little buggers out of the camper. I saw the BugMD Vamoose packets online and so far, since January, haven’t had a mouse. Hopefully it keeps working. Just little packets you throw out, kinda smell like Grandpa Guss packets.”

Lynne Z. uses Fresh Cab. She writes, “Fresh Cab, 24/7, 365 days a year. Use liberally. It has never failed me.”

Another vote for Fresh Cab. Vicki S. says, “Get some Fresh Cab!! It works. We had to use the sticky pad at first to get rid of them (which I hate), but it worked. Then used the Fresh Cab as a repellent. We have never seen another mouse or even evidence of one!!”

Nicole A. responded to Vicki and wrote, “Just FYI, we used these for 12 years with no mice, then last year we got hit. They avoided the bags and came through the bathroom pipe in the tub. We cleaned everything and reinforced any small holes under the trailer’s underbelly and put in steel wool... no mice this year! So in the end it’s just luck…”

But then… Paulita C. has a different experience: “I tried this (Fresh Cab) after reading everyone’s recommendations, and it didn’t do anything. Went out to the camper last week to open it up for the year, and the darn rascals got in and ate through some bedding, towels, and got in my utensils and left their droppings. I don’t understand since I put the sachets everywhere.”

Mothballs

Steve W. has had good luck with mothballs. He says, “This is what I do. I put mothballs all around my camper underneath it on the wheels, which keeps the rodents away. When I shut it down in the wintertime, I put four or five packs inside the camper. Then, when springtime gets here, I’ll take them out. Open the doors and windows and let it air out. No mice!”

Bait boxes

David I. recommends bait boxes. He says, “Luck and weather-proof bait boxes OUTSIDE wherever you are storing your RV. Freshen that bait religiously and FIGHT BACK. YOU RULE over rodents!”

Nothing works…

Freedom T. responded to Jerry and wrote, “What you have done is the only thing that truly works. All of these other recommendations don’t work, and if they do, they don’t work for long. Maybe these GA mice are different, but they eat the soap and dryer sheets and peppermint cotton balls and anything ‘botanical’. The only thing that works for these mice is old-fashioned traps and blocking their entry points, like you have done.

“I wish these other ‘solutions’ would just disappear. The same suggestions appear on every mouse-related post, and they are so tired.”

Rhino W. agrees. They say, “Nothing you use is going to keep the mice out of your unit. No Grandpa Gus’, no Tomcat peppermint spray, Irish Spring soap, or dryer sheets. They all don’t work. The only thing that works is keeping your unit clean and plugging up all the holes underneath that they can get into. We had an issue with mice but after I plugged up all the holes, I haven’t seen any signs of any mice or chipmunks in two years.”

RELATED

RVT1207