Today’s poll isn’t quite about RVing, but we know, from past polls, that many of you are veterans. So today we want to know: Did you ever physically serve in combat?
While RVing and military service may seem like two very different chapters in life, they often share common threads—discipline, adaptability, and a deep appreciation for the freedoms we enjoy.
Many veterans find RV travel to be a natural continuation of the self-reliance and camaraderie they experienced during their time in the service. Hitting the open road brings a special kind of peace, and for some, it’s a way to reconnect with the country they once served in uniform.
We’ve heard from readers who have parked their rigs at military campgrounds or simply shared stories around a campfire with fellow vets. And while this poll is just a yes-or-no question, we recognize that behind each answer lies a lifetime of memories—some painful, some proud, and many complex.
This community has always been supportive and appreciative of our veterans. If you’re comfortable, we encourage you to share what your experience was like, or simply let others know you served. You never know who else in the RV park or on our website might quietly relate. Sometimes a single comment sparks a powerful connection.
And, most importantly, we thank you for your service!
By Dustin Simpson
Learn all about mastering RV maintenance with the perfect caulking gun in this informative video from a skilled RV repair shop owner—me! Discover the benefits of a dripless caulking gun and how to use it effectively.
Why caulking is essential for RV maintenance
Seals joints and seams to prevent water leaks.
Protects against weather damage and pests.
Maintains the structural integrity of your RV.
The advantages of a dripless caulking gun
1. Precision
• Provides better control for accurate application.
2. Cleanliness
• Reduces mess by preventing excess caulk from dripping.
3. Efficiency
• Makes the caulking process faster and smoother.
Features of a dripless caulking gun
1. Design
• Trigger mechanism Ergonomic handle for comfortable use.
Smooth trigger action for easy dispensing.
• Anti-drip mechanism Automatically retracts the plunger to stop caulk flow when the trigger is released.
2. Construction
• Durable materials Made from high-quality metal or plastic for longevity.
• Lightweight Easy to handle and maneuver.
How to use a dripless caulking gun effectively
1. Preparation
Step 1: Select the right caulk
Choose a caulk suitable for RV use, such as silicone or polyurethane.
Step 2: Cut the nozzle
Cut the nozzle at a 45-degree angle to control the flow.
Step 3: Puncture the seal
Use a nail or the built-in puncture tool to break the seal inside the nozzle.
2. Application
Step 1: Load the caulk tube
Place the tube in the caulking gun and secure it.
Step 2: Apply even pressure
Squeeze the trigger and apply a consistent bead of caulk along the seam or joint.
Step 3: Smooth the caulk
Use a caulk smoothing tool or your finger to smooth the bead for a neat finish.
3. Clean up
Step 1: Release pressure
Engage the anti-drip mechanism to stop the flow of caulk.
Step 2: Clean tools
Wipe the nozzle and any tools used with a damp cloth.
Step 3: Store properly
Store the caulking gun and remaining caulk in a cool, dry place.
Expert tips for using a caulking gun
1. Practice makes perfect
Practice on a scrap piece of material to get a feel for the trigger pressure and flow rate.
2. Keep a steady hand
Maintain a steady hand and consistent speed to apply an even bead of caulk.
3. Use painter’s tape
Apply painter’s tape on either side of the joint for clean, straight lines and remove it immediately after caulking.
4. Check weather conditions
Apply caulk in dry conditions to ensure proper adhesion and curing.
Mastering the use of a dripless caulking gun is a valuable skill for any RV owner. With the right tools and techniques, you can effectively maintain and protect your RV.
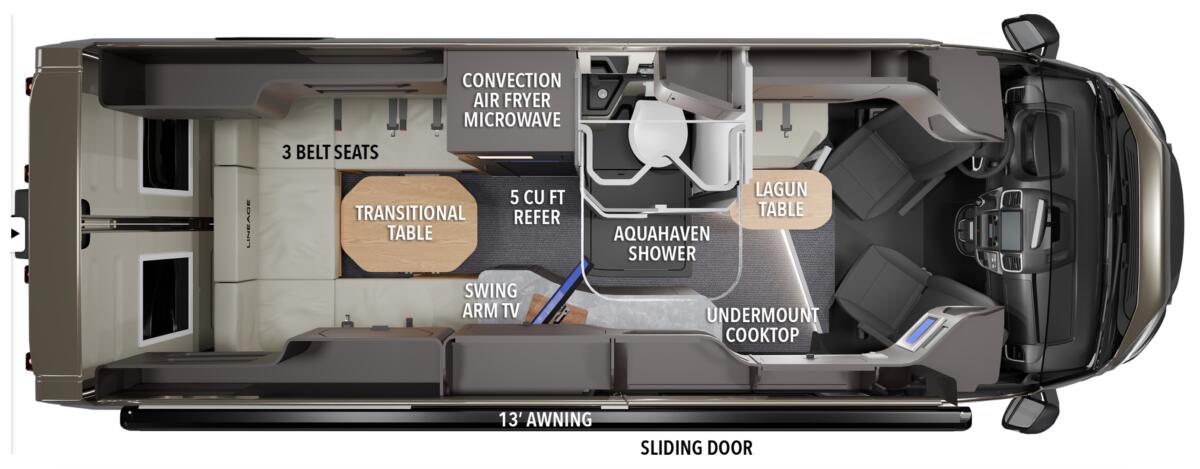
Grand Design’s move into compact motorhomes gets more interesting with the 2026 Lineage LVP2. This Ram ProMaster-based camper van keeps the footprint small, but it packs in the kind of lounge, storage, and sleeping flexibility that usually shows up in pricier vans. This model looks more polished than “budget-friendly” suggests, and it fixes a few common van pain points, including the bathroom setup, screen door, and black tank design.
In the video at the end of this post, Matt, of Matt’s RV Reviews, gives us a tour and shares his thoughts about this rig.
What the Grand Design Lineage LVP2 is working with
The LVP2 rides on a Ram ProMaster 3500 Super High Roof EXT chassis with a 3.6L V6, 276 horsepower, 250 lb-ft of torque, and a 9-speed automatic transmission. At 20’11” long and 10’2″ inches tall, it stays compact enough for easier travel while still giving taller campers usable standing room.
This is also an all-electric setup, with no propane and no generator. The video description lists 180W of solar, a Lithionics 12V 310Ah battery, 30-amp shore power, and a 5,000-pound hitch.
The basic specs:
Tank
Capacity
Fuel
24 gal.
Fresh water
31.5 gal.
Gray water
26 gal.
Black water
12 gal.
Exterior updates make a difference
The outside keeps the same dark, clean look seen on other Lineage models, but this version adds small decals and a few practical upgrades. The power awning includes LED lighting, and an optional solar awning is available. Nexen Roadian 225/75 R16C tires with blacked-out wheels help the van look sharper than expected.
The most welcome exterior touch may be the powered entry step and the added screen door. The acrylic windows also open with more flexibility than the earlier click-stop style. Around back, the van includes rear power ports, privacy blinds, roof access prep, a Maxxair fan, Furrion A/C, available Starlink, and side utility hookups with an outdoor shower.
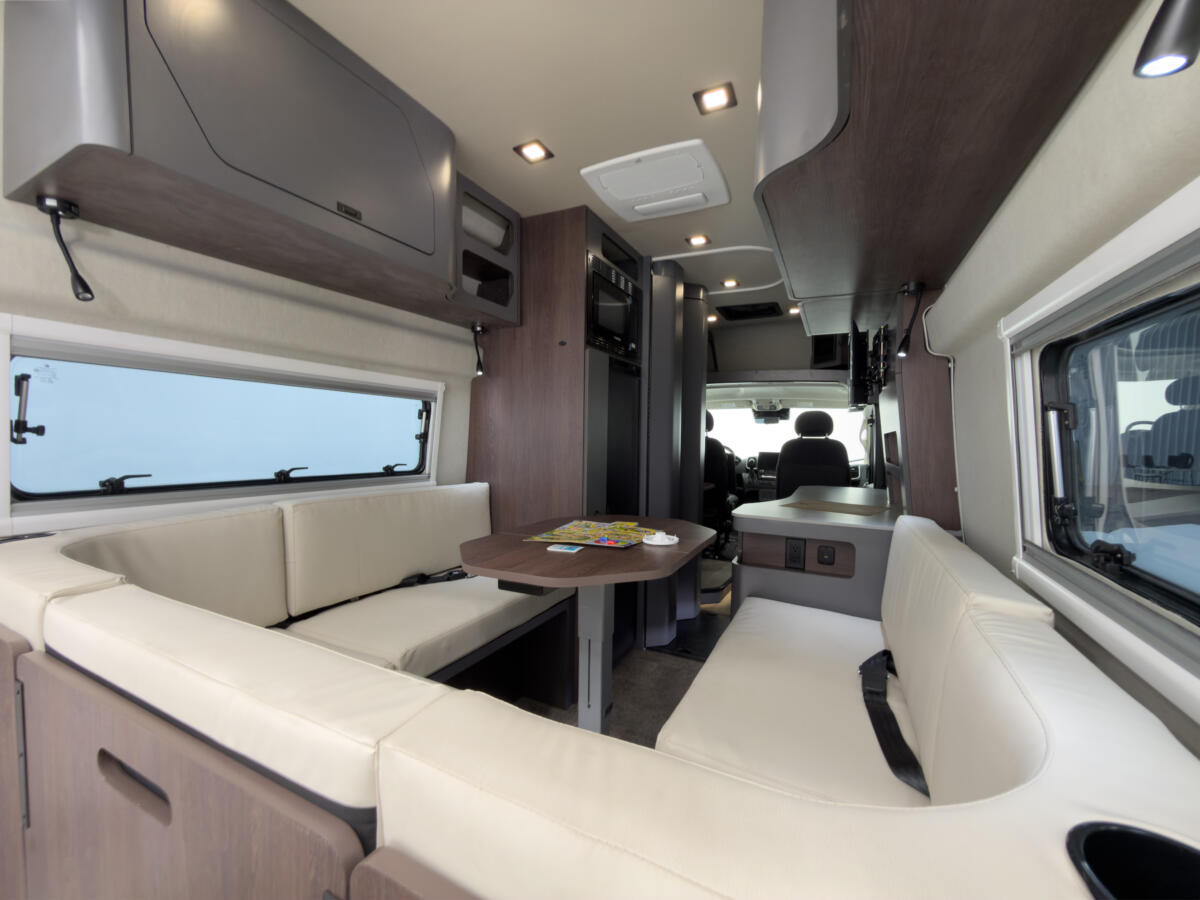
Interior
Inside, the front cab looks modern, not stripped down. The driver area gets a large touchscreen, digital dash, wireless charging pad, cup holders, 110V and 12V power, and swivel seats.
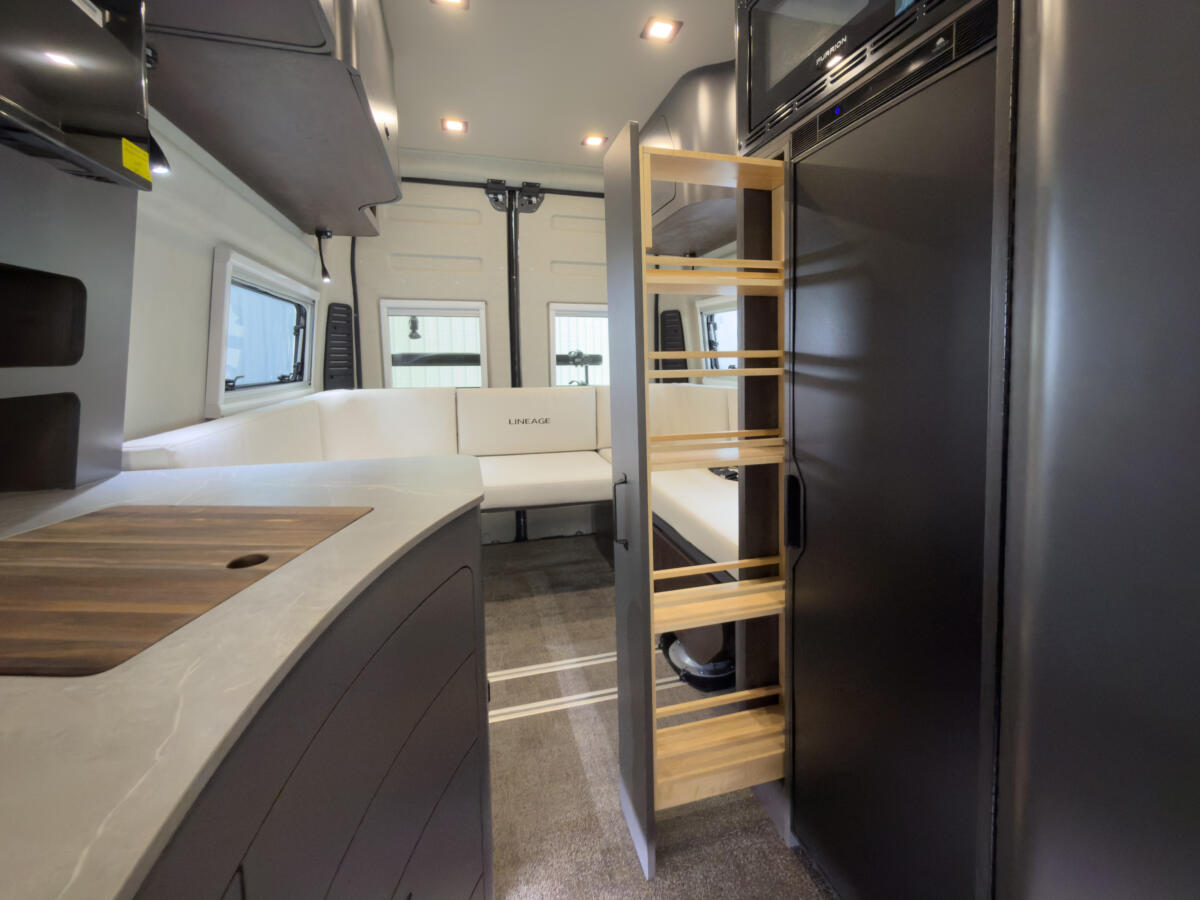
The kitchen is one of the best parts. It uses an Invisacook single-burner induction system hidden in the counter, so prep space stays usable when cooking is done. There’s also a pull-up sink, soap dispenser, cutting board insert, soft-close drawers, pantry space, a 5.3-cubic-foot Norcold fridge, and a Furrion convection microwave with air fryer function.
A lot of the visual appeal comes from the curved Amish-built cabinetry, offered in light gray or sandstone.
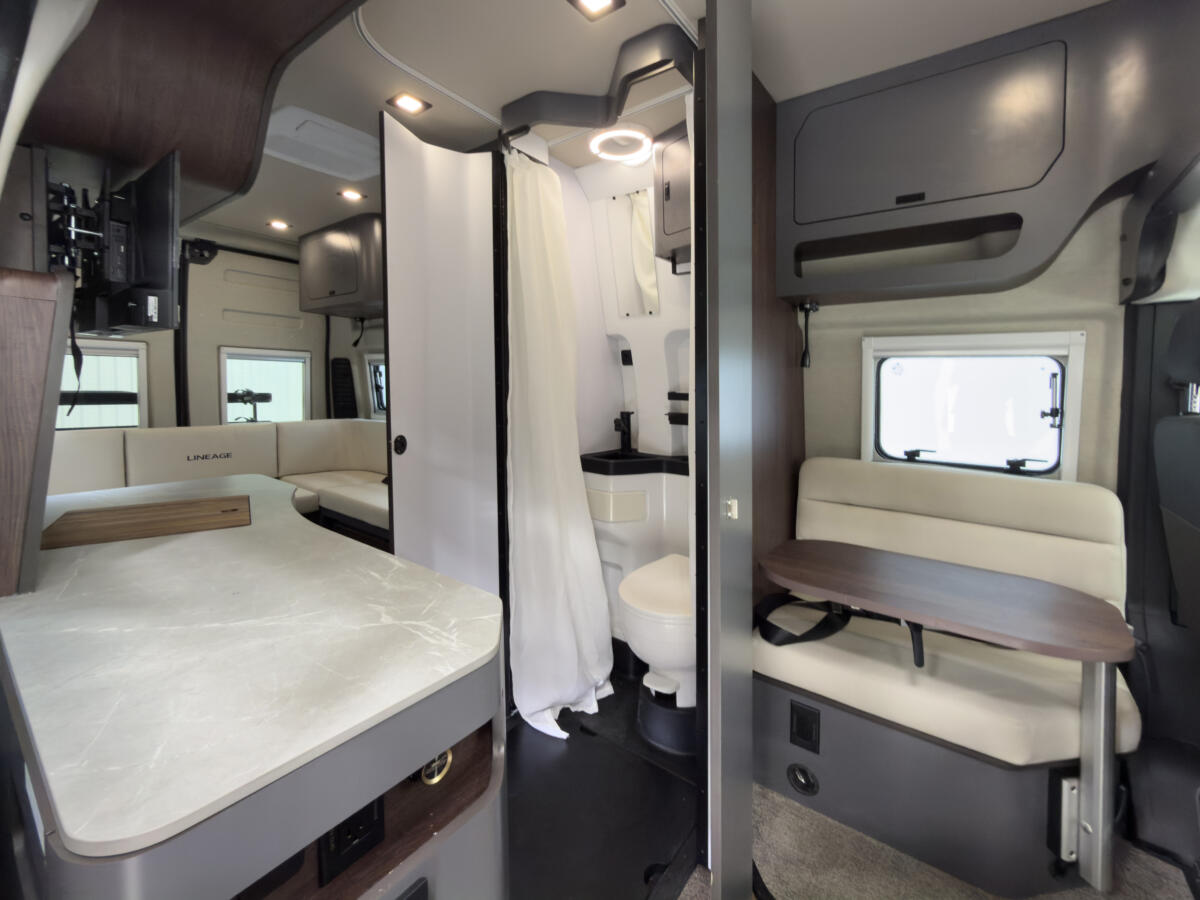
The rear lounge is the main event
The back of the van is where the LVP2 separates itself. A large U-shaped dinette slides side to side, opens up the aisle, and converts into a bed. Above it, the power bed lift lowers from the ceiling, then adds side extensions to use more of the van’s width.
That setup gives the van a lounge-first feel during the day and more sleeping flexibility at night.
The bathroom also changes the formula from the Transit-based Lineage. Instead of track walls, it uses fold-out doors and a pull-out shower pan. The sink sprayer doubles as the shower head, which saves water, but it was also one of the few weak points called out in the review.
Final thoughts
MSRP lands at $160,291, with dealer pricing available at shows and retailers.
The strongest praise went to the rear lounge, the drop-down bunk design, and the curved cabinetry. The main complaints were the basic shower setup, the need to store removable dinette pieces, and the small step near the front seat.
However, what stands out most is how much Grand Design seems to have learned from early feedback. The LVP2 doesn’t try to be huge. It tries to be useful, and in this size, that matters more.
America’s Original RV Newsletter. Since 2001 Issue 1256 If you find this newsletter helpful, please consider supporting our work with a donation of your choice. Thank you!
Today’s thought
“Man cannot discover new oceans unless he has the courage to lose sight of the shore.” —André Gide
Need an excuse to celebrate? Today is National Grilled Cheese Sandwich Day! Like grilled cheeses? Then you will looooove all of these.
On this day in history: 1937 – Sir Frank Whittle ground-tests the first jet engine designed to power an aircraft, at Rugby, England.
RVtravel.com readers discuss staying at Love’s RV Stops. Stay or pass? Worth it or not?
By Tony Barthel
Last week, I shared my honest thoughts about staying overnight at Love’s RV Stops, and you all weighed in. Heavily! I was surprised how popular the story was, and there were some great comments which I’d like to address. Here are the things you love about Love’s, and the things that you don’t. Some of you say you’d never stay at a Love’s again, so let’s dive in.
Rising costs push RVers to rethink how they travel
By Emily Woodbury
If you’ve been RVing for a long time, you already know how to stretch a dollar. But lately, many of us are pausing before turning the key. Fuel prices are unpredictable and climbing quickly, campground rates are creeping up, and those “quick getaways” don’t feel as inexpensive as they used to. So what are RVers doing about it? Find out here.
You can be TOO nice of a campsite neighbor. Don’t do these four things.
By Nanci Dixon
Be a good campsite neighbor and don’t do these four things. There are a number of simple etiquette things to do or not to do to be a good RVer that we all know… or at least should know. I recently learned some new things and these four things are now at the top of my not-to-do list. I found out you can be too nice of a campsite neighbor…
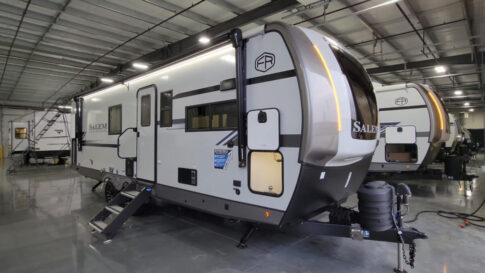
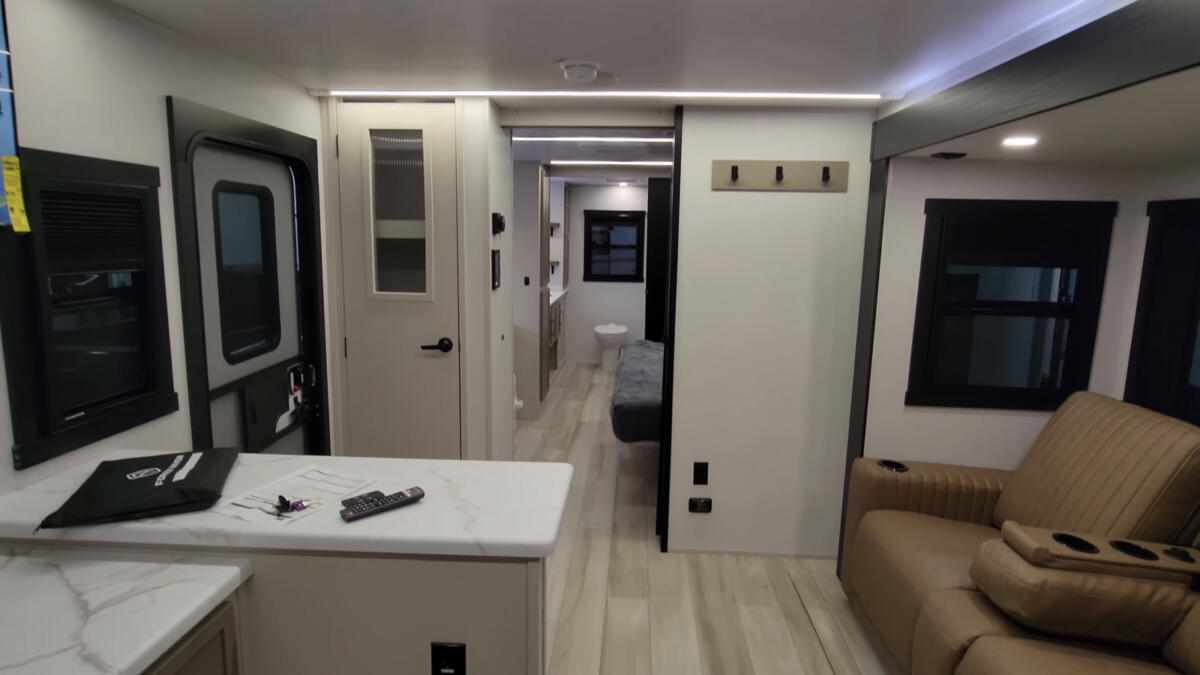
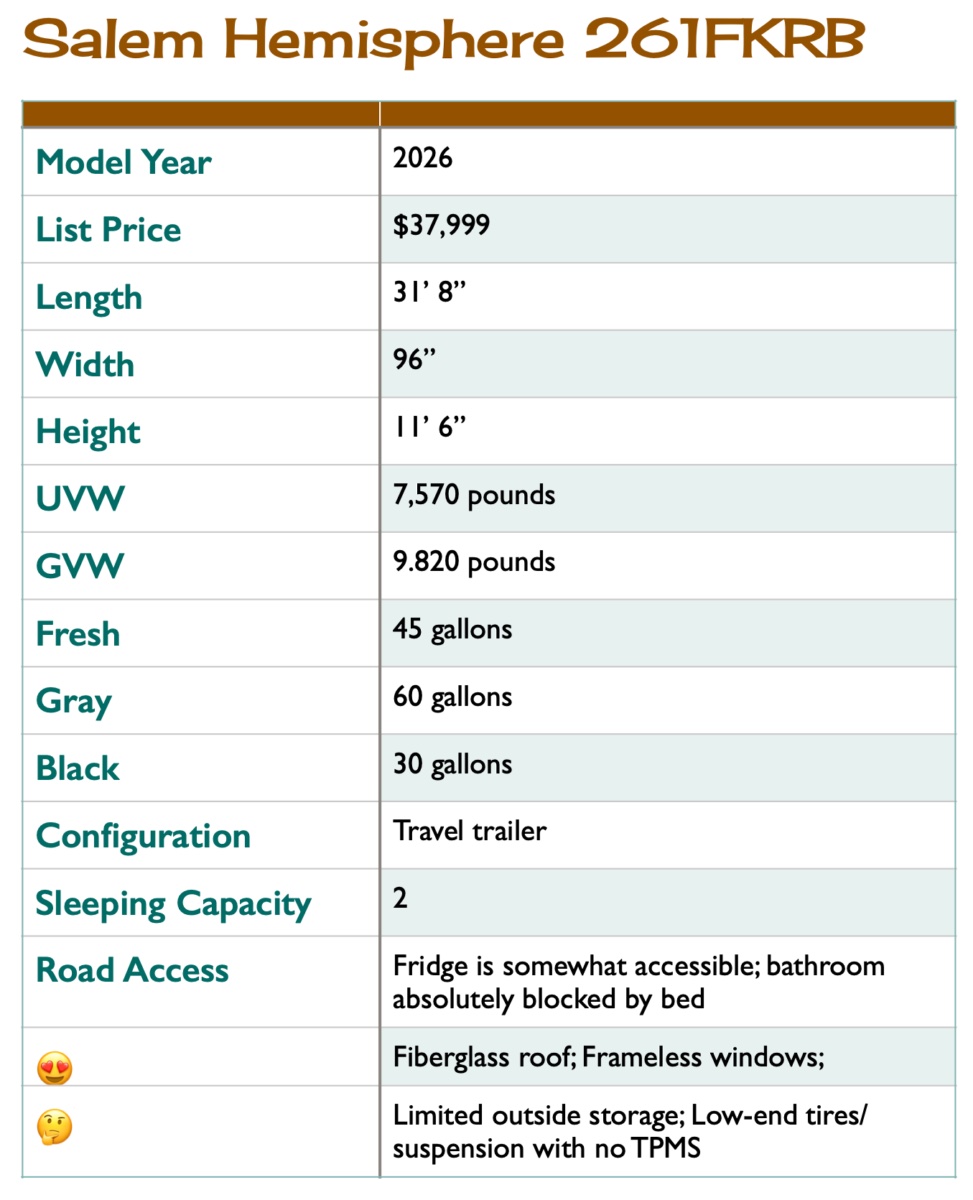
Today’s RV review… 2026 Salem Hemisphere 261FKRB—a nice long-term choice with premium features
By Tony Barthel
Today’s RV review is of the 2026 Salem Hemisphere 261FKRB—a couple’s trailer with an unusual floor plan. I know many of you who read this have seasonal sites, and I could see this being a great choice for that type of use. This also has some layout features I haven’t seen in a while. It hits the mark on a number of premium features without a really premium price tag. Check it out.
It doesn’t take much to make a parked RV feel like it’s floating. Even with RV wheel chocks in place, that slow rocking can still show up. Somebody walks from the kitchen to the bedroom. A gust of wind hits the sidewall. Maybe you just shift your weight in the recliner. What’s missing is control of the one kind of movement that leveling doesn’t really handle: that gentle forward-and-back creep in the tires. Here’s what you need.
Slide room in a van?! Tour the expanding DIY RV van build
In the video at the bottom of this article, Bob Wells from Cheap RV Living interviews Kelly, an engineer by trade, who created just about the most advanced DIY camper van you will ever see. He even installed a slide room on a van! As Bob says, “Everything you could want in a van is in this van!” Wow! Check it out.
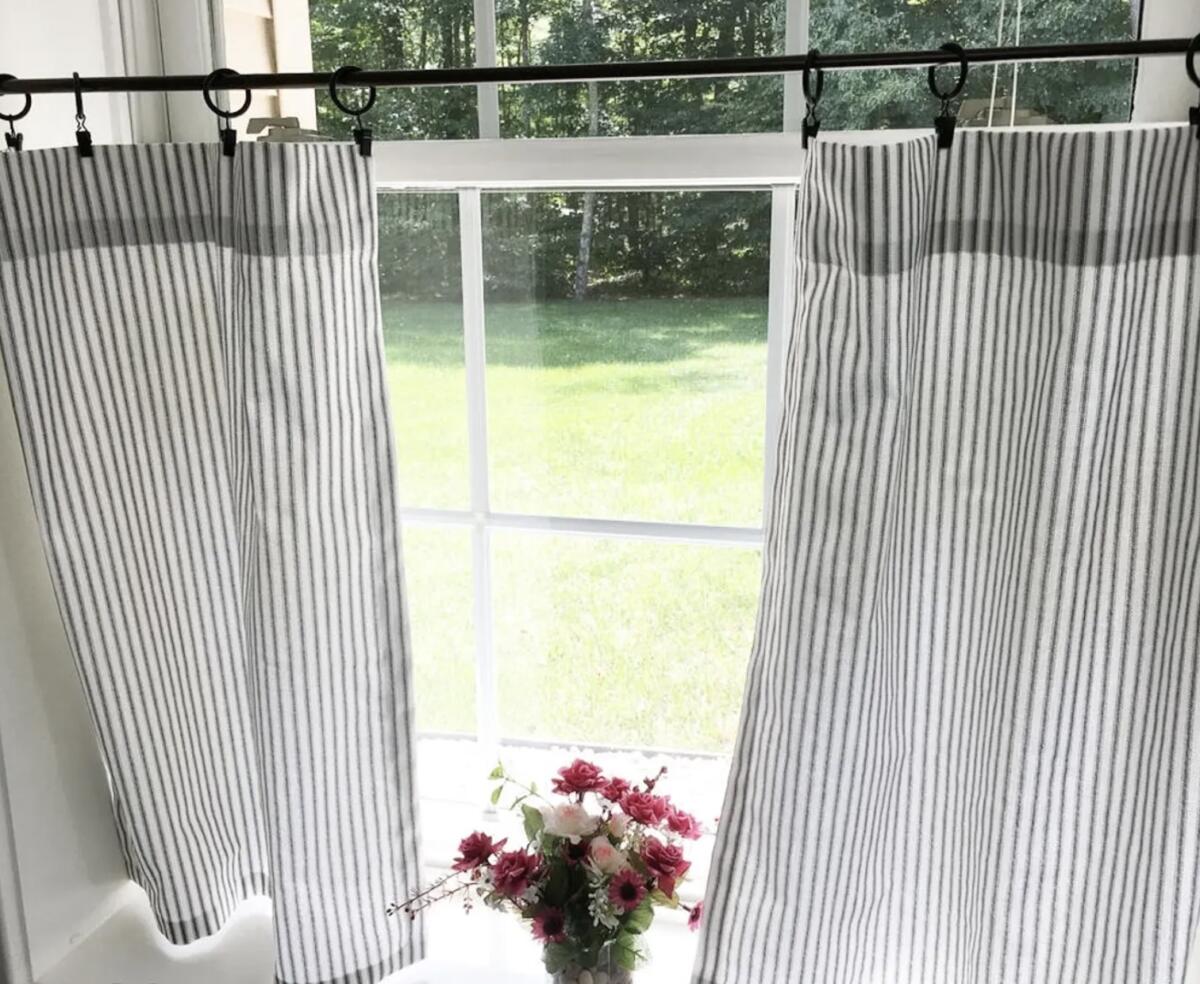
Easy, no-sew DIY curtain ideas for your RV’s windows
If you’ve spent any time inside your RV staring at bulky, dated window valances, you’re not alone. They’re one of the most commonly disliked design features in RVs. The good news is you don’t have to live with them. Whether you want to soften the look, brighten your space, or go full modern minimal, your windows are one of the easiest places to start. Check out these easy DIY ideas.
Tanner Toons With Tanner Woods
You may share this Tanner Toon, unaltered, on your website, blog or social media with our compliments. The musings from Tanner Woods’ creative mind appear in this newsletter every Saturday and Sunday and in many RV Daily Tips newsletters through the week.
Our amazing readers RVtravel.com readers reveal the special times in their lives
By Chuck Woodbury
A few weeks ago, I asked you to write me about some of your special life moments or accomplishments of which few, if anybody you know, were aware. Here are your stories. Thank you for sharing, and keep ’em coming. Don’t be shy!
Blast from the past
This short item appeared in this newsletter’s November 1, 2001, edition:
RVers BENEFITING FROM LOWER GAS PRICES Nationwide, AAA reports that gas prices have dropped to $1.30 a gallon, providing motorists with a much-needed break at the gasoline pumps. The prices are the lowest since January 2000, due mainly to a dramatic drop in crude oil prices since mid-September.(Sigh.)
🔥 Reader favorite Have a hard time opening water bottle lids? These will help! Simply push one of these “lids” onto the water bottle lid, and voila, it’ll be much easier to twist off. These are designed with seniors and those with arthritis in mind, and they really help! Here’s an affordable pack of 3.
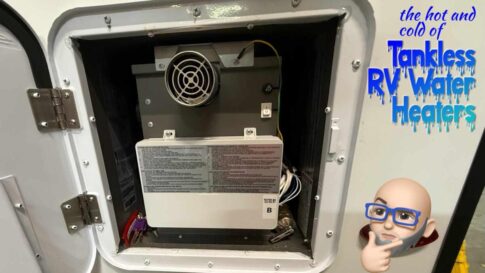
Tony’s tips The hot and cold of tankless RV water heaters
Why are you seeing tankless water heaters suddenly being included in so many RVs? A few years ago, these were luxury items, and now they’re everywhere. Is the RV industry becoming more generous with what they’re offering? Have you stopped laughing at that question yet? So what’s the deal? I’ll tell you here.
Reader poll (and article) To tell or not to tell: Would you tell other RVers about the “perfect” campground?
After RVing for years, you stumble upon the perfect RV campground. Do you tell other RVers about your find? Or do you keep information about the campground all to yourself? Respond here.
Times are challenging. Can you help?
RVtravel.com readership has dropped. Why? Google no longer shows our stories in its search results, which has had a big impact on us. It’s the same story with a million other independent websites. We’re doing okay because of our loyal readers, but we are hugely challenged. Would you please become a voluntary contributor? It would really help. As a thank you, you’ll receive our Saturday and Sunday newsletters ad-free. Thank you very much, and thank you for being a valued reader.
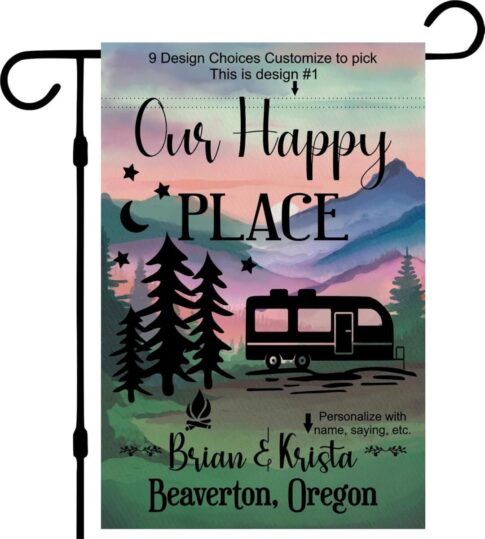
Create your own custom campsite flag. Tons of designs and RV options. Click here.
How to win We’ll select a winner at random out of all entries we receive today by 7 p.m. Pacific time. You can only enter once and after we notify you by email that you won, you have 24 hours to respond. Click here to enter or see last week’s winner.
Travel destinations
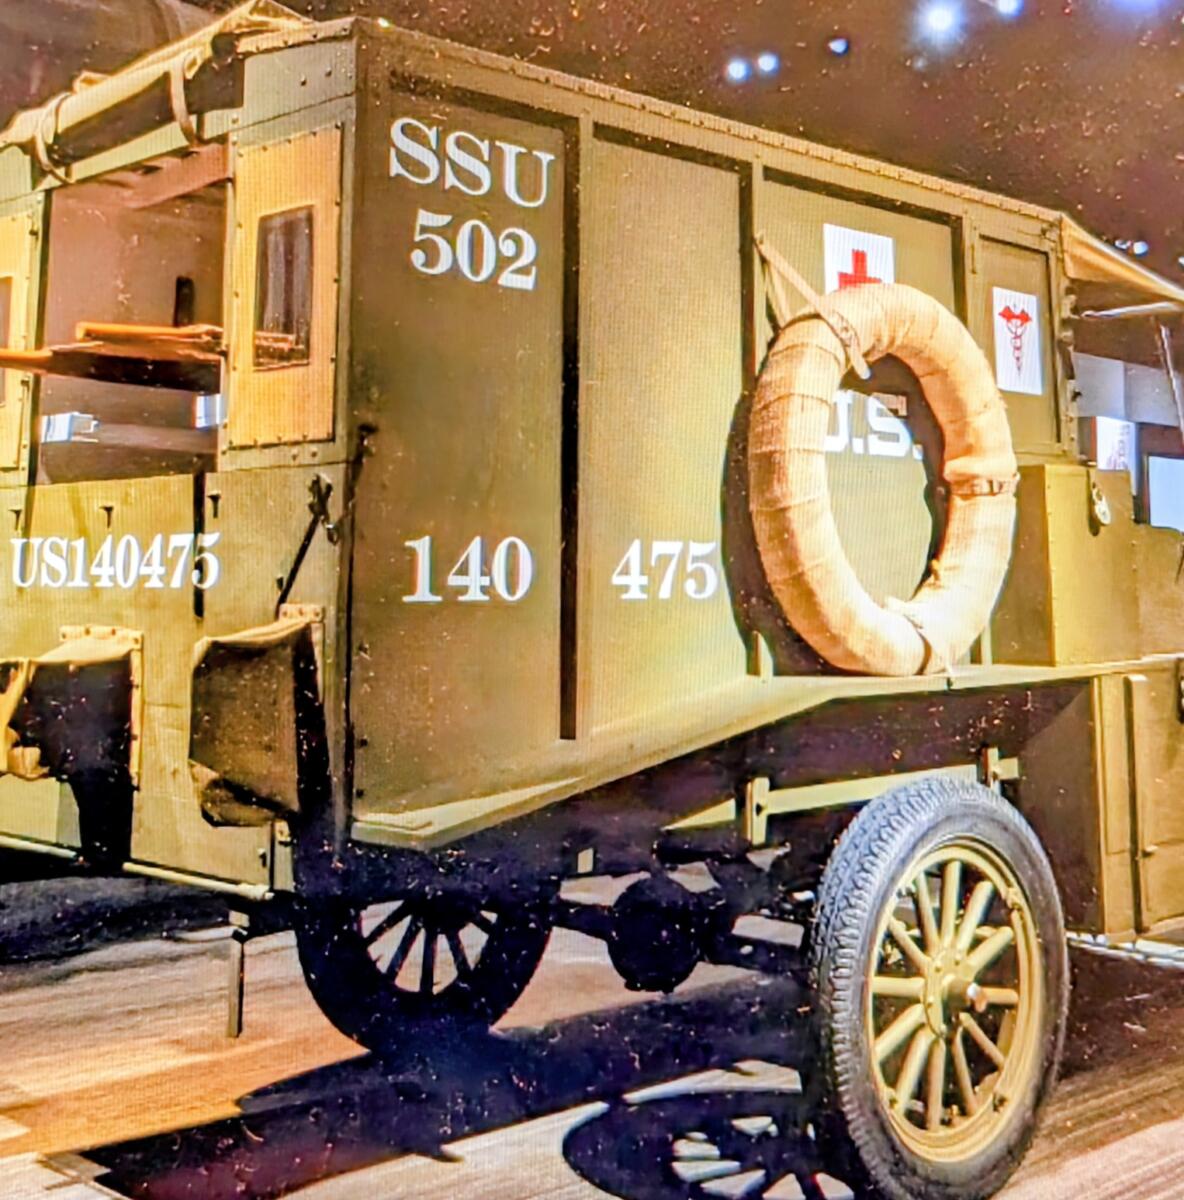
A visit to the incredible National Museum of Military Vehicles
Just outside the small town of Dubois, Wyoming, you’ll discover a big surprise—The National Museum of Military Vehicles. This 160,000-square-foot museum features an extensive collection of meticulously restored military vehicles, artifacts, and firearms. Dedicated to honoring our U.S. military forces, the National Museum of Military Vehicles makes history truly come alive. Learn more.
Mississippi’s forgotten tropical paradise
Most people think “beach trip” means Florida or California, but Mississippi’s Gulf Coast offers soft sand, calm water, and hometown southern hospitality. Mississippi Sound’s barrier islands keep waves mellow and the atmosphere laid back. Read on to see why RVers love Mississippi’s beaches.
? MYSTERY PRODUCT OF THE DAY ? How in the HECK would you drive around like this at night—how could you see anything? This is one of the dumbest, craziest inventions we’ve ever seen. But it has thousands and thousands of rave reviews. Maybe it’s not as bad as we think! What do YOU think?
Highlights from this week’s RV Daily Tips Newsletter
BORED?? Well, there is no excuse! Read back issues of our RV Daily Tips Newsletters! More than 2,000 to choose from!
In the RV shop with Dustin Dry-rotted floors in RVs and what it would take to fix them
Water damage is one of the most common—and costly—issues RVers face. When one reader discovered a dry-rotted subfloor in his trailer, he turned to a repair shop for answers. How bad could the damage be, and what would it take to fix it? In this video, the experts break it down and explain what every RVer should know before a small problem turns into a major repair.
RV tire safety Change load range on tires to prevent “blowouts”?
By Roger Marble
I recently read a post on an RV forum from a guy who said he wanted to prevent “blowouts,” so he was switching from ST 235/80R16 LR-E to LR-G tires. However, he would continue to run the 80 psi specified for his RV, because his wheels were only rated for 80 psi. Continue reading.
Ask Dave This past week’s questions that Dave answered:
Remember this?
From the archives: Tricks to using paper towel holders in and around an RV
By Gail Marsh
Recently, when cleaning cupboards, I found an unused paper towel holder. Just as I placed the extra holder into the “donate” box, I stopped to think. I quickly grabbed the paper towel holder back out of the box. I knew I could come up with some creative tips and tricks for using paper towel holders in an RV. So here they are!
RVer health Scientists turn plastic bottles into Parkinson’s drug
Scientists have found a surprising new use for discarded plastic bottles: turning them into a key medication used to treat Parkinson’s disease. Researchers at the University of Edinburgh developed a process that converts a common plastic used in water and food containers into L-DOPA, the most widely prescribed drug for managing Parkinson’s symptoms. Continue reading.
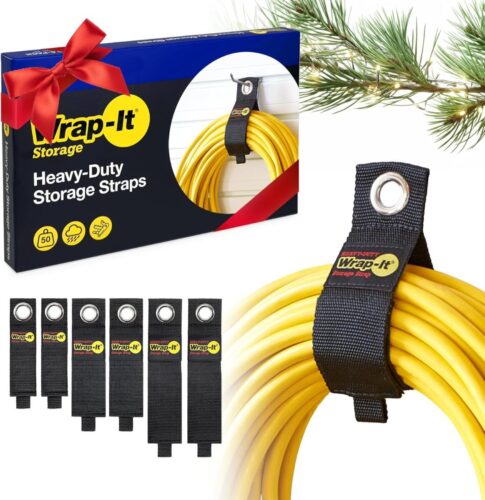
Heavy-duty Wrap-It storage straps are a must-have for RVers
Tired of all your cords getting tangled? That shouldn’t happen, and it won’t if you use these Wrap-It storage straps! Family-owned and made in the USA, these polypropylene straps hold up to 50 lbs.—perfect for RV hoses, extension cords, tools, and garage gear. One simple solution for a clean, pro-level organization. Come in a 6-pack! Learn more or order.
Comments this week from readers
“Just a reminder, some showers won’t drain properly if your camper is too far off-level. We have this issue when parked in our gently sloping driveway. Using the levelers to raise the front end a few inches eliminates the problem.” —Brian N.
“Normally, we do plan a special drive to see flowers this season, but due to high fuel prices, we’re keeping our driving to a minimum. Already canceled our first trip out for this season😢” —Wayner
“As is often the case, the movie doesn’t do the slightest justice to the book (“A Walk in the Woods”). The first time I read it was on a cruise while lounging on the sun deck. I laughed out loud so hard that the tears of laughter streamed down my leg. My laughter prompted several conversations from passersby… Read this book!” —Artful Dodger
“Do we collect souvenirs when we travel? I guess bugs on the nose cap of our motorhome don’t count. They seem to stay with us forever.” —Dan
“I find it amazing how many people leave chairs, canopies, awnings, and other things out when they leave or go in for the night. We stayed in one campground where at least four awnings were destroyed by a sudden storm, and chairs ended up in the roads.” —Bob
Live cam
Barred Owl Nest Cam
Readers’ pets of the day
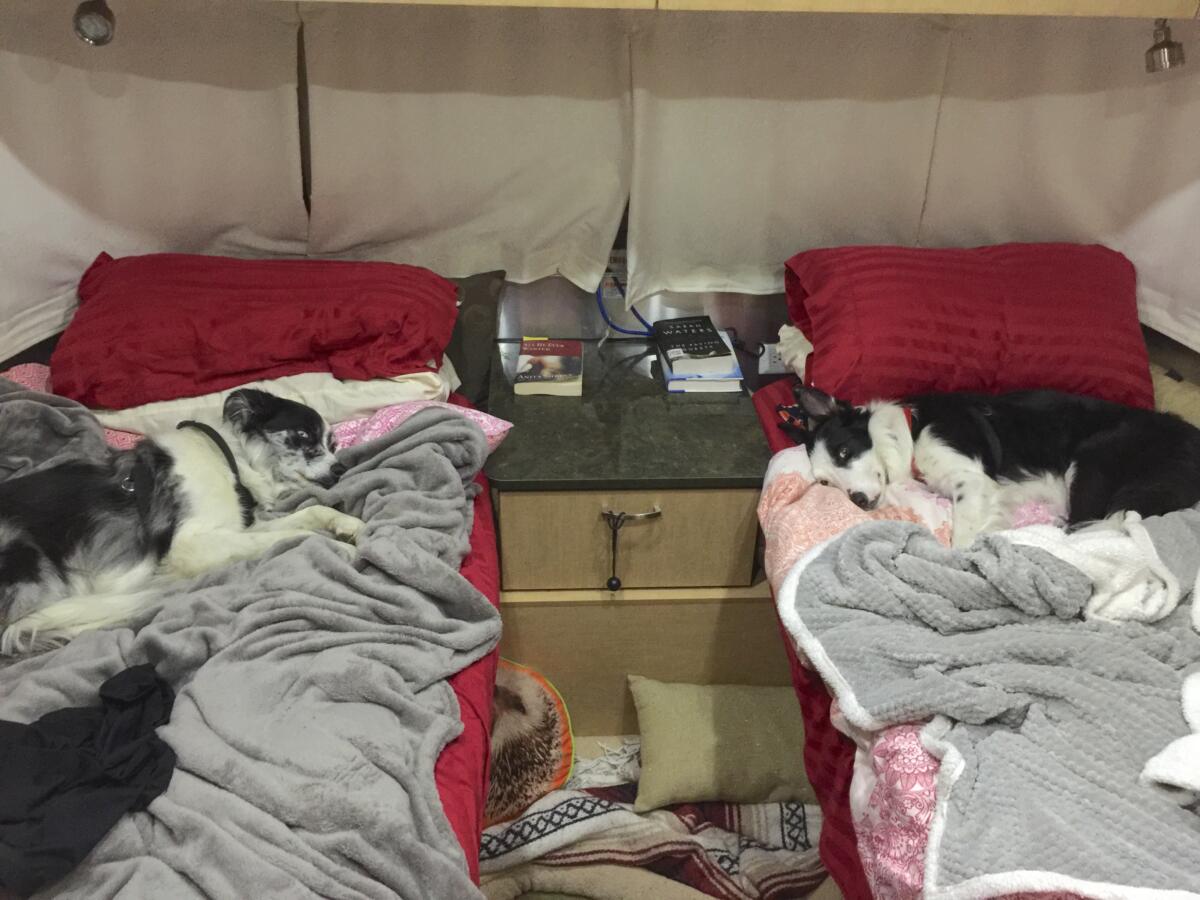
“Merlin and Daisy Mae (ages 12 and 10). They said to get a twin bed configuration so the dogs could sleep on the floor between the beds… NOT HAPPENING! BORDER COLLIES ARE SMARTER THAN THAT!” —Thomas Orcutt
Want to see your pet in this newsletter? Please send us a photo of your pet with a short description. No blurry photos and please do not submit your photo more than once.
Trivia
The tallest planetary mountain, Olympus Mons, is located on Mars. The mountain rises an astounding 13 miles above the Martian sea level and 13.6 miles off the dry sea beds. Even without the extra elevation from the sea bed, Olympus Mons is two and a half times as tall as Earth’s tallest mountain, Mount Everest.
MUG OF THE DAY:This is an interesting, funny, and patriotic way to start your day! Maybe with your clever wit, you, too, could create a presidential slogan after your first cup o’ joe! Check this mug out. We love it!
By Nanci Dixon
Be a good campsite neighbor and don’t do these four things. There are a number of simple etiquette things to do or not to do to be a good RVer that we all know … or at least should know. I recently learned some new things and these four things are now at the top of my not-to-do list. I found out you can be too nice of a campsite neighbor…
Don’t distract!
We love RV neighbors welcoming us, but, please… a simple “Hi” or wave is great until we are set up. It is too easy to get distracted and miss something like turning on the water, flipping the circuit breaker, putting pads under the jacks, or, worst for me, my husband not connecting the sewer hose!
Don’t be too neighborly!
We love to talk with folks. We have made some lifelong RV friends in our travels, some of whom were campsite neighbors. But, please, don’t be too neighborly and wander over every time you see us out. Give people a little space. Absence makes the heart grow fonder…
Don’t have it all about you
We love hearing about other people’s journeys, their kids, their stories—but not ALL of their life stories, problems, how much money they have or don’t have, illnesses, medicines and how much tax they pay or can avoid. Make the conversation a two-way street and don’t monopolize it.
Don’t talk politics with your new campsite neighbor!
In this climate, this should be a given. Politics are politically charged! Don’t assume you know where your campsite neighbor stands and don’t try to convert them to the “truth” if you do. You will only be met with uncomfortable silence or a heated discussion. If politics and religion can put a deep wedge in families, think how quickly they can ruin an otherwise amazing camping trip.
These four “don’ts” might seem obvious, but there are a lot of newcomers out there excited about their newfound freedom and wanting to connect with people. RVers, after all, are an amazing group of friendly folks.
And, no, before the comments swirl, I am not a Scrooge (although I am a bit of an introvert). I really like people stopping by, pulling up a chair, and chatting. But just like the in-laws visiting, I want them to go home sometime!
This 160,000-square-foot museum features an extensive collection of meticulously restored military vehicles, artifacts, and firearms. Dedicated to honoring our U.S. military forces, the National Museum of Military Vehicles makes history truly come alive.
Location
The National Museum of Military Vehicles sits on U.S. Highway 26/287, the Wyoming Centennial Scenic Byway, in western Wyoming. The address is 6419 U.S. 26, Dubois, WY, and it is just a short (2-4 hr.) drive from Yellowstone and Grand Teton National Parks. If you served in our military, love history, or are interested in combat vehicles and/or historical artifacts, the museum is definitely worth a stop!
Note: Even though the official Dubois population is just 1,000, Dubois can feel much busier in the summer. Seasonal residents, tourists, and RVers passing through on their way to places like Jackson and Yellowstone can nearly double the number of people in town during peak travel months. Keep that in mind as you plan your trip.
What to expect
The National Museum of Military Vehicles celebrated its grand opening in phases, with full opening in August 2022, not quite four years ago. It features nearly 500 restored military vehicles, artillery, naval vessels, and aircraft from 1897 to today. The large, $100 million facility highlights American involvement in World War II, the Korean War, and the Vietnam War.
Photo credit: The National Museum of Military Vehicles
Inside, visitors will experience a firsthand look at American military history rather than a quick walk past a few static displays. The galleries are designed to tell the stories behind the machines as much as the machines themselves.
Photo credit: The National Museum of Military Vehicles
Museum admission covers two consecutive days, and the museum currently offers free public guided tours on Saturdays and Sundays when staffing allows. (Your tour cost is included with the admission fee.) Here’s the breakdown for admission:
• General Admission: $23
• U.S. Military Veterans: $18
• Children Under 10: Free
• Active U.S. Military: Free
Current museum hours are 9:30 a.m. – 5:00 p.m., Wednesday through Sunday. Summer hours for daily operation begin on May 20, 2026. The museum will be closed on July 4.
Watch some of the museum’s videos to get inspired (and excited) for your visit.
More to do
This area of Wyoming is beautiful and offers many opportunities for a variety of outdoor adventures. The Wind River, located nearby, is described by local tourism as one of the nation’s best fly-fishing spots.
You may also enjoy hiking, horseback riding, and picnicking. You can golf at Antelope Hills Golf Course, a small, public course just minutes from the museum in the Wind River Valley. The course is known for its relaxed atmosphere and beautiful mountain surroundings. (You’re likely to spot some wildlife.)
For RV parks, Dubois gives you several solid choices close to the museum.
• Dubois/Wind River KOA Holiday is highly rated on TripAdvisor. It sits in the heart of town with RV sites, patio sites, and riverfront sites available.
• Windhaven RV Resort offers full hookups, 30/50-amp service, Wi-Fi, laundry, firepits, and a walking-distance location near downtown Dubois.
• Longhorn Ranch Lodge & RV Resortis located about 3 miles east of downtown and offers riverside RV sites plus the option of cabins and lodge rooms.
You should go!
For RVers who like places with a story, the National Museum of Military Vehicles is an easy choice. The museum and nearby areas offer plenty for an RVer to see, do, and enjoy.
Have you visited the museum? Tell us about it in the comments below.
I had also mentioned one of the things I really love, hehe, about Love’s is those grind-on-demand coffee machines and, apparently, I’m not alone. Reader Henry Dorn added:
I love Love’s and the big red heart in their logo and always go for the coffee machines (those are around $40,000 by the way) that grind your decaf or caf, and then you can load your cup to your heart’s content with those sweeteners and creams, and besides, the employees are quite wonderful and dedicated. If you sleep overnight in a Love’s, that might be due to your poor planning, but that said, Love’s is my go-to place, and be sure to buy one of their coffee cups since they have a heart on them. Isn’t RVing about Love?
Some customers need to share the Love’s
One of the complaints lodged by several people is one I share myself, and something I’m not sure Love’s can help with. That is the inconsiderate folks who park at the pumps and then head in for a potty break or for snacks or whatever it is. I’m 100% with you on this.
Many’s the time that I’ve been waiting (I would say patiently, but I actually have no patience) for a pump, only to find that someone comes out of the main store after an extended period of time and then starts pumping their fuel. Other times, I’m next in line to depart after filling my truck, and the vehicle in front of me is just there. Unoccupied.
When I’m driving just the truck, it’s easy enough to maneuver out around these inconsiderate parkers, but when I’ve got 30’ of trailer hanging off my back end, that’s not the case.
I have no idea how Love’s, or anybody, could police this. It seems that common courtesy has gone from being a practice to an oxymoron, and those oxymorons are the ones parked where I need to be.
Cleanliness counts
The Love’s where we stayed overnight in St. Joe, MO, was anything but clean! You could hardly walk around our site; there was so much dog poop. And, not just at our site, the dog park was a mess, too. We paid $45, I think, and unfortunately, it has soured me from ever thinking about staying at a Love’s RV Park again. —Pat
To be fair, I have been in a few Love’s where attention was needed when things were really busy, but the team that was at that Love’s usually got to things pretty quickly. I like how their bathrooms have that rating system where you can push a button to rate the restrooms.
There have been times when I’ve pushed the yellow and even the red button, but not often.
Unfortunately, the dog doo situation—the best I can offer is to contact their team and let them know. I suspect the people who just leave their dog’s waste behind because they think their mommy is in the area are the same group of folks who park at the pump and go inside and just leave their vehicles.
I can’t really comment first-hand on the dog parks because I’ve had dogs and don’t want dogs or any pets any longer. Too many other people are ruining the experience for me with their off-leash dogs and other examples of poor behavior. Some folks’ mommas didn’t raise them right.
The price for staying overnight
It seems that a lot of you have issues with the price of the Love’s RV Stops, and I can’t disagree with that. I’ve patronized a number of these, and the price is comparable to a campground, quite honestly.
Was super excited when Love’s started their RV areas … but then the price skyrocketed from the $20ish range to now some are in the $60’s!!!!!!! Yes, they are convenient, but come on, for an overnight stop, I find it extremely overpriced. Who needs a pickleball court at a truck stop?? —Cindi
I’m sure someone with a marketing degree has researched what people want in a campground, and those people have asked for pickleball and all sorts of other things. (Pickleball did top the list of amenities being added to RV parks in 2024.)
I also know that the price of doing anything once you get the government involved escalates through the roof. You have to think that putting in a new RV park means you’re getting permits for electricity, power, water, sewer, pouring concrete, the gas distributed by patrons at Taco Bell, and who knows what else.
All these permits and inspections and second inspections and contractors and everything else cost a lot of money, and, surprise, surprise, the only way to recoup that money is to charge the customer.
We can all Monday-morning-quarterback anyone else’s business. But if I were doing so, I’d pare down what is offered as much as possible because I’m with you. I don’t plan my camping adventures around staying at a gas station.
What I really like about Love’s RV Stops is that everything works the first time. I really like the digital reservation system.
These are gas stations—not resorts
But there has to be some consideration for the fact that these places, even the ones with resort amenities, aren’t resorts. They’re gas stations. And we stop because we’re tired and we want to simply spend the night and move on.
I’ve stayed in Love’s “RV parks” a handful of times, hoping that by using them they’d have an incentive to build more. They have, but at the same time, they’ve jacked the prices up. Sky high! One I stayed at, outside Muscle Shoals, AL, was nice, but nearly all of the others I’ve stayed at have been noisy, difficult to get in or out of, and nowhere near the price they charged. If the prices were half of what they are, or there was a discount for those who fuel (I’ve got a 100-gallon tank), I’d probably use them again. But until then, hard pass. —Chris P. Bacon (ha)
Nothing more to add other than what a great user name.
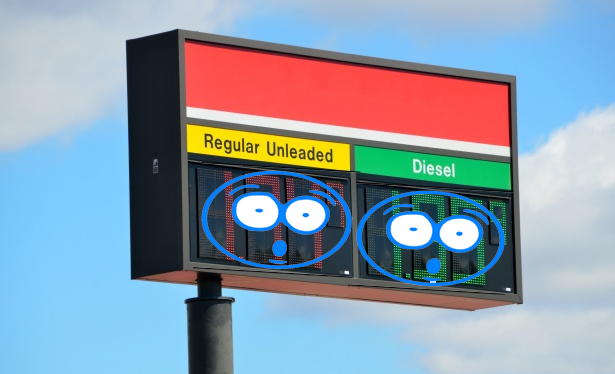
The gas and diesel
We’ve stayed at many of the Love’s RV stops in the south, the latest at their newest stop in Mandeville, LA. Check in via the app worked great, and the location of the RV spots made it the quietest Love’s we’ve stayed at. All the Love’s we’ve stayed at have been clean, and the utilities have worked as expected. Yes, it’s pricey, but it’s convenient. We’re just waiting for more to be built for our annual trip to da UP! I only use Top Tier gas, so I don’t buy their gas, but the window washers have nice long handles! —Bruce
There were also a number of you who made comments about the fueling in general. More than a few made comments about the fact that the fuel at Love’s is not Top Tier, and I totally get that.
For those who don’t know, the fuel industry has come together to offer a measure of performance in fuels called Top Tier. These fuels have greater detergent additives, no metallic additives, and are tested to other performance levels. There are vehicle manufacturers that very specifically recommend Top Tier fuels, particularly for folks who drive vehicles with turbochargers, which is an ever-increasing population.
Unfortunately, none of the truck stop gas stations seem to offer Top Tier fuels. So, for those who have vehicles like those Ford EcoBoost trucks, this may have you shopping elsewhere if you care.
This is one of the many, many reasons I chose the truck that I did the last time I chose a truck. Simple American gasoline V8, and I could pour almost anything into the tank and be okay. I do prefer Top Tier fuels when I have a choice, but I’m not forced to use them.
Navigating the pumps at Love’s RV Stops
There were also more than a few of you who stated that navigating the “retail” pumps at Love’s was challenging, especially for larger rigs. I get that, too. And, universally, you stated that the fuel prices for diesel at Love’s tend to be the highest in any given area.
If I had a larger diesel vehicle, I would look into commercial fueling programs at Love’s or anywhere, for that matter. You know the truckers aren’t paying full price for their fuel, and they buy a lot. But that might be why they’re not paying full price for their fuel.
This hasn’t been an issue for me, so I haven’t looked into it.
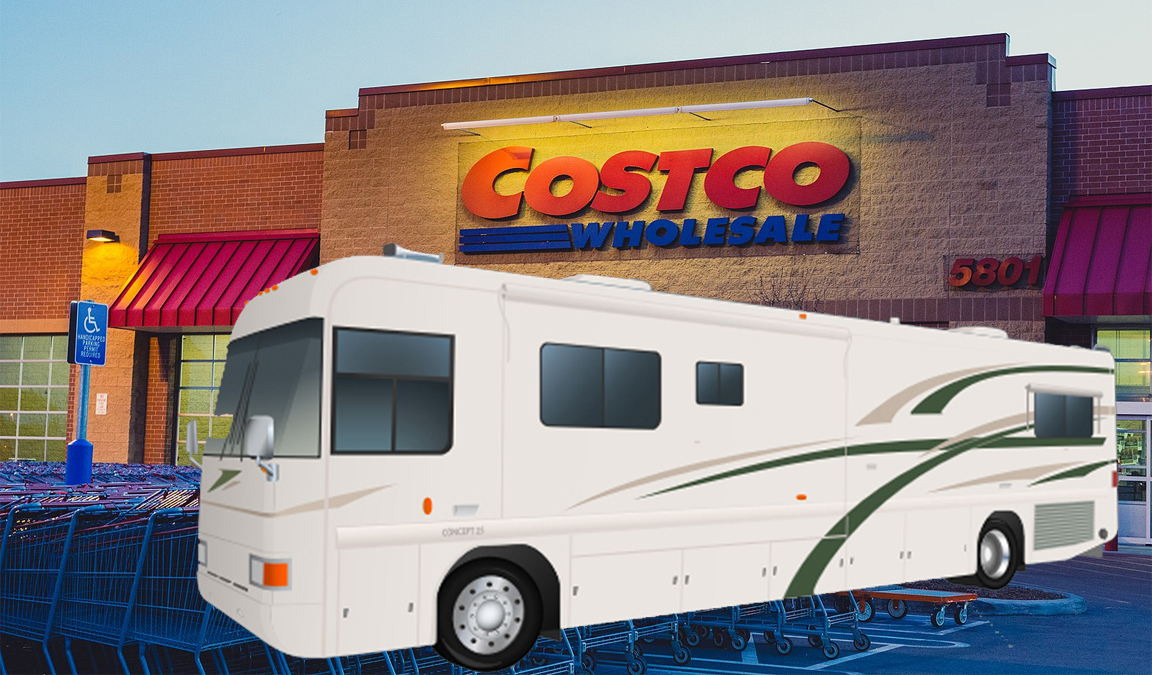
Costco image base image Tony Webster on wikimedia.org Motorhome added by editor.
Alternatives?
More than a few of you wrote that you prefer Buc-ee’s, and I get that. I don’t like Buc-ee’s only because it’s so huge and chaotic inside, but the bathrooms are spotless. But their fuel is also not Top Tier, although some of you had written that you have no problem getting your larger RVs into a Buc-ee’s.
But one of the comments surprised me:
You can also spend the night at Costco. Ask first, of course. They ask that you park along the wall, usually near the truck docks. I’ve stayed numerous times, and it’s always quiet. No hookups though! lol. —Carol
Really? With the ludicrous solar and lithium system on my RV, this would be ideal, and Costco’s gasoline is Top Tier and usually priced lower than almost anywhere else. I gotta try this and, of course, I’ll share my experience.
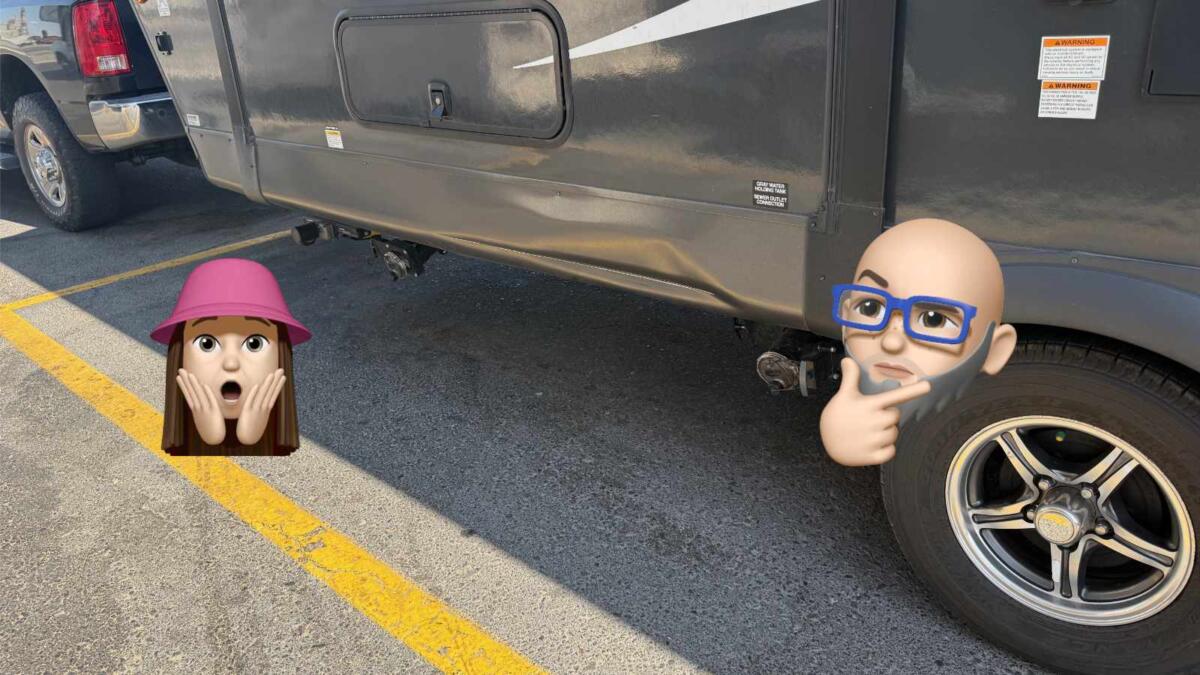
A number of you made comments about how tight the spaces are at Love’s. Yep. There was a particularly tight location, and I was fairly new to pulling my latest trailer. So my trailer and the concrete base that’s there to protect the fuel pumps from knuckleheads, like me, came into contact. The concrete base won, of course.
I was lucky that the damage was only to the metal skirt molding on the trailer and didn’t do anything more. But I did take the trailer all the way back to Indiana and have the skirt molding replaced at the factory.
I could blame the fact that it was near sunset and the light was in my eyes. I could also blame the fact that the bleeping concrete was painted black when yellow or another bright color would have been easier to see.
By Cheri Sicard
In the video at the bottom of this article, Bob Wells from Cheap RV Living interviews Kelly, an engineer by trade, who created just about the most advanced DIY camper van you will ever see. He even installed a slide room on a van! As Bob says, “Everything you could want in a van is in this van!”
Kelly’s engineering mindset has allowed him to come up with many innovative ideas for his camper van, but working at a fabrication shop has given him the ability to actually turn those ideas into a tangible and practical reality.
Kelly’s goal was to build an RV that did not need to stay at RV parks and plug in (a man after my own heart). Not only did he accomplish that, but he did it without needing any propane in his rig!
It started with a Ram ProMaster 350 van, the biggest one they make. It sits on a 1-ton chassis. Kelly chose this van because it has lots of room underneath where you can hang things. For instance, your water tanks.
Kelly ordered a van with sliding doors on both sides so that he could add his slide-out room on one side. A DIY van with a slide-out—I am amazed at that alone!
The pair started the tour with this feature, as it truly sets this particular van build apart. Kelly says it was important to order the van with the slider door. Then, you can order a slide-out kit. You then basically build a box that gets fastened to the van door, and a frame for the track to mount to, before wiring it all in.
The kit Kelly used is the same type that an RV manufacturer would buy when putting slides in a trailer, 5th wheel, or motorhome.
Kelly’s slide-out on a van is a regular 12-volt-powered slider just like you might have on a larger RV. It slides in and out with the touch of a button. When closed, you might never know it slides, as his stealth van looks like every other van in the world.
When opened, it provides what looks like a huge amount of space, even though in reality it’s only about 18 inches.
Unsurprisingly, the inside of Kelly’s van is also impressive:
The slide room provides counter/table space on top of lots of storage drawers
There’s a sink, fridge, butane stove, and microwave
Full-size bed with lots of storage underneath
780 watts of solar panels on the roof
Rooftop DC split system air conditioner
700 amp-hour lithium batteries
A second inverter that charges the batteries while driving
Composting toilet
Shower
Two freshwater tanks and one gray water tank
A hydronic system that keeps the battery and water tank heated
In-floor radiant heat
Be sure to watch the video for the full tour. The quality of Kelly’s workmanship is impressive, and you are sure to be amazed by what he has done to this formerly humble little van.
In the video below, Brian from RV with Tito DIY shows how to mount large solar panels to your RV without the need to drill holes in it!
Be sure to watch the video to see how it is all done.
Brian begins by cleaning the roof well and creating the mounting hardware that he will use.
As Brian is mounting his RV solar panels to the roof of a large Class A motorhome, he wanted to use large solar panels that would maximize the space available and provide lots of energy. He sourced some used panels that set him back $175 for a 435-watt panel (plus shipping), and he bought four of the panels. This will give him a whopping 1,740 watts of solar power.
Before connecting the panels, Brian uses this multimeter to test them and make sure everything is working properly. Watch the video to learn how.
Next, Brian made a cardboard pattern the size of his solar panels. He uses it on the roof to lay out where the four panels will go. He had to move his antenna, too. Depending on the layout of your RV roof, you may or may not need to move other components as Brian did. Brian shows you how to do it, along with how to seal everything up watertight.
How to mount the panels
To mount his panels, Brian uses galvanized metal strut channels he bought at his local home improvement store. He uses these instead of the typical Z-brackets because they give you far more flexibility. The strut channels also improved the panels’ weight distribution and increased the surface used to secure the solar panels to the RV’s roof.
Instead of drilling into his RV’s roof, which would not have worked with the type of roof he has, Brian uses heavy-duty 3-M VHB tapeto secure the strut channels to the RV’s roof.
Of course, he measures twice before attaching anything. You should, too. The video will show you step-by-step how to mount the hardware so it stays put, then mount your solar panels to it.
If you have any doubt about whether this system will hold up, Brian did a follow-up video almost a year later after traveling from Alaska to Mexico. Be sure to check it out here.
Today’s RV review is of the 2026 Salem Hemisphere 261FKRB—a couple’s trailer with an unusual floor plan. I know many of you who read this have seasonal sites, and I could see this being a great choice for that type of use. This also has some layout features I haven’t seen in a while. It hits the mark on a number of premium features without a really premium price tag.
Something else to know about this rig is that it’s essentially the same as a Wildwood Heritage Glen 261FKRB—the same trailer, different stickers. I have an article about why RV companies make twin RVs with different stickers.
So what are those premium features? You know where we’re going to start!
How is the Salem Hemisphere 261FKRB built?
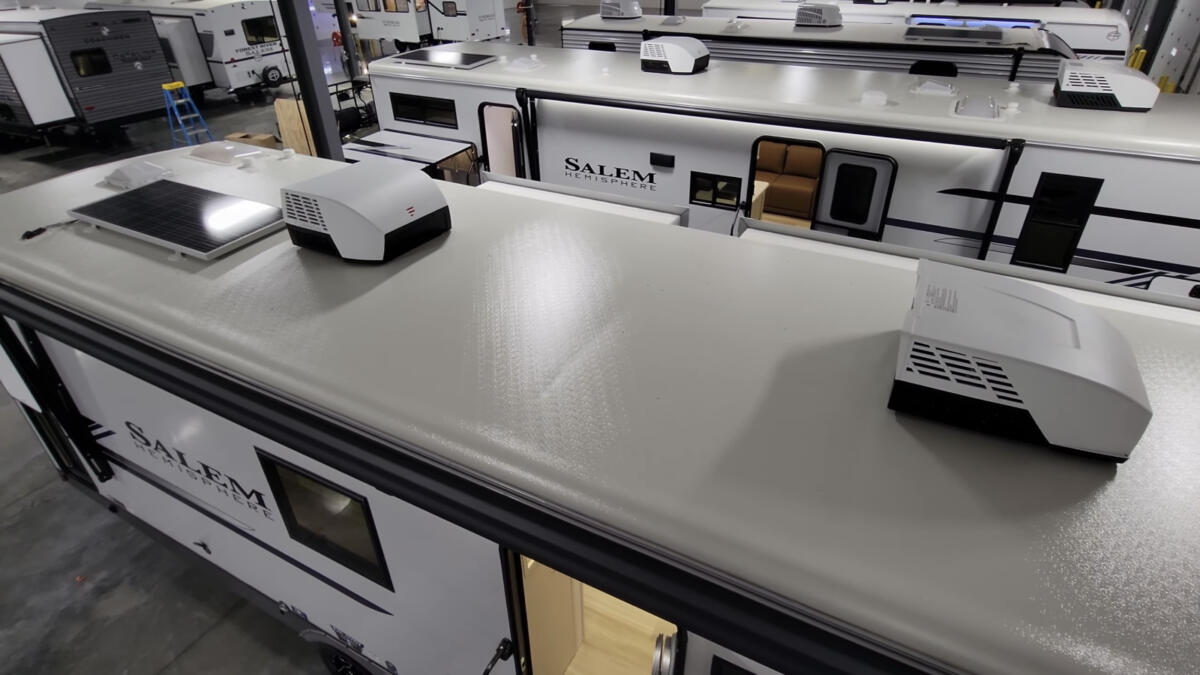
One of the things that surprised and impressed me was that this trailer uses a fiberglass roof instead of the typical membrane roof. These are arguably tougher than the membrane and might do a bit better at fending off damage from tree limbs and such. This is how many motorhomes are made, and not something you’d expect to see in a travel trailer.
That roof also wraps partially down the side of the trailer, so there isn’t that sharp edge. That can be another failure point—another feature many motorhomes have.
Do understand that the roof of the slide rooms themselves is still a membrane-type product. You’ll want to be cognizant of that—perhaps get an RV Slideout Sweep. I still use mine all the time, including for dusting off solar panels. I’m also not a fan of slide-topper out awnings.
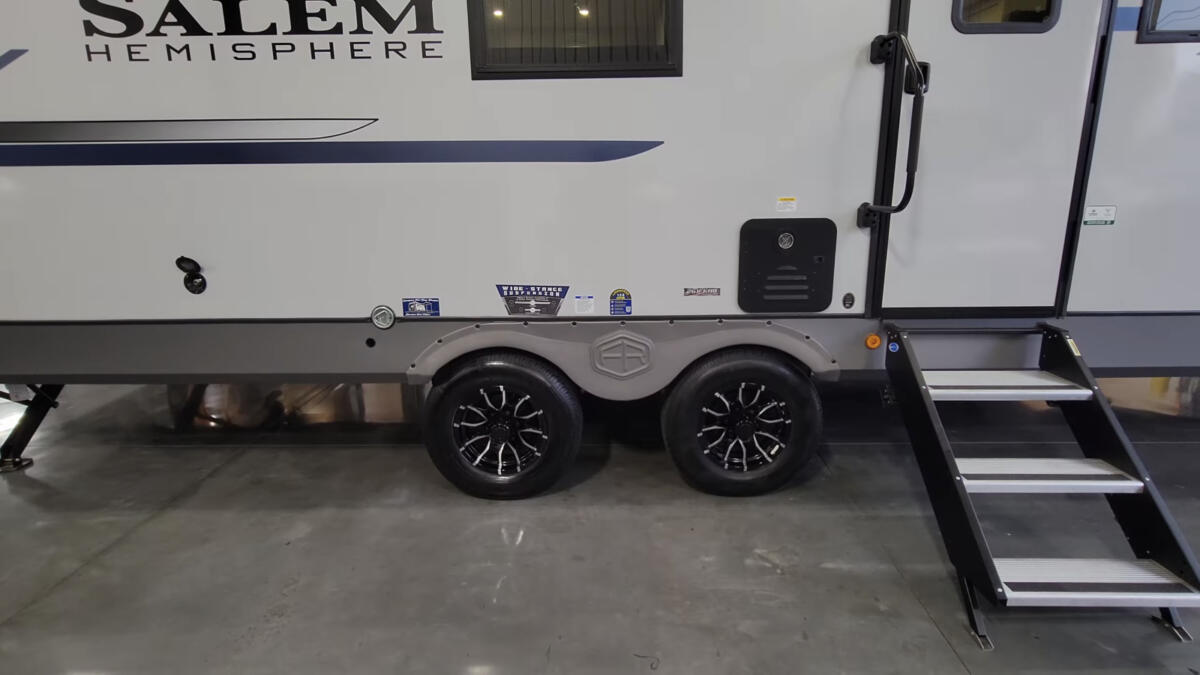
Interestingly, the axles on this trailer are spread farther apart. That purportedly offers a better towing experience by making the trailer more stable. Do you know that this is a simple leaf spring suspension and imported RV tires? There is also no tire pressure monitor. This is okay if this thing’s going to sit at a seasonal site. But if you’re roving the countryside, you’ll absolutely want a tire pressure monitoring system and, perhaps, some better rubber, too.
There are two slide rooms on this trailer, and both use a rack-and-pinion system—my favorite.
Another thing I really like is the windows, which incorporate the shades and bug screens right into the window assembly—a premium feature.
The Lippert OneTouch control panel inside this RV has buttons that are simple to operate, but those who wish to can also operate it with a smartphone or tablet. This is how my own RV is configured, and I really like this system.
Salem Hemisphere 261FKRB - 2026
1 of 16
The Salem Hemisphere has a mini fridge and huge awning
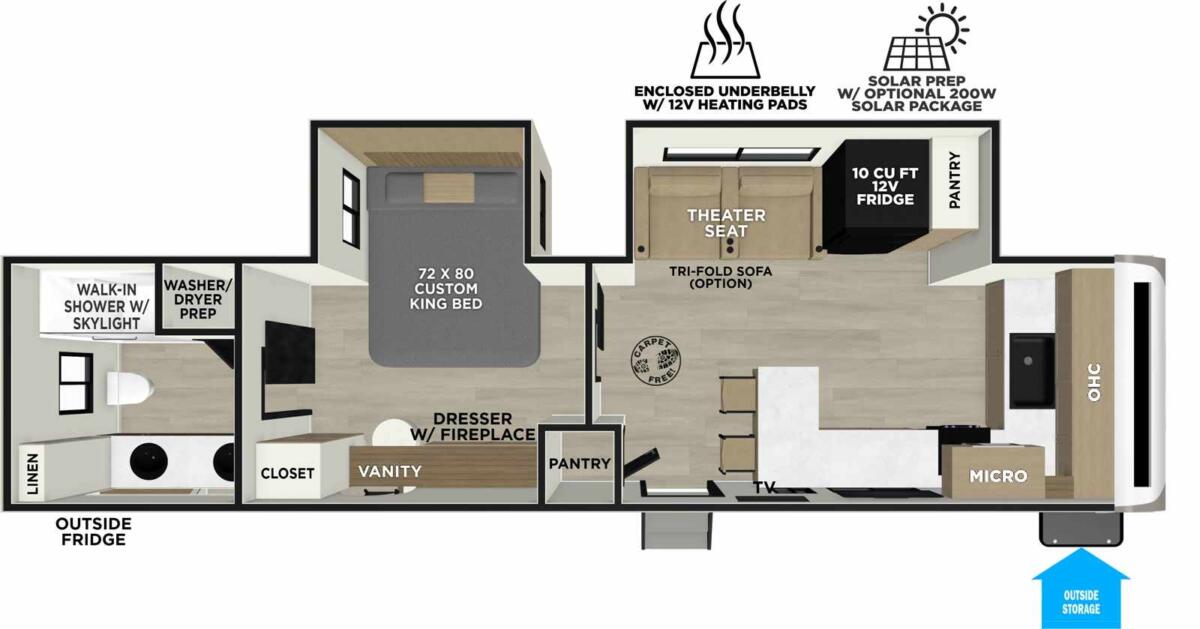
Salem Hemisphere 261FKRB floor plan
A lot of counter space in the kitchen of the Salem Hemisphere 261FKRB
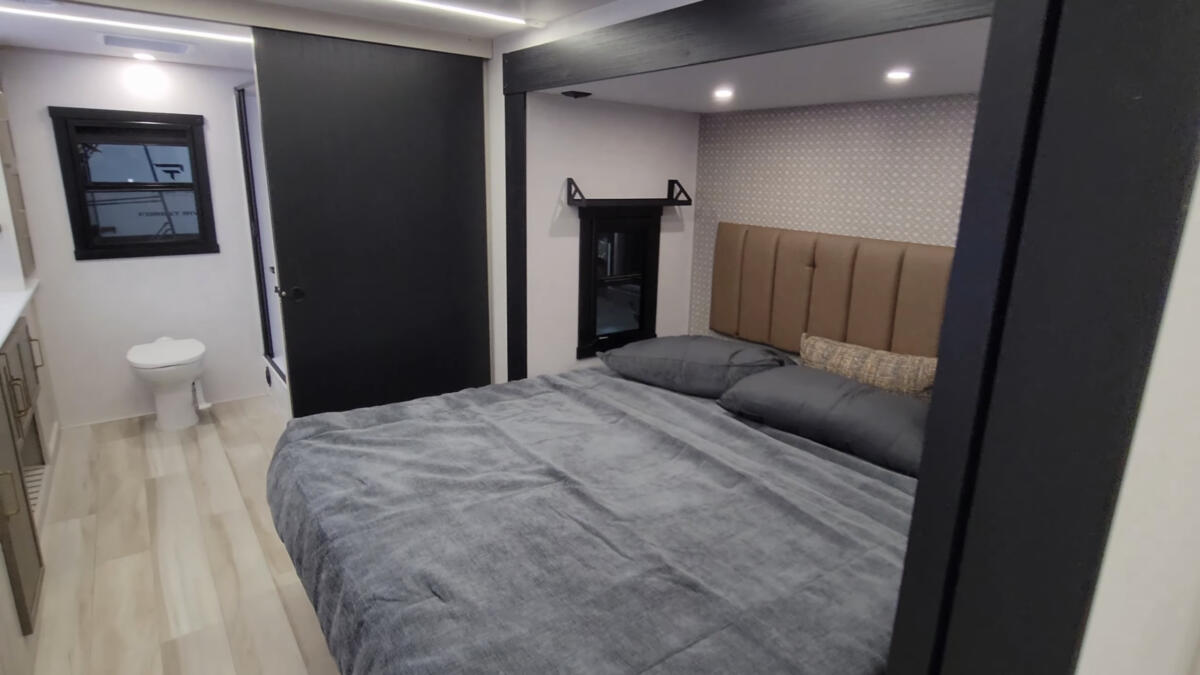
A 72 x 80 bed in a slide in the bedroom of the Salem Hemisphere 261FKRB
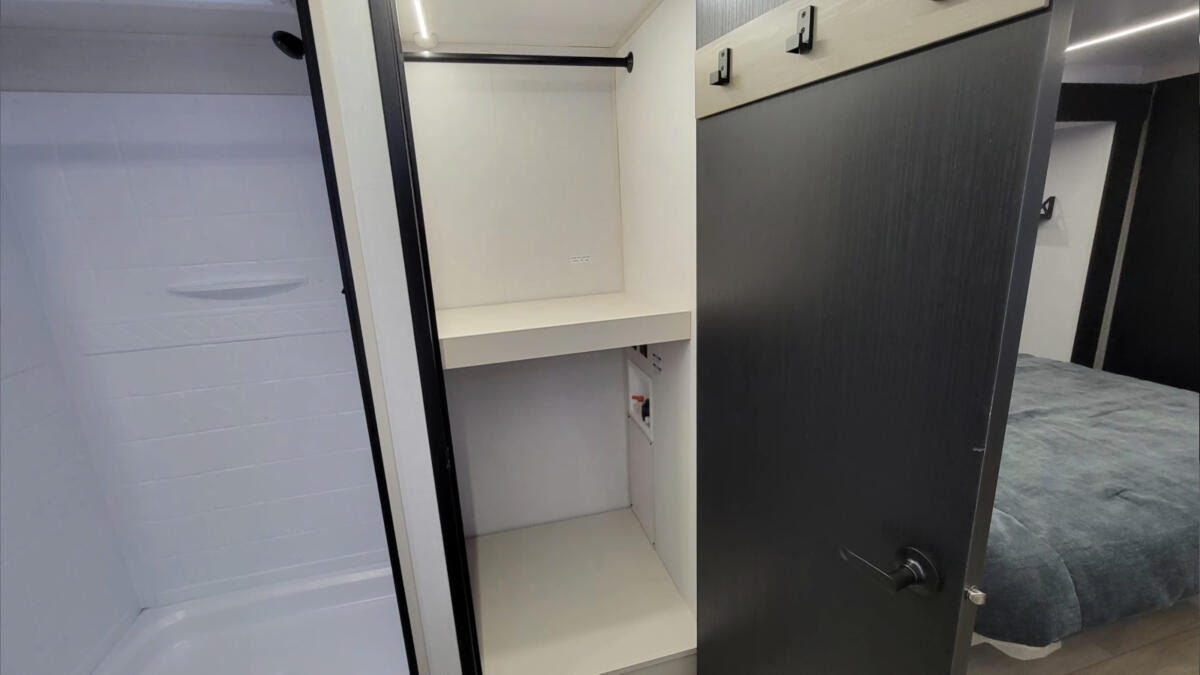
A closet in the bathroom features washer-dryer hook-ups in the Salem Hemisphere 261FKRB
A fiberglass roof is a great feature in the Salem Hemisphere 261FKRB
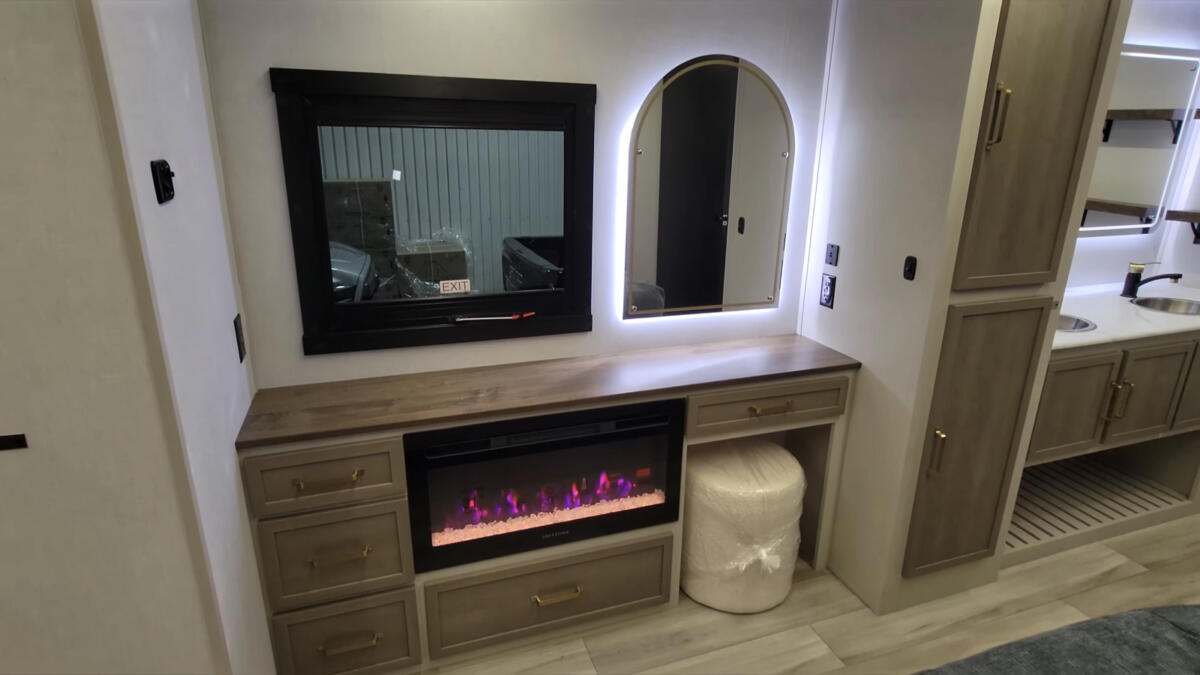
A vanity with an ottoman is a midcentury modern throwback
A very pleasant interior with breakfast bar and theater seats in the Salem Hemisphere 261FKRB
A very spacious bathroom with a lot of counter space and two sinks
An exceptional kitchen space in the Salem Hemisphere 261FKRB
Plenty of drawers and counter space in the Salem Hemisphere 261FKRB
Space below the sink for totes plus two sinks are highlights of the bathroom in the Salem Hemisphere 261FKRB
The spread axles purportedly offers a better towing experience but on import-brand tires
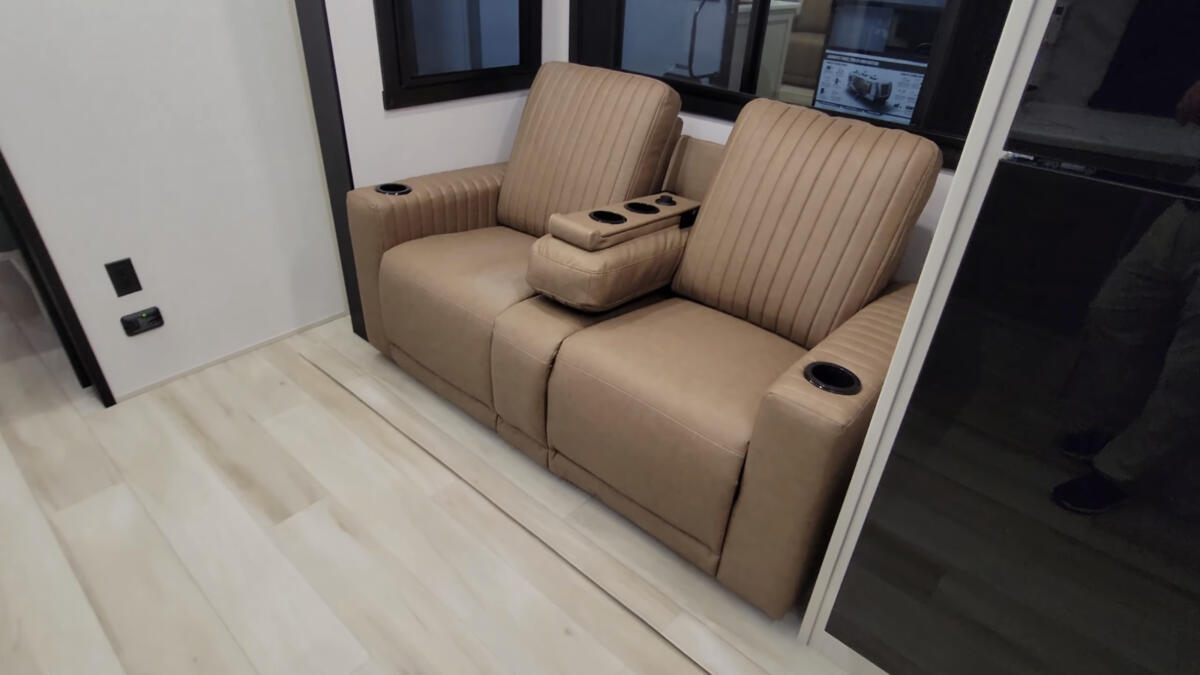
Theater seats in the Salem Hemisphere 261FKRB
There are totes under the bed and storage accessible from outside and in in the Salem Hemisphere 261RKRB
What’s inside the Salem Hemisphere 261FKRB
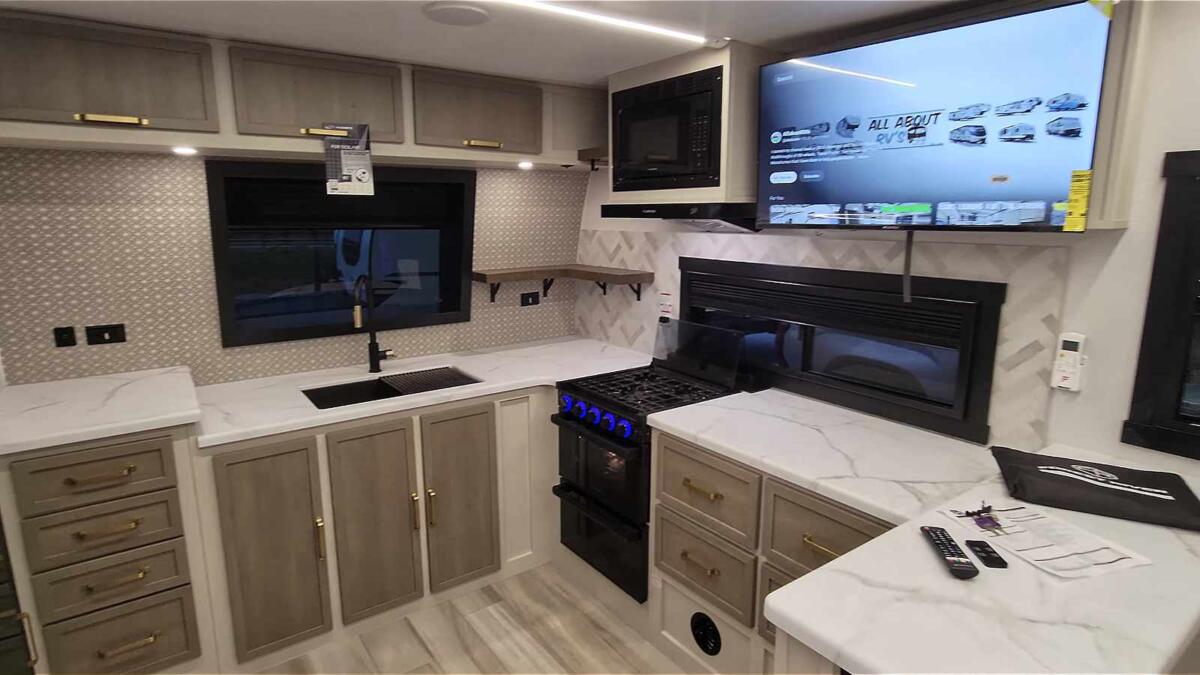
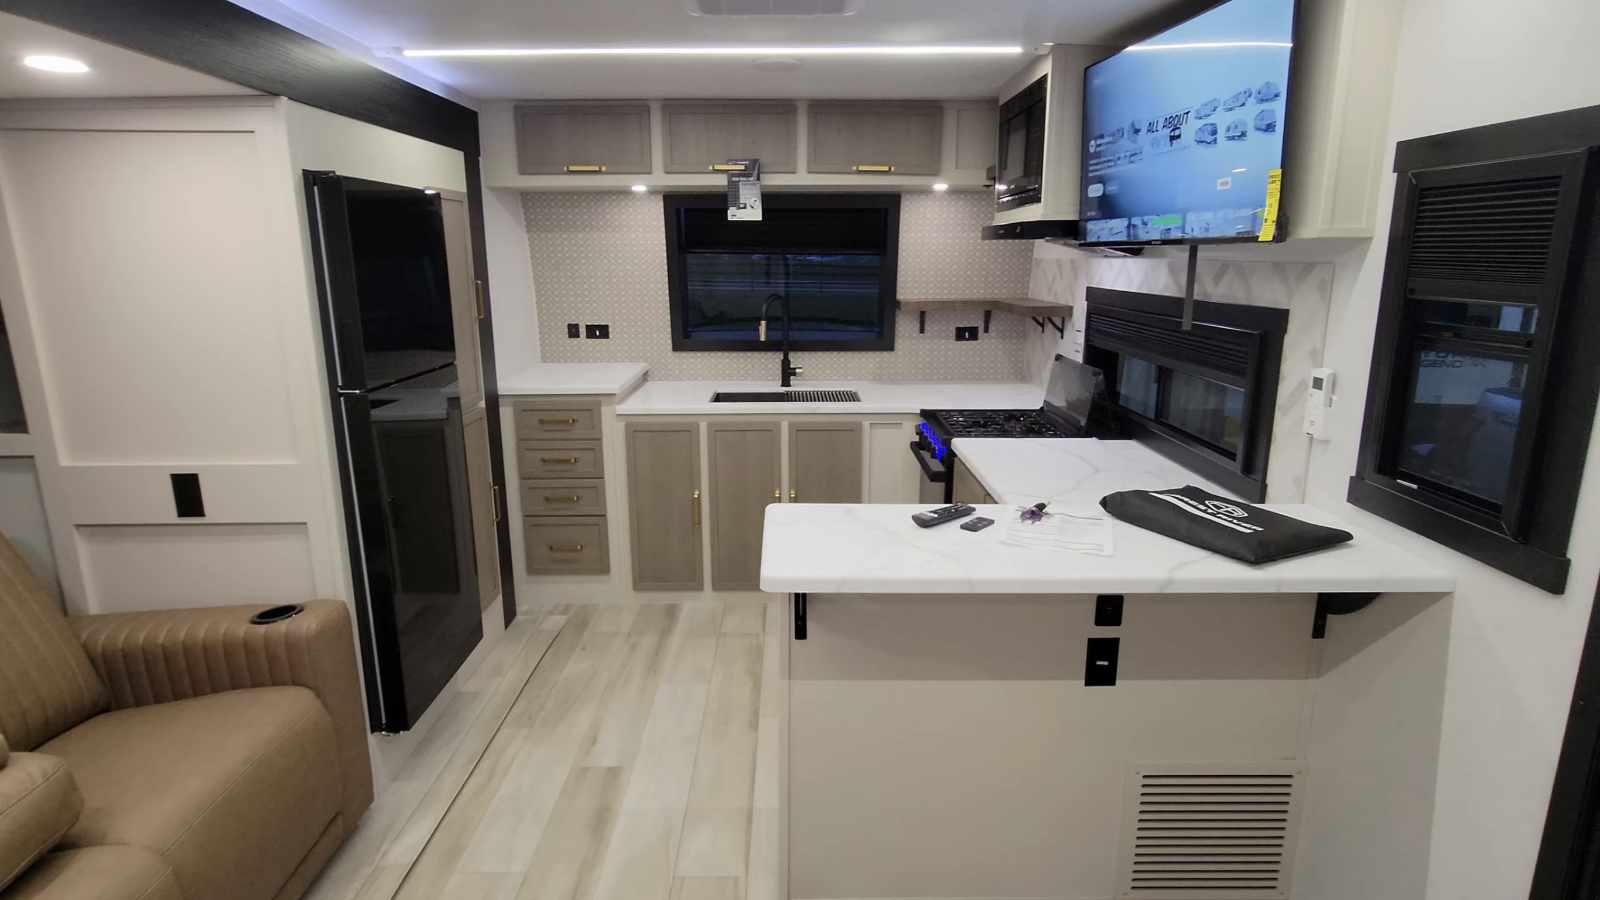
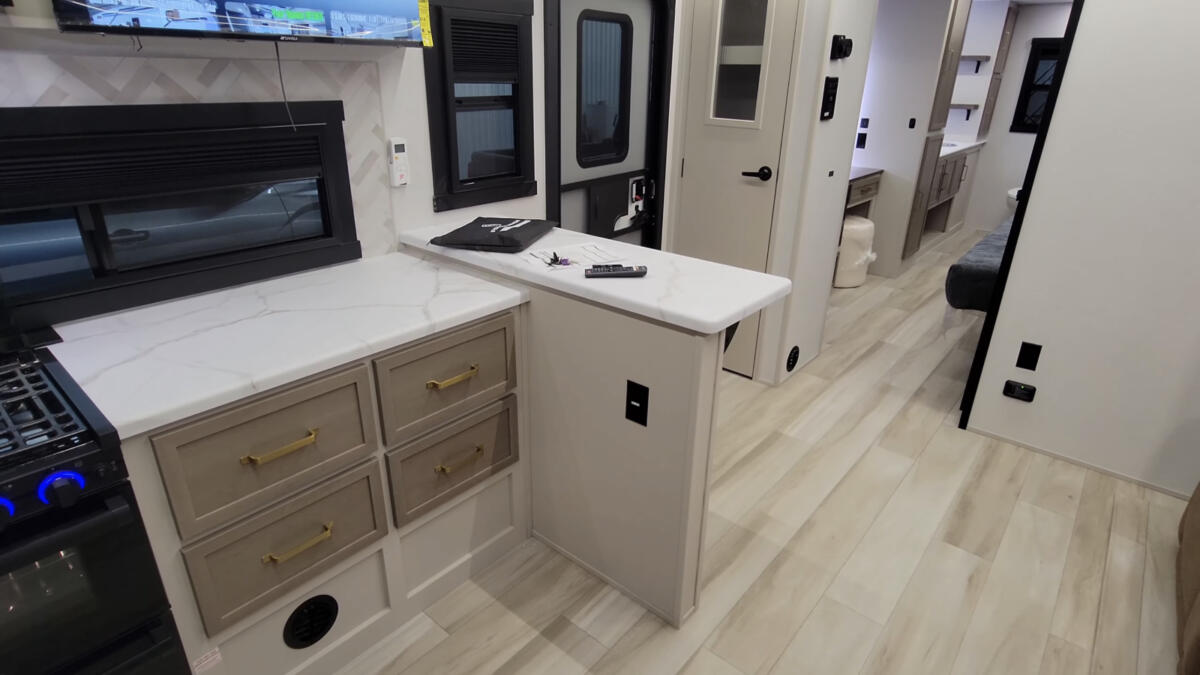
This trailer features a front kitchen, and it’s a good one. The countertop encompasses the width of the trailer along with the camp-side wall all the way to the wider-than-average entry door. There’s a decent pantry over on the road side in the slide room next to the 10-cubic-foot, 12-volt refrigerator.
The overhead cabinetry includes a microwave above the three-burner propane stove with a 21” oven. Nice. The number of drawers and storage in this RV are something not to be missed. There are also open shelves at the front of the space, as well as hooks and a cubby.
There’s also a breakfast bar with a couple of stools, so your significant other can sit there and rate the cooking process—which is why you give them a margarita and tell them to go outside.
The only seating here is a theater seat/couch, which is really for two normally sized rear ends, but three skinny rear ends could occupy this as well.
Bedroom
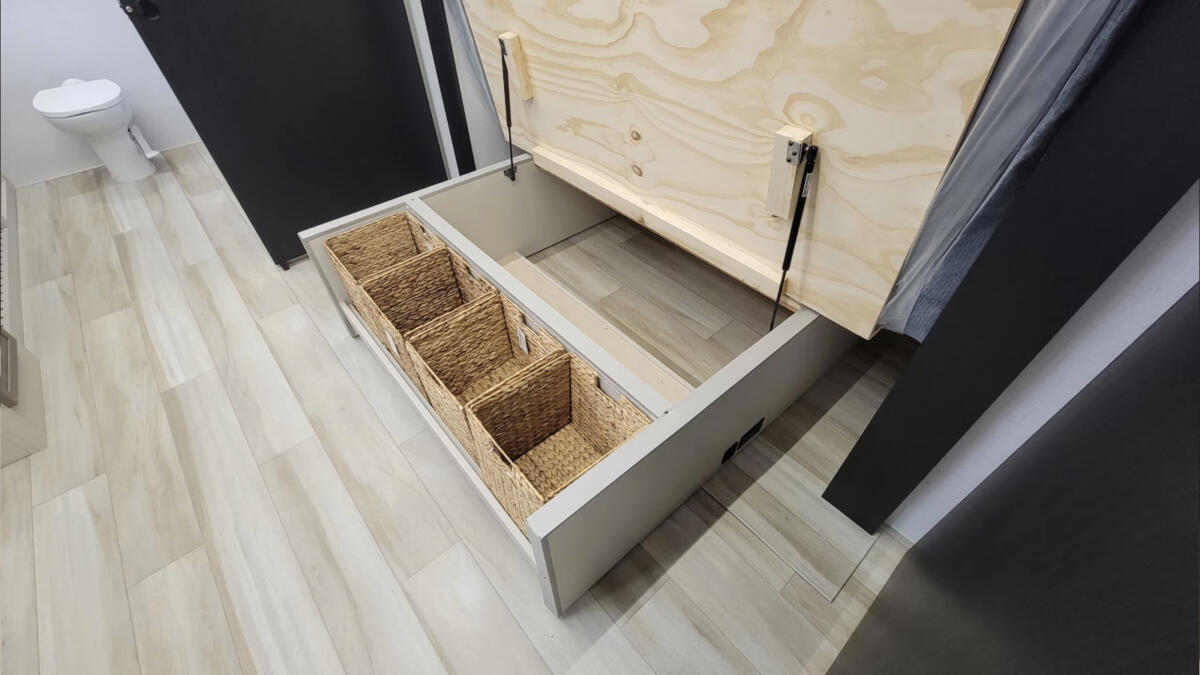
Something I like about Salem/Wildwood is the fact that they have a lot of spaces where they’ve included portable baskets or totes, and that’s true here, too. Under the bed are several wicker totes, which makes loading/unloading a bit easier.
The bed tilts up to reveal storage, which is pretty typical—but you can access that storage from outside or in. The bed measures 72” x 80”. There are also shelves on either side of the bed, which could be good for the electronic toys you’re using to read RVtravel.com at night or, perhaps, a CPAP or something. There is an outlet above one of these shelves, but not both.
There’s also an electric fireplace over on the road side. There’s also a large table with a round ottoman and a mirror, which reminds me of the makeup table that my aunt had when I was a kid. I haven’t seen something like this, and it gives off midcentury modern vibes, especially with that round ottoman.
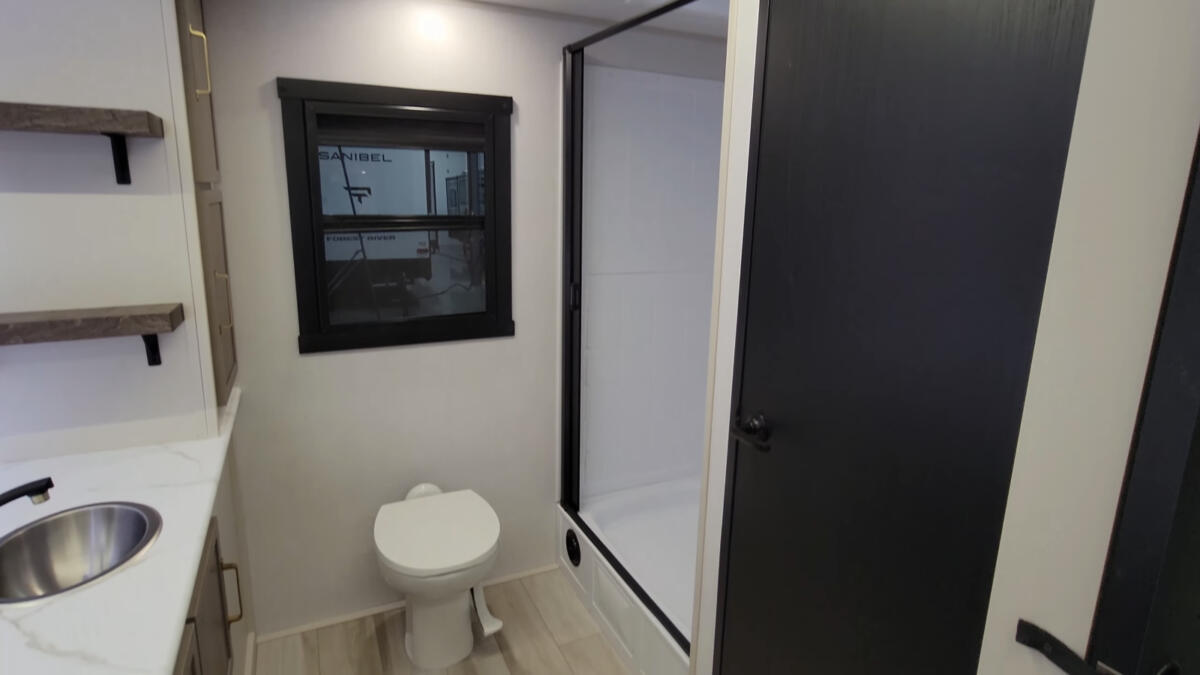
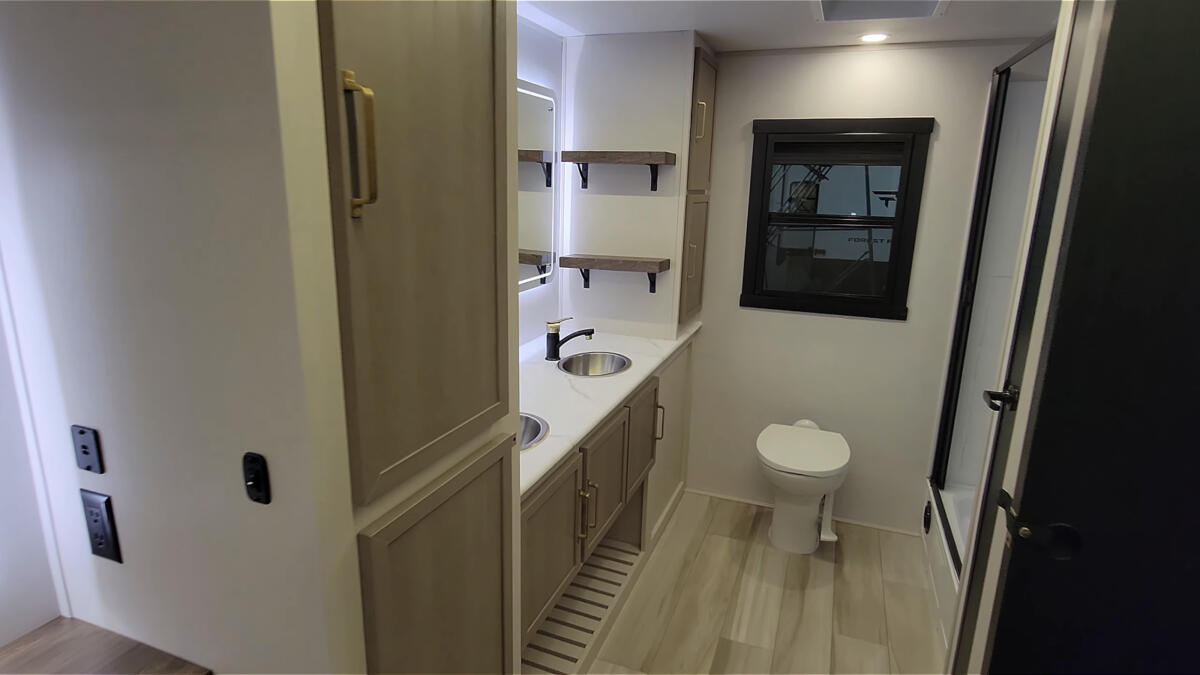
Bathroom
The bathroom in this trailer is absolutely huge, and the two sinks in the bathroom tell that story well. The two sinks also give off midcentury modern vibes to me, but this would allow a teeth-brushing competition.
There are open shelves next to the sinks as well as storage adjacent to them and below. Farther down is another space for more of those totes.
Across from the sink is a shower with a Nautilus-style retracting shower door, and next to that is a big closet. That closet has hookups for a washer and dryer, further telling the story of this being at a seasonal site.
Boondocking and travel access in the Salem Hemisphere 261FKRB
If boondocking is your thing, there may be better choices than this. There are no solar panels that come with the trailer, although most people who have larger solar systems on their RVs have put them on in the aftermarket.
Know that with the slides closed, you would have to crawl over the bed to get to the bathroom in the back. It’s not recommended that you occupy the slide rooms when they’re closed. So, if mid-trip potty breaks are important, that’s another consideration.
The kitchen slide mostly blocks access to the refrigerator. Again, if there’s a skinny traveler with you, they might be able to get to the fridge.
Final thoughts on the Salem Hemisphere 261FKRB
There is a lot to like about this trailer, and that is even more true as a seasonal unit. The roof material and those windows are definitely premium features.
I believe that the lack of standard solar panels isn’t a problem because, if this is going to a seasonal site, you’re going to have full hookups. Having paid for a solar system that you’re not using doesn’t make sense.
Outside storage isn’t a strong suit of this trailer. However, there is a bar-sized refrigerator in a cabinet at the back of this trailer. If storage is a higher priority than cold cucumber salad, then that fridge can get donated to charity, and now you have another outside compartment.
If you’ve spent any time inside your RV staring at bulky, dated window valances, you’re not alone. They’re one of the most commonly disliked design features in RVs.
The good news is you don’t have to live with them. Whether you want to soften the look, brighten your space, or go full modern minimal, your windows are one of the easiest places to start.
No sew
Even better, you don’t need to be a seamstress to transform your RV windows. There are creative, no-sew ways to refresh your RV windows and give your space a personality that actually feels like you.
So, if sewing isn’t your thing, don’t worry. These ideas are approachable, affordable, and completely customizable.
Pillowcase problem-solver
One of the simplest tricks is using pillowcases and thumb tacks. Fold a pillowcase (or a piece of fabric) to the size of your valance. Secure it discreetly along the sides, top, and underside with thumb tacks. This creates a clean, tailored look without permanent changes. It’s also easy to swap out seasonally or match to coordinate with your bed linens for a cohesive look in your RV bedroom.
Runner to the rescue
Another creative option is to remove the valance* (see how below). Replace the valance with a decorative table runner. Once the valance is down, use a lightweight wooden dowel as a curtain rod. You can choose to paint or stain the dowel. Then attach it to the wall. (Command hooks work well.)
Clip the runner to the dowel using curtain clips. This gives you a relaxed style, and you can rotate runners throughout the year for a fresh look without committing to one design.
If you want something even more minimal, consider skipping fabric altogether. Instead, apply removable window film directly to the glass. I like this option for the RV bathroom. It provides privacy yet still allows natural light and no worries about musty-smelling fabric in this high-humidity area. Bonus! Window clings are easy to remove later without damage. They come in all different styles and designs.
Gotcha covered
A fourth option is to use peel-and-stick wallpaper or adhesive fabric to wrap a flat wooden valance. First, clean the surface. Then just measure, cut, and smooth into place. You’ll find a huge variety of colors and patterns here.
Paint RV window valances (yes, even fabric!)
If you don’t mind keeping the valance structure but hate the color or fabric, painting is a great solution. The approach depends on what your valance is made of.
For fabric-covered valances, start by removing and cleaning them thoroughly. Dirt and oils can prevent paint from adhering properly. A light coat of primer helps create a smooth base and improves durability. Then apply multiple thin coats of fabric-safe paint or spray paint, allowing drying time between coats for the best finish.
For wooden valances, the process is similar but with a few extra prep steps. Lightly sand the surface to help the paint stick, wipe away dust, and apply a primer suited for wood. After that, use a high-quality paint in your desired finish. Thin, even coats will prevent drips and give a more professional look.
In both cases, patience is key. Rushing the drying process can lead to uneven coverage or tacky surfaces, especially in humid environments.
How to remove RV valances
Before trying many of these ideas, you’ll need to take the RV window valance down. Fortunately, the process is straightforward and doesn’t require special tools.
Most valances are attached with screws hidden inside the top or side panels. In many cases, you’ll need to remove blinds first to access those screws. Once located, simply unscrew the brackets and lift the valance free.
Take your time and keep track of all hardware. You may need it later. For some applications, you can reuse the screws. If you end up replacing screws, be sure to buy the exact length of the originals (or shorter) so you don’t accidentally penetrate the outside shell of your rig.
Window treatments take up a surprising amount of visual space in an RV. Bulky window coverings can make interiors feel smaller and darker. Lighter, simpler alternatives open things up and let in more natural light.
Many RVers who remove or update their valances notice their space feels more modern and less cramped almost instantly. It’s one of those upgrades that delivers a big impact without a big budget.
Your RV should feel like home. Giving your windows a little attention is a small project that can completely transform your living space on the road.
Do you like your current window valances? Have you ever swapped them out for something else? Tell me in the comments below.
After RVing for years, you stumble upon the perfect RV campground. Do you tell other RVers about your find? Or do you keep information about the campground all to yourself?
Perfection!
Picture this: You pull into a wonderfully large, well-maintained site. A picnic table and fire ring welcome you. The site fee is considerably less expensive than other campgrounds, and this one has much better amenities along with heart-stopping views.
Better still, the manager has obvious pride in the camp because everything is in tip-top condition. The grounds are pristine. After just one day in this RVer’s dream camp, you discover that everyone is super helpful and kind.
It took years to find, but you’ve done it! You’ve found the perfect campground. So, do you tell other RVers about your discovery? Or do you keep this little gem quietly to yourself?
Sharing is caring
The case for saying “yes” is simple: Good camping tips save other RVers time, stress, money, and guesswork. Sharing a location can help others learn about a place, understand what to expect, and enjoy a great experience.
Telling others about a beautiful campsite can be a friendly gesture. Not only will other RVers share your joy, but the campground is also rewarded with continuous customers—a well-deserved reward for their dedication and effort.
Keep it under wraps!
The case for saying “no” is just as strong. Sharing the information about your perfect campground may well have negative consequences. More RVers means more traffic to a spot that was special because it was quiet. An influx of RVers may mean more wear on the amenities, more noise, and less solitude.
Poll question
When you find the perfect campsite, would you tell other RVers about it?
Please vote in our poll. Then explain your vote in the comments below.
We use cookies to ensure that we give you the best experience on our website. By continuing to use our site, you consent to accepting cookies. We NEVER have or will sell reader's data. For more info, please see our privacy policy page.