By Cheri Sicard
In the video below, the team from Travels with Lucky stumbled upon a place that felt frozen in time. A little time capsule into Apache Junction, Arizona’s past, where the echoes of the 1960s linger—an odd, abandoned RV park.
Apache Junction sits at the foot of the legendary Superstition Mountains. This area, steeped in history and folklore, holds more than just scenic views. Off Superstition Boulevard, at the corner of San Marcos and Grease Wood, is the abandoned RV park.
Today, the park is a shell of its former self, with whispers of what used to be. If you visit, imagine driving into the RV park in its prime. Palm trees lined the road. Desert plants like barrel cactus, agave, prickly pear, aloe vera, and fan palms dotted the landscape. Can you picture it?
The entryway today is a stark contrast. The beauty is faded, but remnants remain. Old telephone cables and power utilities hint at a past community. It’s like seeing time in reverse.
Now, picture rows of RVs parked side-by-side. Residents are hooked up to the electrical grid. Neighbors gathered for “cocktail hour,” sharing stories and laughter. The old electrical panel is a relic. Flippers and main elements stand as testaments to an earlier time. What did each component do? Electricians might find these artifacts fascinating.
Visiting this abandoned RV park evokes a sense of nostalgia and loss. Not everyone might find it interesting; but for some, it’s a connection to the past.
Nature is slowly reclaiming the land. Old electrical hookups are surrounded by palm fronds. Palo Verde trees and prickly pear cacti thrive amid the decay. A “dead end” sign stands with a strange, ironic truth.
Many people from the Midwest flocked to Apache Junction in the 1960s. The RV park would have been in its prime then. The “Charlotte H” station stands as a mystery. What was its purpose? Electricians familiar with this equipment might know. Finding such a well-preserved abandoned RV site is rare.
Have you ever visited this RV history relic? Be sure to share your experience in the comments below.
For many RVers, hitting the road full-time or even part-time is a dream come true. But let’s be real—gas, campground fees, maintenance, and day-to-day living expenses can add up quickly. That’s why more RVers than ever are blending travel with work, taking their careers on the road or finding jobs along the way to help fund their adventures.
Some folks earn income through remote jobs, freelancing, or running small businesses from their RVs. Others take seasonal or temporary jobs like campground hosting, working at national parks, or pitching in during harvest seasons.
There’s also a growing trend of RVers participating in the “gig economy,” delivering packages, pet-sitting, or offering services online. For those who can make it work, it’s a lifestyle that offers both freedom and flexibility.
Of course, not everyone needs to work while traveling. Some RVers are retired and living off pensions or Social Security. Others saved up for years to take a big, bucket-list trip without the need to earn while on the road. And then there are those who treat RVing as a weekend escape or seasonal getaway, keeping their home base and full-time job steady in the background.
In this week’s poll, we want to hear from you: Do you rely on work income to afford your RV travel? Whether you’re working full-time from the road, picking up the occasional gig, or living completely work-free, your experience helps paint a picture of how RVers today are making the lifestyle work. Your input could help others who are thinking about hitting the road themselves.
And just a reminder—Our polls are always completely anonymous. We never see how any individual responds, and we don’t collect or share personal information. So answer honestly and know that your privacy is fully protected!
America’s Original RV Newsletter. Since 2001
Issue 2876 • New issue every weekday If you find this newsletter helpful, please consider supporting our work with a donation of your choice. Thank you!
Today’s thought
“I went to the woods because I wished to live deliberately, to front only the essential facts of life, and see if I could not learn what it had to teach, and not, when I came to die, discover that I had not lived.” —Henry David Thoreau
Need an excuse to celebrate? Today is National Fresh Tomato Day!
On this day in history: 1808 – John Jacob Astor incorporates the American Fur Company, which would eventually make him America’s first millionaire.
Tip of the day How to adjust your RV toilet seat height
By Russ and Tiña De Maris
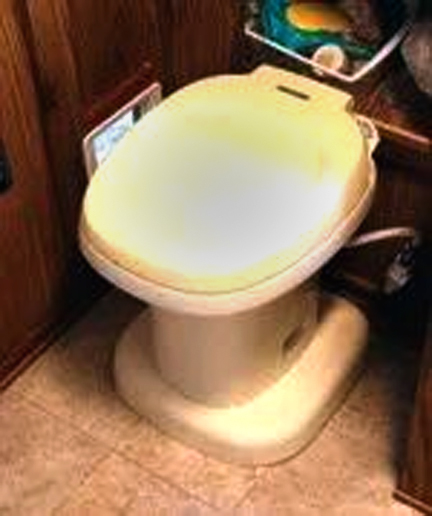
Hate to let you in on a little secret, but the older we get, the harder it is to use the toilet. We’ll spare you the medical perspective of bodily functions, but just getting up and down from the toilet can be—well, a pain in the—er—neck. And legs. And back. And don’t forget the knees. Adjusting the height of your RV throne can make a world of difference. An RV toilet riser may be just what you need.
Too often, RV toilets are on the short side, but we found a relatively inexpensive upgrade that really helps. Install a riser to give yourself a bit of a lift. We’ll walk you through your own “Game of Thrones.”
YESTERDAY WAS EASTER... Which means you may have been out and missed our Sunday newsletter! If so, catch up and read it here. It’s a great issue!
In the RV shop with Dustin How to replace an RV microwave
Join me “In The RV Shop” as I show you how to locate your RV microwave model and serial number. In most cases, RV microwaves are not repairable by your local appliance repair shop. In order to fix it, you will need the model and serial numbers to give the RV repair shop or dealership. Dometic, Panasonic, GE and Furrion will all require this information on your microwave to look up a replacement unit or to purchase parts. Continue reading.
The best marshmallow (and more) roaster!
This is hilarious! Take your marshmallow or hot-dog-roasting to a whole new level with this roasting reel. Give it a crank at the perfect speed, and you’ll have the perfectly roasted or toasted… whatever… in no time! Makes a great and funny gift. Find it here.
Article and video Stinky RV odors and how to get rid of them
Our favorite RV inspector, Duane from the RV Inspection And Care YouTube channel, is back with a discussion of a topic that every RVer is likely to encounter at some point: stinky RV odors! These odors can really put a damper on your travel and camping fun. So, how do you kick those stinky smells to the curb and keep your RV smelling fresh? Duane offers some good advice for just about every type of smell.
REMEMBER: You don’t need to receive an email alert from us to read our newsletters. Just visit our homepage, www.RVtravel.com, at any time of day, and the latest issues and articles will be right there for you.
Featured article How full-time and extended-travel RVers get their mail
By Nanci Dixon
Getting mail on the road is always a concern of full-time RVers and those on extended travels. One of those people is reader Sue L. She and her husband are going on a long trip this winter and won’t be staying in any one place for long. They wonder how they will get their mail.Here is lots of useful information for Sue and other RVers.
Ask Dave Dealer says I can’t use my RV slide room unless fully extended?
BEST T-SHIRT FOR RVERS: Maybe your husband looks like this when he finally settles down at the campsite (wink), or maybe you just really like this “dude”. Either way, we love this shirt!
Reader poll Would you attend an RV show in the next month if it were within an hour’s drive of you?
If you’re running wires, for example for a solar installation, all those individual wires can make quite a mess. Using a few wire zip ties—done properly—can make your installation very organized.
Website of the day
Get Your Guide
This website shows you tours all around the U.S. and the world! It’s the best way to see and experience a new place! Take a Chicago architecture river cruise, go on a walking tour of Harvard University, take an Alcatraz night tour and so, soooo much more.
WOOHOO! A new week means a new stretch of open road. Where are you headed this week? Tell us in the comments below.
Monday Motivation
“The problem, often not discovered until late in life, is that when you look for things like love, meaning, motivation, it implies they are sitting behind a tree or under a rock. The most successful people recognize that in life, they create their own love, they manufacture their own meaning, and they generate their own motivation. For me, I am driven by two main philosophies: know more today about the world than I knew yesterday. And along the way, lessen the suffering of others. You’d be surprised how far that gets you.” —Neil deGrasse Tyson
? MYSTERY PRODUCT OF THE DAY ? If you like history, you’ll love this! Having this information in one place is ideal, and the presentation here is near perfect.
Trivia
The entire state of Wyoming has only two escalators. They’re both in Casper: one at the main branch of Hilltop National Bank, and one at the downtown First Interstate Bank building. A third escalator previously existed in a Cheyenne JCPenney, but it was removed.
Readers’ pets of the day
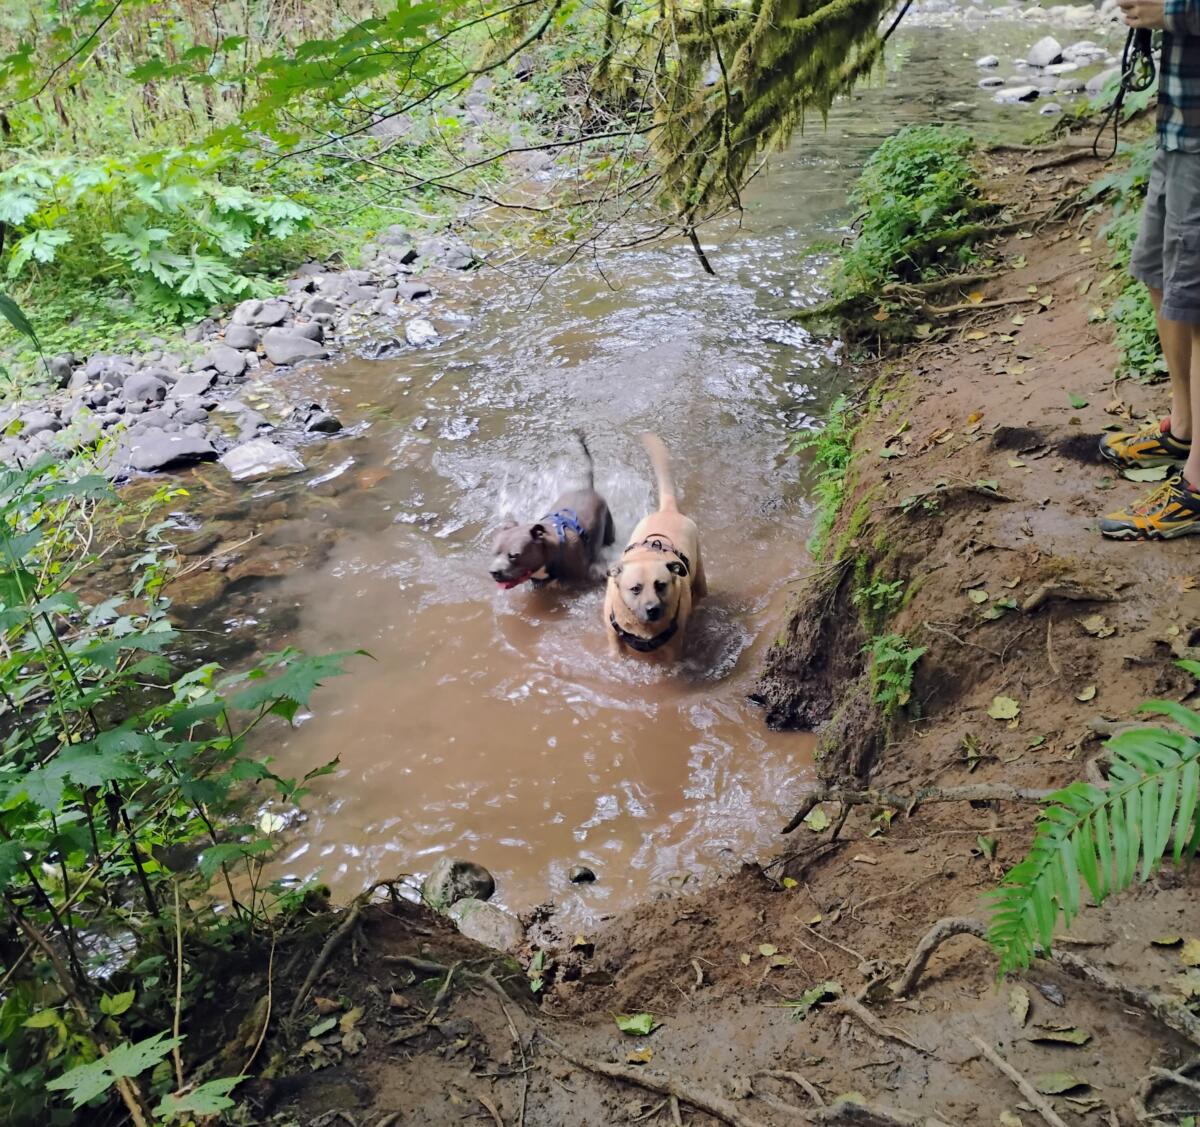
“Our grandpups, Guinness and Baloo, are enjoying a romp in the stream at Siuslaw National Forest.” —Nancy Mutell
Send us a photo of your pet with a short description. No blurry photos and please do not submit your photo more than once. Thanks!
LIVE: Mission to the Moon
As bandwidth allows, this stream will feature live views from Artemis II’s Orion spacecraft, without commentary, as it makes its journey around the Moon. You will see a blue screen if there is a loss of signal, or if the bandwidth is needed for mission activities. You may see what appears to be a black screen when the vehicle is in darkness.
Leave here with a laugh
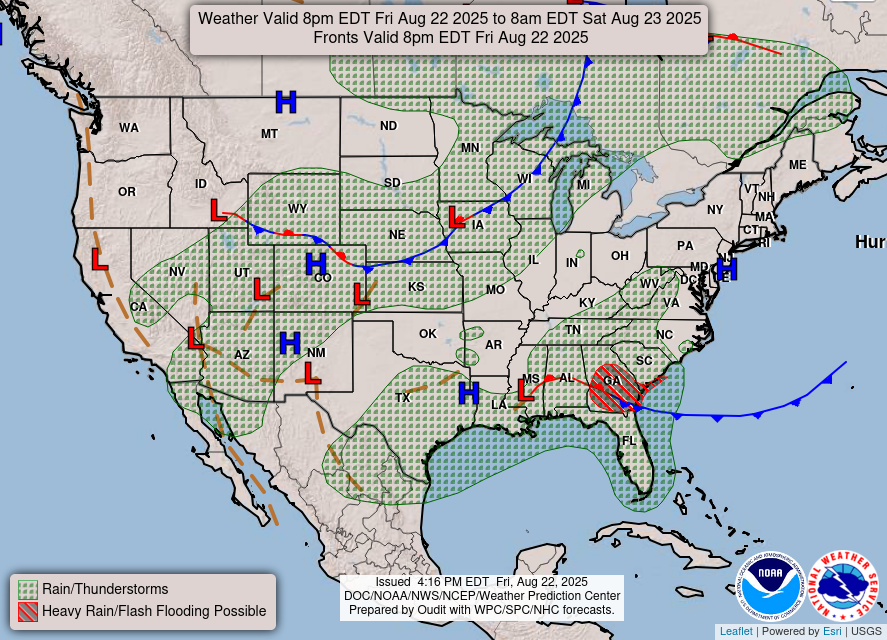
Today’s weather forecast across the nation THIS MAP UPDATES TWICE A DAY
If you shop at Amazon.com we’d appreciate you using this link. We get an itty bitty commission if you buy something, but they add up and help us pay our bills (most importantly our hard-working writers!).
Dear Dave,
I’m finally looking to purchase my forever camper! I was considering a Grand Design 22RBE. However, I saw the Imagine 2300MK at the Springfield, MA, RV show. Although it has two doors for travel access, I am wondering if it is possible with a rack-and-pinion slide mechanism to partially put the slide out to have access without going out of the trailer and back in the other door at night. I have been told both—that you can and can’t. As always, thank you for the help. —Sharon, 2025 Grand Design Imagine 2300MK
Dear Sharon, Looking at the floorplan on the Grand Design website, I see the driver side slide room most likely blocks the entry to the bedroom when retracted.
Grand Design Imagine 2300MK
This topic of slide rooms is something I cover in my RV Buyers Seminar at RV shows. If a retracted room blocks access to the bedroom or bathroom, it could be an issue with a dead battery or if the mechanism fails. A dead battery isn’t as much of an issue, since you can jump the battery or start the tow vehicle with it plugged in to get 12-volt power to extend the slide. However, a failed mechanism means you will need to manually extend the slide room—which in some cases is a difficult task.
My question is, why would you not fully extend the slide room at night when you are using the rig? That would allow access in and out of the bedroom at all times.
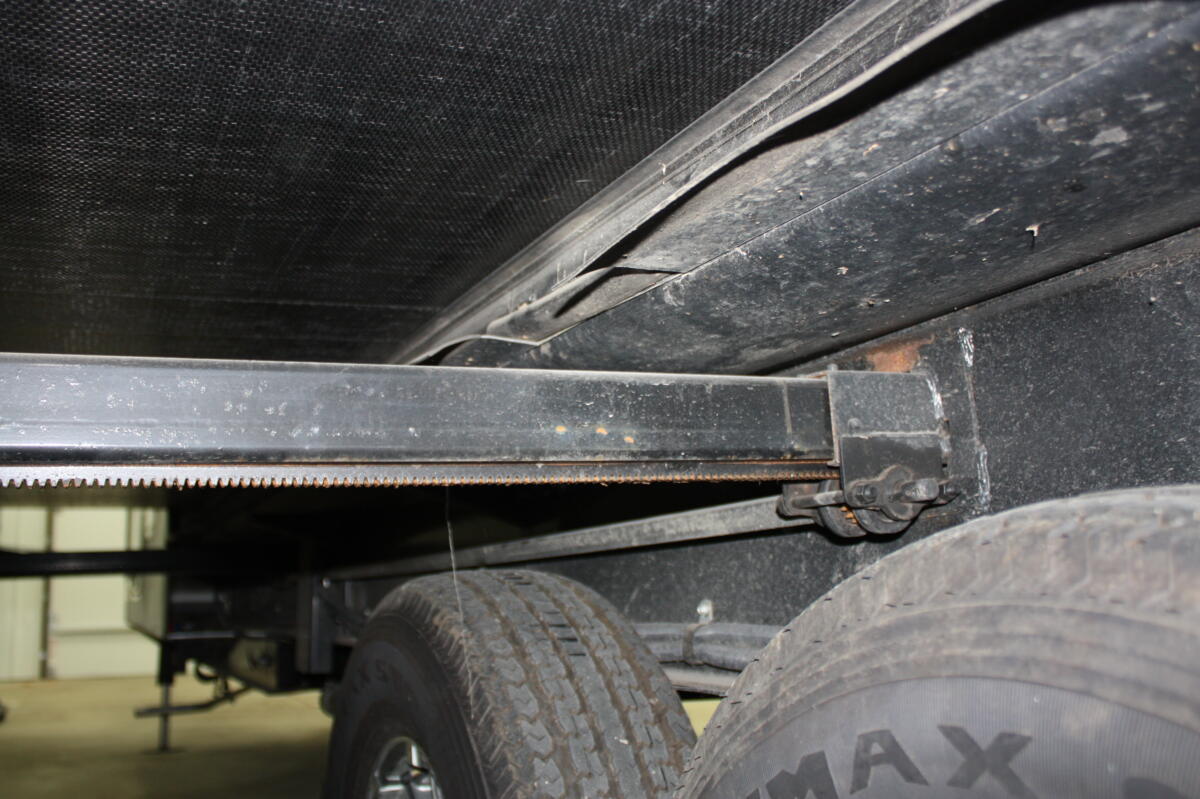
How the slide out mechanism work
The rack-and-pinion mechanism is a rail system with teeth on the “rack” and a gear with bearings for the “pinion” which moves the room in and out.
Rack-and-pinion slide mechanism
I believe you can run the room out partially. However, there are some considerations that need to be addressed and possibly the reason for the difference of opinion.
Concerns to consider regarding the slide room
The small rails used for extension and retraction are not designed to support much weight, especially if someone is sitting in the dinette. Typically, the weight is supported by the sidewall perimeter when the room is fully extended. If you do extend the room partially, do not put any additional weight on the room.
The floor of your slide room is most likely made of plywood with a perimeter metal frame. When the room is retracted or even partially extended, the floor actually “floats.” Stepping on it will bend it, creating a dip or bowed floor that will cause issues with alignment.
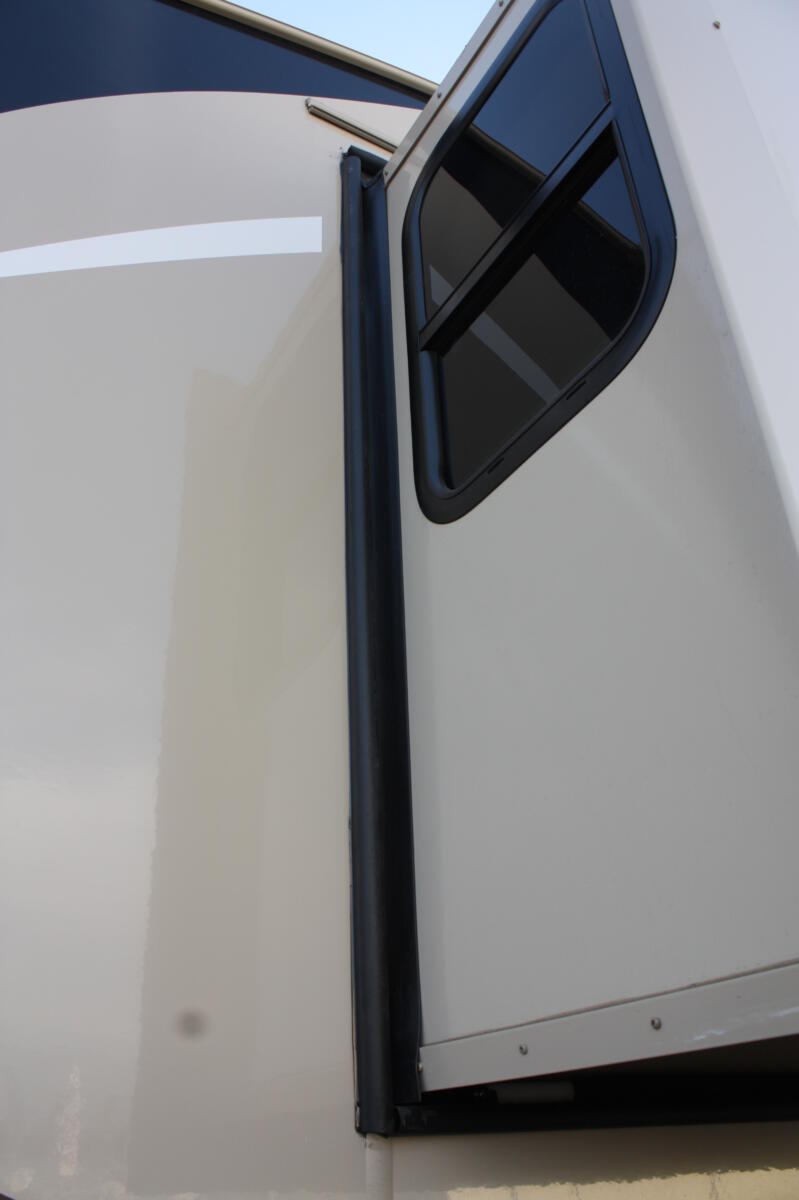
One last consideration is the seal used around the perimeter of the opening. Most trailers have a rubber bulb seal around the outside and inside edge of the square cutout. The room has a flange on both the inside and outside. When the room is retracted or extended, the flange presses against the bulb seal and creates a weatherproof seal.
If the room is only extended partially, there will be a gap between the side of the room and the sidewall. Some manufacturers use a double-sided bulb seal that has a flange or “squeegee” that not only wipes off moisture but also helps seal the room if it is only partially opened.
Slide room with bulb seal
Those are the only considerations that I know of. With a little understanding of these, you should be able to use the room partially extended. Again, I’m not sure why you would not fully extend it unless there was an obstruction or width limitation at a campground?
Update
I sent the rough draft to Sharon this weekend and got this follow-up reply.
I didn’t explain it right, Dave. When stopping at a rest stop or a Walmart or a Cracker Barrel, they don’t want you to put the slide out. Being older now, I have to get up a couple times a night to use the amenities, which are not available when you’re in the bedroom. You can go out the bedroom door and go in the other door to have access. But I am not comfortable doing that late at night. If I just put the slide out a foot I don’t have to go outside. I thought that if I did that it would be more stealth and I wouldn’t get kicked out!
Back to Dave
Thanks for the follow-up, Sharon. That makes more sense. However, I have not found many rest stops, truck stops, or Walmarts that don’t allow you to extend a slide room. But I admit that in the last several years I have not been traveling fulltime and have not stayed in enough parking lots to have a qualified opinion. Let’s see what our readers have found.
You might also enjoy this from Dave
Gear on RV’s slide room mechanism has stripped twice. Can I adjust it?
Dear Dave,
Is there a way to set the stop limits on the RV’s slide out with compartments below that has a rack and pinion slide mechanism? I keep stripping the forward gear by leaving the in button depressed too long when bringing the slide out in. It’s very tricky to release the in button at just the right time to seal the outside seals yet don’t strip the gear. —Will, 2017 Winnebago Sightseer 33C
By Russ and Tiña De Maris
Hate to let you in on a little secret, but the older we get, the harder it is to use the toilet. We’ll spare you the medical perspective of bodily functions, but just getting up and down from the toilet can be—well, a pain in the—er—neck. And legs. And back. And don’t forget the knees. Adjusting the height of your RV throne can make a world of difference. An RV toilet riser may be just what you need.
An RV toilet riser for your own “Game of Thrones”
Too often, RV toilets are on the short side, but we found a relatively inexpensive upgrade that really helps. Install a riser to give yourself a bit of a lift. We’ll walk you through your own “Game of Thrones.”
Thetford riser puts two and a half inches between the floor and your RV toilet.
Thetford, maker of many RV toilets, also produces an RV toilet riser. The device gives RV toilets a lift of two-and-a-half inches. Happily, it works not only on Thetford models, but also on toilets produced by other manufacturers, including SeaLand (Dometic). The riser installs on the bathroom floor where your current toilet sits, and the toilet is then mounted atop the riser.
As we’ve changed RVs, we’ve had occasion to install these risers. It’s a fairly easy job, albeit a bit smelly for a few minutes. We’ll walk you through the process and talk about a couple of alternatives.
Before you get started
Prep work is straightforward. Aside from having the riser kit and appropriate tools (coming up), dumping your black water tank is a good idea. The less “junk in the trunk,” the less smell you’ll have to endure.
Tools? You’ll want to eyeball your existing toilet installation. You may be able to remove the bolts that hold your toilet to the floor with just an end wrench. Others may need a ratchet and socket, and maybe an extension bar. Some RV engineers must be fans of Cirque du Soleil—you could need a universal joint for your socket setup.
Got a SeaLand toilet? Consider buying just one new “closet seal” (the gasket that normally goes between the toilet and the floor), as your seal is a bit larger than those used on Thetford toilets. The Thetford kit includes two seals, and one of them will be fine for the floor-to-riser junction, but the riser-to-toilet connection could stand to have the bigger seal.
In all cases, check out the existing fresh water supply line. You’ll be putting the toilet up another 2½ inches. If your existing supply line won’t have enough “give” to make the added distance, you’ll need a longer replacement. You may bless yourself if you also add a shut-off valve to the setup. That way, if your toilet starts leaking on the fresh water side, you can shut it down without killing off the water supply to the rest of your rig.
Finally, before you yank the toilet loose from the floor, have rags and some household cleaner on hand. The things you see under your toilet can be creepy, and “clean up on Aisle 9” may be your first order of business.
Here’s the step-by-step process—Taking it apart
Shut off the water supply to the toilet and drain the toilet bowl. Since you’ll need to turn the toilet upside down for the installation, getting the water out is a must. Disconnect the toilet from the existing flange bolts that hold it to the floor.
Toilet goes upside down to install the new flange gasket.
Likely, the old toilet flange seal will be hanging onto the toilet for dear life. Too bad! Pull and toss away the old seal and clean up the bottom of the toilet. Remove the old toilet hold-down bolts; they are useless for the new installation. Install the new flange seal.
Depending on where your water supply line comes in, you may need to modify the toilet riser. If the supply line comes up through the floor, the new riser may cover it. In that case, you’ll need to drill a hole in the riser to accommodate the plumbing line. Thetford’s instructions will provide you with possible locations for the hole.
In our installs, the water line came from the wall immediately behind the toilet. It was also in an area impacted by the riser. Rather than trying to cut a hole through the side of the riser, we relocated the line. In one case, the water line was in a “dead space” in a cabinet behind the toilet. This added a considerable amount of time to the installation, but we were happy with the results.
And putting it together
Since the new riser sits on the floor, you’ll find new flange bolts that pass completely through the riser, then into the toilet. Instructions in the kit advise which of the two sets of bolts you’ll use. You’ll also find two flange seals. Again, if you’re installing a SeaLand toilet, you’ll use your own new SeaLand seal. Otherwise, put one of the new flange seals from the kit on the bottom of your toilet flange. This gasket forms a new seal between the base of the toilet and the top of the riser. You’ll also install a new seal gasket over the flange on the bottom of the riser. Here you’ll use one of the seals from the riser kit.
Pick the right flange bolts and position them in the floor flange. Next, line up the riser so the word “front” will be where the front of the toilet will be located. Now simply lower the riser down over the bolts. This is where it gets tricky. Those hold-down bolts probably won’t stand real still, and you’ll be basically threading the bolts through little holes in the riser. Since most RV bathrooms are pretty tiny, you won’t likely have room for a helper to assist you in the alignment process. For some, liberal applications of the appropriate refreshing beverage may be called for.
Soda straw hack
There’s a trick you can apply, aside from that beverage. Go out to the car and open the glove box. Pull out one of those drinking straws you got at the fast-food joint but didn’t use. Cut off a chunk of the straw, and force the open end of it down onto the flange bolt. The extra length above the bolt can then be fed through the riser, and then through the toilet. It keeps the bolts from slipping and sliding, and helps tone down the language of frustration.
Once you’ve got the riser settled down on the floor flange, line up the toilet and drop it down over the hold-down bolts. This is a bit easier since the bolts will be less inclined to wobble, now that they’ve been “collared” by the riser—and by the drinking straw.
You might need a “throne sitter” before you’re even done
But you’ll be fighting against the collective efforts of two springy rubber flange seals. Here’s where a helper may be needed. Have the helper sit on the toilet so his or her weight will compress the flange seals enough to get the bolts to come into reach. Quickly get hold-down nuts tied onto the threads and start running the nuts home. With your helper off the pot, tighten the nuts until all rocking motion is taken out of the installation. If your bathroom floor is carpeted, it may take considerable doing.
Here’s our own “Flintstone and Rubble” experience with one install. We struggled to get the toilet pushed down far enough to get the flange bolts through the toilet base. We thought we needed the longer bolts, so we yanked the riser back up, and put on the longer bolts. Wrong, Fred and Barney! After we put the longer bolts in and got it all lined up, we started threading the nuts on. Woops! Now the bolts were too long! We couldn’t thread the nuts down far enough! Off comes the toilet and the riser, and in go the shorter bolts. That old “put somebody on the throne” to moosh the toilet down was the needed trick. When Thetford tells you which of the bolts you need, believe it!
Completed install.
With the toilet firmly moored, reattach the water supply line, turn on the water, and check for leaks.
Shop around for a new riser
If you want to proceed with this as a project, be sure to shop around. Prices for Thetford risers vary widely. On the internet, you’ll find prices (including shipping) range anywhere from a low of $35 to the mid-$50 range. We phoned two local suppliers and found one retailer, renowned for its low prices, asking $35, while another sold us a new riser for $27.
While this riser will fit all Thetford toilets, and most SeaLand models, it will NOT work with SeaLand’s 511 and 911 models, nor will it function if your SeaLand uses a SeaLand “universal mounting unit.”
Alternatives to a “whole-toilet” riser
An on-the-seat riser might work for you. Amazon.com image.
We mentioned alternatives. Some RVers don’t want the hassle of doing this kind of install. One reader says they wanted to have something they could take with them if and when they switched RVs. One reader suggested a toilet seat add-on riser. Instead of lifting the entire toilet up, this riser sits atop the existing toilet seat. [Here are more toilet seat risers for seniors, including those with handles.]
If you want to consider this option, be sure to measure your existing RV toilet seat. Compare it to the information provided by the riser manufacturer to make sure the riser is compatible with your toilet seat. And one thing we saw was this—instead of adding just 2½ inches like the Thetford whole-toilet riser does, this one jacks your throne up five inches. For some, that could be a problem. We have visions of how to install a small trampoline in your RV bathroom to get access to the really tall throne.
And if your partner’s height is too different from yours
What about cases of toilet users who vary significantly in height? While adding a couple of inches of height might be just fine for a taller person, if your significant other is shorter, a riser might not work. Still, there might be a case of health creating issues with getting off and on the seat. What to do?
Here’s how one RVTravel.com reader fixed the problem: “I added a vertical handle in the corner [of the bathroom] where the two walls meet in front of us in the right corner. There are studs there that provide a secure anchor for the handle. I used a 12″ long, 3″ wide piece of corner molding to which I mounted an 11″ white plastic grip handle. We can grasp that as we rise off the toilet and it makes the effort much easier.”
Is an RV toilet riser worth the effort? For us, absolutely! Easing down to sit is much easier, and when it’s time for “liftoff,” getting a 2-inch jump on gravity can make a huge difference on those knees and other recalcitrant body parts.
By Cheri Sicard
Our favorite RV inspector, Duane from the RV Inspection And Care YouTube channel, is back with a discussion of a topic that every RVer is likely to encounter at some point: stinky RV odors! These odors can really put a damper on your travel and camping fun.
So, how do you kick those stinky smells to the curb and keep your RV smelling fresh? Duane offers some good advice.
Conquer the sewer smell
Ah, the dreaded sewer smell. It’s common, awful, and can have a few different causes.
Sometimes, no matter how much you try, that sewer smell just won’t go away. If that’s the case, it might be time to call in the pros. Professional RV black tank and gray tank cleaning services exist. They use high-pressure equipment to blast away all the gunk inside your tanks, leaving them fresh and clean.
Once you’ve got those tanks sparkling, how do you keep them that way?
If your RV has a built-in tank flush, use it! Some folks need to flush after every dump, while others can use it every two or three dumps. Figure out what works best for your setup.
Don’t be shy with the water when you flush the toilet. Plenty of water helps prevent solids from sticking to the sides of the black tank.
Consider using a tank treatment like Happy Camper. This stuff isn’t just a perfume cover-up; it actually breaks down solids and helps keep odors at bay in both your black and gray tanks. Check out Happy Camper tank treatment.
Banish the musty smell
That musty smell is another common RV odor woe, especially if you’re in a humid area. It usually means excess moisture has found its way somewhere and set up shop. Here’s how to deal with it.
First things first: Open everything up! Open your doors, windows, and vents, crank up the vent fans, and get some air circulating. Sometimes, a good airing-out is all you need to get rid of that musty smell.
If airing out isn’t enough, try some activated charcoal bags. These handy bags pull odor particles right out of the air.
DampRid is another popular option for getting rid of moisture and musty smells.
If you’re constantly battling humidity, a small dehumidifier might be your best bet. There are some great compact models perfect for RVs.
Reclaim your refrigerator
RV refrigerators are notorious for trapping smells. Because they are small, a bad smell can intensify quickly. Regular cleaning is key, but sometimes smells linger.
Try wiping down the inside of your refrigerator with a mixture of baking soda and water. This can help absorb and neutralize odors.
Once you’ve gotten rid of the smell, keep an open box of baking soda in the fridge to help prevent new odors from forming. Yes, space is precious in an RV fridge, but it’s worth it!
Tackle pet smells
We love traveling with our furry friends, but they can bring some smells with them. Here’s what to do.
Regular baths are a must, even if your pet isn’t a fan.
A small air purifier can work wonders for pet odors (and other odors, too!). An air purifier can also help with other odors.
When all else fails: The ozone machine
If you’ve tried everything and still have a stubborn, unidentified odor in your RV, it might be time to bring out the big guns: an ozone machine. These machines are used by professional cleaners and are very effective at eliminating odors.
It’s CRUCIAL to know, however, that ozone machines can be dangerous if not used properly. Never be in the RV (or let your pets be in the RV) while the ozone machine is running. Follow the manufacturer’s instructions carefully. After the treatment, open everything up and air out the RV thoroughly.
Nobody wants a stinky RV. By tackling odors head-on with these strategies, you can keep your mobile home smelling fresh and clean for all your adventures.
Do you have other RV odor-fighting tips? Share them in the comments below!
Even if you’re not planning on buying a new RV right now or anytime soon, RV shows are still fun to attend. It’s fun seeing the new trends and the new features. If you have a fifth wheel, maybe it’s fun going inside all the Class B vans, and if you have a Class B, maybe you like going inside the big fifth wheels because you can’t believe how much space they have… and two bathrooms. What?!
Beyond just checking out RVs, these shows are a great way to see the latest gadgets and gear that can make life on the road easier. Whether it’s a new solar setup, a clever space-saving storage solution, or the latest in Wi-Fi boosters, there’s always something that sparks an RVer’s curiosity.
And let’s not forget the seminars! Many RV shows feature expert-led discussions on everything from boondocking tips to maintenance must-do’s. Even if you’re not looking to upgrade your rig, you might pick up valuable advice that helps you take better care of the one you already own. Or maybe you’ll finally get an answer to that one nagging question about your RV’s electrical system that’s been bugging you for months.
Of course, RV shows are also just a great excuse for a fun day out. Walking through all the different models, dreaming about future road trips, and maybe even meeting fellow RVers who share your love for the lifestyle—it’s all part of the experience.
If an RV show was happening within the next month and it was only, say, 30 minutes or an hour away, would you attend? If so, are you interested in buying a new RV or would it just be for fun? Feel free to answer those questions in the comments below the poll after you vote. Thanks!
By Dustin Simpson
Join me “In The RV Shop” as I show you how to locate your RV microwave model and serial number. In most cases, RV microwaves are not repairable by your local appliance repair shop.
In order to fix it, you will need the model and serial numbers to give the RV repair shop or dealership. Dometic, Panasonic, GE and Furrion will all require this information on your microwave to look up a replacement unit or to purchase parts.
Microwave tag locations
You’ll find the microwave’s tag inside the microwave above the door on the frame or on the left side wall.
Sometimes they may be on the bottom of over-the-range microwaves, usually near the back or on the back.
Replacing an RV microwave
It’s usually a pretty straightforward process. Here’s a general guide on how to do it:
Remove the old RV microwave
Open the microwave door and locate the mounting screws. These are typically found on the sides or top of the unit.
Unscrew the mounting screws while supporting the microwave. Have someone assist you if the microwave is heavy.
Once the screws are removed, carefully lift the microwave off its mounting bracket.
Disconnect power
Unplug the old microwave from the power source. If it’s hardwired, turn off the circuit breaker supplying power to the microwave.
Prepare the new microwave
Unbox the new microwave and remove any packaging materials.
Check the new microwave’s dimensions to ensure it will fit in the existing space.
Mounting bracket (if needed)
Some microwaves come with mounting brackets that need to be attached to the RV’s interior wall. Follow the manufacturer’s instructions for installation.
Install the new microwave
Lift the new microwave into place, aligning it with the mounting bracket.
Secure the microwave by screwing it into place using the mounting screws.
If your new microwave is a similar model, the existing mounting bracket might be compatible. If not, use the new mounting bracket provided with the microwave.
Level the microwave
Use a level to ensure that the new microwave is level both horizontally and vertically. Adjust as needed.
Connect power
Plug in the new microwave or connect it to the power source. If hardwired, turn on the circuit breaker.
Test the microwave
Test the new microwave to ensure it’s working properly. Check that the turntable (if applicable) is moving smoothly.
Secure the microwave door
If your microwave has a travel latch, make sure it’s engaged to secure the door during travel.
Final checks
Double-check all screws and connections to ensure the microwave is securely in place.
Always follow the specific instructions provided by the manufacturer of the new microwave, as installation steps may vary. If you’re unsure or uncomfortable with the process, consider seeking assistance from a professional RV technician.
DON’T MISS any of our articles about RV repair and maintenance. Every Tuesday, we issue a free weekly email digest of all our articles from the past week on the subject. Sign up here for RV Repair and Maintenance Tips (and check out all our other reports and newsletters).
America’s Original RV Newsletter. Since 2001 Issue 1255 If you find this newsletter helpful, please consider supporting our work with a donation of your choice. Thank you!
Need an excuse to celebrate? Today is Easter, of course! It’s also National Read A Road Map Day… Do you still use one of those paper things?
On this day in history: 1621 – The Mayflower sets sail from Plymouth, Massachusetts, on a return trip to England.
Today’s thought
“Every day is a renewal, every morning the daily miracle. This joy you feel is life.” — Gertrude Stein
22 of our best spring cleaning articles, tips and projects for RVers
It’s officially spring (we made it!) and you know what that means… spring cleaning! Spring cleaning is more than just a quick dust-off before your first trip. It also involves smaller things like maybe changing a headlight or buying a new RV fire extinguisher. Here are 22 of our best articles about quick and easy cleaning projects. Well, get to work!
Living on a $1,250 Social Security check—This RVer says it’s her happiest life yet
Is RVing on Social Security possible? Yes! Here, we meet Mona, who, at 62, is living through the happiest period of her life, in a van, on the road. Mona gives us a tour of the rig and shares her thoughts on her mobile lifestyle. As a single mom, she spent her life covering bills, raising her son, and getting by without savings. But one van trip changed everything. At 62, she now lives debt-free in a custom van on $1,250 a month from Social Security. Here’s her inspiring story.
Why Tractor Supply Company is an RVer’s best friend
If you spend any time traveling by RV, you quickly learn that not all stores are created equal. Some are great for groceries, others for gear, and a select few become go-to stops for just about everything. Tractor Supply Company falls firmly into that last category. Whether you’re parked at a campground or boondocking off a back road, this retailer is one you’ll want on your radar.
By Tony Barthel
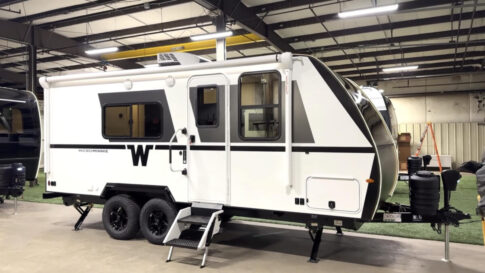
Today’s RV review is of the 2026 Winnebago Micro Minnie 2000-Series travel trailers. This is a narrow-body, no-slide, twin axle trailer. It represents one of two lines from Winnebago that show that the company has taken a serious look at its towable offerings and made some nice changes. There are three main variants in Winnebago’s 2000-Series lineup, with the primary differences centered around the bed configuration. Continue reading.
EASTER FUNNY:What do you call a mischievous egg? A practical yolker.
The ‘Fasta Pasta’ pasta cooker cooks pasta perfectly; minimal water and no propane
Nanci Dixon writes, “This is my new favorite ‘As seen on TV’ pasta cooker. It really is perfect for the RV!” To cook the perfect pasta all you do is add pasta, water, and microwave. It uses little water and no propane—no “real” cooking involved. Read Nanci’s review of it here. It’s great!
BORED?? Well, there is no excuse! Read back issues of our RV Daily Tips Newsletters! More than 2,000 to choose from!
Should I unhappily downsize or hang up the keys for good?
By Nanci Dixon (Yes, Nanci is back!)
Not to bring the entire world, or at least RV Travel’s world, into an ongoing, unpleasant discussion between my husband and me, but here you are. I was going to call this “forced downsizing,” but “unhappily downsizing” says about the same. It’s exhausting driving our 40’ motorhome towing an additional 16 feet of car long distances. Should we downsize, or should we hang up the keys for good? I’m not so sure… Continue reading.
Best 2026 couple’s trailers according to Josh the RV Nerd
Josh the RV Nerd of Bish’s RV has put together a list of his favorite 2026 couple’s travel trailers along with video highlights of each. We’ve summed up Josh’s comments in this article and provided a link to his full-length video review of each model. The video at the bottom of this article contains clips from each video along with Josh’s comments. That may be enough to give you an idea of what interests you. See what you think.
Stop comparing yourself to other RVers
By Gail Marsh
There’s nothing like rolling into a new campground, unfurling the awning, and feeling the whole world slow down. But… then you scroll your social media feed or walk past a neighbor’s larger, newer rig and suddenly feel deflated. Comparing yourself to other RVers is normal, I suppose. However, when it becomes habitual, it can steal the simple joys that made you hit the road in the first place. Continue reading and tell us: Do you do this?
Tanner Toons with Tanner Woods
You may share this Tanner Toon, unaltered, on your website, blog or social media with our compliments. The musings from Tanner Woods’ creative mind appear in this newsletter every Saturday and Sunday and in many RV Daily Tips newsletters through the week.
EASTER FUNNY: What do you call a line of rabbits hopping backward? A receding hare-line.
Reader poll RV tire covers: Pros and cons—Do you use them?
MUG OF THE DAY: What the… heck is this? Why would you want a mug that has this on it? Oh, boy, this gave us a real good chuckle. Sooooo funny, not to mention random. And weird. Very weird.
RV gadgets and gizmos Your RV is a rolling earthquake—These gadgets protect what’s inside
Every time you pull your RV onto the road, you’re putting everything inside through a rolling earthquake for hours at a time. Protecting cookware in an RV isn’t just about stopping rattles, it’s about preventing the steady wear that ruins pans, chips dishes, and loosens what you carry. Constant rattling can increase wear that shortens the life of what you carry. Here are some gadgets and tips that help with the rattle.
The sweet history of Easter’s favorite candy. Do you like Peeps?
By Gail Marsh
It’s time to celebrate Easter! To me, Easter means church, family gatherings and, of course, Peeps! These iconic marshmallow treats have been an Easter staple for my entire life. Have you ever wondered how Peeps came to be? Me, too! After reading the history of Easter’s favorite candy, vote in our poll and tell us whether or not you like Peeps.
Travel destinations
Five iconic movie locations for RVers to explore, and where to camp nearby
By Gail Marsh
I love movies! I love visiting actual movie locations, too! Here are five great movie sites to visit. You’ll also discover nearby activities and attractions that will make your RV “movie trip” well worth your time. Ready? Action!
4 unique U.S. waterfalls RVers should visit
By Gail Marsh
The U.S. has many, many waterfalls—too many to count! However, there are a few unique waterfalls that deserve a spot on your RV itinerary. If you think you know just about everything about waterfalls, you may be surprised. Read on to see what I mean.
EASTER FUNNY: Why don’t rabbits ever get hot in summer? They have hare-conditioning.
? MYSTERY PRODUCT OF THE DAY ? We couldn’t pick just one of these to feature, so instead, you’re getting a whole page to look through. This is just torture for us. We want them all! And let’s just say they wouldn’t last long if we got our hands on some of these…
Highlights from this week’s RV Daily Tips Newsletter
If you’re not subscribed to our RV Daily Tips newsletter, boy, are you missing out! It’s informational, educational, and very entertaining. Our readers love it! Learn more or sign up here.
In the RV shop with Dustin The 2-in-1 RV tank cleaner for all RV water tanks
Join me in the video below as we say goodbye to stubborn tank deposits and hello to hassle-free cleaning with the revolutionary Thetford 2-in-1 tank cleaner! Specially formulated for black, gray, and portable tanks, this cleaner offers a comprehensive solution to keep your tanks in top condition. Check it out.
Vintage RVs
Trailer from 1938 is gorgeous and not so different from those of today
This 1938 travel trailer is older than all but a few RVtravel.com readers, and probably in better condition. It’s a real beauty that will likely attract a lot of attention wherever it appears. It’s so well preserved that you might think it was parked in a garage through the years—some travel stickers in a front window suggest otherwise. You will love this!
RV tire safety When changing tire size, don’t forget this critical information
By Roger Marble
I saw a question about tire size on one of the RV forums I monitor. About a dozen people replied. ALL of them ignored the importance of including both the… Continue reading.
A 10-second spray that protects your RV’s most important electrical connection
Corroded plugs cause big problems and this simple electrical cleaner helps stop them before they start. A quick spray on your 7-pin connector clears moisture, grime, and buildup, helping keep your lights, brakes, and charging systems working as they should. It dries fast, leaves no residue, and takes about 10 seconds to use. Read Dave Solberg’s recommendation here, or learn more or order on Amazon.
EASTER FUNNY: What do you call an egg that tells jokes? A comedi-hen.
Live cam
NASA’s Artemis II Live Views from Orion
As bandwidth allows, this stream will feature live views from the Orion spacecraft, without commentary, as it makes its journey around the Moon. Viewers will see a blue screen if there is a loss of signal, or if the bandwidth is needed for mission activities. Viewers may see what appears to be a black screen when the vehicle is in darkness.
Readers’ pet of the day
“Zoe had been in the shelter for one of her two years when we adopted her 13 yrs ago. She enjoyed the same fulltime RV life we did for 11 of them, then we sold the MH. She’s with us in Indy now, an apartment cat. Gets out her own stuffed mice to play with, and watches the visiting bunnies through the patio door. She enjoys reading and walking on a leash in the grass.” —Tim Slack
Want to see your pet in this newsletter? Please send us a photo of your pet with a short description. No blurry photos and please do not submit your photo more than once.
For the most part, the color of a chicken’s earlobe determines the color of the egg it lays. A red earlobed chicken lays brown eggs and a white earlobed chicken lays white eggs. Eggs are laid at 105 degrees Fahrenheit.
Sunday funny
FACTOID: Most Americans bite the ears off a chocolate bunny first (apparently, we’re all the same).
FREE IS GOOD! Get an official Massachusetts Travel Guide. It has some must-sees for each region in the state, a highway map, and some really pretty photos. Online or by mail.
Today’s weather forecast across the nation THIS MAP UPDATES TWICE A DAY
It’s officially spring (we made it!) and you know what that means… spring cleaning!
Spring cleaning is more than just a quick dust-off before your first trip. It also involves maybe changing a headlight, buying a new RV fire extinguisher, replacing the batteries in your smoke and carbon monoxide alarms, refilling your first aid kit, checking all your sealants… all that stuff, and much, much more.
These are some of our top “spring cleaning” posts over the years. Many are quick and easy projects that you could, and should, spend an afternoon doing.
Spring cleaning projects, tools, and gadgets for RVers
RV spring cleaning: 7 maintenance tasks to do before leaving
This article and video from Chris of the Why Wait YouTube channel contains seven quick and easy RV maintenance tasks that are good to do each year as part of your RV spring cleaning. You probably haven’t thought of some of these, but they’re important!
Spring cleaning time for fresh water tanks
By Russ and Tiña De Maris
Really, if your rig has been snoozing all winter and you remember that you forgot to drain the system down, aside from fixing broken pipes, it’s not a bad idea to do a disinfect. It only takes about one mouthful of “Yecchh!” water to convince you that water can go stale. What to do? Well, this is the same trick we recommend before you use the water system on any “new to you” RV.
USB rechargeable spin-scrubbing brush cleans RVs inside and out
By Cheri Sicard
Amazon recently sent an offer I couldn’t refuse on this spin-scrubbing brush set. I debated whether or not I needed this gadget in my RV, but, as I said, it was an offer I couldn’t refuse. And I am so glad I tried it. I admit it. I am not a great housekeeper. The spinning scrubber brush makes it easier. And with so many different attachments, I can use it to clean almost any surface on my RV, inside or out. Check it out.
My 11 favorite RV cleaning products
By Nanci Dixon
There are a number of cleaning products that can be effective for use in an RV. I have some favorites that I just can’t do without. Here’s my list of essentials.
How to find and clean the dirtiest places in your RV
By Gail Marsh
I rarely clean certain items inside our RV. Maybe you avoid them, too. There are places in our RV that are harder to clean than others. Or at least that’s the excuse I give myself for not tackling these cleaning jobs very often. I know there are specialized products made specifically for certain cleaning chores. However, these products often take up valuable space inside our RV or add unnecessary weight. So, I pack just a few cleaning items when we RV. I use them along with some tips and tricks that make cleaning tasks easier.
A step-by-step guide to checking and cleaning your RV appliances
By Dustin Simpson
Regularly checking and cleaning the appliances in your RV is essential for their proper functioning, efficiency, and your overall comfort during your travels. Here’s a step-by-step guide on how to check and clean some of your RV appliances.
Gadgets to keep RV black tanks stink-free and clean
By Dustin Simpson
Today, I want to introduce you to a few products that help keep your black tanks clean and free from any odors. Check these out.
A quick, easy trick to keep your sewer hose clean
By Nanci Dixon
I had a chance to attend a seminar on all things black and gray tanks and learned a new dump technique. After all these years of RVing, I had never heard of or thought about this sensible tip to keep your sewer hose clean. Here is the quick, easy tip to help keep it clean.
Ask Dave: OK to use pressure washer to clean RV exterior?
Dear Dave,
My husband has done a terrific job of keeping our old RV looking new. About a year ago, we noted what looked to us like mold, which seemed to be under the finish. It could not be cleaned off and was evenly distributed everywhere. Recently, my husband was cleaning off the deck and aimed the pressure hose at the RV. He was using Olympic Deck Cleaner also. I worried about the pressure hose and the deck wash further harming the finish, but the upside is that all the blue/black (mildew?) streaks are gone. There are still no leaks in the RV. Is this OK?
How to get rid of and prevent black streaks on an RV
Have you ever noticed gray or black streaks coming down the sides of your RV? It’s a common problem, especially after a rain. Here, the team from The Camping Loop wanted to know the best way to get rid of black streaks on an RV, so they put three products to the test. They also talk about how to prevent unsightly black streaks on an RV from happening in the future.
How to properly clean RV toilets to prevent damage
Let’s face it, RV toilets aren’t the most glamorous part of RVing. There are tons of videos about black tank maintenance, but what about the basics? Many people buy a used RV and never get a walkthrough, leaving them clueless about how to properly use and clean their RV toilet. In this article and video, Jason Epperson of RV Miles covers everything from how to use an RV toilet to cleaning it without causing damage.
How to clean an RV hot water tank
In the video at the end of this post, certified RV technician RV Repair Woman pulled a water heater from a customer’s rig, then found the kind of mess that keeps water cold and faucets sluggish. Her video guide shows exactly how that tank was brought back from a solid inch of gunk to a tank that could actually heat again. Wow…
It’s time to clean those dirty, yellowed or clouded headlights
If your pickup truck, tow vehicle, or motorhome has yellowed or clouded headlights, it is likely due to the plastic or acrylic components. This yellowing or clouding can occur over time due to exposure to UV rays, environmental factors, and general wear and tear. Cleaning your headlights is an important safety task.
Making the most of your Swiffer while RVing
Take a deep breath. Chances are that the road has gifted your RV with dust, pollen, and perhaps even a sooty souvenir from last night’s firepit. Before you reach for your bulky vacuum, grab a Swiffer. Lightweight, compact, and surprisingly versatile, the Swiffer is one of those travel-friendly tools that can handle more than just your RV floors. Check out the following practical, RV-tested tips to get more mileage out of your Swiffer.
The best product for cleaning and polishing RV woodwork
By Nanci Dixon
I will admit I have been remiss in cleaning and polishing the overabundance of wood cabinets, walls, and moldings in our RV. I had tried numerous products in the past that polished and shone, but they just became a dust magnet, so I basically gave up and dusted. That was okay most of the time, but I noticed the cabinet doors were becoming a bit grimy, and wiping with a damp cloth was not working well. I found this at our local grocery store and decided to try it…
Clean your RV window screens without water
By Jim Twamley
To thoroughly clean my RV window screens, I remove them and wash them with soap and water. But if they are merely dusty, a microfiber towel will do a great job without using water. Continue reading.
Using ketchup to clean your RV’s BBQ grill, plus other tips to keep it like new
Tips to clean a gunky gray water tank. Yes, yours is gunky, too
By Nanci Dixon
This all started when our suction cup soap holder in the shower fell off the wall. I decided to clean the soap residue from the soap holder and, while at it, I cleaned another soap container. The soap didn’t just rinse off, and both items needed a good soak. The bucket I was soaking them in ended up full of soap scum, and I realized that the residue in the bucket was a microcosm of what must be in our gray water holding tank. It was time to clean.
Tips for cleaning the inside of your windshield
By Gail Marsh
Of all the parts on your truck or motorhome, your windshield is one of the most important to keep clean. Most folks have no problem cleaning the exterior of the windshield. Almost every fuel station has a cleaner, a sponge, and paper towels that will scrub the windshield’s exterior clean. However, the job isn’t done until both sides of the glass sparkle. So here are some tips for cleaning the inside of your windshield.
Cleaning RV air vents: A simple, important task to breathe easy
By Gail Marsh
I don’t know about you, but I rarely look up when I’m inside our RV. That changed a few days ago. I happened to be contemplating very deep thoughts (read: relaxing) on the sofa when I noticed the intake air vent above me. Hmm… it looked dusty. Really dusty! “Is there a way to clean that?” I wondered. The answer is yes, and it was much needed!
How to clean a Blackstone griddle
By Gail Marsh
Our Blackstone griddle has seen a lot! From the Rocky Mountains to the Florida shores, we’ve cooked countless breakfasts, lunches, and dinners on our trusty Blackstone. The bad news? Our favorite cooktop has accumulated some rust. The good news? Blackstone® provides a straightforward fix, designed to get your flat-top back to work without guesswork. Here’s how to clean it.
How to clean your RV’s microwave
By Gail Marsh
It happened again! I was popping some microwave popcorn and got distracted. Ugh! Whenever I open the microwave door, I’m continually reminded of my blunder! Funny how a single overcooked popcorn bag odor can hang inside the RV microwave like an uninvited guest. Small spaces make smells stronger and linger longer… I need to freshen up my microwave. Now!
What spring RV projects are you attempting this year? Leave a comment below and tell us.
Is RVing on Social Security possible? Yes! Check out the video at the end of this post from Tiny Home Tours. It profiles Mona, who, at 62, is living through the happiest period of her life, in a van, on the road. In the video, Mona gives us a tour of the rig and shares her thoughts on her mobile lifestyle.
As a single mom in low-paying management jobs, Mona spent her life covering bills, raising her son, and getting by without savings. But one van trip changed everything. At 62, she now lives debt-free in a custom van on $1,250 a month from Social Security.
From nonstop work to life on the road
Mona once said she thought she would work until noon on the day of her funeral. That line says a lot about the life she left behind. She had little time for herself, and because pay was lower for women, retirement savings never took shape.
Van life started small. She saw someone living in a van on YouTube, bought one for trips, and fell in love with the lifestyle on the first outing. What looked like a vacation setup soon became a full-time plan. Her son supported it, too, often telling her she was finally living her best life.
After finishing this second van build in March 2021, she stayed in it under a carport for a few months. Then she sold her house on November 1, 2021. By 10 a.m., it had sold above asking price after a bidding war. She kept working six more months by parking behind her boss’s business, then hit the road when he sold the company.
A van built around simple living
Mona’s van works because it stays simple. She skipped plumbing and built-in electrical wiring on purpose. That choice cut stress, cost, and repair risk.
In the kitchen, she created a standing-height prep area and also made room to sit on a stool while cooking. A collapsible sink gives her more counter space, while seven 1.3-gallon water jugs under the bed handle dishes and showers. For storage, she swapped custom drawers for a $100 Amazon file cabinet.
Mona also installed a permanent propane stove with a 1-gallon tank because the small green canisters were getting too expensive. Across from it sits a SetPower 55-quart dual-door fridge and freezer, powered by its own Bluetti AC180. It holds about a week of groceries, plus room for ice cream.
Her favorite part of the van is the cedar-lined closet, built by friends in her brother’s cabinet shop. Mona doesn’t like folded clothes, so hanging storage mattered more than almost anything else.
Mona’s shower is just as practical. With magnetic hooks, a curtain, a pan, a bucket, and stove-heated water, she showers every morning. She likes the water between 118 and 120 degrees. A heater warms the area, and windows plus a MaxxAir fan help dry things out fast. Her toilet setup is a 3-gallon bucket with a seat lid and horse pellets.
Secrets of RVing on Social Security: Enjoy Full-time RV and Motorhome Retirement on a Budget. Learn more.
How Mona makes $1,250 a month work on the road
Mona lives on Social Security and keeps expenses low. Her regular bills are van insurance, a cell phone, and small YouTube-related costs for This Van Life of Mine on YouTube.
She thrifts her clothes, cuts her own hair, uses an America the Beautiful pass for national parks, and looks for free water and free places to stay. Inside the van, five power stations and a Champion 4,000-watt generator keep things running without hardwired systems. She also keeps a $10,000 emergency fund because van life still depends on a machine.
The biggest shift was learning to slow down. At first, she tried to see everything at once. Now she stays in one place for days, sometimes a week, and enjoys life at a gentler pace.
Mona says she has no regrets and has no wish to return to the “rat race.”
Not to bring the entire world, or at least RV Travel’s world, into an ongoing, unpleasant discussion between my husband and me, but here you are. I was going to call this “forced downsizing,” but “unhappily downsizing” says about the same.
I read with interest one of Gail’s recent articles on what to look for when downsizing, and took it as a sign that, along with my husband’s rather adamant nagging, it really is time to at least face the inevitable changes in life head-on. Or at least with one eye open.
We are both aging, and my husband is definitely feeling his age as he moves to another birthday tomorrow. We have been doing so much physical work on this folly of a fixer-upper house that I actually feel younger, or at least healthier.
The crux of the problem
But the crux of the problem is really how exhausting it is to drive a 40’ motorhome towing an additional 16 feet of car long distances. And the southern border of Arizona is a long distance from Minnesota on the northern border. No, I don’t drive. I have half-heartedly offered, but I always get the “You can drive when I am dead” response. Or, sometimes it is, “Get a younger man for your next husband who will drive you around.”
I love our RV. It was the only home we had for eight years, and it has been our home for close to another year now. I love the woodwork, the furniture, the pull-out island, dishwasher, washer and dryer, and spacious bathroom. It has been our home, my home. I love the feeling of freedom to go anytime. Since I first went camping with my cousins at age 8, I have wanted this lifestyle and even built two RVs—the first at age 16!
My husband does not particularly like RVing, but he says he does it because he loves me. Unless I start driving this humongous vehicle, we will be downsizing.
The next chapter
Since I wrote the above a month or so ago, I have come to accept the truth about both aging and the need to downsize at some point. Downsizing will be next year when we return to Arizona.
We have moved into our fixer-upper house in the mountains, and I love it! The stuff left inside to do is minor, and the outside is still being renovated. We didn’t do a glitzy remodel on this old house; it was more of a bringing it back to what it could have been.
I told a friend recently about my ultimatum: downsize or drive the RV myself. I told her I was surprised that I didn’t have the traveling itch. And I haven’t even made any reservations for the summer yet. I am in no hurry to go. She mentioned that it is my next chapter. Come to think about it, we all have chapters: school, youth, relationships, marriage, kids, jobs, and retirement. All are different chapters of life. This chapter may be the chapter of slowing down, sitting still, and enjoying the place we are now.
Oh, my! Hang up the keys?
Will we hang up the keys completely? I hope not, but don’t know yet. A summer of travel will help with that decision. I do know, despite my love for the RV and RVing, it did get old living in the RV these last nine months waiting to move into the house.
Hanging up the keys is a decision most people have to make at some point, either when interest lags, costs get too high or they just plain age out. We haven’t aged out quite yet, but we are living in a place more beautiful than any desert mountain campground could possibly be. Every window has a mountain view, stars beyond measure, and spectacular sunrises and sunsets. We share the land with bobcats, mountain lions, javelinas, coyotes, and, yes, rattlesnakes and scorpions. There is enough room for all of us. I just don’t know if we will be sharing the land with another RV or not. More to come.
We use cookies to ensure that we give you the best experience on our website. By continuing to use our site, you consent to accepting cookies. We NEVER have or will sell reader's data. For more info, please see our privacy policy page.


 A 10-second spray that protects your RV’s most important electrical connection